Brief: Let’s have a look at the new Ubuntu Community theme named Yaru and see how to install it.
One of the proposed new features in Ubuntu 18.04 was the brand new Community Theme, named Yaru. It was initially named Communitheme. As you might have guessed, the Community Theme is being developed by the community i.e. volunteers across the globe.
The new community theme Yaru uses the Adwita theme (GNOME’s default theme) as its base and looks similar to Ubuntu’s own Ambiance theme. Ubuntu Touch inspired Suru is the icon theme here.
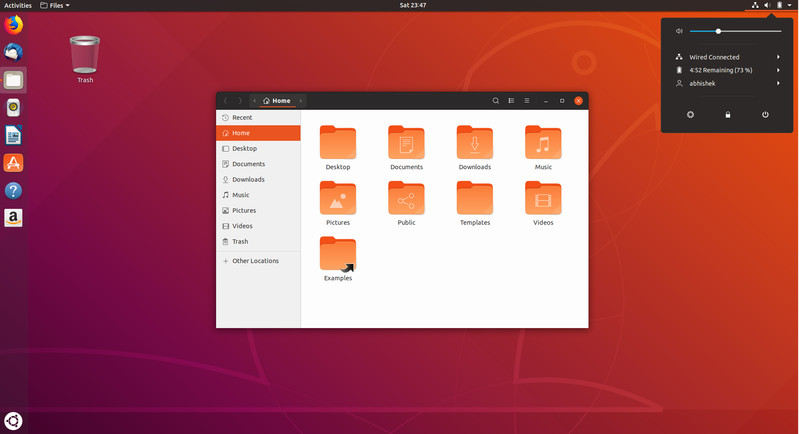
Yaru was supposed to become the default in Ubuntu 18.04 but that did not happen. It’s because the theme was not ready for the LTS release. However, it comes packed in as the default on Ubuntu 18.10 and above.
But, if you still want to stick to Ubuntu 18.04, you can try out the new Yaru theme by following the potential methods mentioned in this article.
Ubuntu has also made the new theme available via PPA so that you can easily install it.
Also, if you have an Ubuntu-based distro like Pop!_OS or similar, I have also mentioned a solution to install Yaru theme on it at the later part of this article.
Installing the Yaru community theme in Ubuntu 18.04
Yaru a.k.a Communitheme is an entire package. It comprises a GTK theme, icon theme, GNOME shell theme and redesigned GDM login screen.
There are two ways to install this community theme in Ubuntu 18.04. You can use Snap or you can use the PPA.
Method 1: Use Snap
To install the Communitheme Snap package, use the command below:
sudo snap install communithemeMethod 2: Use PPA
The official Communitheme PPA is only available for Ubuntu 18.04. It is worth noting that you CANNOT use this PPA in 16.04 or 17.10.
Open a terminal and use the following commands:
sudo add-apt-repository ppa:communitheme/ppa
sudo apt update
sudo apt install ubuntu-communitheme-session
Once you have the Communitheme session installed, you can change the theme and icon using GNOME Tweaks. You’ll have to change the Applications theme to Communitheme and icons to Suru.
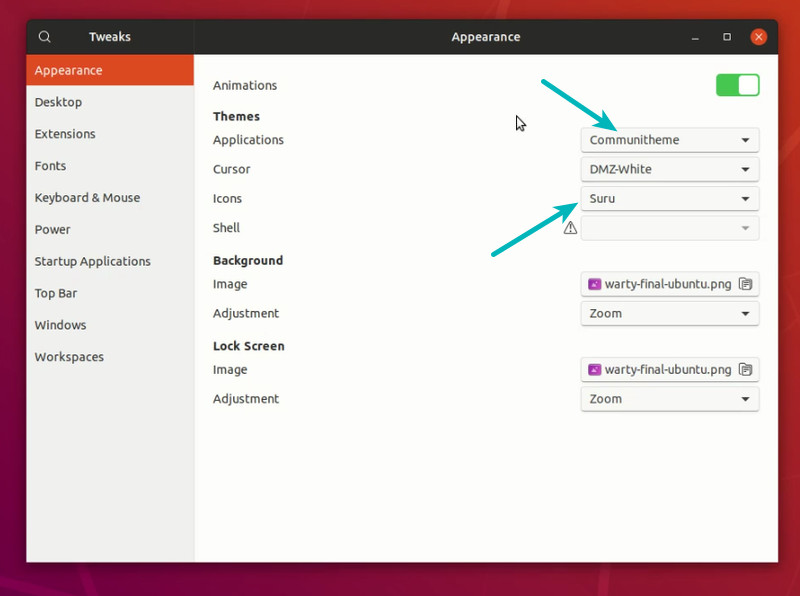
This won’t use the GNOME Shell (mainly the top bar) and won’t install the new GDM login screen.
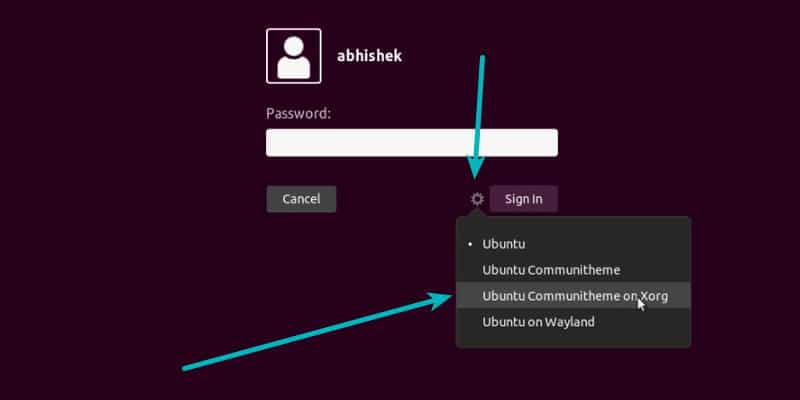
If you want to use the complete package, restart your system and click on the user and then click the gear symbol. In here, choose Ubuntu Communitheme on Xorg (recommended) or Ubuntu Communitheme. You’ll still have to manually change the GTK theme and icons.
Here’s a video I made to show Communitheme and its installation procedure. Even if you are not going to install it, you can still see it in action in the video below:
Install Yaru Theme On Rebranded Ubuntu 19.04 or Above
Here, by “rebranded”, I refer to the Ubuntu-based Linux distributions who have re-designed or changed the default theme and icon pack that comes packed in.
And, also, if you don’t prefer using PPAs, this method will come in handy.
So, here’s what you have to do:
1. Head to the launchpad page of Yaru theme.
2. Look for the version that you have installed on your computer. For instance, I have Pop!_OS 19.10 installed, so I’m gonna look at the latest 19.10.5 version of the package as shown in the image below.
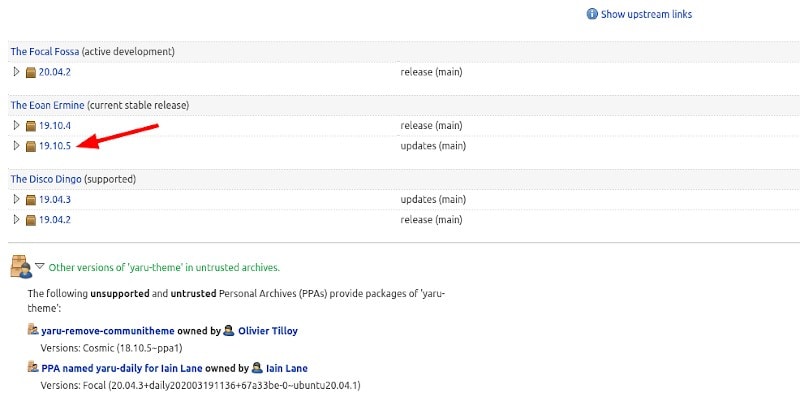
3. Next, you just find the .deb files listed when you click on it. All you have to do now is to download the files for the GNOME shell, GTK theme, and the icon theme.
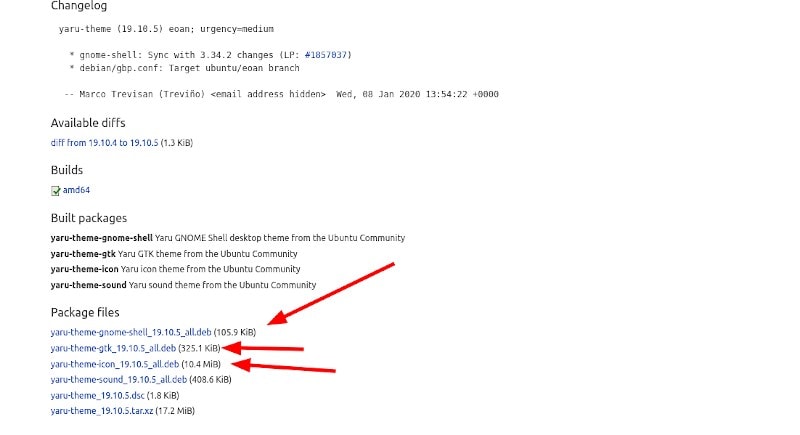
4. Finally, you simply install them using GDebi or Eddy installer. Next, you just make your way to the GNOME Tweak tools to select the theme, icons, and the shell theme as shown in the image below.
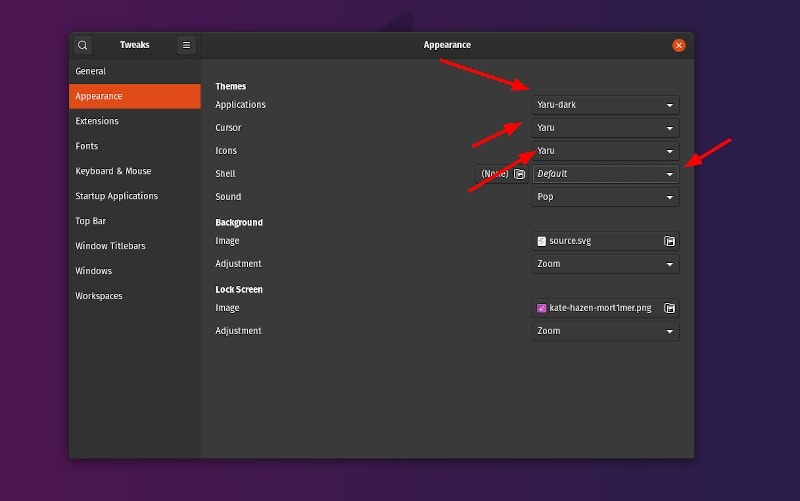
If you haven’t used the tweaks tool before, I insist that you check my guide on using GNOME tweak tool for more details.
You’ve successfully installed the Yaru theme on your rebranded Ubuntu-based distribution!
Wrapping Up
Now that you know how to install the new Yaru theme on Ubuntu 18.04 or other distros, make your desktop look great!
Feel free to let me know your thoughts in the comments.

