


My agent harnessing journey started with Nanoclaw. Which is super simple to setup and use. It works for a few simpler tasks through Telegram.
But I wanted something to work on my main computer. Out of all claw like agents, I find Hermes the most suited.
So I installed Hermes on a Raspberry Pi running on Pironman 5 Pro Max. And I installed Hermes desktop on my Asus Zenbook laptop, my primary system.
The advantage is that the Raspberry Pi remains the always-on Hermes machine. I can close Hermes Desktop or shut down the laptop without needing Hermes itself to run on the laptop (for scheduled tasks). Also, Hermes agents won't have unrestricted access to my system. A safer approach, in my opinion. At least, that's the idea I am going with.
The basic architecture is:
Laptop
└── Hermes Desktop
        │
        │ Remote Gateway
        ▼
Raspberry Pi
└── hermes serve
    ├── Agents
    ├── Jobs
    ├── Memory
    └── Tools
Let me show you how you can use the Hermes agent via the remote gateway feature.
Step 1: Start the Hermes Gateway on the Raspberry Pi
Open a terminal on the Raspberry Pi or SSH into it.
You need to add the following in the ~/.hermes/.env file of hermes:
HERMES_DASHBOARD_BASIC_AUTH_USERNAME=admin
HERMES_DASHBOARD_BASIC_AUTH_PASSWORD=YOUR_STRONG_PASSWORD
HERMES_DASHBOARD_BASIC_AUTH_SECRET=YOUR_RANDOM_SECRET
The 'random secret' can be generated with.
openssl rand -base64 32These credentials will be used from the Hermes desktop. Now start Hermes's backend with:
hermes serve --host 0.0.0.0 --port 9119
You may see a message like this:
Headless backend (hermes serve): web UI disabled — use `hermes dashboard` for the browser UI.
This is normal. hermes serve does not provide a browser interface. It starts the backend that Hermes Desktop connects to.
Keep this process running while testing the connection.
Step 2: Verify that Hermes is listening
Open another terminal tab to access the Raspberry Pi, and run:
ss -ltnp | grep 9119
You should see something containing:
0.0.0.0:9119
This means Hermes is listening for connections on port 9119.
Step 3: Install Hermes Desktop on the pc
Hermes provides an official script for installing the Hermes Desktop:
curl -fsSL https://hermes-agent.nousresearch.com/install.sh | bashDuring installation, Hermes may ask to choose a terminal backend:
Select terminal backend:

Local
Docker
Modal
SSH
Daytona
...
Keep current (local)
For this setup, you can leave this as:
Keep current (local)
The Terminal Backend setting is separate from the Remote Gateway setting. The gateway is what connects Hermes Desktop to Hermes running on your Raspberry Pi.
I also left out the model selection. Whatever the remote Hermes server uses will be used here, too.
Step 4: Use remote gateway on Hermes
Start Hermes Desktop from the terminal:
hermes desktopThat's the way it runs for the moment. Ironical to run a desktop GUI app from the terminal.
Anyways, inside Hermes Desktop, click on the settings and go to gateway and find the remote gateway option:
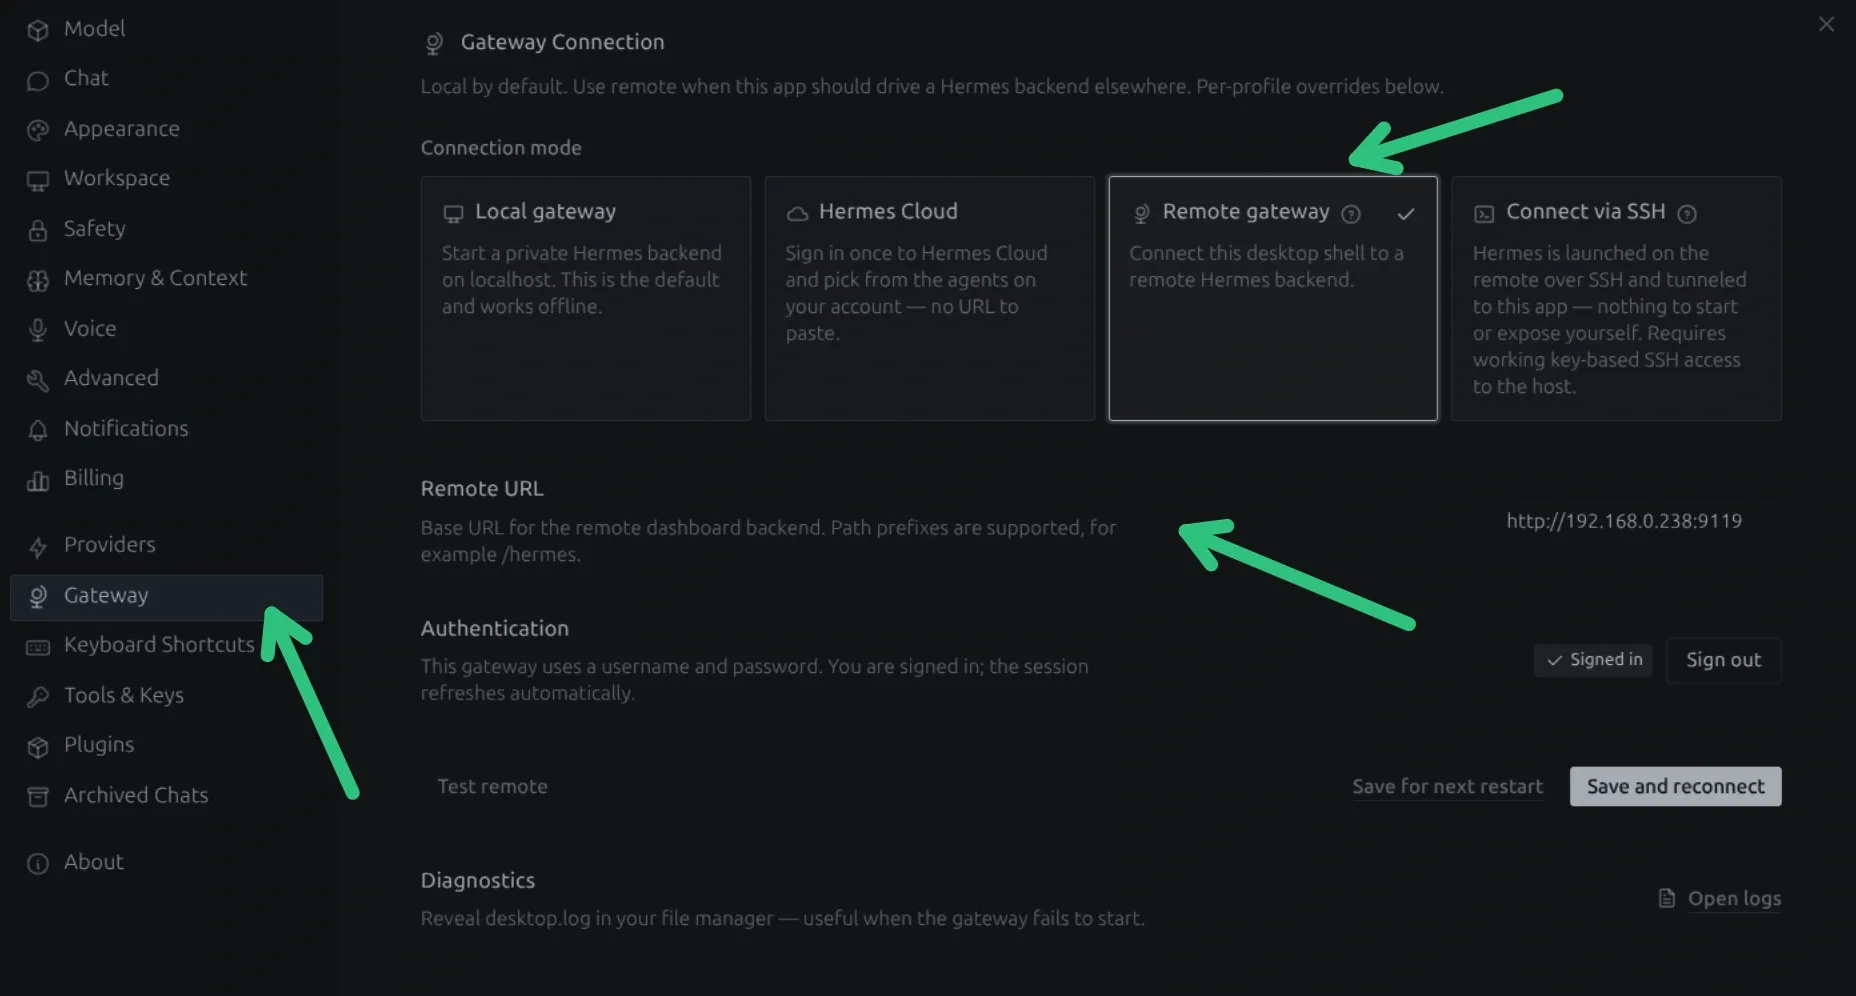
In the Remote URL field, enter the address of the device running the Hermes backend with the port 9119:
http://<IP of Pi>:9119
Then save/apply the setting and reconnect.
Hermes Desktop should now connect to the Hermes backend running on your Raspberry Pi.
Hermes Desktop becomes the interface for interacting with the Hermes instance on the Raspberry Pi.
Step 5: Make the gateway permanent
If things are working fine so far, it is time to make things permanent. Because keeping this running on the remote Hermes server is not a wise move.
hermes serve --host 0.0.0.0 --port 9119
Because if I close that terminal or reboot the Raspberry Pi, the gateway will stop.
For an always-on Raspberry Pi setup, running hermes serve as a systemd service works better.
No need to SSH into the Pi and manually launch Hermes every time. It will be automatically start thanks to the systemd service.
Get the Hermes executable path with:
which hermesAnd then create the systemd service:
sudo nano /etc/systemd/system/hermes-server.serviceHere's the file I used. You should replace the EnnvironmentFile and ExecStart values as per your setup.
[Unit]
Description=Hermes Agent Backend
After=network-online.target
Wants=network-online.target

[Service]
Type=simple
User=pi
EnvironmentFile=/home/pi/.hermes/.env
ExecStart=/home/pi/.local/bin/hermes serve --host 0.0.0.0 --port 9119
Restart=always
RestartSec=5

[Install]
WantedBy=multi-user.target
Once you have saved the service file, run it in this fashion:
sudo systemctl daemon-reload
sudo systemctl enable --now hermes-server
Check the status of the newly created systemd service:
systemctl status hermes-serverConclusion
I am yet to fully utilize Hermes on desktop with the remote gateway method. Portability could be an issue if I move out of my home network, but even in that case, there are ways to SSH into Raspberry Pi from outside network.
I'll be sharing more of my local AI exploration and experiences. Do subscribe to Local AI Weekly newsletter for that.
If this helped you, consider supporting It's FOSS
It's FOSS has been helping people use Linux for the past 14 years. Help us stay independent from big tech. Become a Plus member, enjoy ad-free reading and get 5 eBooks.