

GNOME 40 brought a radical new interface with a horizontal first approach. One of the features in this approach is a three-finger swipe for the touchpad.
Swipe three fingers up on the touchpad and brings up the activity menu. Do it once more and you’ll have the application menu. Move the fingers down, and you’ll be coming out of the application menu and the activity area.
Similarly, moving three fingers horizontally moves you to the next workspace on your right (or left).
In this article, we shall:
- Look at various finger gestures in GNOME
- Troubleshoot why three finger gesture is not working
- Learn how to get the swipe gestures in GNOME 39 or older version
- Learn to use some swipe gestures with Xorg display server
Mastering the finger gestures in GNOME
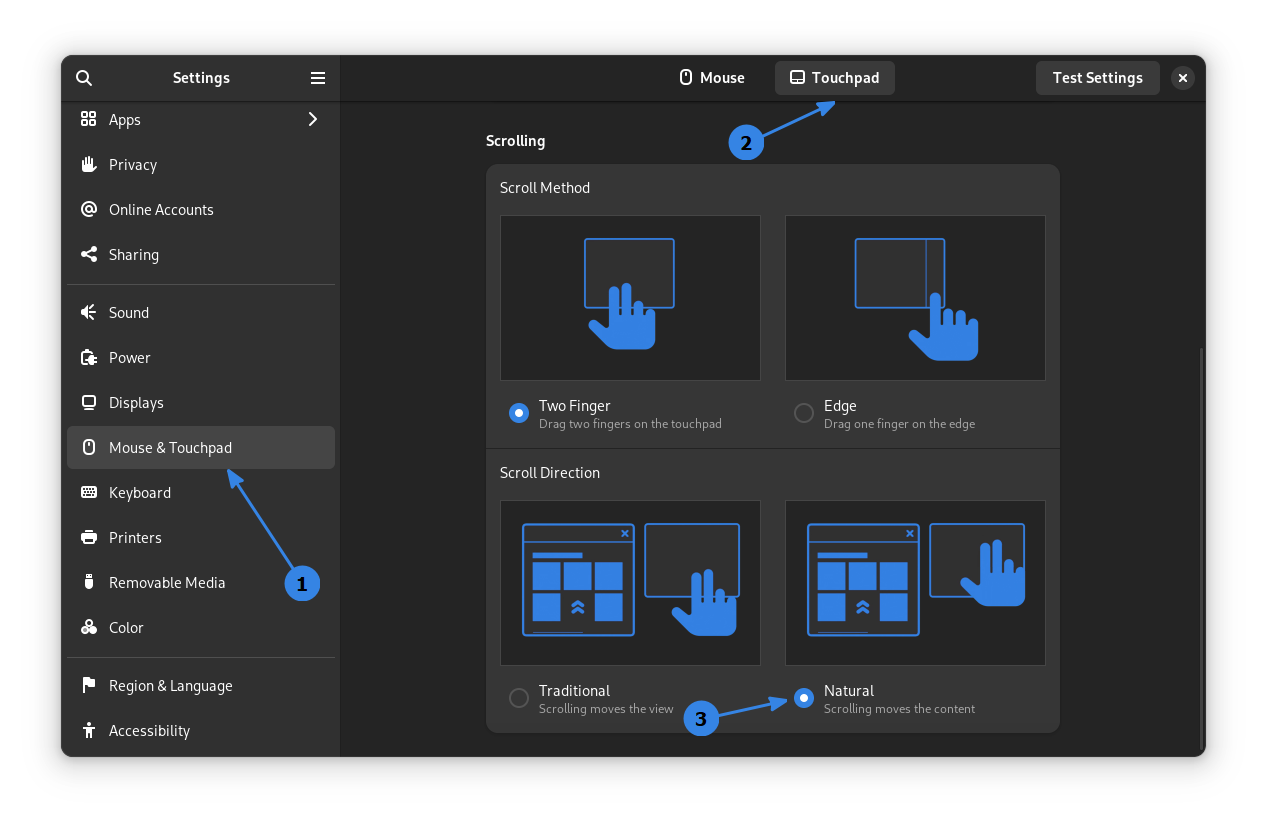
The gestures I am going to mention here work when the touchpad scrolling is set in the Natural direction. If you are using the Traditional scrolling mode, you'll have to perform the gestures in the opposite direction of what's mentioned here.
You can check the scrolling direction by opening the system settings and going to Mouse and Touchpad. Here, go to the Touchpad tab and look under Scroll Direction section.
Get Activities Overview and Application Menu
To move to the activities overview, you can swipe up using three fingers. This works anywhere in GNOME.
Go to Activities Overview
Now, while staying on the Activities Overview, you can three-finger swipe up once more to go to the Application dashboard, where you can launch apps, that are not in the dash (left side launcher in Ubuntu).
You can do a swipe down, to get back where you were.
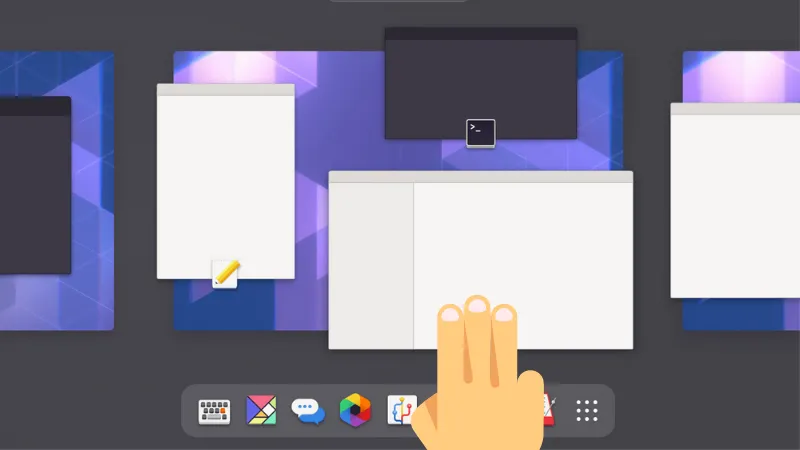
Switch Workspaces
GNOME provides this easy way of switching workspaces, by just swiping left or right using three fingers.
Switch Workspaces
By default, the workspace navigation won’t wrap around, so you will reach the end, on the last workspace and need to swipe back.
Drag windows between Workspaces
While you are in Activities overview, you can drag and drop a window to another workspace.
Move Windows between Workspaces
 Sreenath
Zoom in and out of images
Open an image in the Image Viewer application. Now, you can zoom in or out, by pinching or stretching the touchpad with two fingers.
Zoom In and Zoom Out
This also works on many other apps, like Firefox.
Open folders in tabs in Nautilus file manager
This is a mouse click feature, that is more convenient with a touchpad. Here, you can open a folder in a new tab, by three-finger tap on that folder.
Open Directories in New Tab
Also, it has other roles like, opening a link in New Tab in browsers. etc.
Back and forth on Firefox browser
When you are in Firefox, you can swipe with two fingers, left or right to move back and forth in history.
Move back and forth in Firefox browse history
This will show you a guide arrow, while moving.
There are several other common actions along with the one described above. These actions are listed in the table below, for a quick reference.
| Action | Gestures |
|---|---|
| Default Left Click | Single Tap |
| Right Click | Two fingers Tap |
| Middle Click | Three Fingers Tap |
| Drag Items | Single Tap the item, and move fingers without lifting |
| Zoom In or Out | Pinch or Stretch |
| Scroll a Page | Two finger Move up or Down |
| Get Activities Overview | Three Finger Swipe Up |
| Get Application dashboard | Three Finger Swipe Up from Activities Overview |
| Switch Workspaces | Three-Finger Swipe Left or Right |
| Open in New Tab | Three Finger Tap (Middle Click) |
Troubleshoot: Three finger gesture not working
Please ensure that you are:
- Using GNOME 40 or higher version
- Using Wayland display server
You can check the desktop environment version using a tool like Neofetch.
Similarly, please verify that you are using Wayland. To check, use the following command:
echo $XDG_SESSION_TYPE
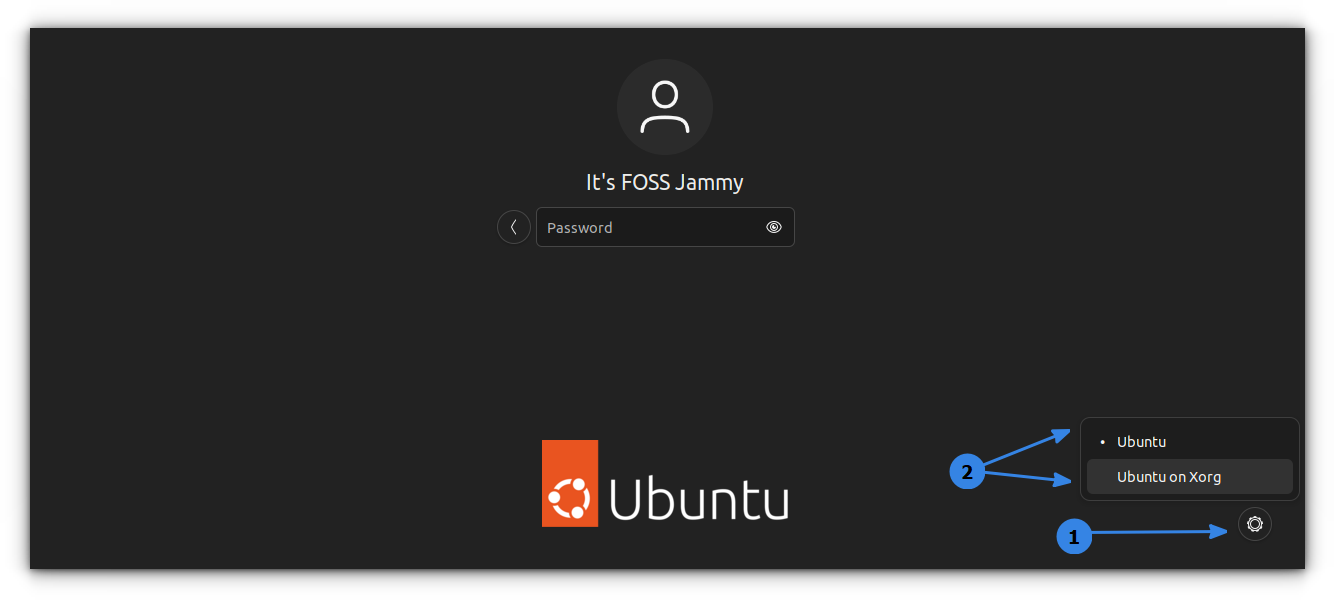
If it shows x11, you’ll have to switch to Wayland from Xorg. Save your work and log out of your system.
On the log in screen, click on your username. In the bottom-right corner, you’ll see a gear symbol. Click on it. You should see a few options like GNOME, GNOME Classic and GNOME on Xorg. Go with GNOME, which uses Wayland by default.
In my case, I had switched to the legacy Xorg display server instead of the default Wayland. I had to do this because no screen recorder would work with Wayland.
After selecting that, enter your password and log into the system. You should have the three fingers gesture working again.
The three fingers swipe works only in Wayland by default. It can be used in X display server as well, but that requires some additional effort, and I’ll show that to you in the next section.
Using three fingers gesture with Xorg and GNOME 38 and higher version
If, for some reason, you must use X display server (Xorg), you could still make the three fingers swipe work with some additional efforts.
You’ll need two things here:
- Install and enable Touchegg
- Install and enable the X11 Gestures GNOME extension
This works not only on GNOME 40 but older versions like GNOME 38 and 36.
Install and enable Touchegg
Touchegg is a daemon that transforms the gestures you make on your touchpad or touchscreen into visible actions on your desktop.
If you are using Ubuntu or Debian, use the following commands to install it from the official PPA:
sudo add-apt-repository ppa:touchegg/stable
sudo apt update
sudo apt install touchegg
If you are using Fedora, Red Hat or openSUSE, install it from the official copr:
sudo dnf copr enable jose_exposito/touchegg
sudo dnf install touchegg
Arch and Manjaro users can find it in the official repository. Install it using:
sudo pacman -Syu toucheggOnce installed, you should start the daemon:
sudo systemctl start touchegg
You should also make it start automatically at each boot:
sudo systemctl enable touchegg.service
With that done, you should go ahead and install the X11 Gestures extension.
Install and enable the X11 Gestures GNOME extension
I have written in detail about how to use GNOME extensions, so I am not going to repeat the steps here.
Go to the extension page and enable it:
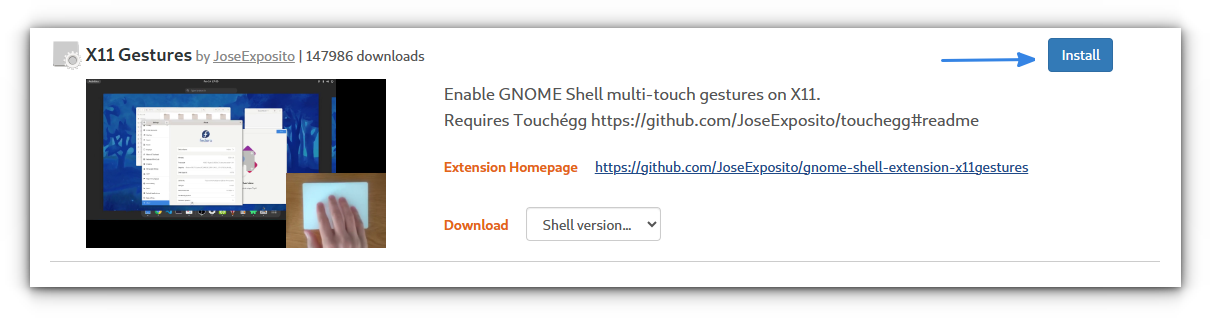
Once you have enabled it, you can test the three-finger swipe immediately. No need to log out or restart.
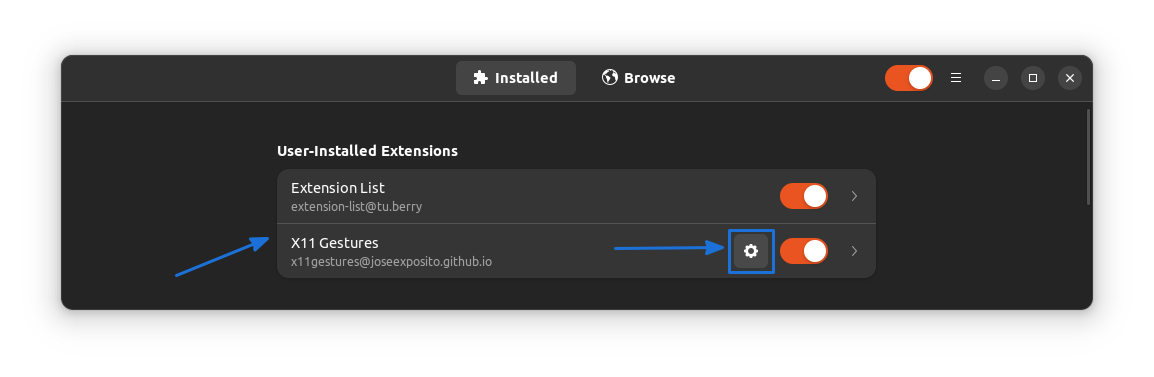
There is a setting on this extension, where you can decide on the number of fingers you want to use for the swipe action. For this, go to the extension manager and then click on the gear icon corresponding to X11-gestures.
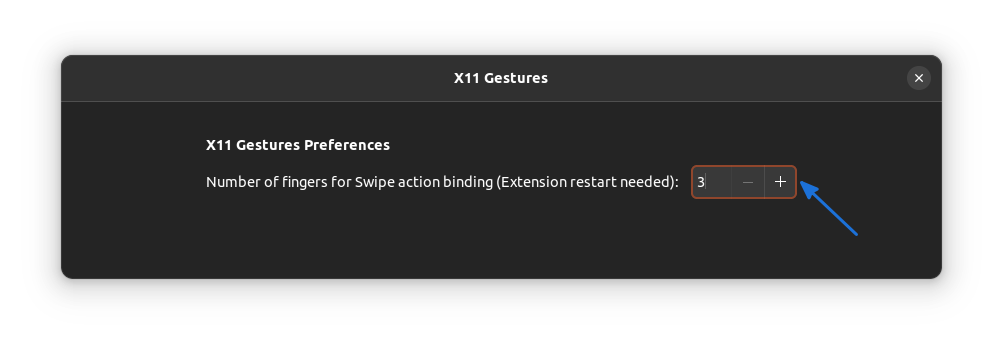
In the Settings dialog, you can specify the number of fingers you would like to use (3 or 4).
That’s it. Enjoy GNOME 40+ to its fullest.
Bonus: Use Touché to customize X11 gestures
Touché is a neat tool you can use to customize touchpad/touchscreen gestures on GNOME running X11.
To install Touché, you need to have touchegg installed. Follow the tutorial in the previous section for that.
Once you have Touchegg installed and started, install Touché from Flathub.
flatpak install flathub com.github.joseexposito.toucheThat's it. To make everything OK, just restart your system.
Now, login to X11 session.
Touché provides essential yet basic functionalities. Below is an overview of what it can do.
When you open Touché, you will find three tabs like Swipe, Pinch, Tap. Here, the Tap functions are available only to touch screen devices.
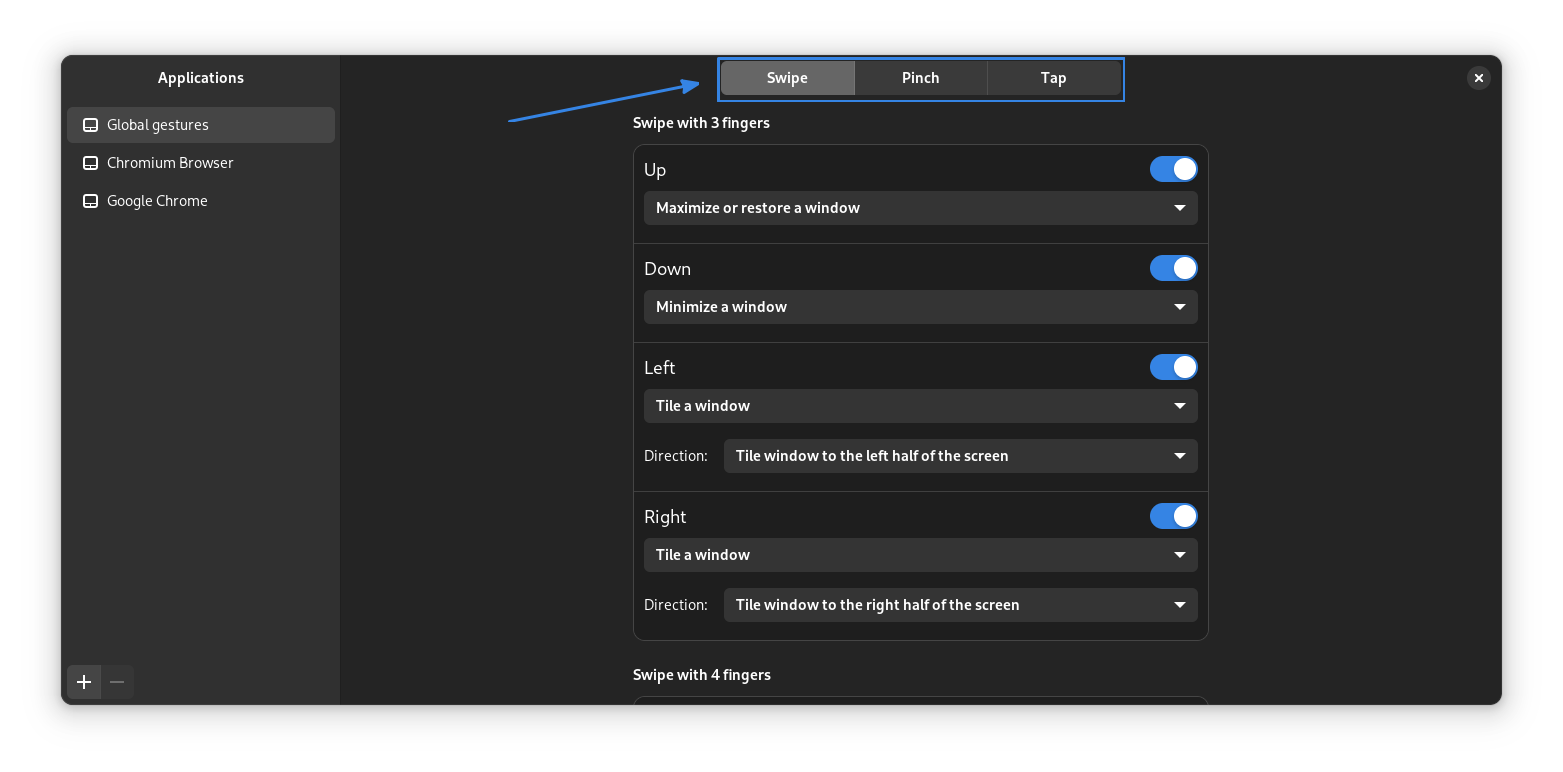
Under the Swipe tab, you can see, there are gestures like three finger swipes, four-finger swipes etc. This is also present on the Pinch tab. You can configure these gestures, with various actions.
Add an action to a gesture
Go to the Global Gestures Tab and decide which gesture you want to use. Let’s say you would like to set four-finger swipe left to tile a window to the left side.
So, scroll down to 4-finger swipe, and enable the “Left” toggle button. Now, from the dropdown list, select the action called “Tile a Window”.
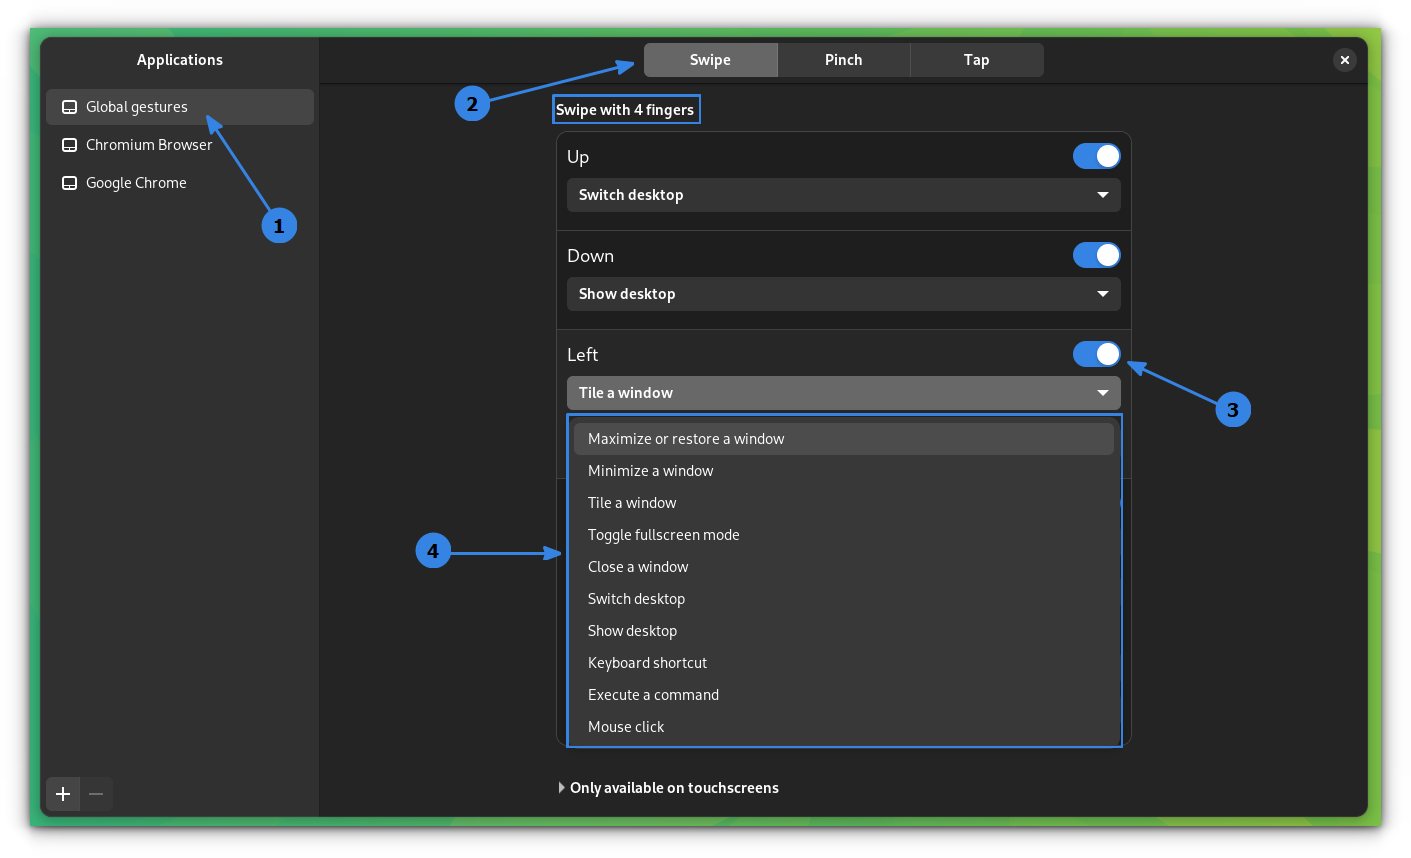
Now, you can select what direction to tile.
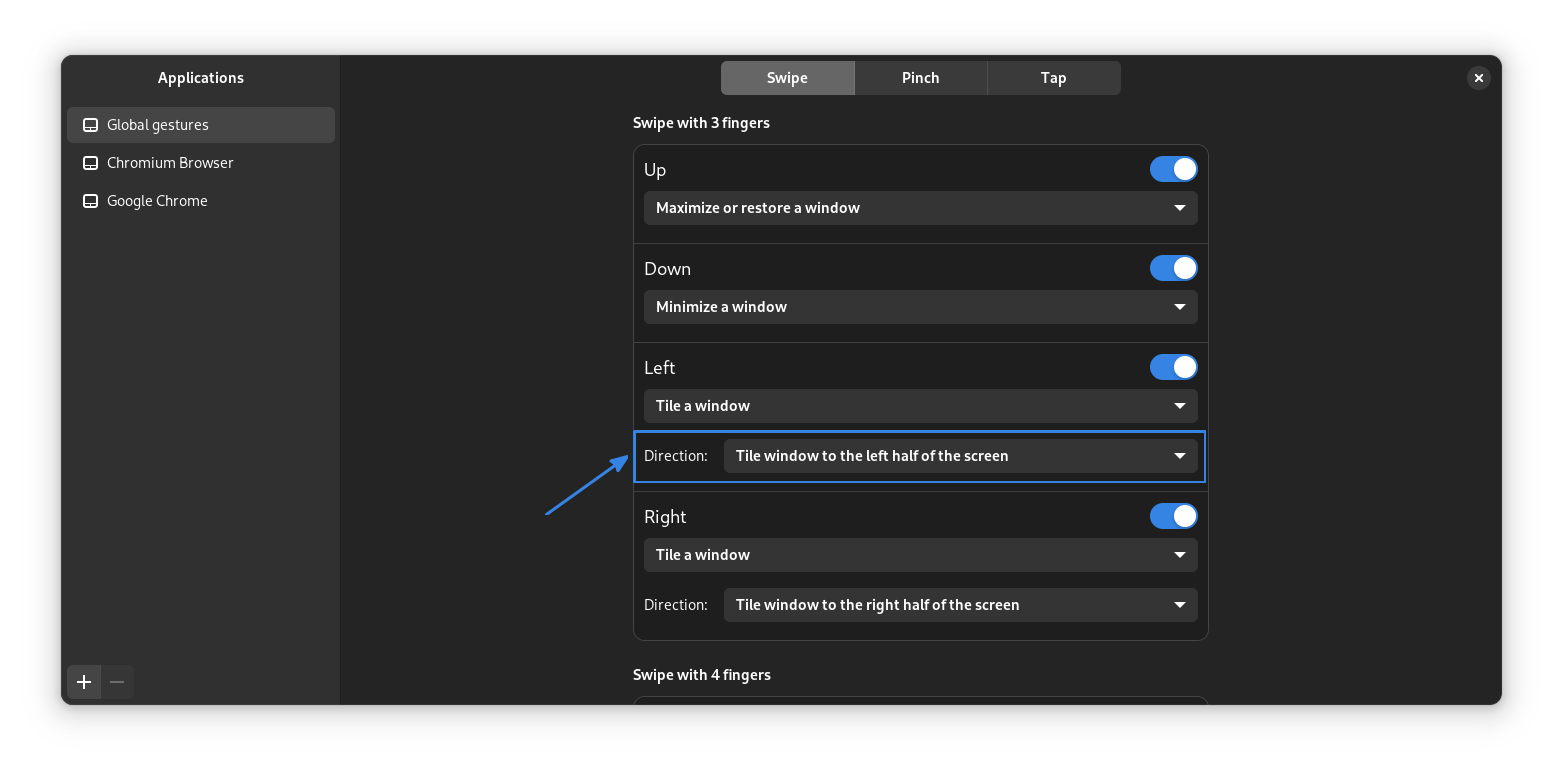
This secondary field appears according to your choice. Now, when you swipe left using 4-fingers, the current window will be tiled.
Add a gesture to an application
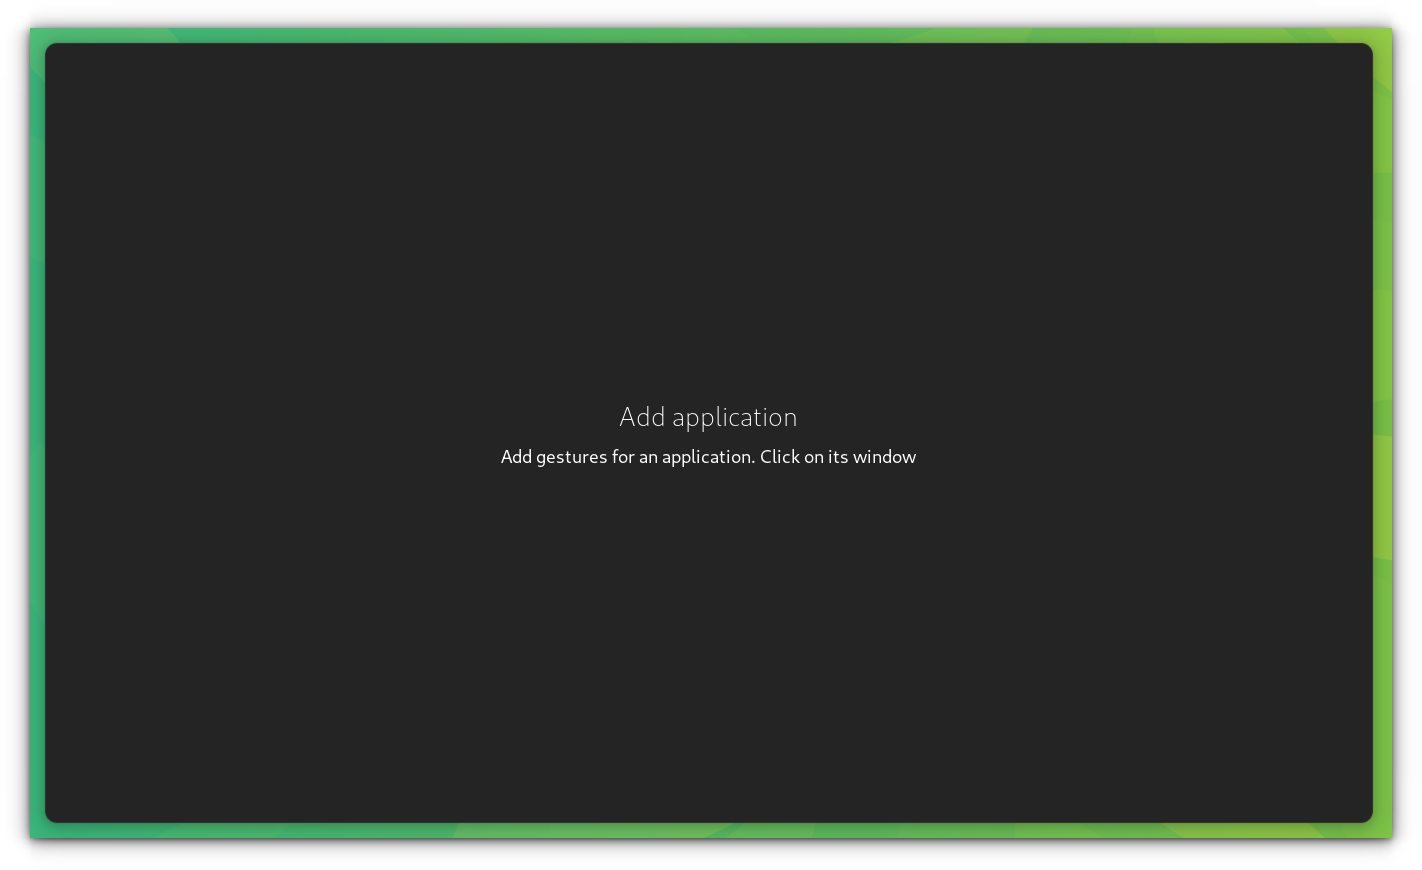
Open the application to which you want to add a gesture. Now, click on the “+” button on the bottom left of Touché.
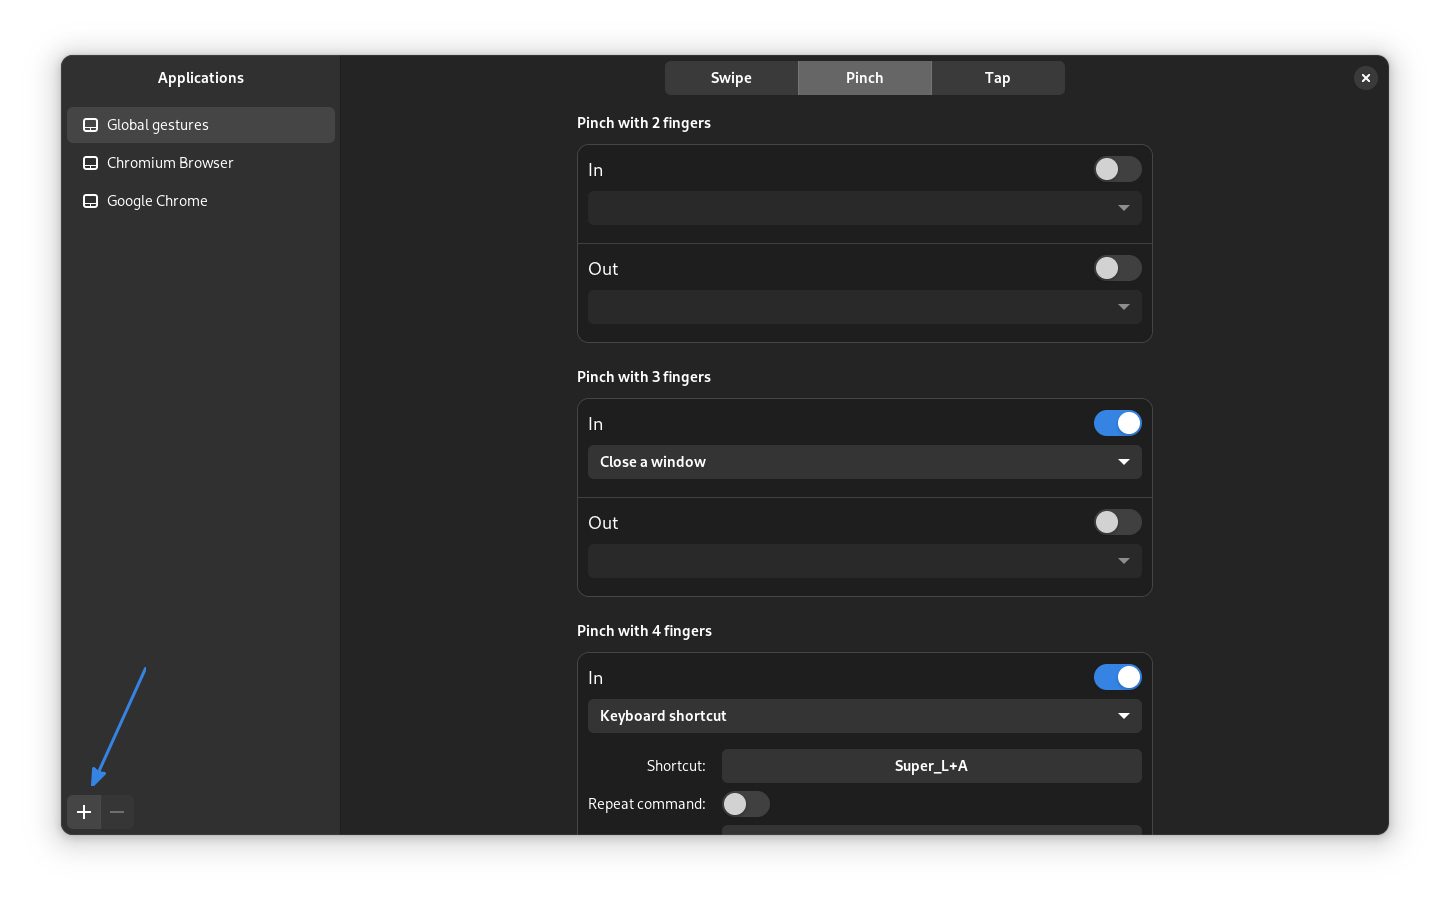
This will make the cursor a “+”. You can select the application by clicking on it.
Once clicked on the application, that application name will now appear on the left sidebar. Select it from that and apply a gesture as we have seen above.
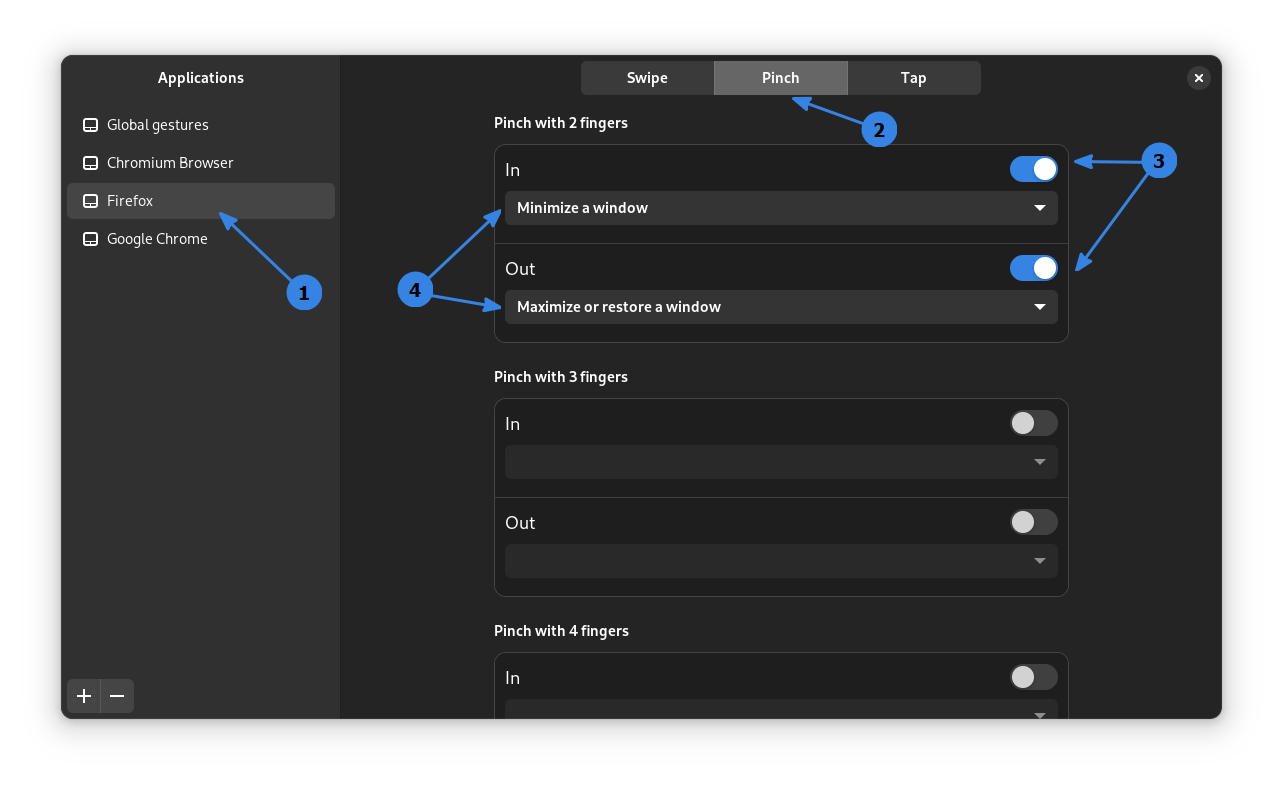
Above, you can see, I have given a 2 finger pinch gesture to Firefox, which will minimize and maximize its window. Remember, this has no effect on other windows.
Add a gesture to a keyboard shortcut
First, go to the Global Gestures. Now, decide which gesture you want to assign as a keyboard shortcut. Toggle on those gestures you intend to use.
Now, select “Keyboard Shortcuts” from the dropdown menu.
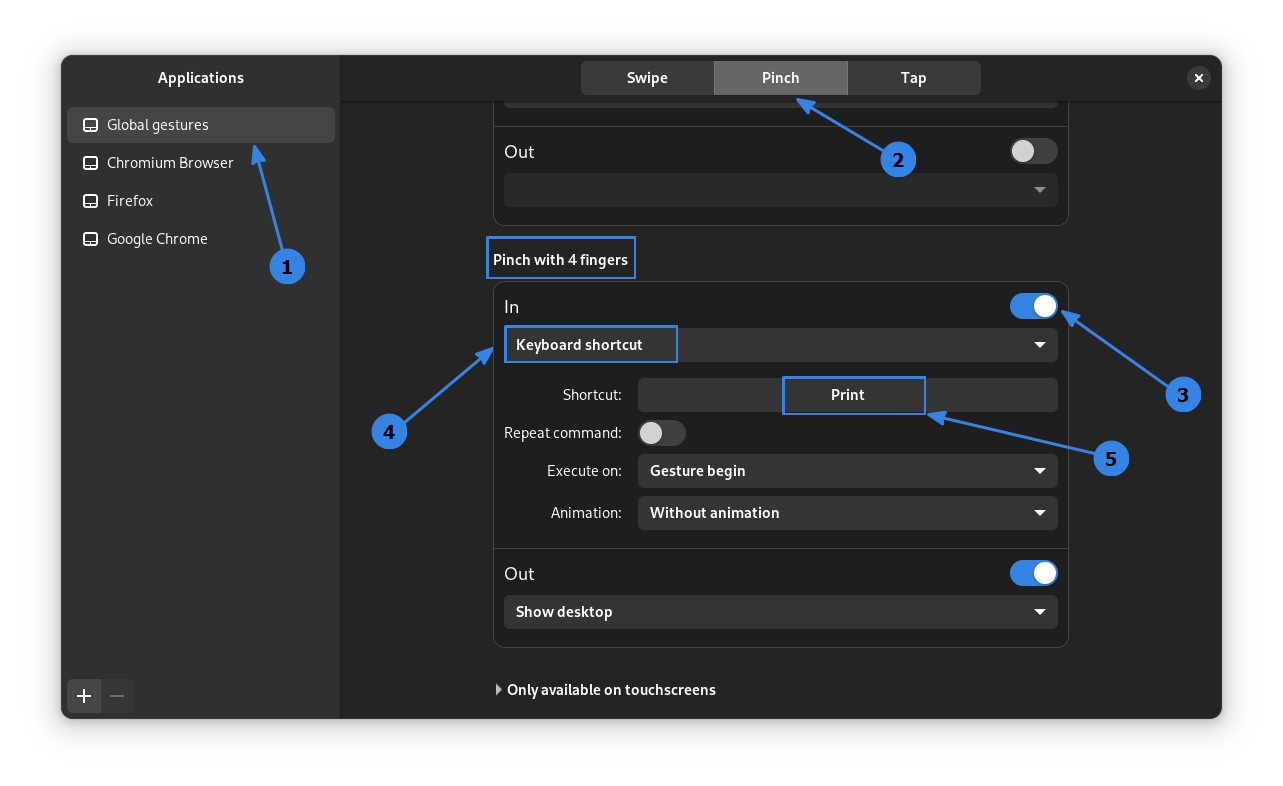
Select the field below, and press the shortcut you want. Here, I have set “Pinch with four fingers” as a gesture for PrtScr key.
Add a gesture to a command
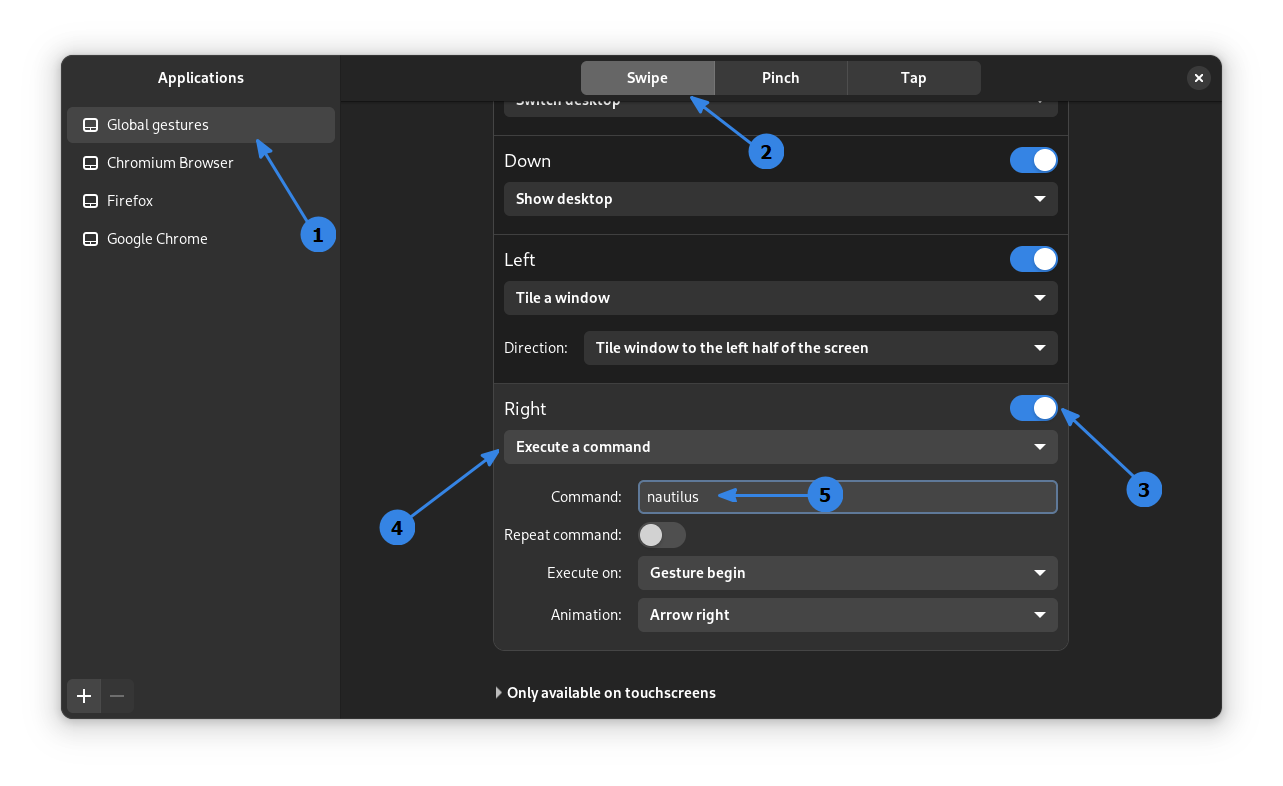
In this method, you can assign a particular command to a gesture. In the example below, I am using the “Four Finger Right Swipe” gesture to open Nautilus File Manager.
So, first toggle on that particular gesture. Now, select the “Execute a Command” option from the dropdown. This will give you a field to enter the command.
I have entered nautilus to open Nautilus File Manager.
That’s it. You can now open Nautilus file manager by swiping right.
Conclusion
As you can see, the finger swipe gestures have their usefulness. From quickly moving between applications to switching between workspaces, it makes you feel more productive and powerful.
While most of it work with the newer Wayland, there are tools that will let you use it on the classic Xorg display server as well.
I have covered everything in detail and I hope you find it useful.
