


AI is rapidly gaining popularity across various fields, and I've found that integrating it into a personal knowledge management system like Obsidian offers far more benefits than one might initially expect.
In this article, I'll show you exactly how I've enabled both local AI and cloud AI within Obsidian, configuring them for different vaults to suit my specific needs.
How I Choose AI
AI technology, while powerful, often comes with inherent privacy concerns.
When you opt for a corporate AI solution, which typically offers faster queries and results, you're risking your privacy.
On the other hand, if you decide to use local AI, it can be quite taxing and slow, especially on moderate hardware.
Given this dilemma, I asked myself: why not use both? With Obsidian, setting up such a workflow is surprisingly easy.
I personally use a local AI for my most private notes and journals, ensuring my personal thoughts remain entirely on my machine.
For my work-related documents and learning journeys, where speed and broader knowledge access are key, I leverage Gemini chat (because it's free). This approach gives me the best of both worlds: privacy where it matters most, and powerful cloud capabilities for everything else.
If you want more segregation, have separate vaults for your work and personal notes.
Use Copilot for Obsidian extension
Don't go by the name. It's not exclusive to Microsoft Copilot.
To integrate AI directly into Obsidian, I rely on Copilot for Obsidian, a fantastic community extension. This plugin supports both local and cloud AI, and it even offers its own Plus features for those who want to enhance their experience further.
Here's how to install this extension in Obsidian:
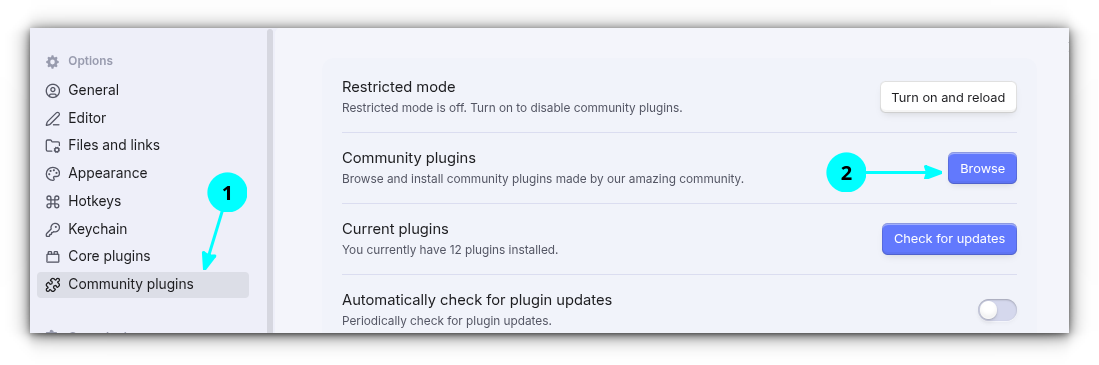
Go to the Obsidian settings by pressing CTRL+,. Inside the settings, go to Community Plugins -> Browse.
Search for Copilot and install the extension.
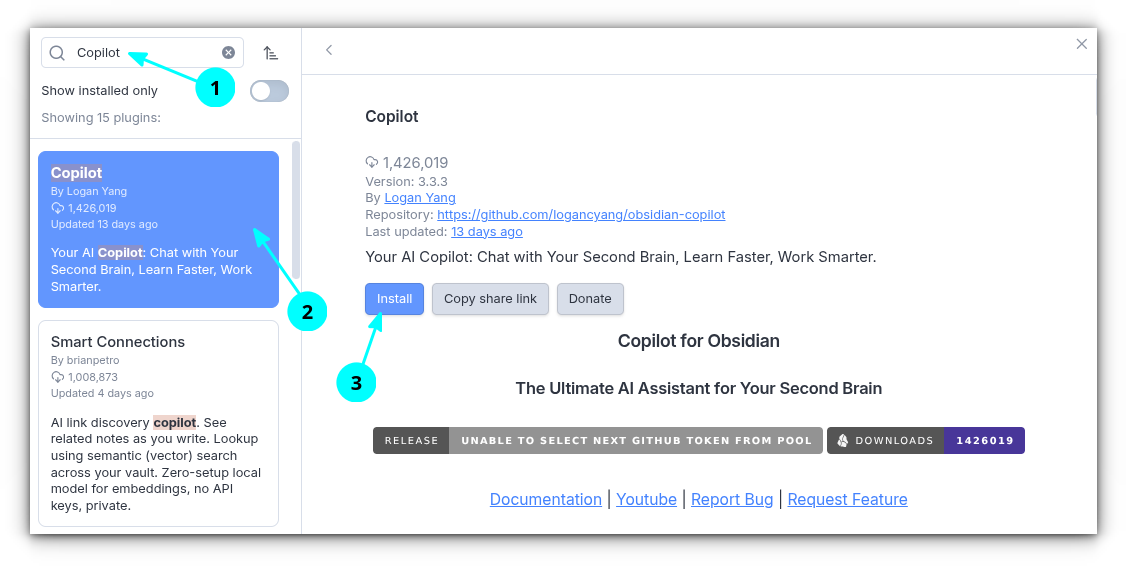
Enable it right away using the Enable button.
Setting Gemini AI in Obsidian
Now that Copilot for Obsidian is installed, let me show how I configure Gemini AI within Obsidian.
Create API Key
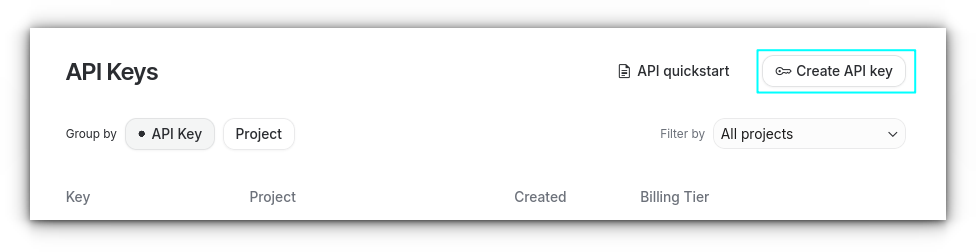
Go to the Google AI Studio website. Click on Create API key button.
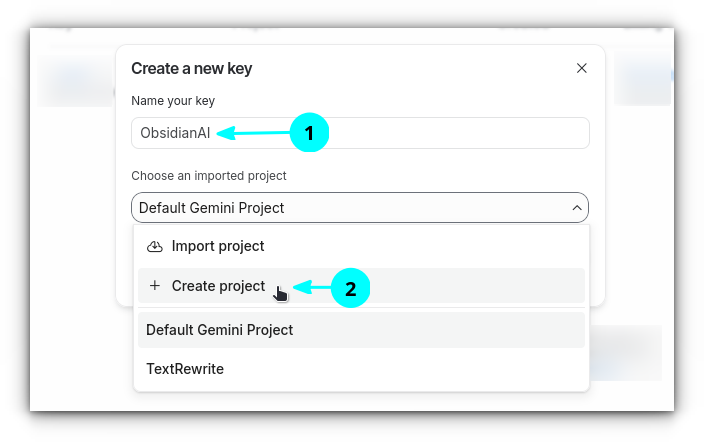
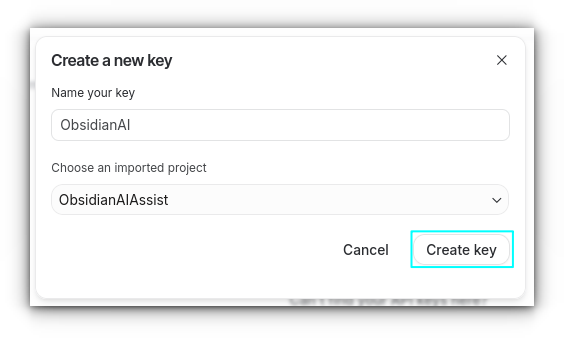
Here, give the key a name and click on Create a New Project.
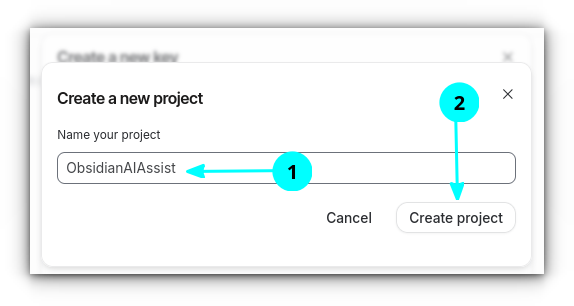
Give the project a name and click on Create Project
Now, click on Create Key.
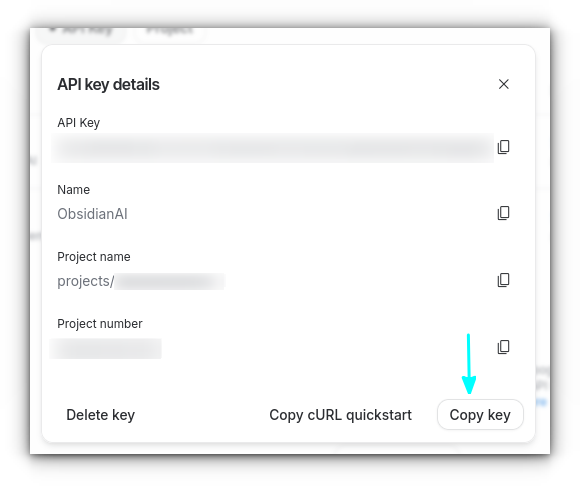
Use the Copy key button to copy the API key.
Configure Obsidian Copilot
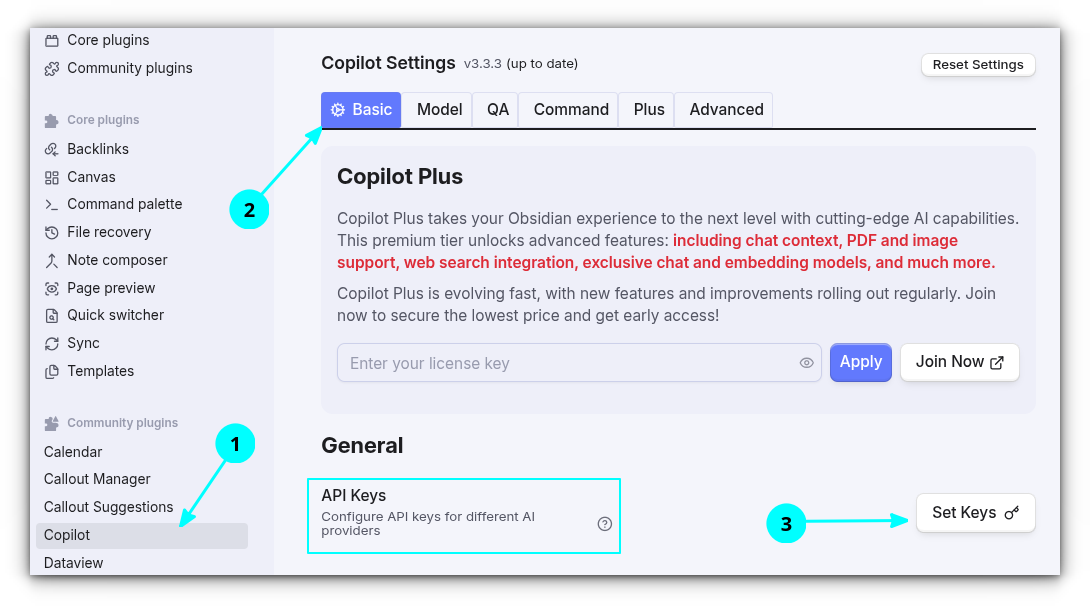
To configure Copilot, open Obsidian and go to settings (CTRL+,). Here, in the sidebar, scroll down and select Copilot.
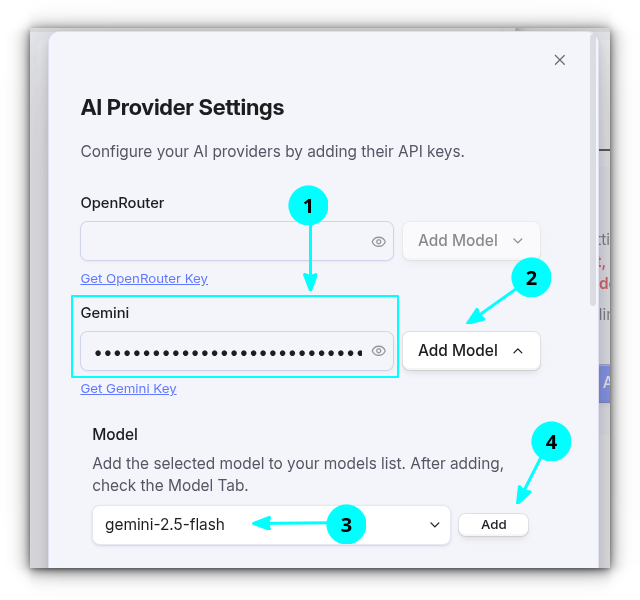
In the copilot settings, go to the Basic tab, click on Set Keys button.
Here, paste the copied API key into the designated field and then select your preferred Gemini model from the dropdown. I have added the Gemini 2.5 Flash model in this particular setup.
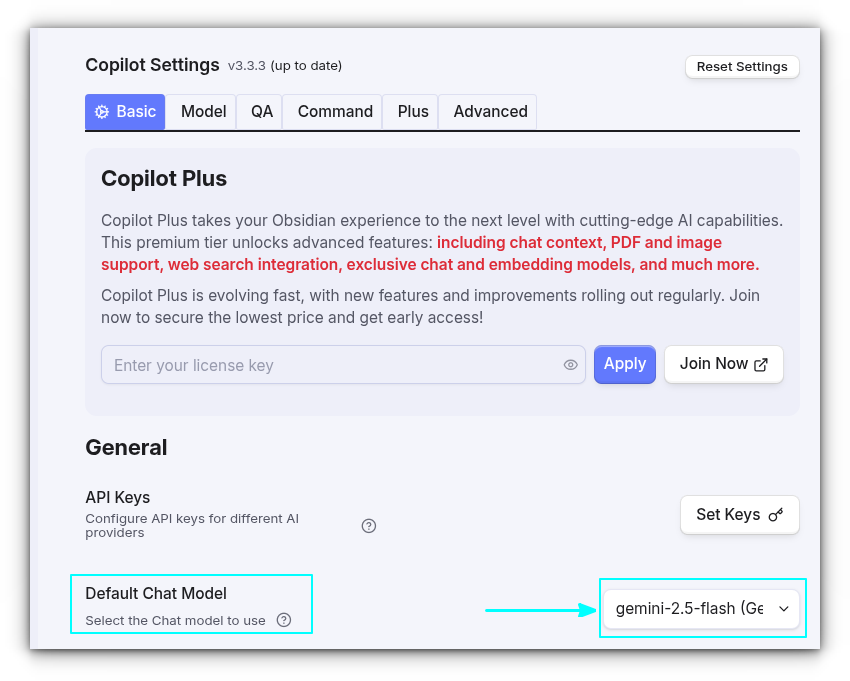
Set the default chat model to the added one.
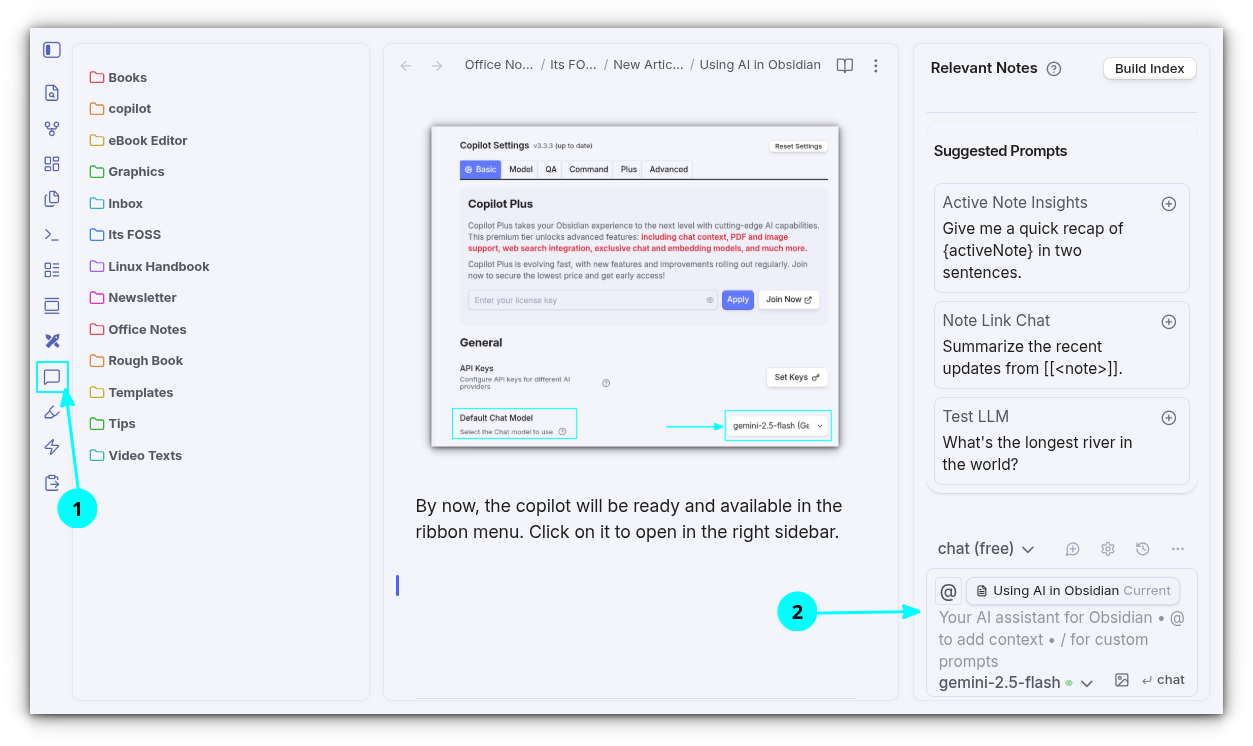
By now, Copilot should be ready and available in the ribbon menu. Simply click on its icon there to open it in the right sidebar.
Follow the same setup for other AI providers like Claude, GPT, etc.
Setting up Local AI
The Copilot plugin isn't just for cloud AI; it can also be used to set up local AI directly within Obsidian.
Here, I'll explain how to get local AI working using Ollama.
Install Ollama
Ollama is a command-line tool that allows us to download and run open-source Large Language Models (LLMs) like Llama3, Phi-3, Mistral, CodeGamma, and many others, right on my local machine.
To run AI locally on Linux with Ollama, you should have a GPU on your system. While it's possible to run AI on a CPU, the experience won't be ideal. A GPU is highly recommended for better performance. If you have a TPU/NPU, that would be even better but I am not sure if Ollama would support all TPU/NPU.
For this tutorial, I'll be using the Llama3.2 3B model. Even though it can be taxing on a CPU-only machine, it still offers noticeably faster performance compared to larger models without a dedicated GPU.
You can, of course, choose other, heavier models based on your system's specifications.
To install Ollama, use the command:
curl -fsSL https://ollama.com/install.sh | sh
Once Ollama is installed, it's a good idea to check if it's running correctly. By default, it operates on a specific port number on localhost.
To verify its status, open a web browser and enter:
localhost:11434
It should show the message, "Ollama is running".
Install llama3.2 3b model
Now that you have Ollama up and running, install the llama3.2 3b model using the command:
ollama run llama3.2:3b
This will download almost 2GB+ data and enable the model. Once the command execution is completed, you will be automatically entered to a llama prompt, where you can chat with the model from terminal.
To exit the prompt, use the command:
/bye
To stop the model, use the command:
ollama stop llama3.2:3b
Note the name of the AI
In a terminal, run the ollama command:
ollama list
This will list the installed models in your system. Copy the name of the llama3.2 model exactly as shown in the output.
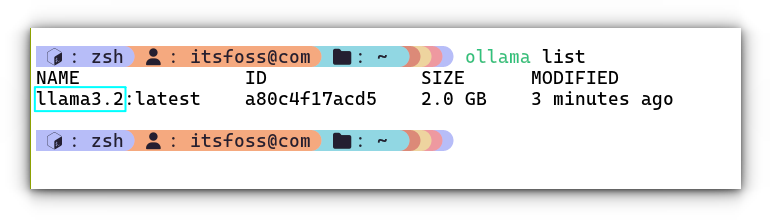
Configure Obsidian Copilot
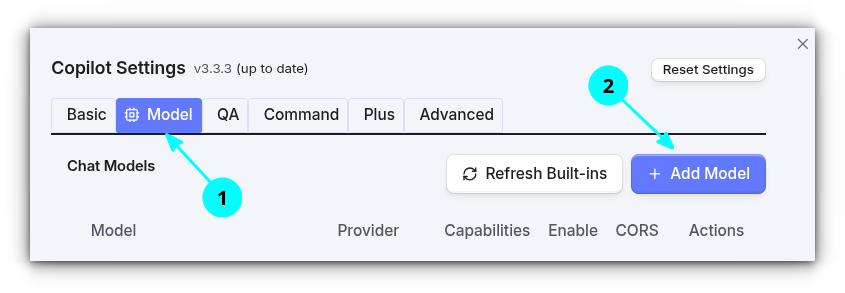
Open Obsidian and go to the Copilot settings as done for the Gemini method.
Here, go to the Model tab and select Add Model button.
Fill the fields appropriately. The Model Name, marked with a red asterisk, should be exactly the name you copied in the last step.
The Display name can be any identifiable name you choose. Set the provider to Ollama, and you can leave the Base URL and API key fields as their default values; there's no need to add anything there.
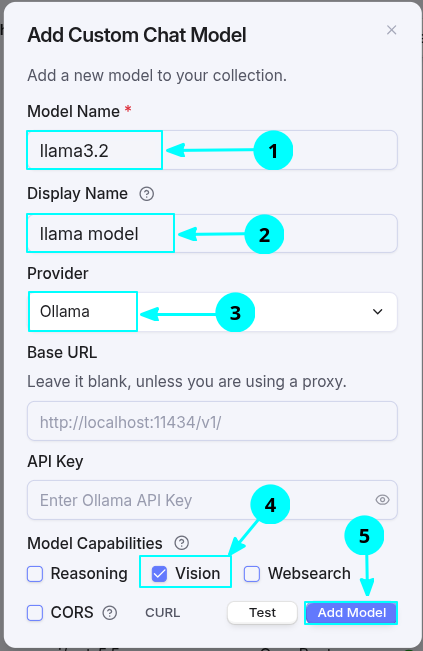
You can enable Vision in Model Capabilities if you want to allow image additions to the chat.
Once you've filled everything out, you can press the Test button to check for any configuration errors. If no errors are reported, use the Add Model button to add this model to your available list.
Now, go back to the Basic tab and set the default chat model to Llama.
That's it! From now on, you can use the local AI to chat with your notes.
Using the AI interface
Copilot for Obsidian comes packed with a lot of cool features. Let's take a look at some of the cooler ones that you may find yourself using frequently.
Context aware chat
As we've seen, Copilot features a neat chat interface that appears in the right sidebar when enabled. This sidebar offers several cool options that can significantly improve your notes.
For example, by default, the current note is automatically selected as the context for your chat. However, by pressing the @ symbol, I can easily select multiple notes to serve as context for my conversation, allowing for more comprehensive and interconnected AI interactions.
Chat with multiple notes
Send images in chat
At times, you may want to chat along with a screenshot. For example, when I am writing some configs, I can take a screenshot of an error and ask the LLM what the error is right then and there.
If the model supports processing images, you can do this directly via the sidebar interface. This is shown in the recording below.
Chat with Images
Add chat to note
What is the use of an AI assistant if it cannot add content directly to your notes? Copy and paste is not always a good solution.
To solve this, each result in the sidebar has an Insert/Replace at cursor button. Clicking on it immediately adds the chat result to the exact place where your cursor is currently located in your note or document, making the workflow incredibly seamless.
Adding Chat Content to Note
Chat backups
Copilot extension adds all chat sessions to a dedicated folder (copilot/copilot-conversations) in your vault as standard Markdown documents. The chat file is cleanly structured in a simple format:
user: user's prompt
ai: ai reply
The best thing about this setup is that it is properly backlinked. A backlink to the chat note is available right within your active note, which is incredibly good for getting a quick refresh on your thought process later on.
Wrapping Up
Using AI in a note-taking application could be a controversial choice, and it is completely a user's personal choice. While AI can hallucinate and add wrong data, I never suggest someone use it for research purposes.
The core learning and note-taking should always be done manually, but you can leverage the power of AI to add some helpful context to your note. Also, you can use it to format your note into a better Personal Knowledge Management (PKM) format, as doing that completely manually is often just an unwanted burden.
Do you prefer using AI in your Obsidian? Feel free to mention your thoughts in the comments section.
If this helped you, consider supporting It's FOSS
It's FOSS has been helping people use Linux for the past 14 years. Help us stay independent from big tech. Become a Plus member, enjoy ad-free reading and get 5 eBooks.
Skip the AI slop and SEO spam in your Google results
Tell Google you prefer It's FOSS, and it will show our Linux news and tutorials, created by experienced Linux users, more often when you search. It takes just a click.
Set as preferred sourceGet FOSS Weekly in your inbox