

GNOME is one of the most popular desktop environments in the Linux world.
But if we discuss the customizability aspect of GNOME, then you don't as get many options as KDE.
Not that you cannot customize GNOME. The GUI tool GNOME Tweaks helps you with several easy config changes. For advanced setting changes, you'll have to rely on the dconf editor which could be intimidating for many.
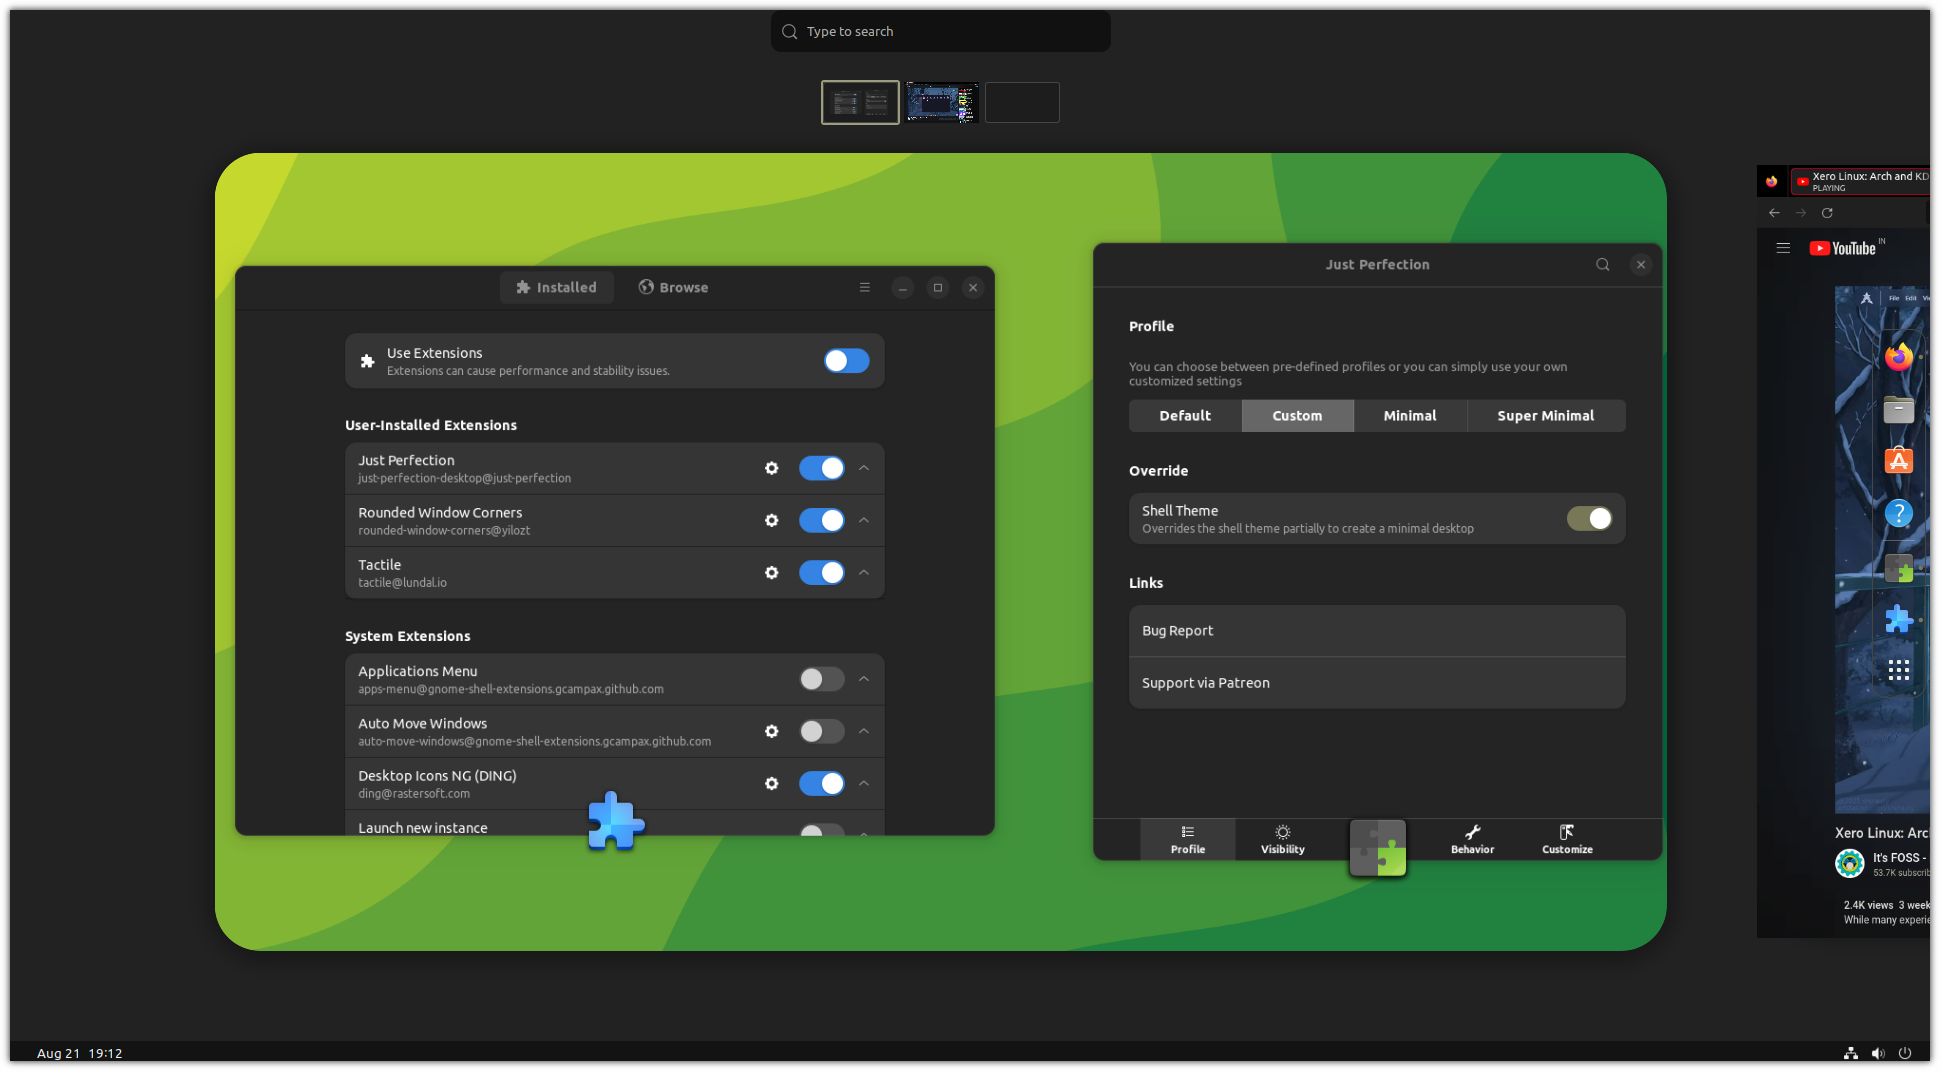
In the customization sense, let me introduce you to Just Perfection GNOME extension that lets you tweak various aspects of your desktop at once.
Just Perfection, the do it all extension 🌟
If the Just Perfection extension would make more sense if it were named Do it all. I'll be more clear when I'll introduce you to the set of features it gets.
Using this extension, you will be able to tweak little things like how you want your dock, notification panel, icons, and interactions with GNOME to be treated.
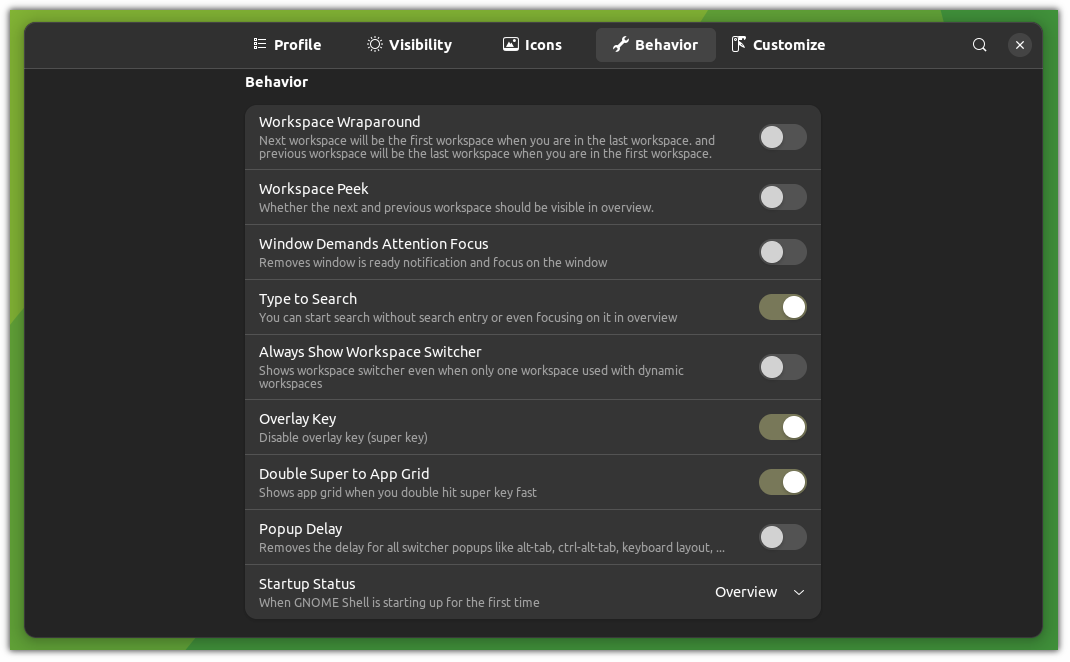
And here are some key features of the Just Perfection tool:
- 4 pre-configured profiles
- Ability to enable/disable super key, animations, panel, clock, calendar, and more.
- Ability to enable/disable icons for the app menu, panel notification, power icon, and activities.
- Customize the panel, notification bar, OSD position (volume/brightness pop-up), size of the window, and app preview when
Alt + tabpressed. - Change the behavior of the workspace preview, whether to show a workspace switcher or not, how you want to open the app grid, and more.
Sounds too promising. Right?
How to install Just Perfection
There are multiple ways to install the GNOME extension in Linux. One of which is to install through a web browser.
And to install it using the web browser, visit their official download page:
Once you're done with the installation, you will see the settings icon on the download page, click that button and it will open a prompt to tune the Just Perfection extension:

Partner Link
How to use the Just Perfection GNOME extension
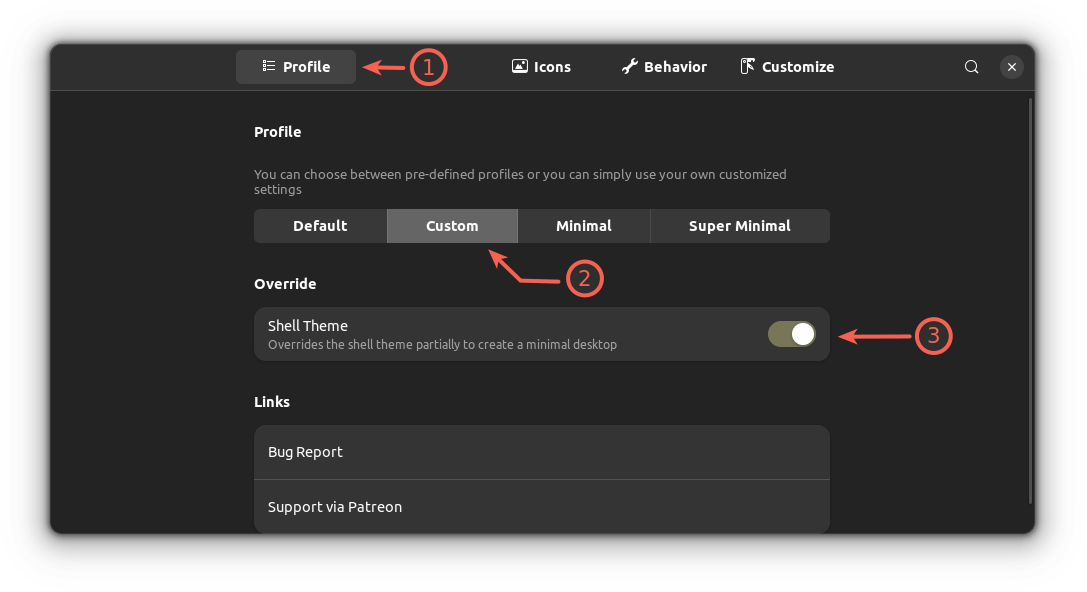
The most convenient way to use this extension is to choose between 4 pre-configured profiles.
Optional but I would recommend enabling the option to override the shell theme to make your desktop more visually appealing:
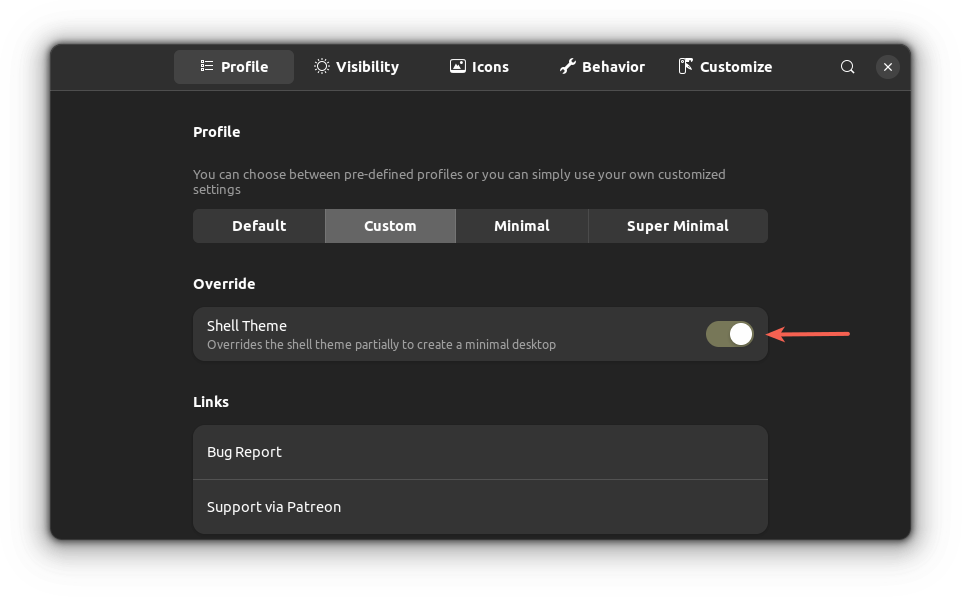
Once you do so, it will automatically switch to the Custom profile and make the dock background transparent.
Brief of each profile:
Default: The default profile where won't apply any changes but if you enable the shell overriding, it reduces the size of the panel and docks a little.Custom: Gets activated when you enable shell overriding and makes the dock background transparent.Minimal: Reduces the size of the dock and panel to have more screen area to work with.Super Minimal: Removes the dock and panel to have a clean look and the most screen area to work with.
Here's the expected behavior while switching between these profiles:
Now, you can enable/disable different options to get a desktop of your liking.
Going minimal with Just Perfection
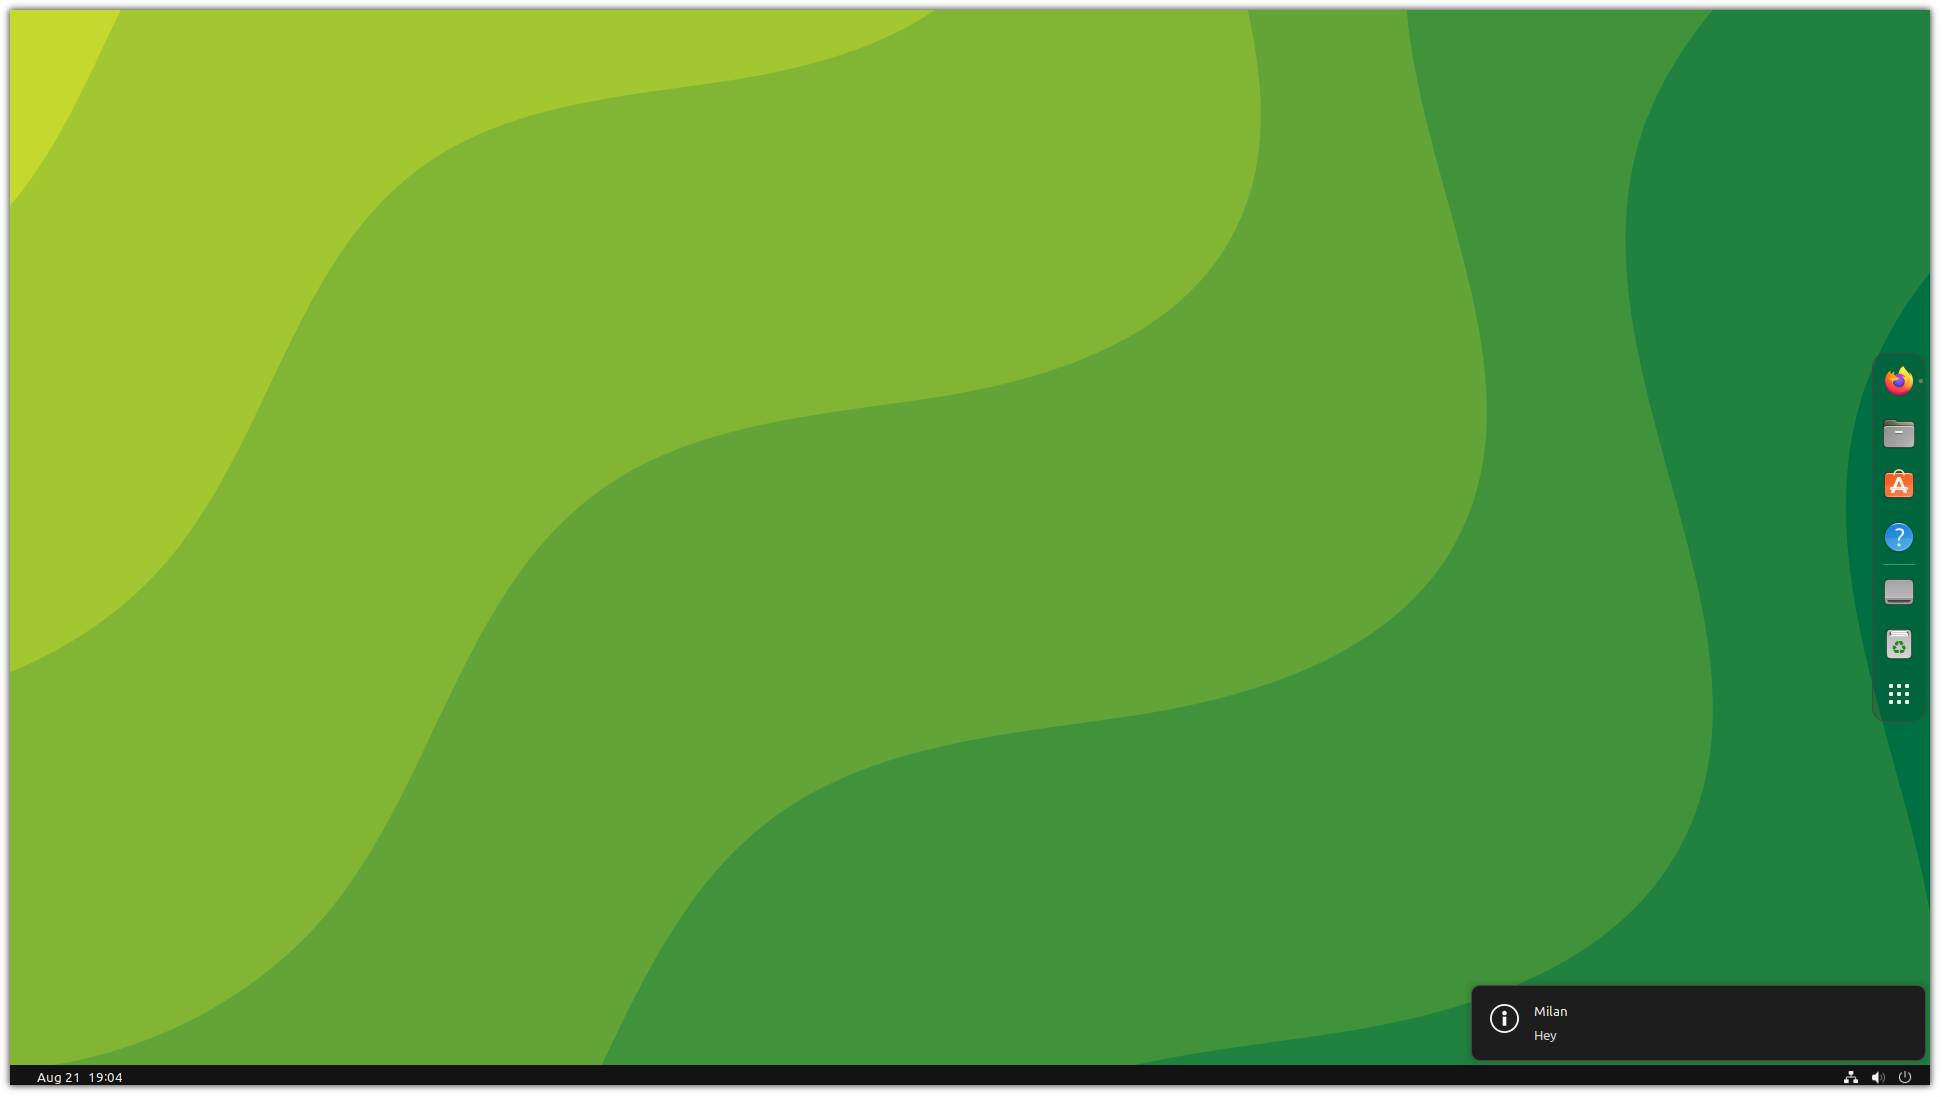
In this section, I will show you how you can have a minimal desktop experience that is inspired by the Linux Mint's Cinnamon desktop that looks like this:
And here's what it looks like while switching workspaces:
Here's what I did to make my desktop look minimal as shown above:
- Transparent dock positioned to the right (from the system menu)
- Change the position of the panel to the bottom
- Remove
Application menuandActivitiesfrom panel - Reposition the clock to the bottom left
- Position notification pop-ups to the bottom left
- Enable workspace switcher
- Increase the radius of the workspace overview pane
Sure, you can skip any of the shown steps.
1. Transparent dock positioned to the right
To have a transparent dock, all you have to do is choose the Custom present from the Profile menu and enable the Shell Theme option:
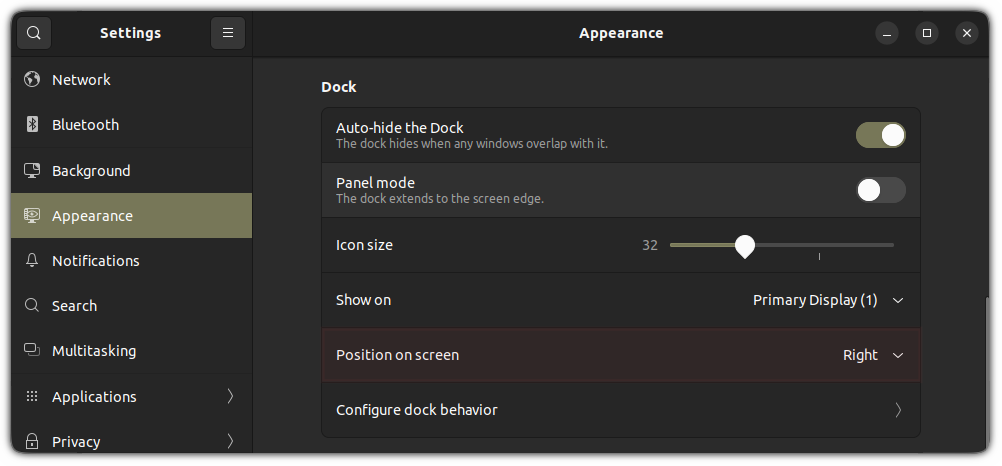
If you're using Ubuntu's recent version, then you will find the option to relocate the dock in the system menu.
First, open settings from the system menu and open the Appearance menu. Inside the Dock section, you will find an option for Position on screen.
There, choose the Right:
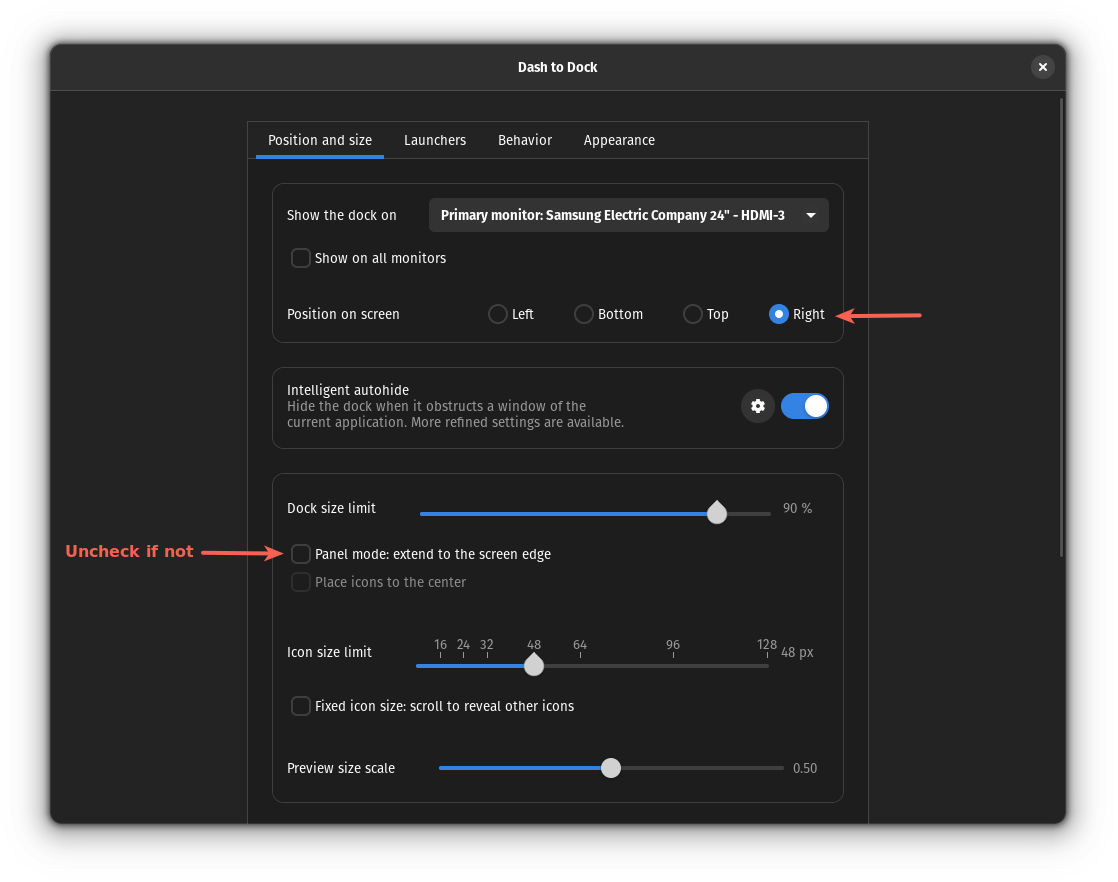
If you are using an older version of GNOME, then you won't find this menu.
But worry not, you can have the same benefit by installing an extension called Dash to Dock.
Here, you have to change two settings:
- Change the position on the screen to
Right - Uncheck Panel mode (if checked)
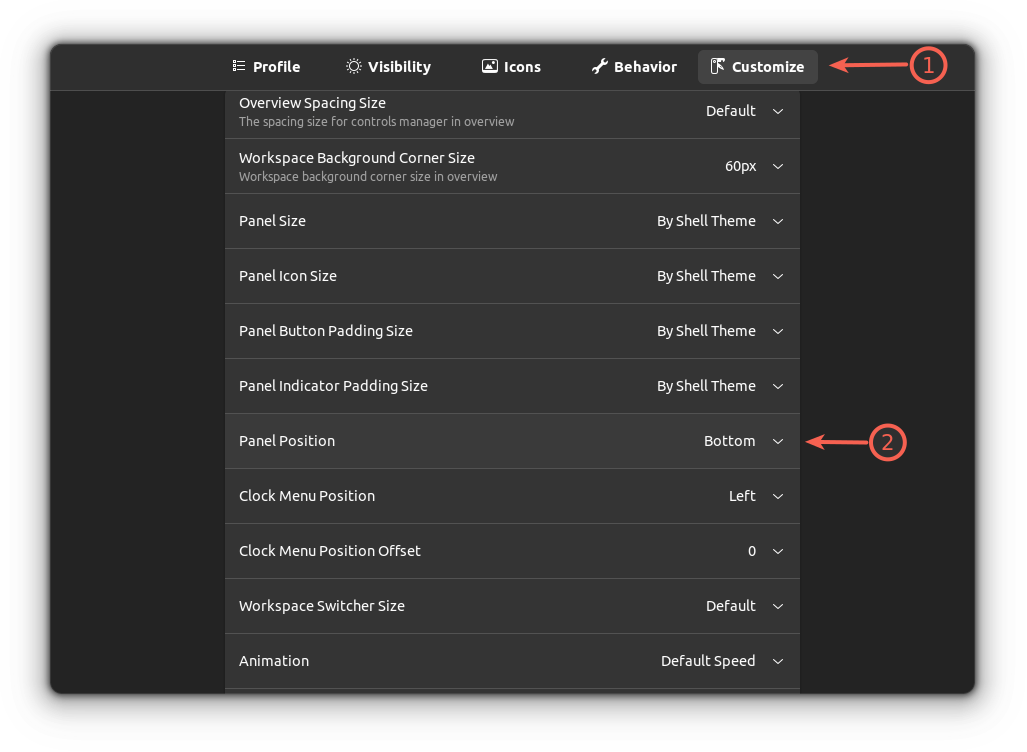
2. Relocate the panel to the bottom
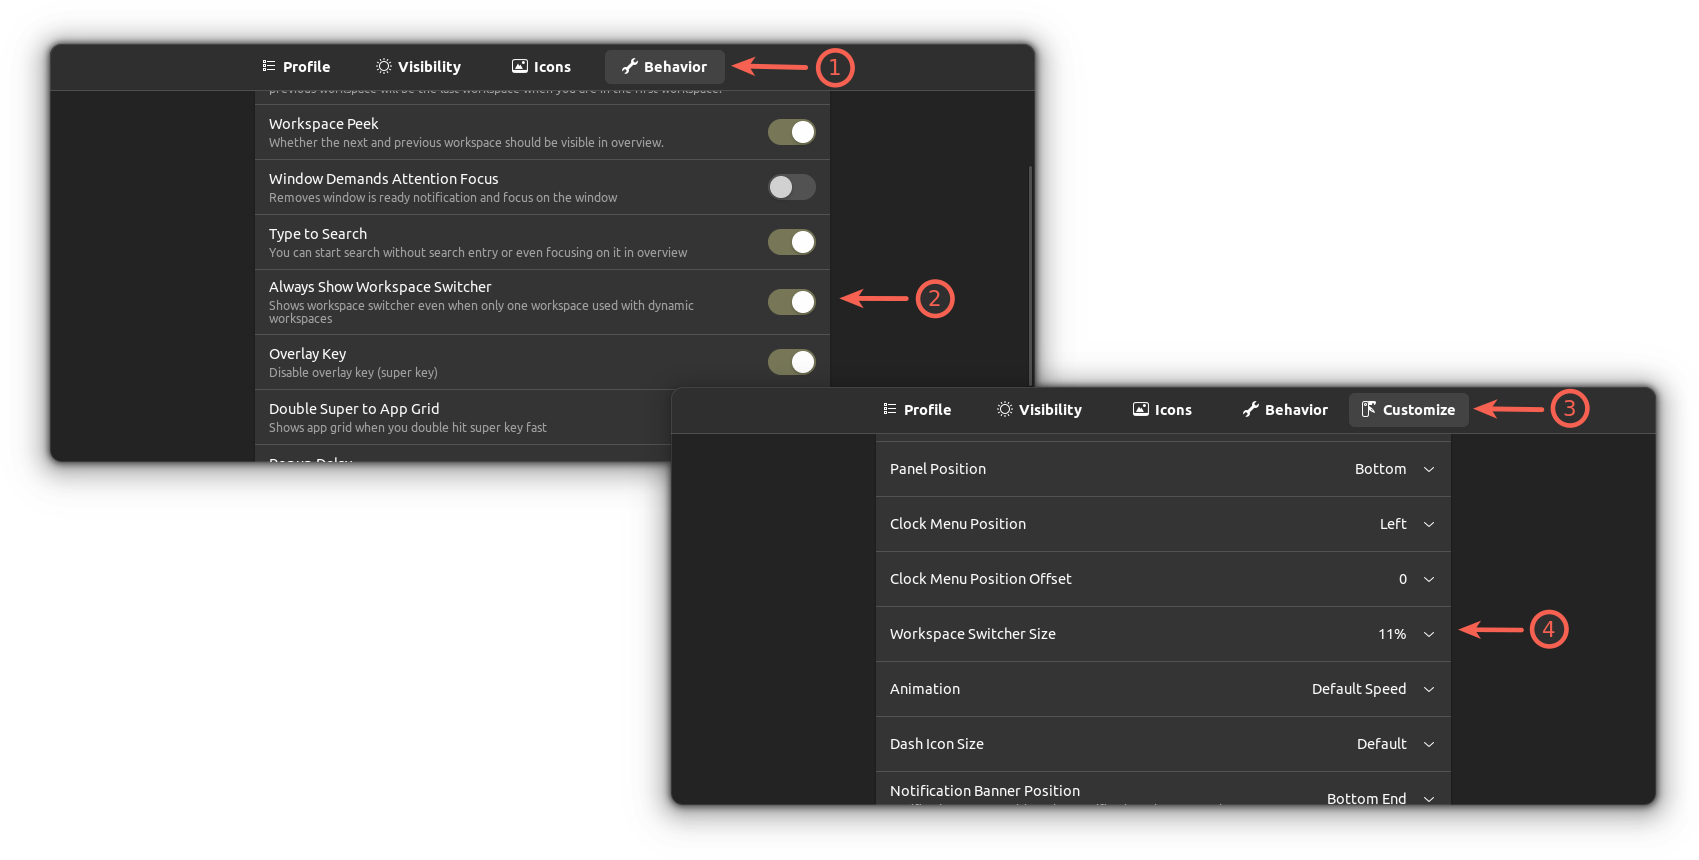
To relocate the panel to the bottom, go to the Customize menu and there you will find the option for Panel Position.
Double-click on that option and choose Bottom:
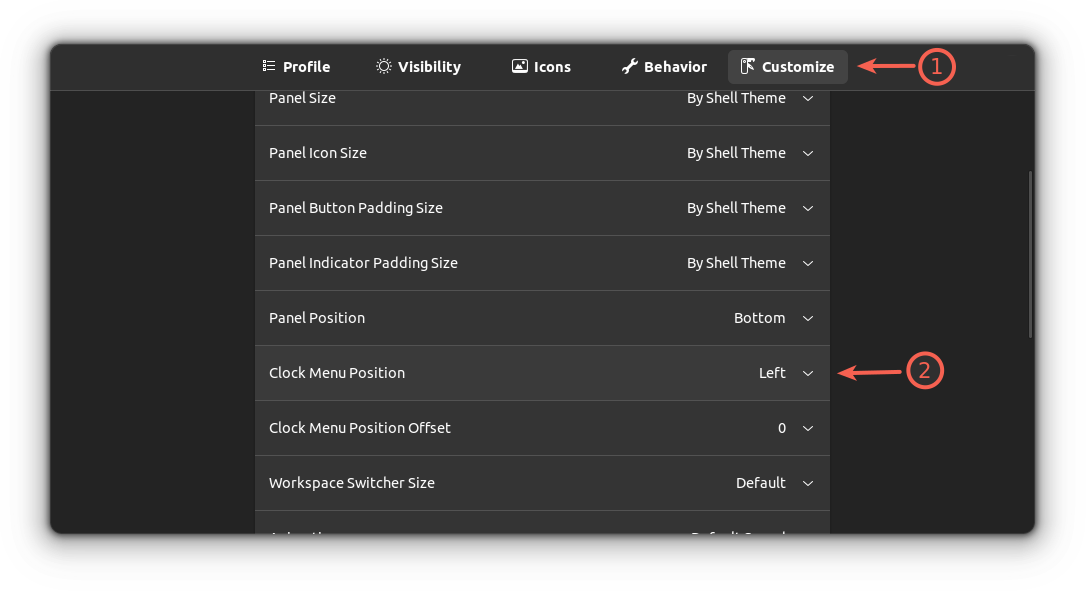
3. Change the clock position to the left corner
I've been using the clock this way for the last 6 months and it had made wonders for my workflow. In simple terms, you read the clock more often and this way you can cope with time faster.
It looks good too!
To change the clock's position, go to the Customize menu and from there, find the Clock Menu Position option and choose the Left option:
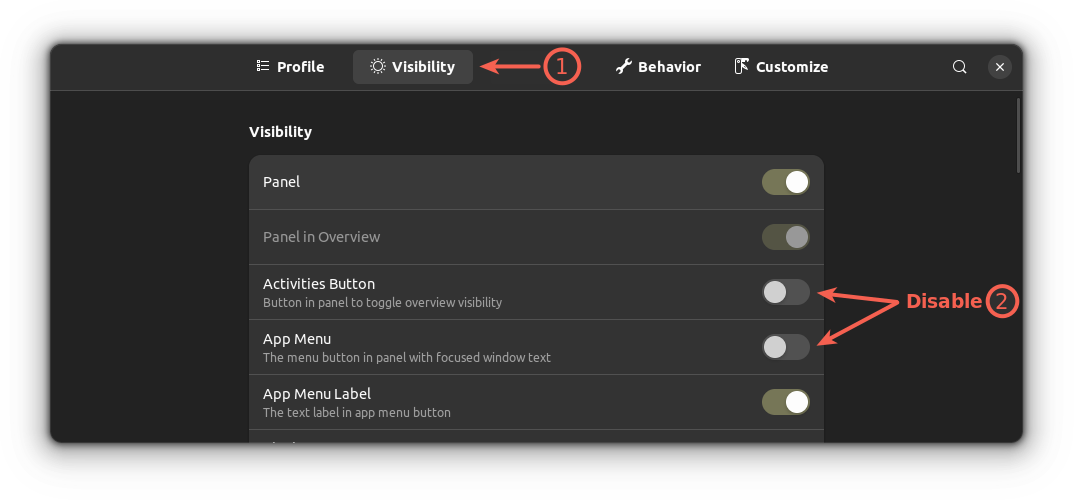
4. Remove the Application menu and Activities button

haven't seen many users using these two options so why not simply remove them and achieve a clean minimal look?
To do that, go to the Visibility menu and disable the following two options:
- Activities Buttons
- App Menu
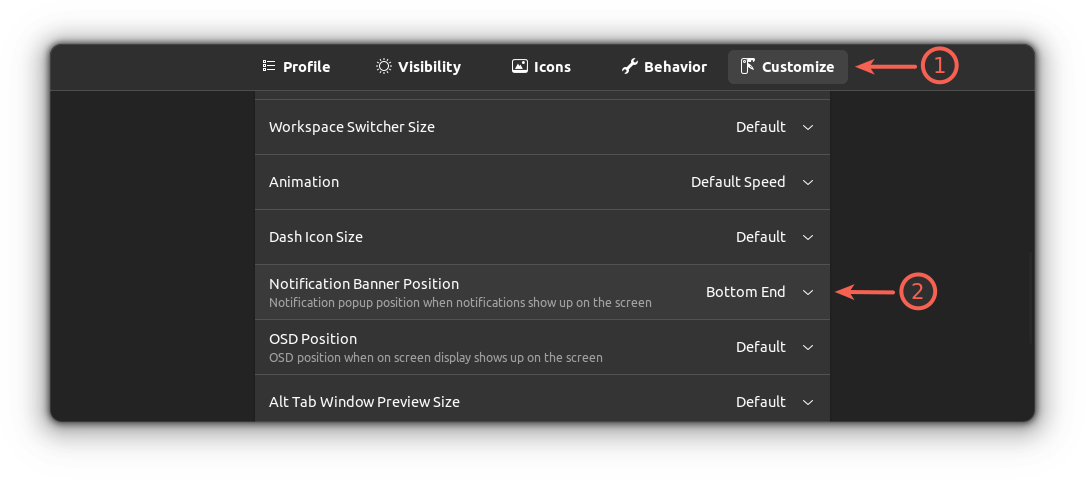
5. Notification pop-up re-positioned to bottom right
As the panel itself was relocated to the bottom, having pop-ups on the top won't make any sense (to me at least). Also, reading messages from the bottom is easy compared to the top.
For this, follow these two simple steps:
- Go to the
Customizemenu - Select
Bottom EndfromNotification Banner Position:
6. Enable workspace switcher
The workspace switcher shows a preview of each workspace when having an overview of the activities of multiple workspaces.
Still confused? It looks like this when enabled:
Using this, you can have a clear overview of what is going on in each workspace by just pressing the super key.
Sure, you can have the same view by opening the system menu (by pressing the super key twice) but why waste one keystroke and open the system menu when it can be enabled in the overview itself?
To enable this, you have to follow the three simple steps:
- Go to the
Behaviormenu and enableAlways Show Workspace Switcher - Go to the
Customizemenu - Select
11%forWorkspace Switcher Size
The reason why I increased the size of the workspace switcher is the default view is pretty small.
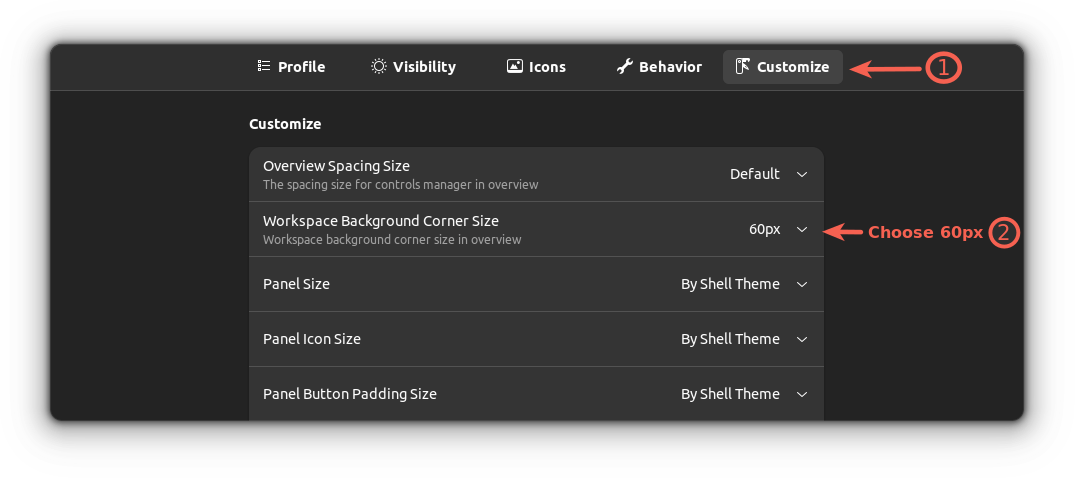
7. Increase the radius of the workspace overview pane
I love rounded corners, especially if applied over the workspace overview pane especially if the wallpaper compliments the setup.
And here's how it will look in after applying the shown setting:
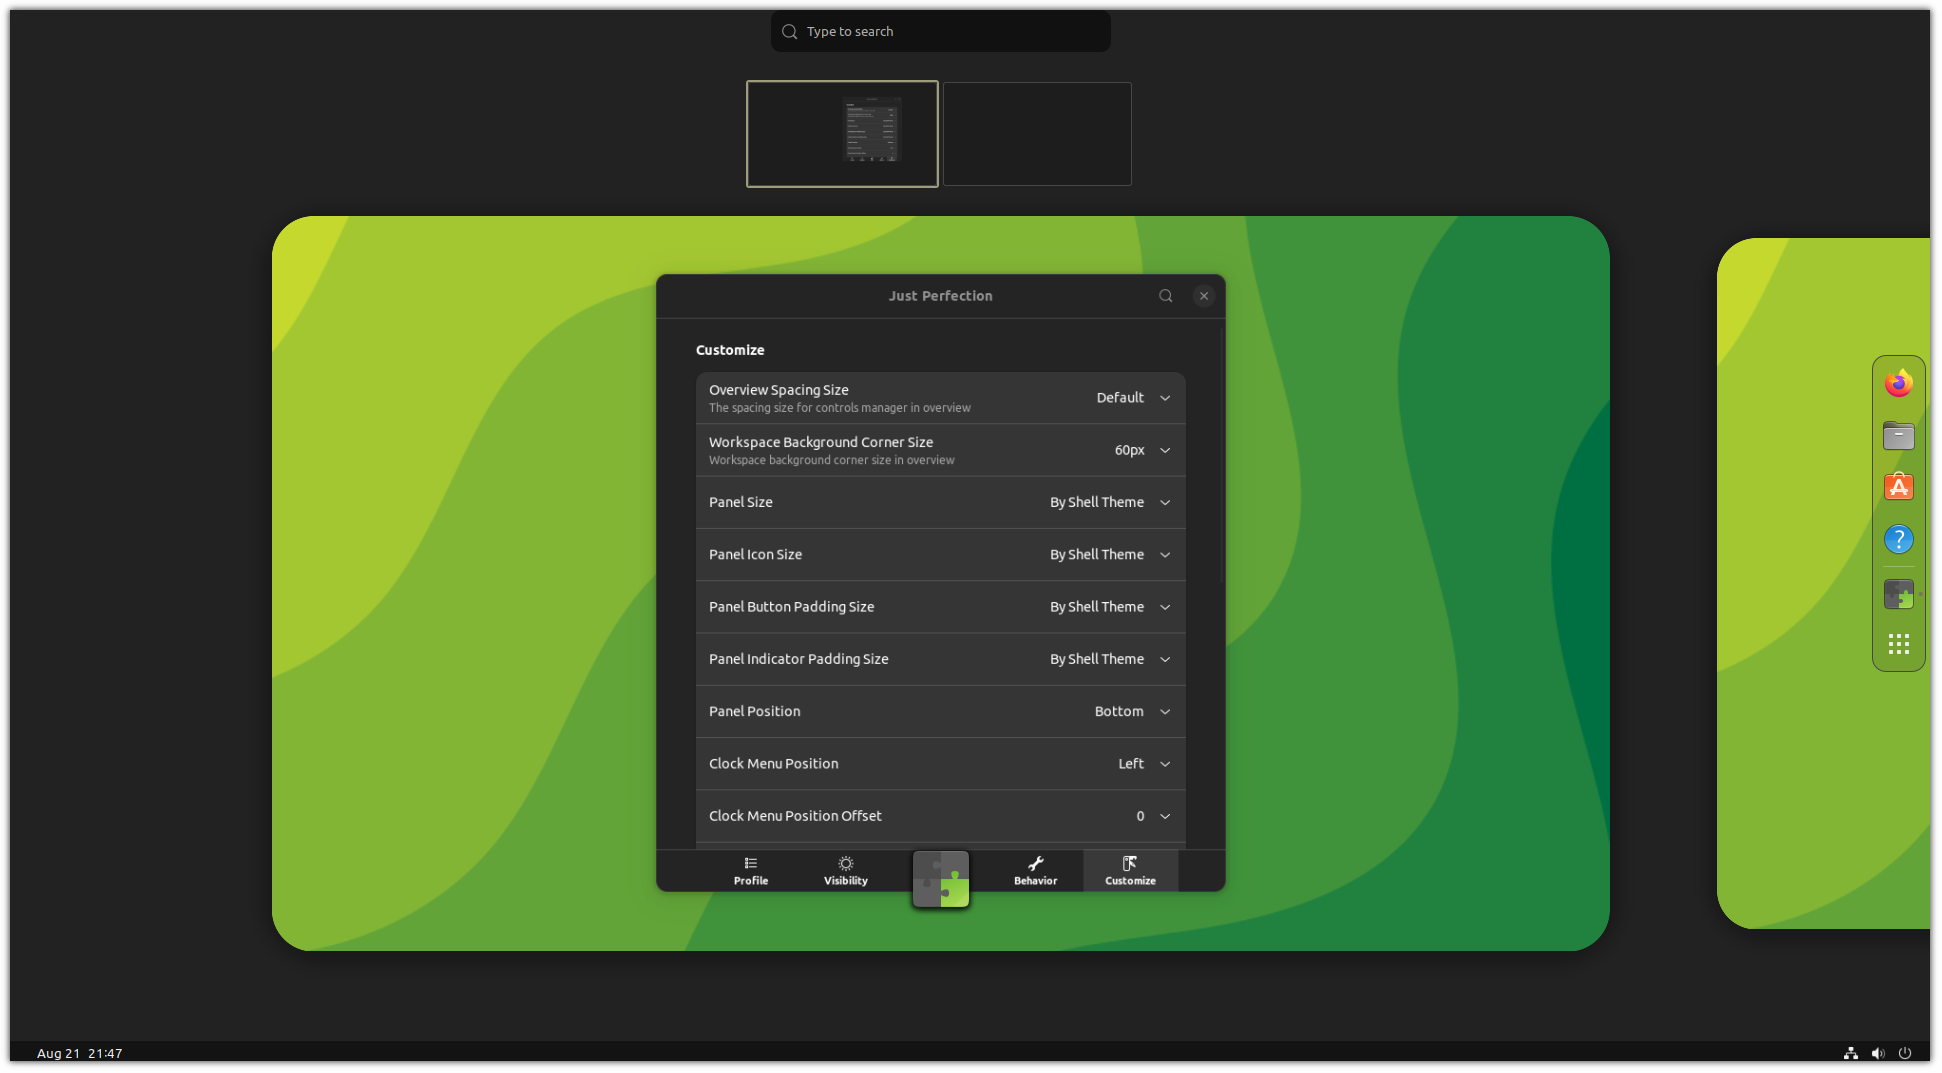
Use the following steps to increase the radius of the workspace overview panel
- Go to the
Customizemenu - Select
60px(the max amount) in theWorkspace Background Corner Size
More on GNOME customization
If you're new to Ubuntu, then we have a detailed guide walking you through all the basics of how you can customize GNOME:
 Abhishek Prakash
Here's how you can use the GNOME tweaks tool to make GNOME awesome:
Abhishek Prakash
I hope you will find this guide helpful.
If this helped you, consider supporting It's FOSS
It's FOSS has been helping people use Linux for the past 14 years. Help us stay independent from big tech. Become a Plus member, enjoy ad-free reading and get 5 eBooks.

