

Building a project where you need to access the Raspberry Pi remotely?
You can enable SSH on the Pi and access it remotely via a terminal from another system.
However, not everyone is comfortable with the terminal and commands.
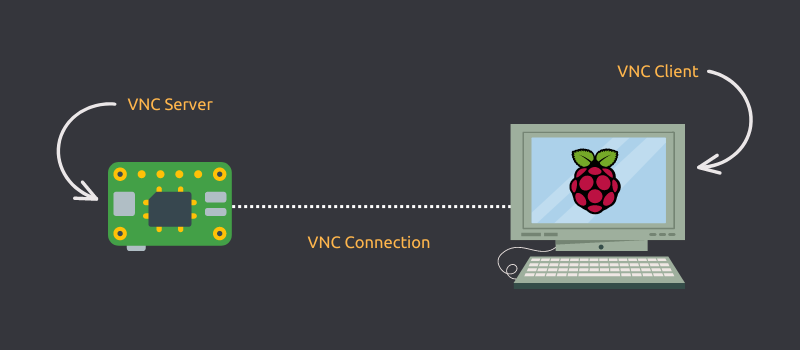
An alternative is to access the Raspberry Pi via VNC. This way, you create a remote connection to the Pi and use it graphically like it was connected to your monitor and keyboard.
Of course, such a connection may lag a little depending on the Raspberry Pi system configuration and network speed.
But at least you get to access it graphically remotely.
It consists of these steps:
- Enable VNC from settings in Raspberry Pi
- Use a VNC client on the remote computer from where you want to access your Pi (on the same subnetwork)
- (optionally) Setup complicated VNC configuration or use paid option of Real VNC to access the Pi over the internet
Let me show you how to remote into the Raspberry Pi using the VNC software. But first, a quick
What is VNC?
The term VNC stands for Virtual Network Computing. Think of it as SSH but with GUI. It lets you remote into a computer on a network and allows you to control it using the normal GUI as if you’re physically using it. VNC is a remote desktop tool like TeamViewer.
In our case, VNC will help us control the Raspberry Pi over the network, but as if the mouse, keyboard and display were physically attached to the Raspberry Pi. VNC is not limited to being used on PCs. You can control your Raspberry Pi from a phone or a tablet as well!
There are several VNC software available. I am going to use RealVNC here. It’s (probably) a proprietary solution from the original creators of the VNC protocol.
Step1: Enable VNC on Raspberry Pi
Usually, Raspberry Pi OS should already have the required packages installed. However, you can ensure that by installing them again.
sudo apt install realvnc-vnc-server realvnc-vnc-viewerOnce you have the necessary package, proceed to enable the VNC service.
There are two ways of enabling the VNC service; using the GUI or using the raspi-config CLI tool. I’ll discuss both.
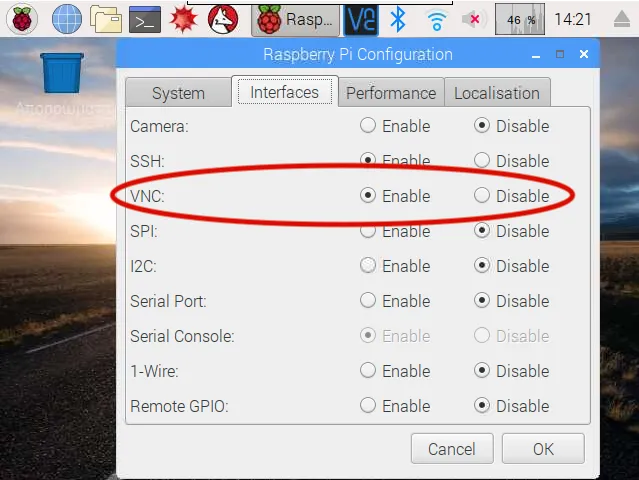
Method 1: Using the GUI
This is the easiest way to enable the VNC service. The steps to do so are as follows (for the default Raspberry Pi OS):
- From the top bar, select Menu > Preferences > Raspberry Pi Configuration.
- In the application view, go to the Interfaces tab.
- Make sure that the VNC service is set to Enabled.
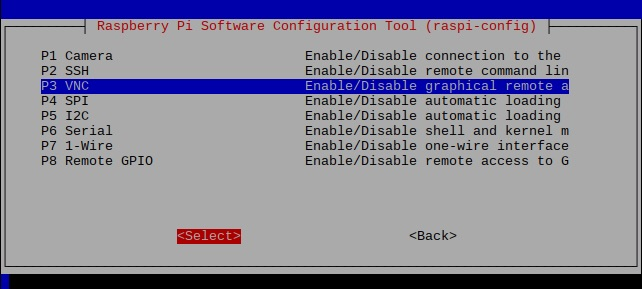
Method 2: Using the ‘raspi-config’ tool
The ‘raspi-config’ tool is a lifesaver on the Raspberry Pi. It has all various knobs that you can tweak to achieve your desirable configuration.
To enable the VNC service, execute the following command in your terminal:
sudo raspi-configThis will start the raspi-config tool in your terminal. Go to Interfacing Options and find the option that says VNC and enable it.
Done! You now have set your Raspberry Pi as your VNC server.
Step 2: Connecting to the Raspberry Pi (over LAN)
You enabled the VNC server on Raspberry Pi. Let’s connect to it.
Get the Raspberry Pi’s IP address
There are several ways to get Raspberry Pi’s IP address. You can check your router for all devices; or if you are already SSH-ed into the Raspberry Pi, it is best to use the ‘hostname’ command like so:
hostname -IRunning the ‘hostname’ command will give you the IP address assigned to the Raspberry Pi.
On my network, the Raspberry Pi got ‘192.168.11.4’ as its IP address. So, this is what I will be using. Yours will be different.
Get RealVNC Client
Just like SSH needs a server and client software, VNC needs a client too. You can visit RealVNC’s website to download the client respective to the OS on your PC/phone/tablet.
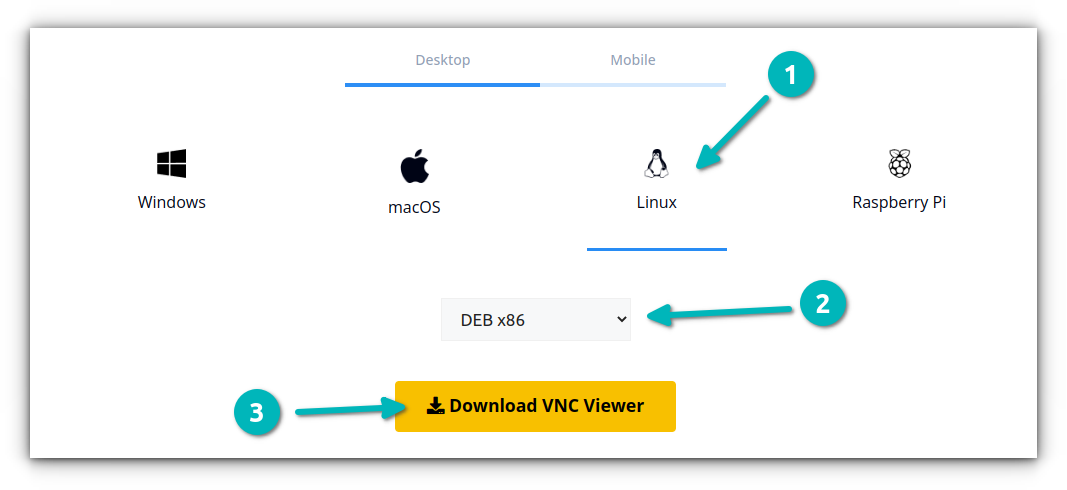
Once the installer is downloaded, install it using the standard method most appropriate to your operating system and launch the RealVNC Client.
Connect to the Raspberry Pi
Once you have the RealVNC Client installed, open it. You will have an address bar on the top (major UI redesign notwithstanding). Please enter the IP address of the Raspberry Pi here.
Once you enter the Raspberry Pi’s IP address in the top address bar, you will be asked for a username and password. In here, use the credentials that you use to log into the Raspberry Pi itself — the ones used for SSH as well.
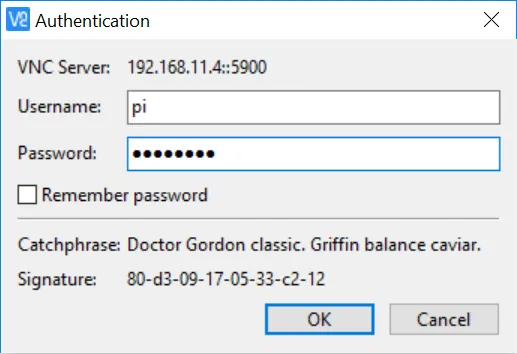
My username and password are ‘pi’ and ‘raspberry’ respectively. So, I will use these credentials to log in.
Your computer should connect to the Raspberry Pi over a VNC session. Congratulations! :)
Optional: Connecting to the Raspberry Pi (over the internet)
You just learned to connect to Raspberry Pi on the same network, but what if you are not home and want to connect to the device from the internet?
You don’t need to remember any IP address or modify your firewall or router configuration. RealVNC handles it all using your RealVNC account.
The downside to this is that you need a paid account. When writing this article, the cheapest subscription available is US $3.39 per month (billed annually).
If you are okay with yet another subscription and do need to access the Raspberry Pi over the Internet frequently, this subscription should be worth it.
Conclusion
I use SSH to connect to my Raspberry Pi remotely. Using VNC could also be a good choice if you need the comfort of the GUI. This works without much effort if the devices are on the same subnetwork.
I hope you like this quick tutorial helpful in accessing your Raspberry Pi using VNC. Let me know if you have questions and I’ll try my best to help you out.
If this helped you, consider supporting It's FOSS
It's FOSS has been helping people use Linux for the past 14 years. Help us stay independent from big tech. Become a Plus member, enjoy ad-free reading and get 5 eBooks.
