

Who hasn’t come across an error while doing an update in Ubuntu? Update errors are common and plenty in Ubuntu and other Linux distributions based on Ubuntu. Here are some common Ubuntu update errors and their fixes.
This article is part of Ubuntu beginner series that explains the know-how of Ubuntu so that a new user could understand the things better.
In an earlier article, I discussed how to update Ubuntu. In this tutorial, I’ll discuss some common errors you may encounter while updating Ubuntu. It usually happens because you tried to add software or repositories on your own and that probably caused an issue.
There is no need to panic if you see the errors while updating your system. The errors are common, and the fix is easy. You’ll learn how to fix those common update errors.
- Understand Ubuntu repositories
Learn what are various repositories in Ubuntu and how they enable you to install software in your system 👇

- Understanding PPA in Ubuntu
Further improve your concept of repositories and package handling in Ubuntu with this detailed guide on PPA 👇

Error 0: Failed to download repository information
Many Ubuntu desktop users update their system through the graphical software updater tool. You are notified that updates are available for your system and you can click one button to start downloading and installing the updates.
Well, that’s what usually happens. But sometimes you’ll see an error like this:
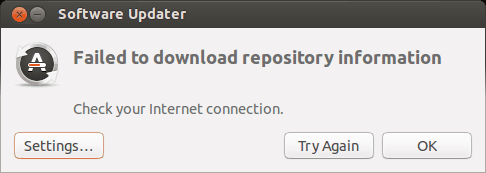
Failed to download repository information. Check your internet connection.
That’s a weird error because your internet connection is most likely working just fine, and it still says to check the internet connection.
Did you note that I called it ‘error 0’? It’s because it’s not an error in itself. I mean, most probably, it has nothing to do with the internet connection. But there is no useful information other than this misleading error message.
If you see this error message and your internet connection is working fine, it’s time to put on your detective hat and use your grey cells (as Hercule Poirot would say).
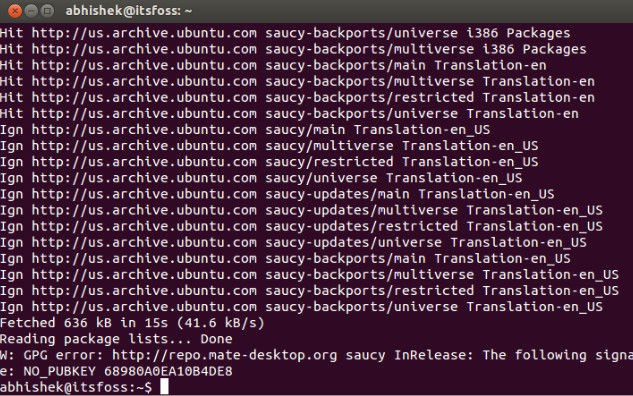
You’ll have to use the command line here. You can use Ctrl+Alt+T keyboard shortcut to open the terminal in Ubuntu. In the terminal, use this command:
sudo apt updateLet the command finish. Observe the last three-four lines of its output. That will give you the real reason why sudo apt-get update fails. Here’s an example:
Error 1: Problem With MergeList
When you run update in terminal, you may see an error “problem with MergeList” like below:
E:Encountered a section with no Package: header,
E:Problem with MergeList /var/lib/apt/lists/archive.ubuntu.com_ubuntu_dists_precise_universe_binary-i386_Packages,
E:The package lists or status file could not be parsed or opened.’
For some reason, the file in /var/lib/apt/lists directory got corrupted. You can delete all the files in this directory and run the update again to regenerate everything afresh. Use the following commands one by one:
sudo rm -r /var/lib/apt/lists/*
sudo apt-get clean && sudo apt-get update
Your problem should be fixed.
Error 2: Hash Sum mismatch
If you find an error that talks about Hash Sum mismatch, the fix is the same as the one in the previous error.
W:Failed to fetch bzip2:/var/lib/apt/lists/partial/in.archive.ubuntu.com_ubuntu_dists_oneiric_restricted_binary-i386_Packages Hash Sum mismatch,
W:Failed to fetch bzip2:/var/lib/apt/lists/partial/in.archive.ubuntu.com_ubuntu_dists_oneiric_multiverse_binary-i386_Packages Hash Sum mismatch,
E:Some index files failed to download. They have been ignored, or old ones used instead
The error occurs possibly because of a mismatched metadata cache between the server and your system. You can use the following commands to fix it:
sudo rm -rf /var/lib/apt/lists/*
sudo apt update
Error 3: Failed to fetch with error 404 not found
If you try adding a PPA repository that is not available for your current Ubuntu version, you’ll see that it throws a 404 not found error.
W: Failed to fetch http://ppa.launchpad.net/venerix/pkg/ubuntu/dists/raring/main/binary-i386/Packages 404 Not Found
E: Some index files failed to download. They have been ignored, or old ones used instead.
You added a PPA hoping to install an application, but it is not available for your Ubuntu version, and you are now stuck with the update error. This is why you should check beforehand if a PPA is available for your Ubuntu version or not. I have discussed how to check the PPA availability in the detailed PPA guide.
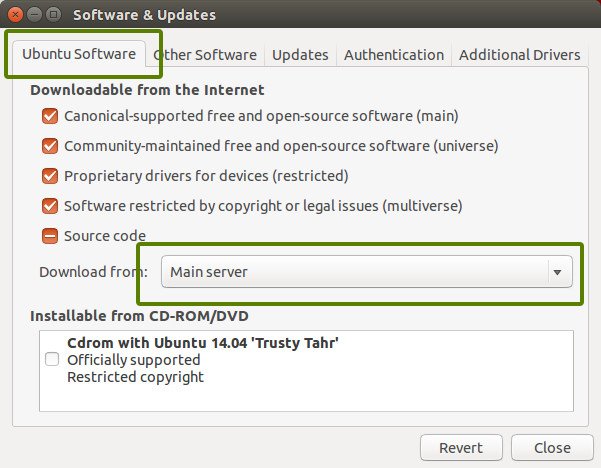
Anyway, the fix here is that you remove the troublesome PPA from your list of repositories. Note the PPA name from the error message. Go to Software & Updates tool:

In here, move to Other Software tab and look for that PPA. Uncheck the box to remove the PPA from your system.
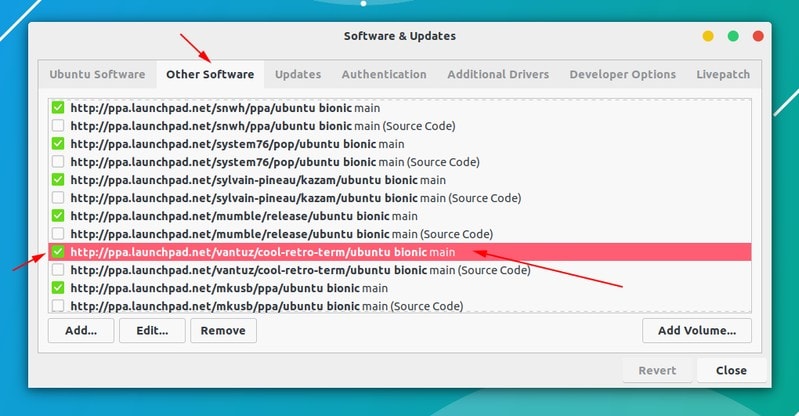
Your software list will be updated when you do that. Now, if you run the update again, you shouldn’t see the error.
Error 4: Failed to download package files error
A similar error is failed to download package files error like this:
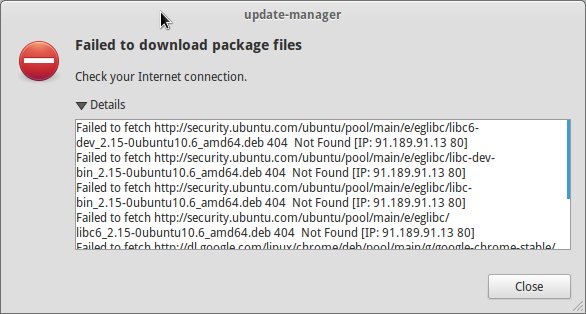
In this case, a newer version of the software is available, but it’s not propagated to all the mirrors. If you are not using a mirror, easily fixed by changing the software sources to Main server. Please read this article for more details on failed to download package error.
Go to Software & Updates and in there changed the download server to Main server:
Error 5: GPG error: The following signatures couldn’t be verified
Adding a PPA may also result in the following GPG error: The following signatures couldn’t be verified when you try to run an update in terminal:
W: GPG error: http://repo.mate-desktop.org saucy InRelease: The following signatures couldn’t be verified because the public key is not available: NO_PUBKEY 68980A0EA10B4DE8
All you need to do is to fetch this public key in the system. Get the key number from the message. In the above message, the key is 68980A0EA10B4DE8.
This key can be used in the following manner:
sudo apt-key adv --keyserver keyserver.ubuntu.com --recv-keys 68980A0EA10B4DE8Once the key has been added, run the update again and it should be fine.
Error 6: BADSIG error
Another signature related Ubuntu update error is BADSIG error which looks something like this:
W: A error occurred during the signature verification. The repository is not updated and the previous index files will be used. GPG error: http://extras.ubuntu.com precise Release: The following signatures were invalid: BADSIG 16126D3A3E5C1192 Ubuntu Extras Archive Automatic Signing Key
W: GPG error: http://ppa.launchpad.net precise Release:
The following signatures were invalid: BADSIG 4C1CBC1B69B0E2F4 Launchpad PPA for Jonathan French W: Failed to fetch http://extras.ubuntu.com/ubuntu/dists/precise/Release
All the repositories are signed with the GPG and for some reason, your system finds them invalid. You’ll need to update the signature keys. The easiest way to do that is by regenerating the apt packages list (with their signature keys) and it should have the correct key.
Use the following commands one by one in the terminal:
cd /var/lib/apt
sudo mv lists oldlist
sudo mkdir -p lists/partial
sudo apt-get clean
sudo apt-get update
Error 7: Partial upgrade error
Running updates in terminal may throw this partial upgrade error:
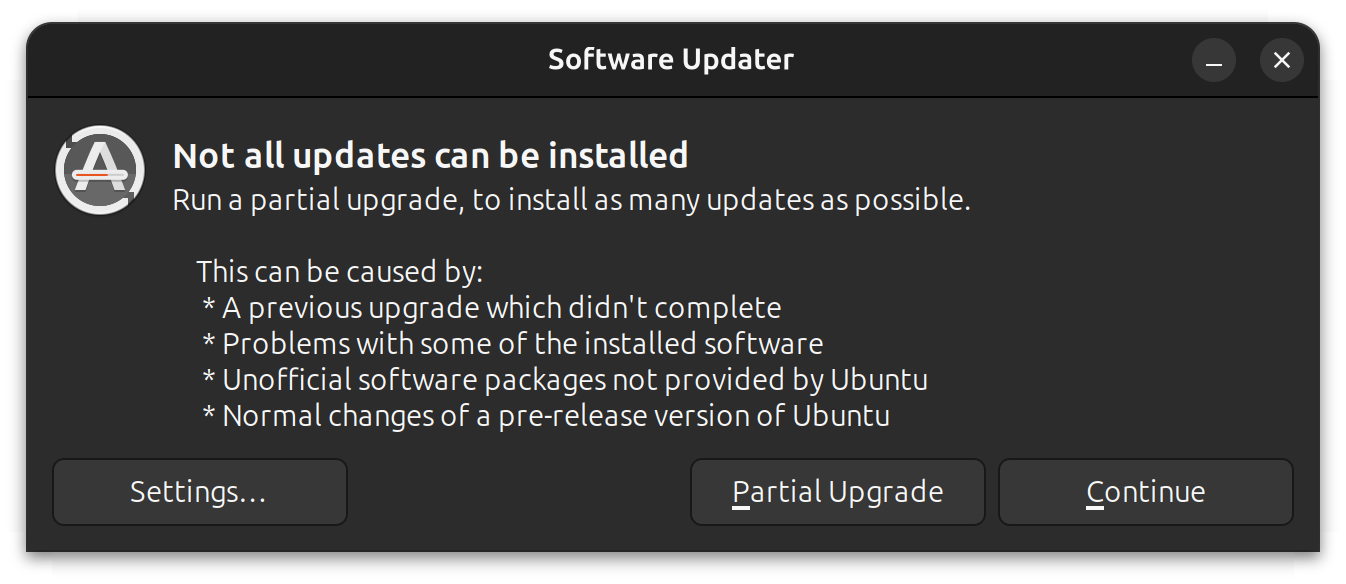
Not all updates can be installed
Run a partial upgrade, to install as many updates as possible
Run the following command in terminal to fix this error:
sudo apt-get install -fError 8: Could not get lock /var/cache/apt/archives/lock
This error happens when another program is using APT. Suppose you are installing something in Ubuntu Software Center and, at the same time, trying to run apt in terminal.
E: Could not get lock /var/cache/apt/archives/lock – open (11: Resource temporarily unavailable)
E: Unable to lock directory /var/cache/apt/archives/
Check if some other program might be using apt. It could be a command running terminal, Software Center, Software Updater, Software & Updates or any other software that deals with installing and removing applications.
If you can close other such programs, close them. If there is a process in progress, wait for it to finish.
If you cannot find any such programs, use the following command to kill all such running processes:
sudo killall apt apt-getThis is a tricky problem and if the problem still persists, please read this detailed tutorial on fixing the unable to lock the administration directory error in Ubuntu.
Any other update error you encountered?
That compiles the list of frequent Ubuntu update errors you may encounter. I hope this helps you to get rid of these errors.
Have you encountered any other update error in Ubuntu recently that hasn’t been covered here? Do mention it in comments, and I’ll try to do a quick tutorial on it.
If this helped you, consider supporting It's FOSS
It's FOSS has been helping people use Linux for the past 14 years. Help us stay independent from big tech. Become a Plus member, enjoy ad-free reading and get 5 eBooks.
