
Brief: In this tutorial, you’ll learn how to assign static IP address on Ubuntu and other Linux distributions. Both command line and GUI methods have been discussed.
IP addresses on Linux Systems in most cases are assigned by Dynamic Host Configuration Protocol (DHCP) servers. IP addresses assigned this way are dynamic which means that the IP address might change when you restart your Ubuntu system. It’s not necessary but it may happen.
Dynamic IP is not an issue for normal desktop Linux users in most cases. It could become an issue if you have employed some special kind of networking between your computers.
For example, you can share your keyboard and mouse between Ubuntu and Raspberry Pi. The configuration uses IP addresses of both system. If the IP address changes dynamically, then your setup won’t work.
Another use case is with servers or remotely administered desktops. It is easier to set static addresses on those systems for connection stability and consistency between the users and applications.
In this tutorial, I’ll show you how to set up static IP address on Ubuntu based Linux distributions. Let me show you the command line way first and then I’ll show the graphical way of doing it on desktop.
Method 1: Assign static IP in Ubuntu using command line

Note for desktop users: Use static IP only when you need it. Automatic IP saves you a lot of headache in handling network configuration.
Step 1: Get the name of network interface and the default gateway
The first thing you need to know is the name of the network interface for which you have to set up the static IP.
You can either use ip command or the network manager CLI like this:
nmcli dIn my case, it shows my Ethernet (wired) network is called enp0s25:
Ubuntu> nmcli d
DEVICE   TYPE      STATE      CONNECTION
enp0s25  ethernet  unmanaged  --
lo       loopback  unmanaged  --
Next, you should note the default gateway IP using the Linux command ip route:
ip route
default via 192.168.31.1 dev enp0s25 proto dhcp metric 600
169.254.0.0/16 dev enp0s25 scope link metric 1000
192.168.31.0/24 dev enp0s25 proto kernel scope link src 192.168.31.36 metric 600
As you can guess, the default gateway is 192.168.31.1 for me.
Step 2: Locate Netplan configuration
Ubuntu 18.04 LTS and later versions use Netplan for managing the network configuration. Netplan configuration are driven by .yaml files located in /etc/netplan directory.
By default, you should see a .yaml file named something like 01-network-manager-all.yaml, 50-cloud-init.yaml, 01-netcfg.yaml.
Whatever maybe the name, its content should look like this:
# Let NetworkManager manage all devices on this system
network:
  version: 2
  renderer: NetworkManager
You need to edit this file for using static IP.
Step 3: Edit Netplan configuration for assigning static IP
Just for the sake of it, make a backup of your yaml file.
Please make sure to use the correct yaml file name in the commands from here onward.
Use nano editor with sudo to open the yaml file like this:
sudo nano /etc/netplan/01-netcfg.yamlPlease note that yaml files use spaces for indentation. If you use tab or incorrect indention, your changes won’t be saved.
You should edit the file and make it look like this by providing the actual details of your IP address, gateway, interface name etc.
network:
  version: 2
  renderer: networkd
  ethernets:
    enp0s25:
      dhcp4: no
      addresses:
        - 192.168.31.16/24
      gateway4: 192.168.31.1
      nameservers:
          addresses: [8.8.8.8, 1.1.1.1]
In the above file, I have set the static IP to 192.168.31.16.
Save the file and apply the changes with this command:
sudo netplan applyYou can verify it by displaying your ip address in the terminal with ‘ip a’ command.
Revert the changes and go back to dynamic IP
If you don’t want to use the static IP address anymore, you can revert easily.
If you have backed up the original yaml file, you can delete the new one and use the backup one.
Otherwise, you can change the yaml file again and make it look like this:
network:
  version: 2
  renderer: networkd
  ethernets:
    enp0s25:
      dhcp4: yes
Method 2: Switch to static IP address in Ubuntu graphically
If you are on desktop, using the graphical method is easier and faster.
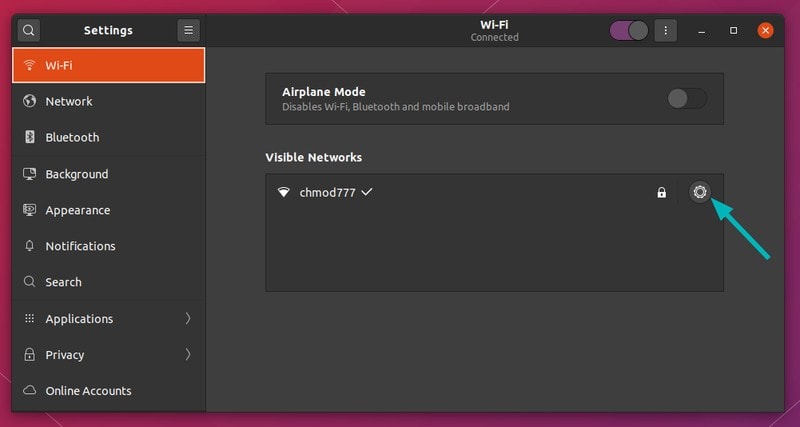
Go to the settings and look for network settings. Click the gear symbol adjacent to your network connection.
Next, you should go to the IPv4 tab. Under the IPv4 Method section, click on Manual.
In the Addresses section, enter the IP static IP address you want, netmask is usually 24 and you already know your gateway IP with the ip route command.
You may also change the DNS server if you want. You can keep Routes section to Automatic.
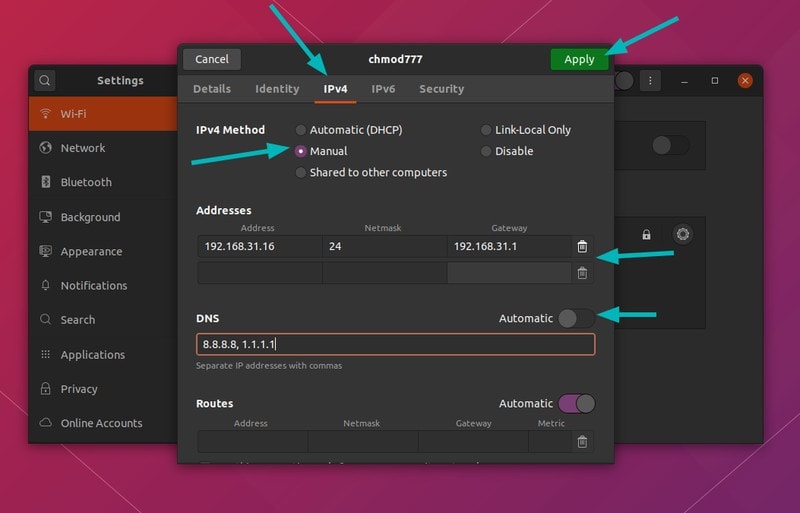
Once everything is done, click on Apply button. See, how easy it is to set a static IP address graphically.
If you haven’t read my previous article on how to change MAC Address, you may want to read in conjunction with this one.
More networking related articles will be rolling out, let me know your thoughts at the comments below and stay connected to our social media.
