

Pi-hole is a DNS-based advertisement blocker. Unlike a Chrome or Firefox extension, a Pi-hole can block ads even on your TV! So let’s see how to install and take advantage of this amazing tool!
What is Pi-hole?
Pi-hole is a DNS Server. It blocks advertisement serving domains. Set it up on a dedicated Raspberry Pi or some other computer and then use its IP address as the DNS of your device. If you use it as DNS of your router, you’ll get an ad-free experience on all connected devices, even your smart TVs and smartphones.
Want more details? Let me explain.
A DNS Server tells your computer what the IP address for google.com is. Without a valid IP address, your computer can not communicate over the Internet to another computer.
Pi-hole has a list of domains that must be blocked. Once a computer queries Pi-hole’s DNS Server for the IP address for a website like adservice.google.com, if it is a domain that must be blocked, then, Pi-hole will respond back with an invalid IP address (which is usually 0.0.0.0).
Since “0.0.0.0” is not a valid IP address, your computer can never talk to the adservice.google.com website. This results in the blocking of advertisements.
Set it at the router level and you go ad-free for your entire home network–yes, even for your “smart” devices like TV, toaster and washing machine–instead of being limited to your browser.
Notice: This is not a foolproof solution. Many advertisers know about DNS-level ad blocking and they have taken preventive measures against this. Most notably, Youtube. While this will not block all ads (nothing can), this will vastly improve ad blocking on your entire network.
Setting up Pi-hole
Using something like this requires some level of experience with the Linux command line, time and patience. It’s more of a DIY Raspberry Pi project but you can also use it with a normal computer running Pi-hole in a container.
So, I’ll be discussing two methods of installing Pi-hole:
- Automated install on a Raspberry Pi device
- Using Docker or Podman to run Pi-hole in a container
Let us cover the easier method first method.
Method 1: Automated installation of Pi-hole (requires Raspberry Pi)
The automated installation is the simplest installation method for installing Pi-hole. It has a few requirements. The picture below mentions OS and hardware support.
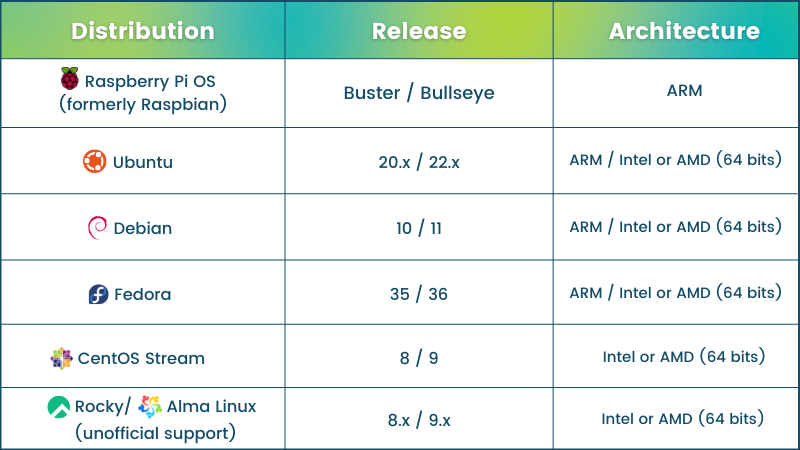
As you can see above, Pi-hole supports most of the popular Linux distributions. From my personal experience, Pi-hole does not consume more than ~100 MB of RAM and only uses less than 1% of CPU. Meaning it can even run on a Raspberry Pi Zero W!
Now that you know which hardware is supported, let us start with the installation steps!
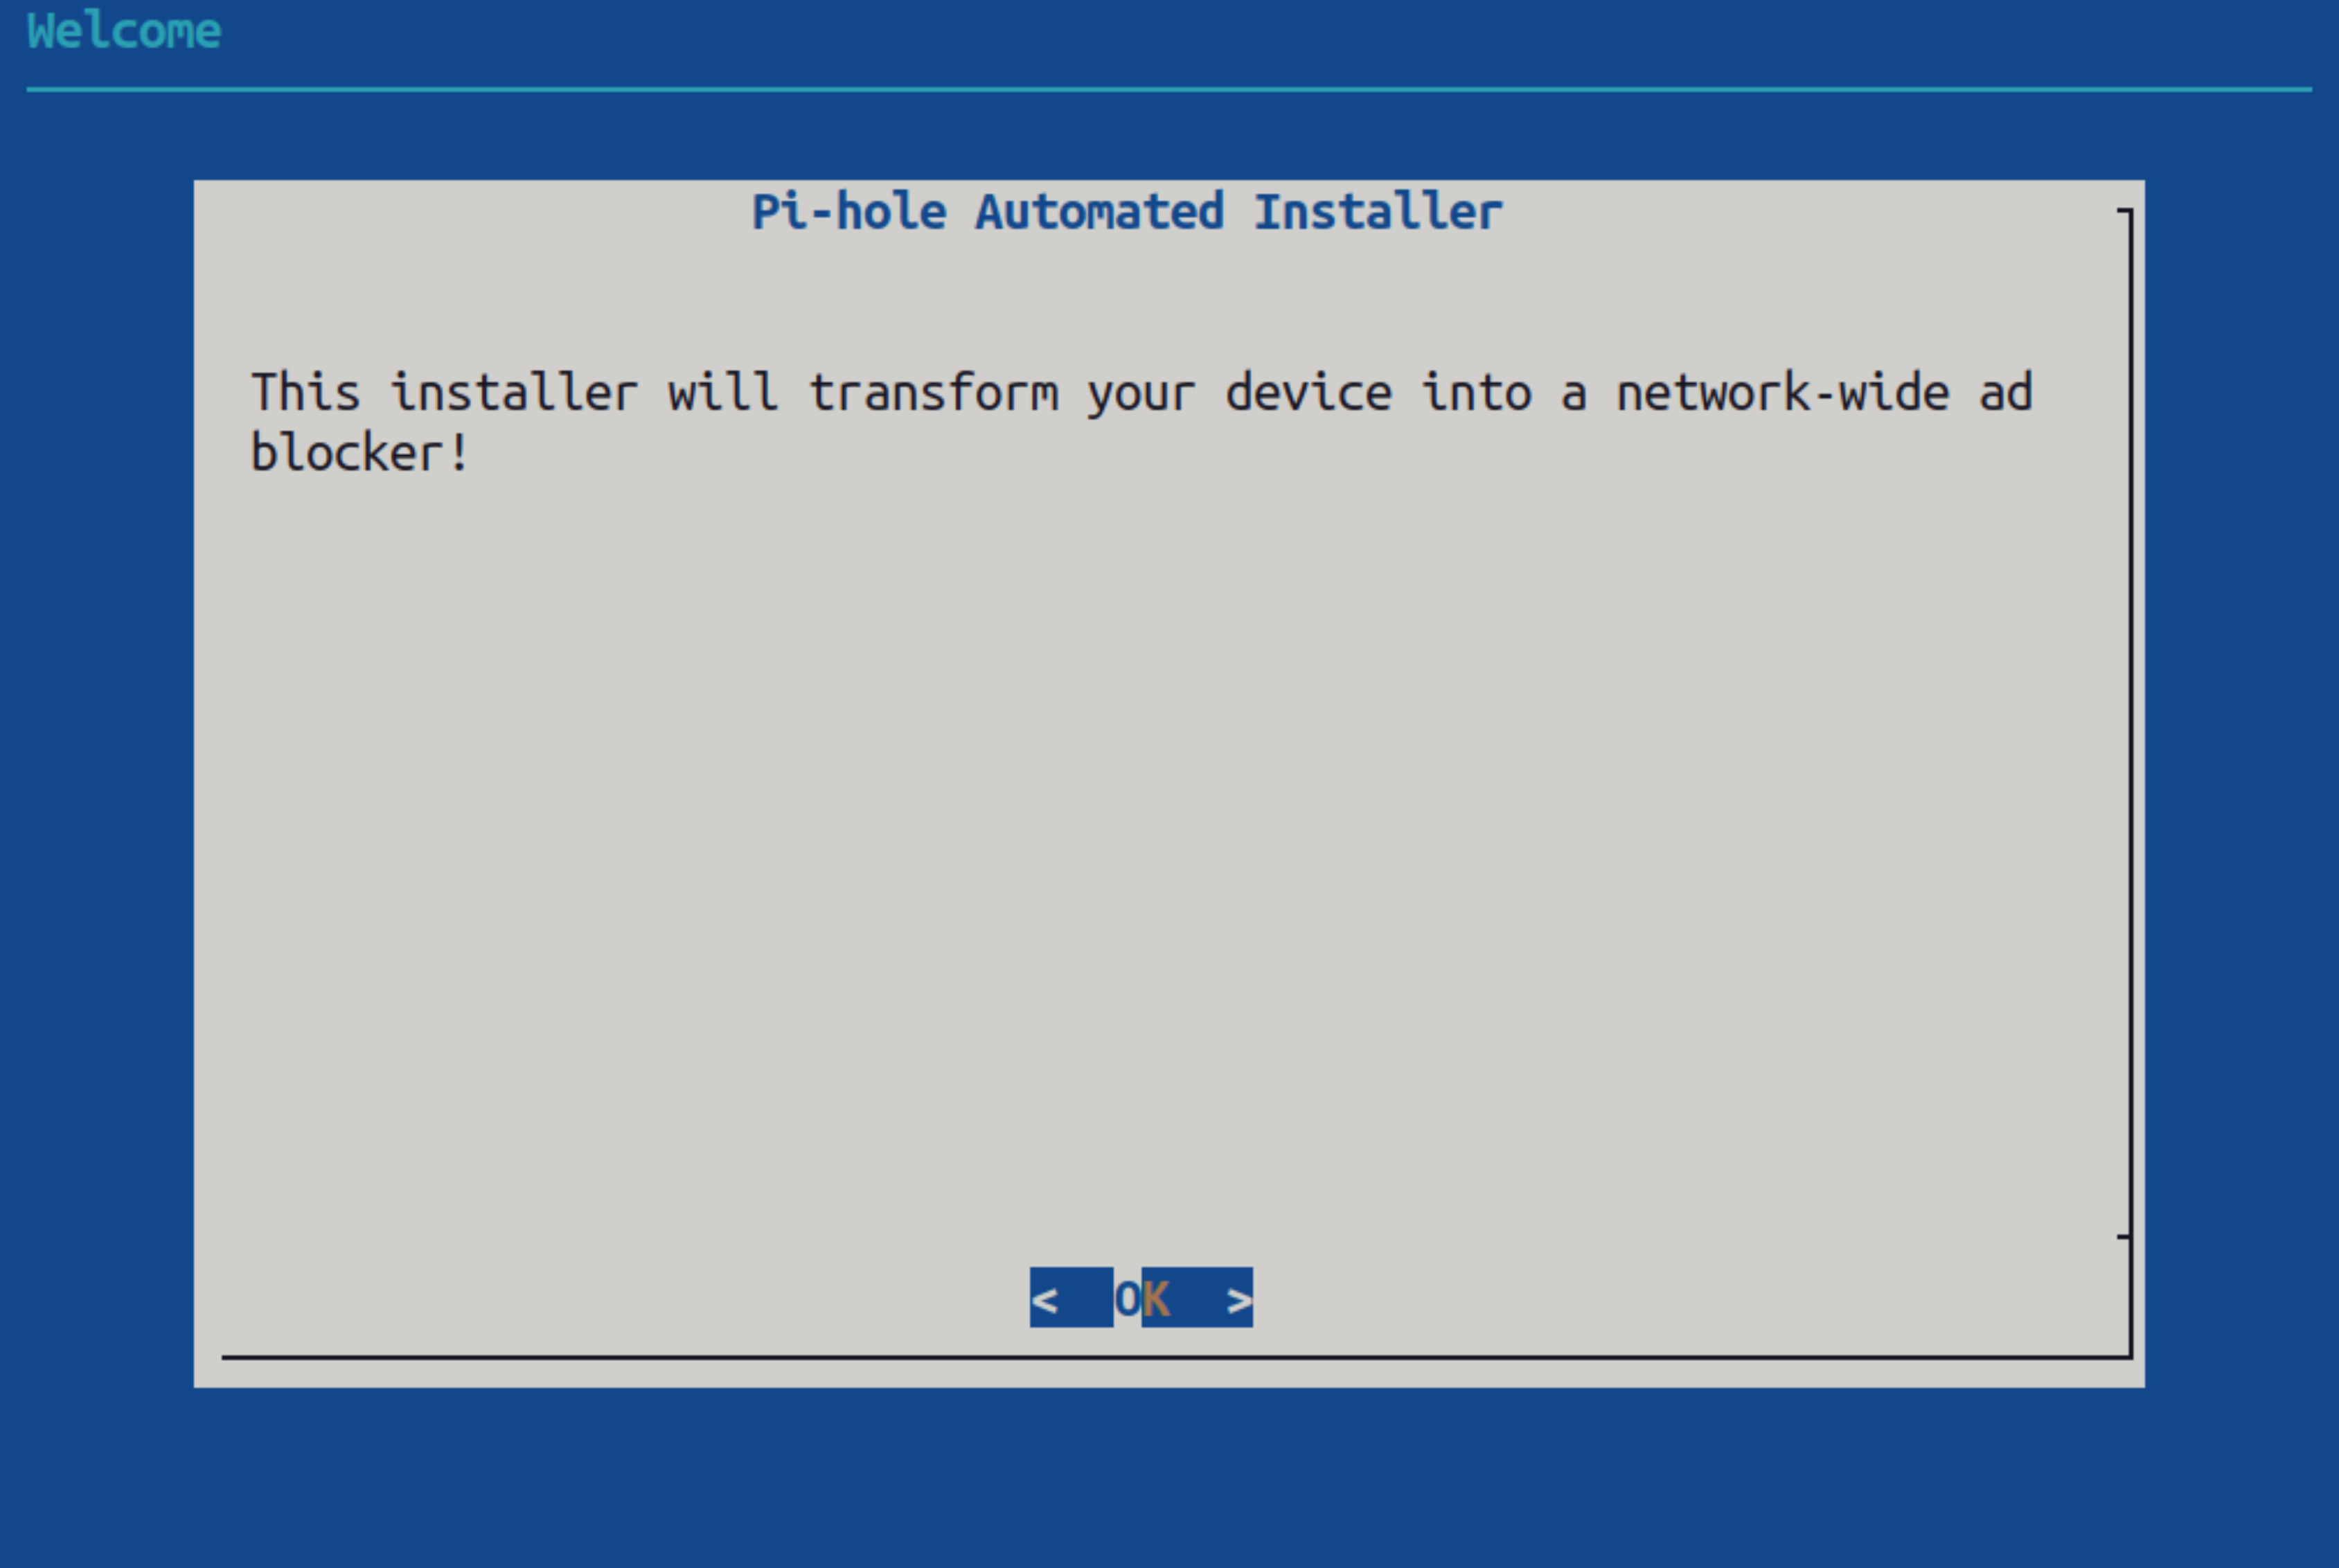
To install Pi-hole using the automated installation method, all you need to do is run the following command. I understand that running a bash script downloaded from the internet is not usual but this is the official installation method.
curl -sSL https://install.pi-hole.net | bashOnce you run the above command, the Pi-hole installer will start and begin to install necessary dependencies and then prompt you with the following screen, indicating that the installer has begun.
PS: You can use your mouse to interact with this command line installer ;)
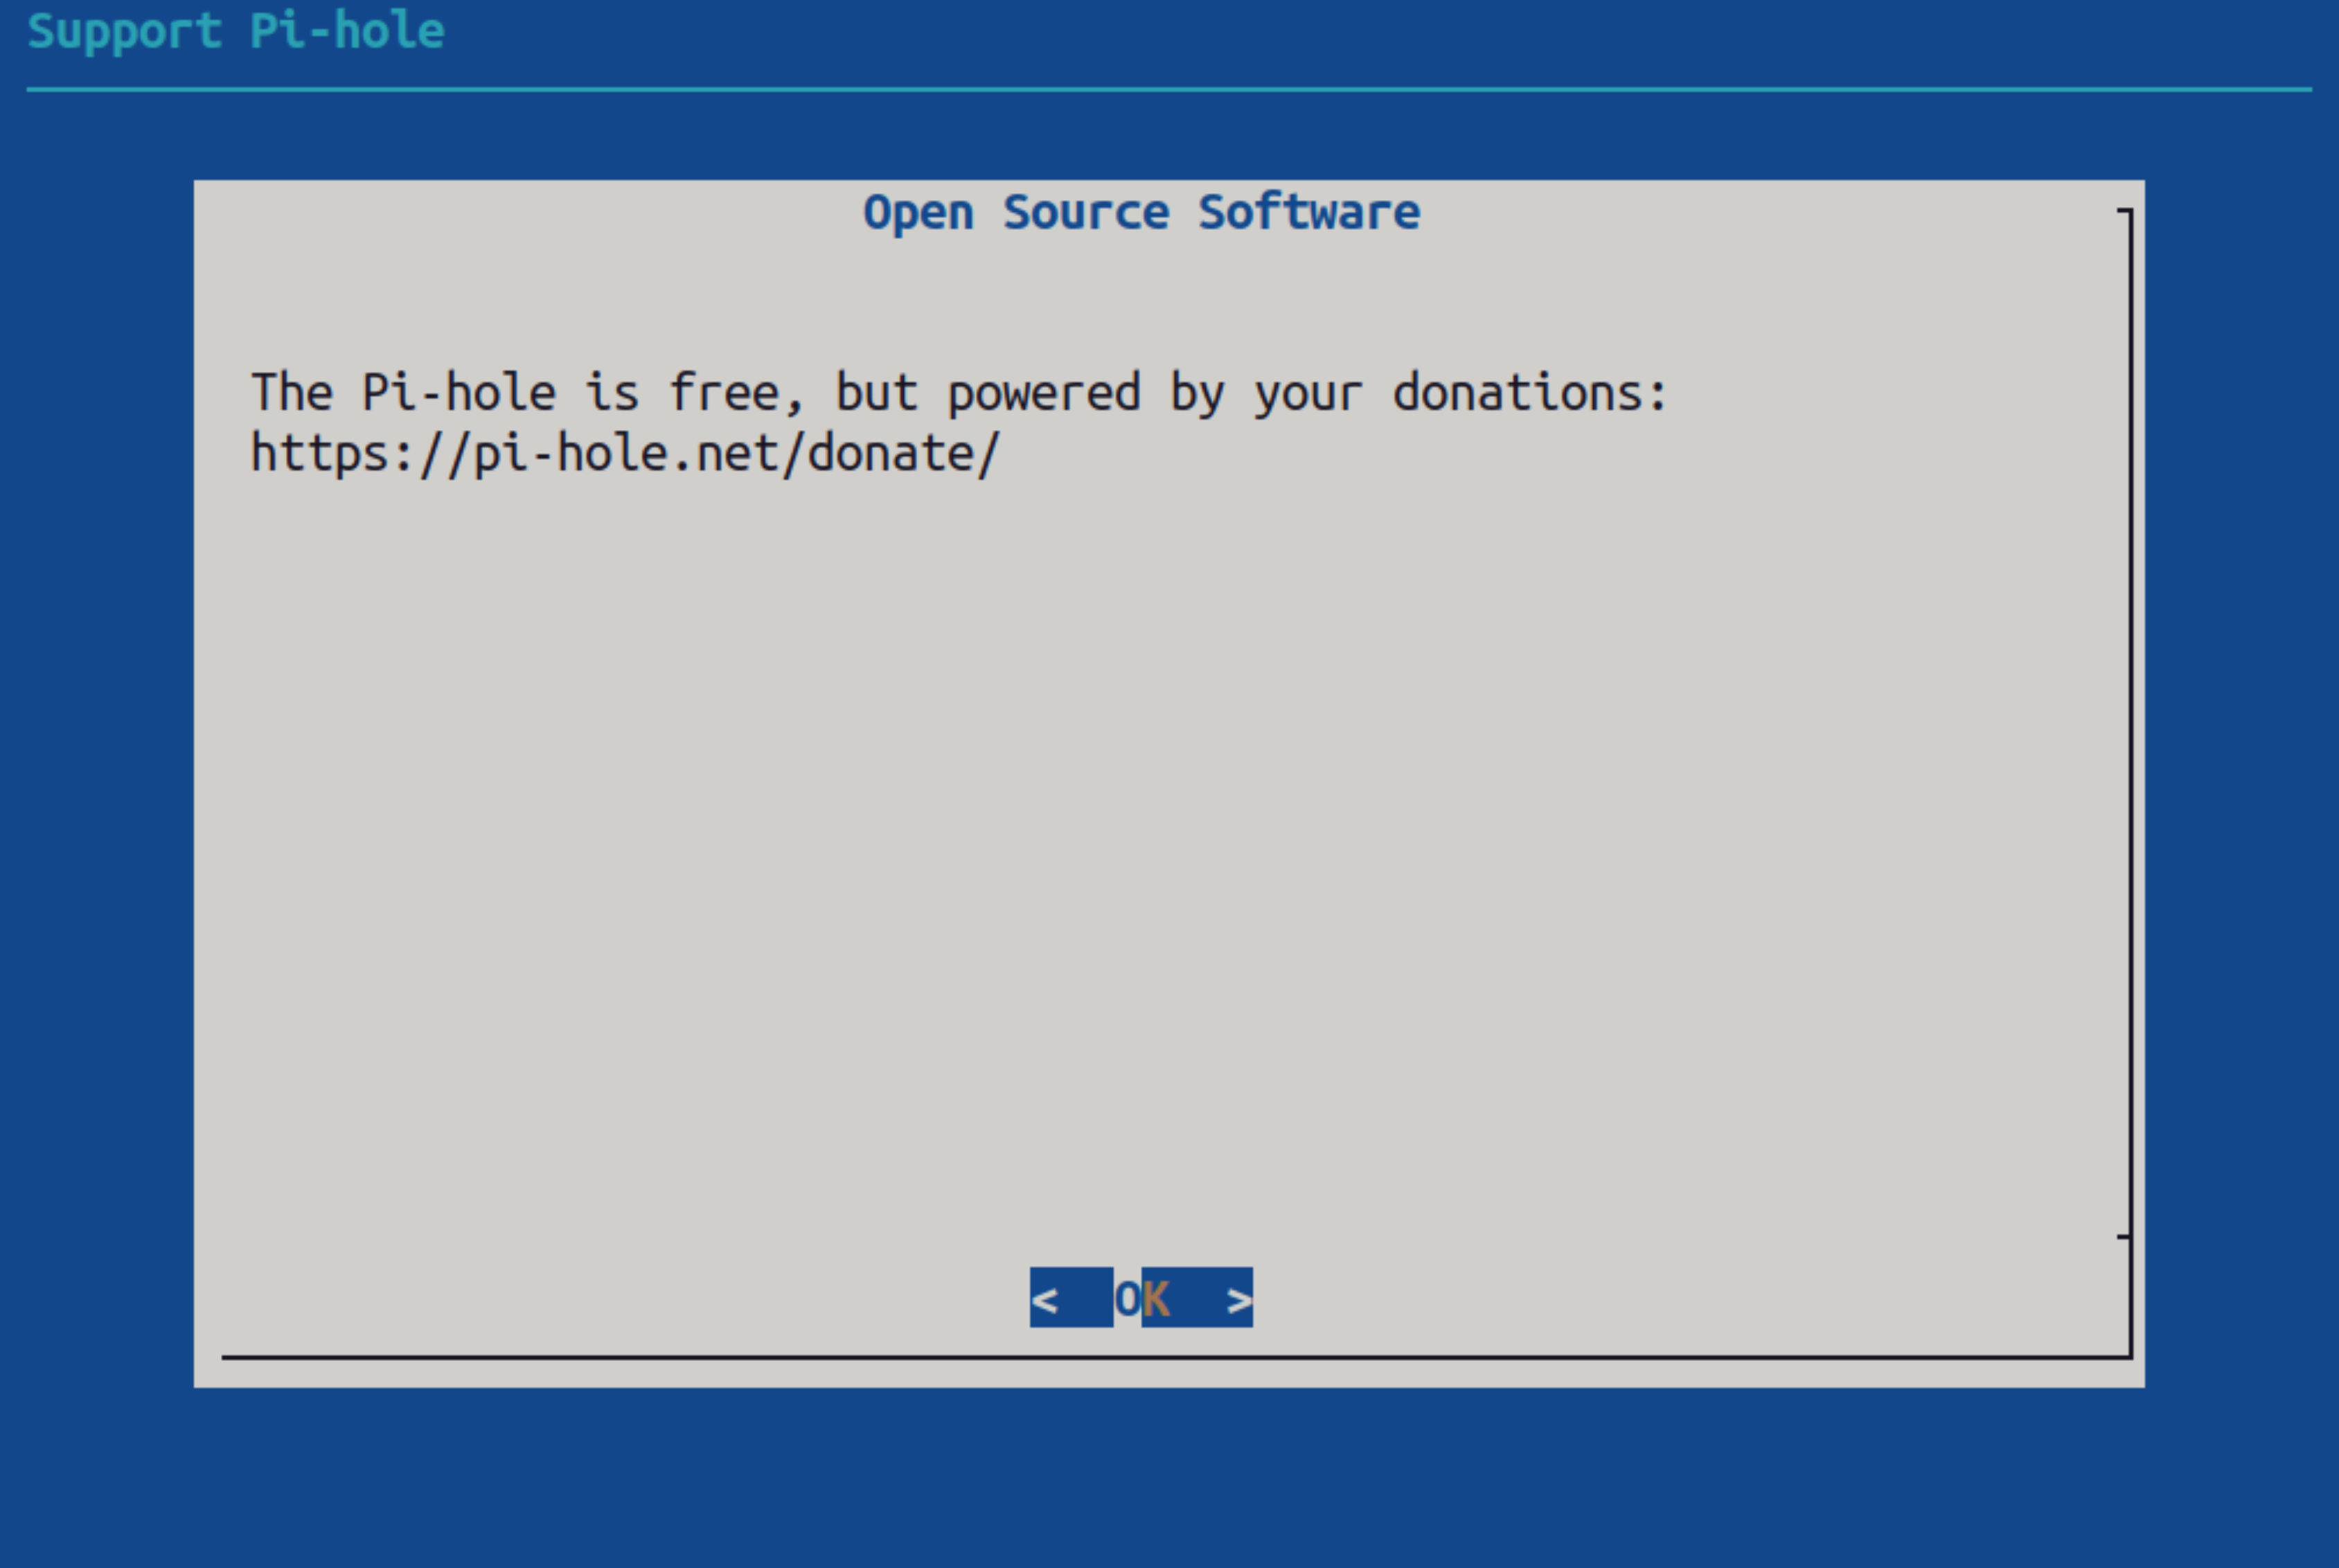
As depicted from the message shown below, Pi-hole is a free and open source software that mainly relies on donations made by normal folks like you and me. If you find Pi-hole to be useful, please consider donating. Here is the hyperlink to Pi-hole’s donations so you don’t have to type the URL yourself ;)
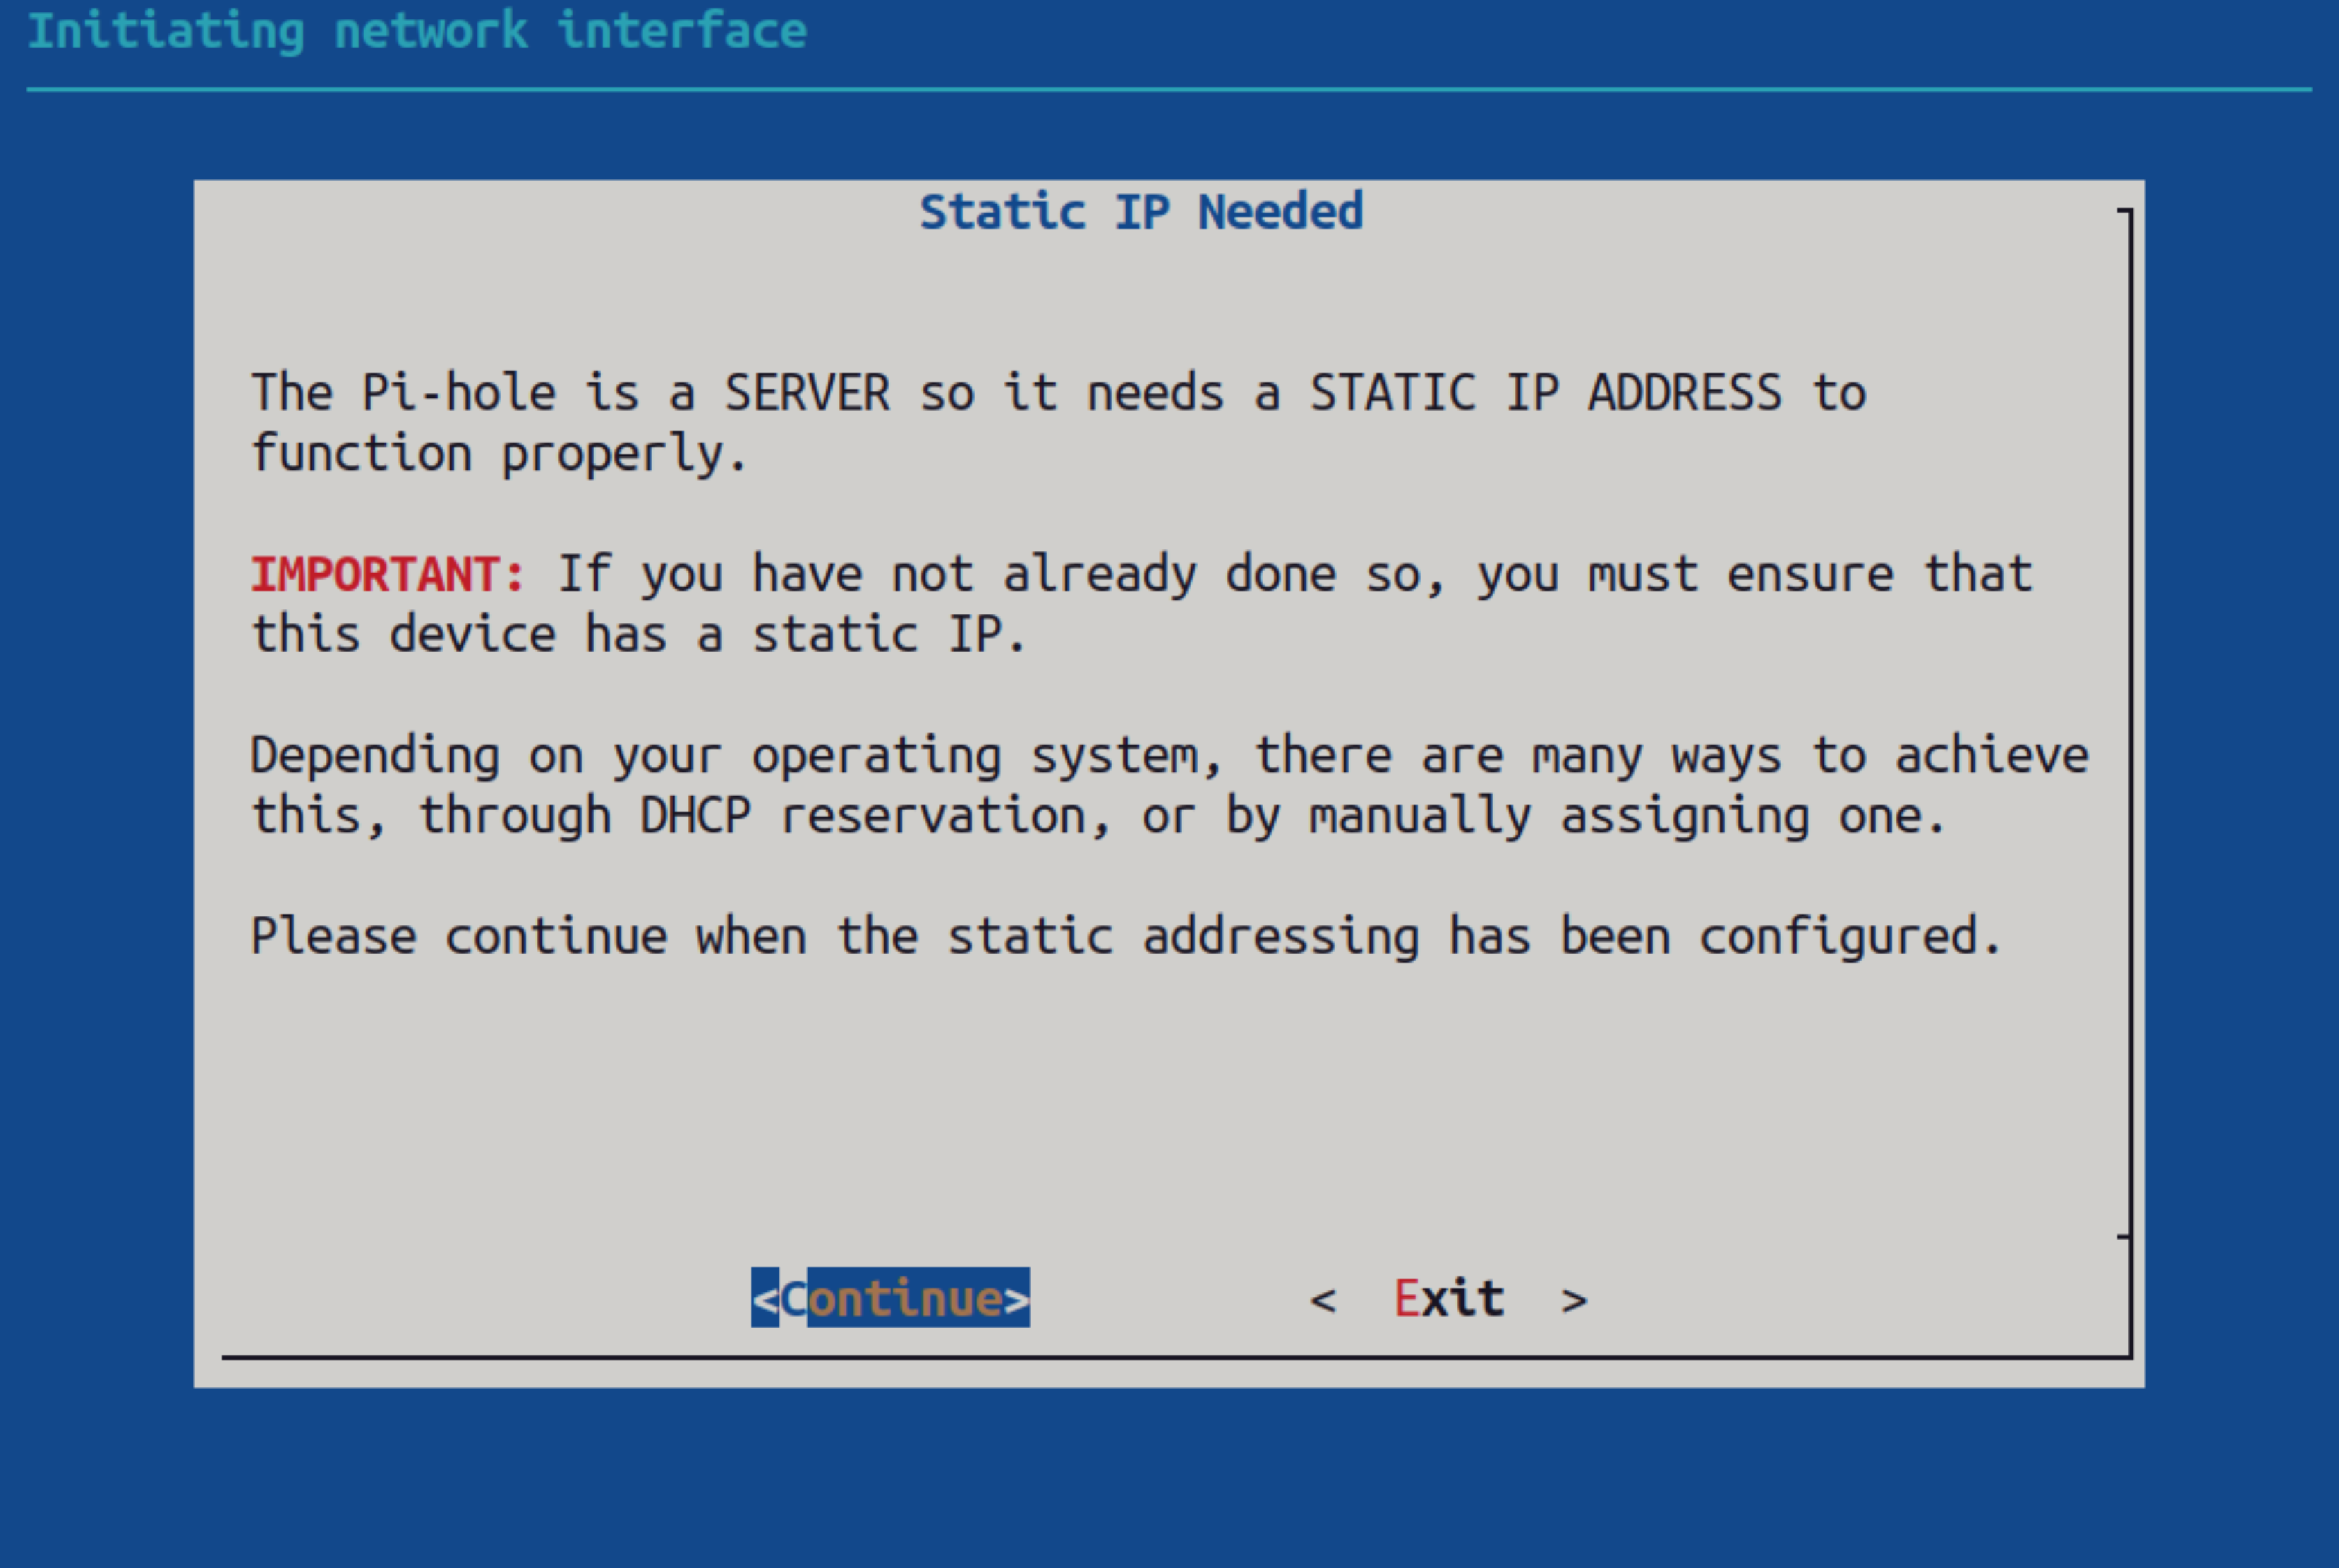
Next up, you will be asked if the computer on which Pi-hole is being installed has a static IP address for your Local Area Network or not. Since your computers need to know about Pi-hole’s IP address beforehand, it is best that the assigned IP address does not change. For more information on how to achieve this, please consult your router’s manual; look for the part with “static/reserved IP address”.
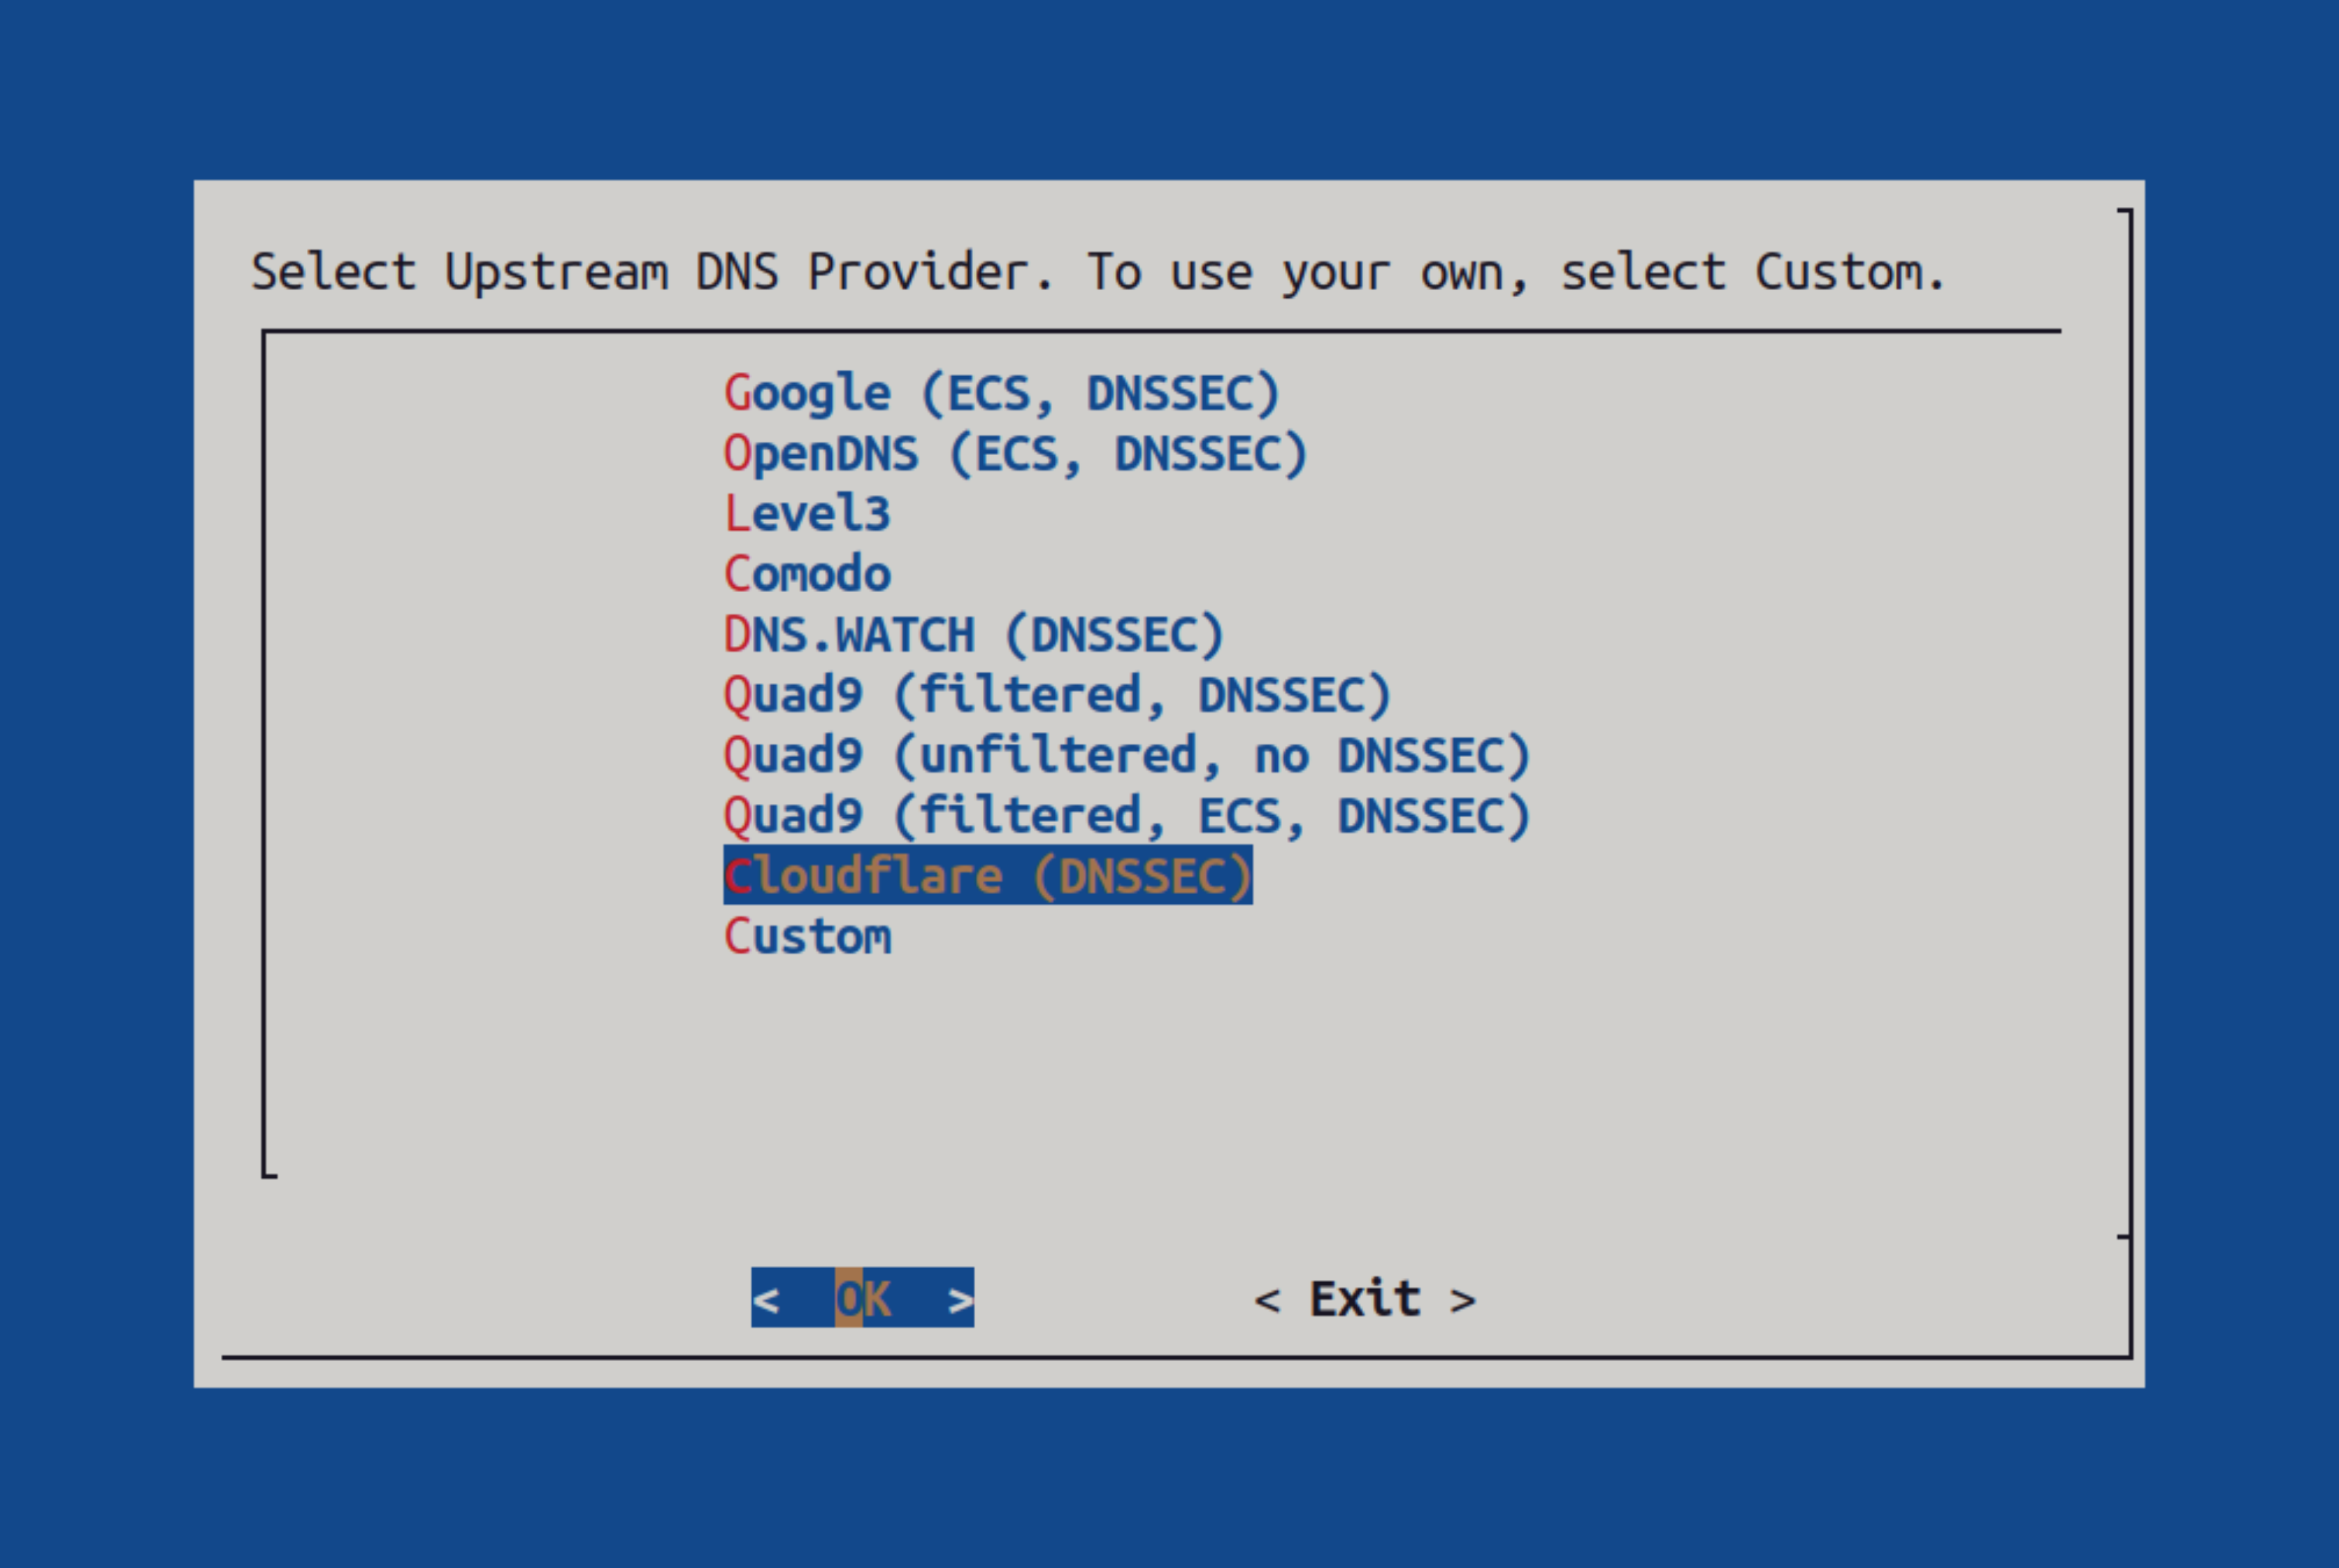
Once you have a static IP assigned to the computer running the Pi-hole, press continue. In the next step you will be asked to choose a DNS provider. This is the server that is asked for DNS Resolution. Some of the most popular DNS providers are listed for you to choose from.
Generally, I would recommend that you use either the “Quad9 (filtered, ECS, DNSSEC)” option or the “OpenDNS (ECS, DNSSEC)” option or “Cloudflare (DNSSEC)” option. They are quite trusted and have good privacy policy (as opposed to Google’s DNS service).
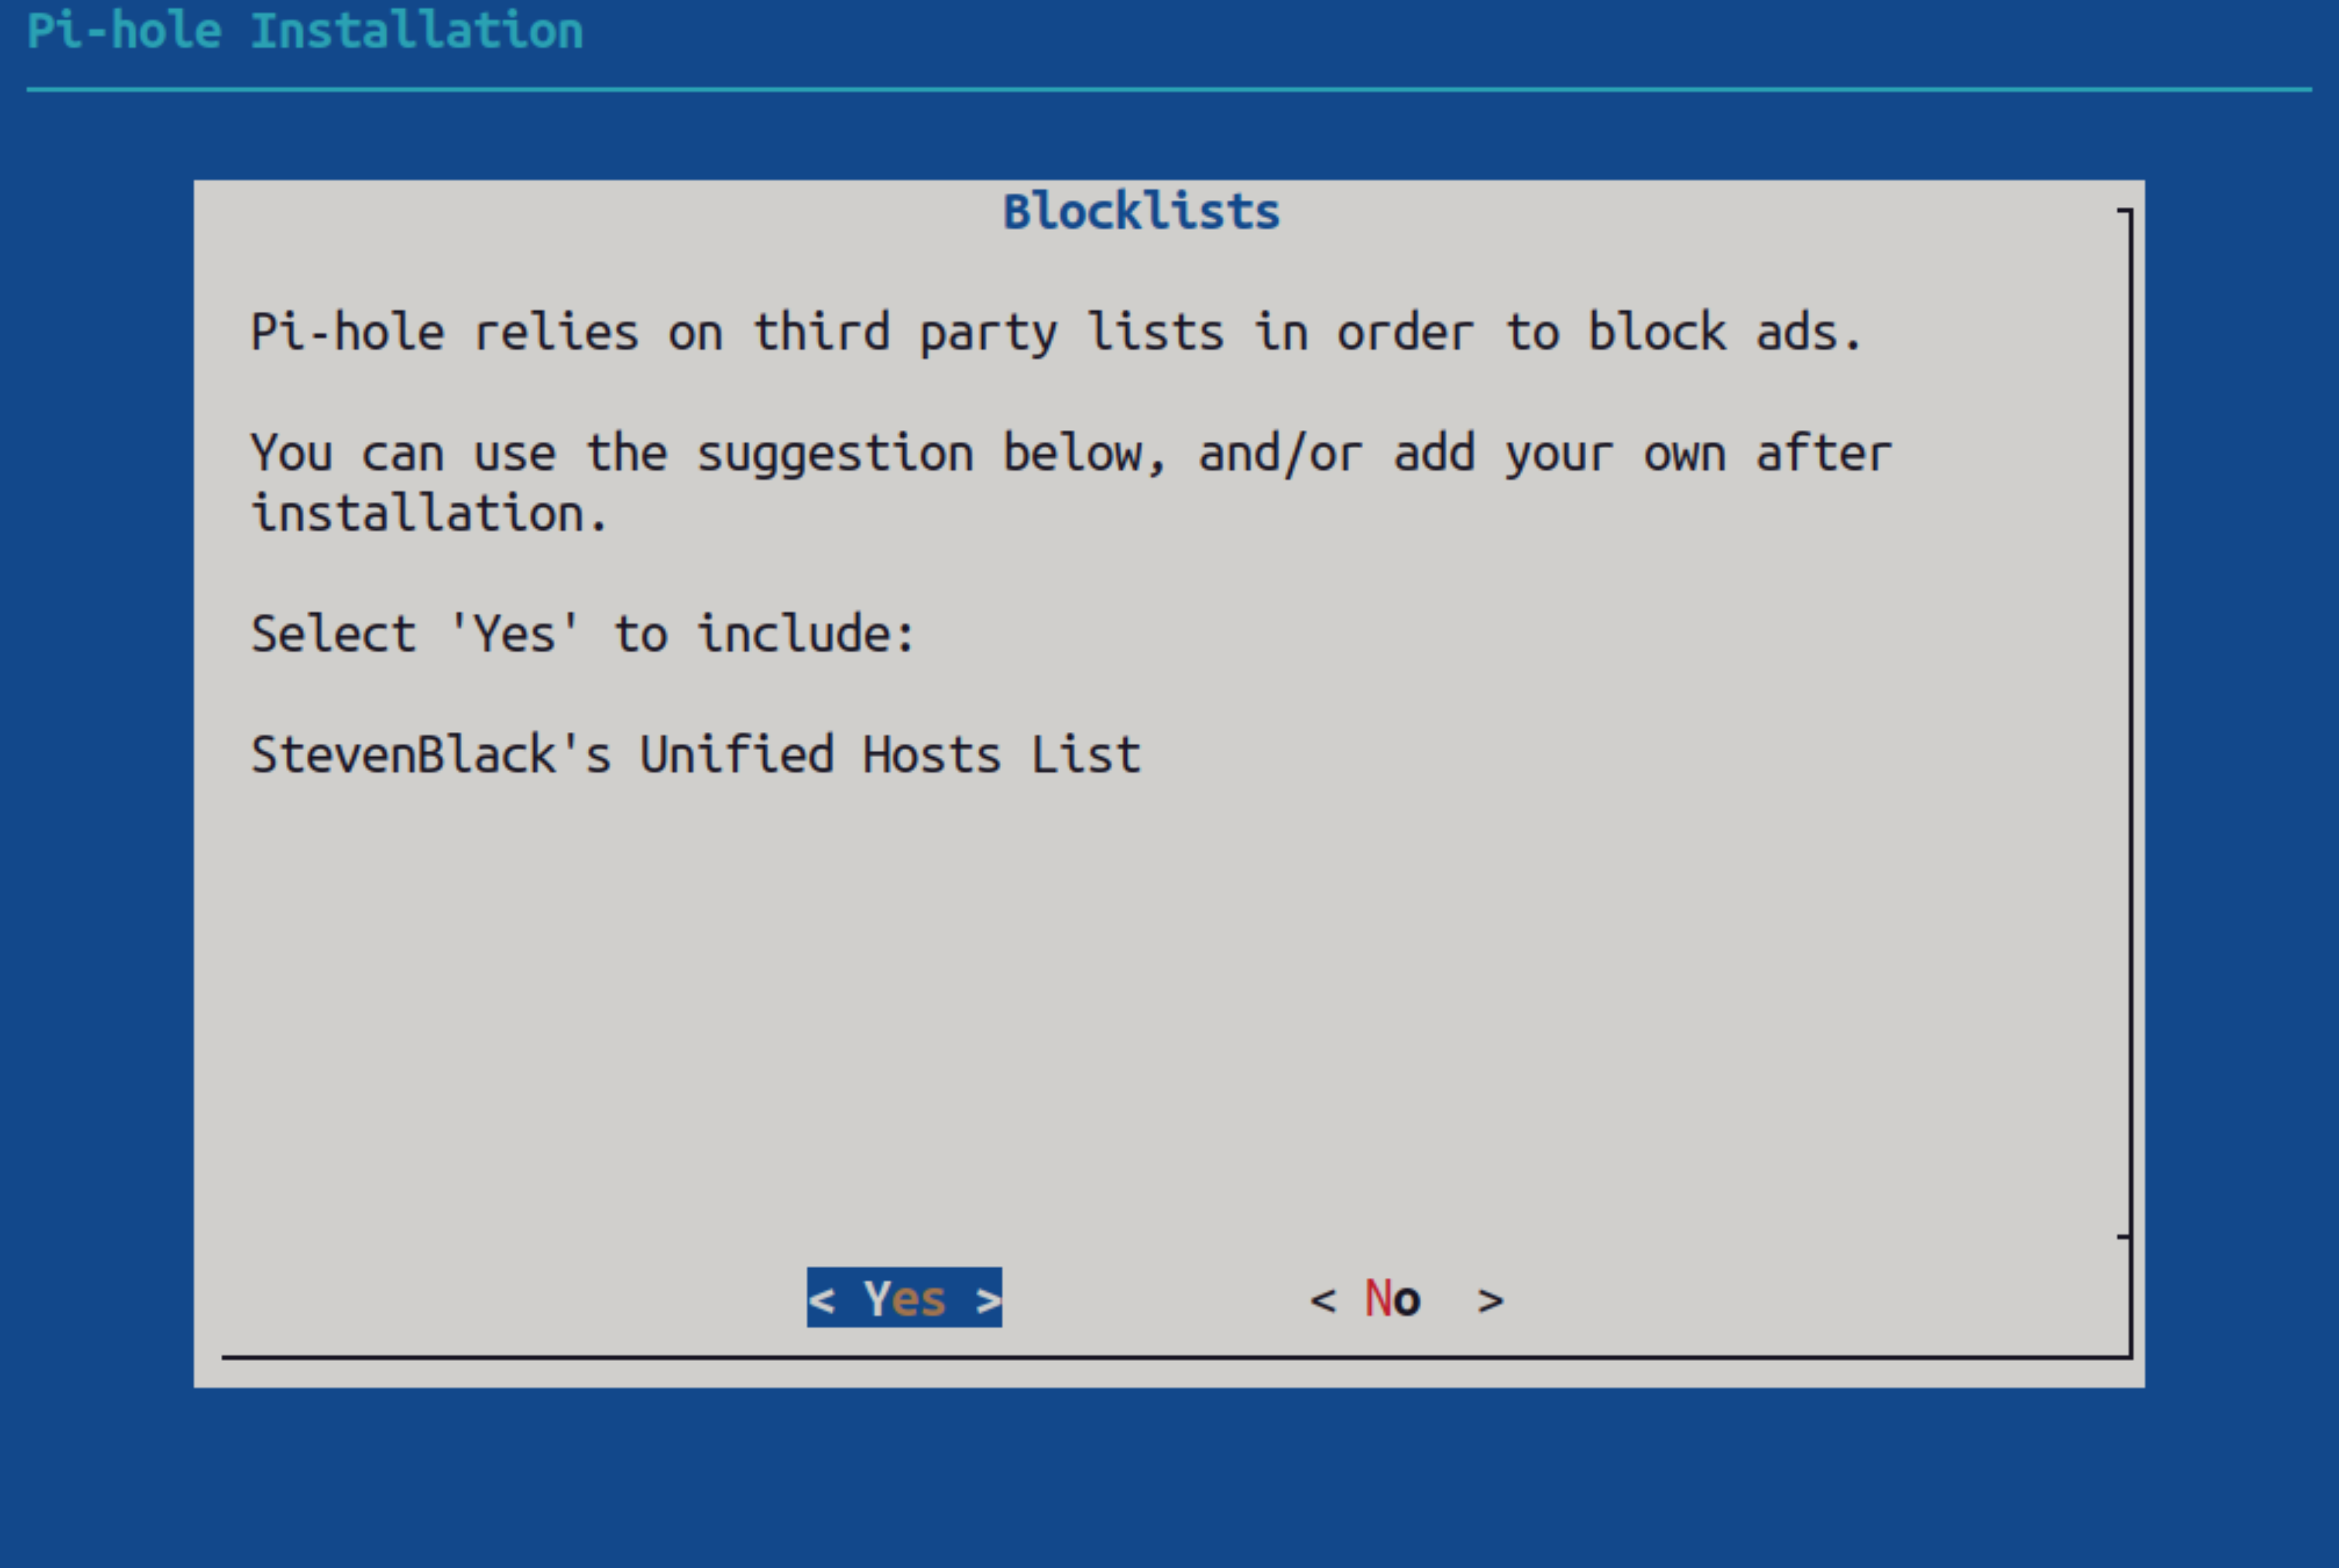
Once you have selected a DNS provider, you will be asked for another choice. Here, you are asked to choose a “blocklist” that contains a list of websites to block. Pi-hole has a recommended blocklist and is asking if you want to use said blocklist.
I have used this blocklist and it does a good job of blocking a majority of advertisements so I highly recommend you say “Yes” to this prompt.
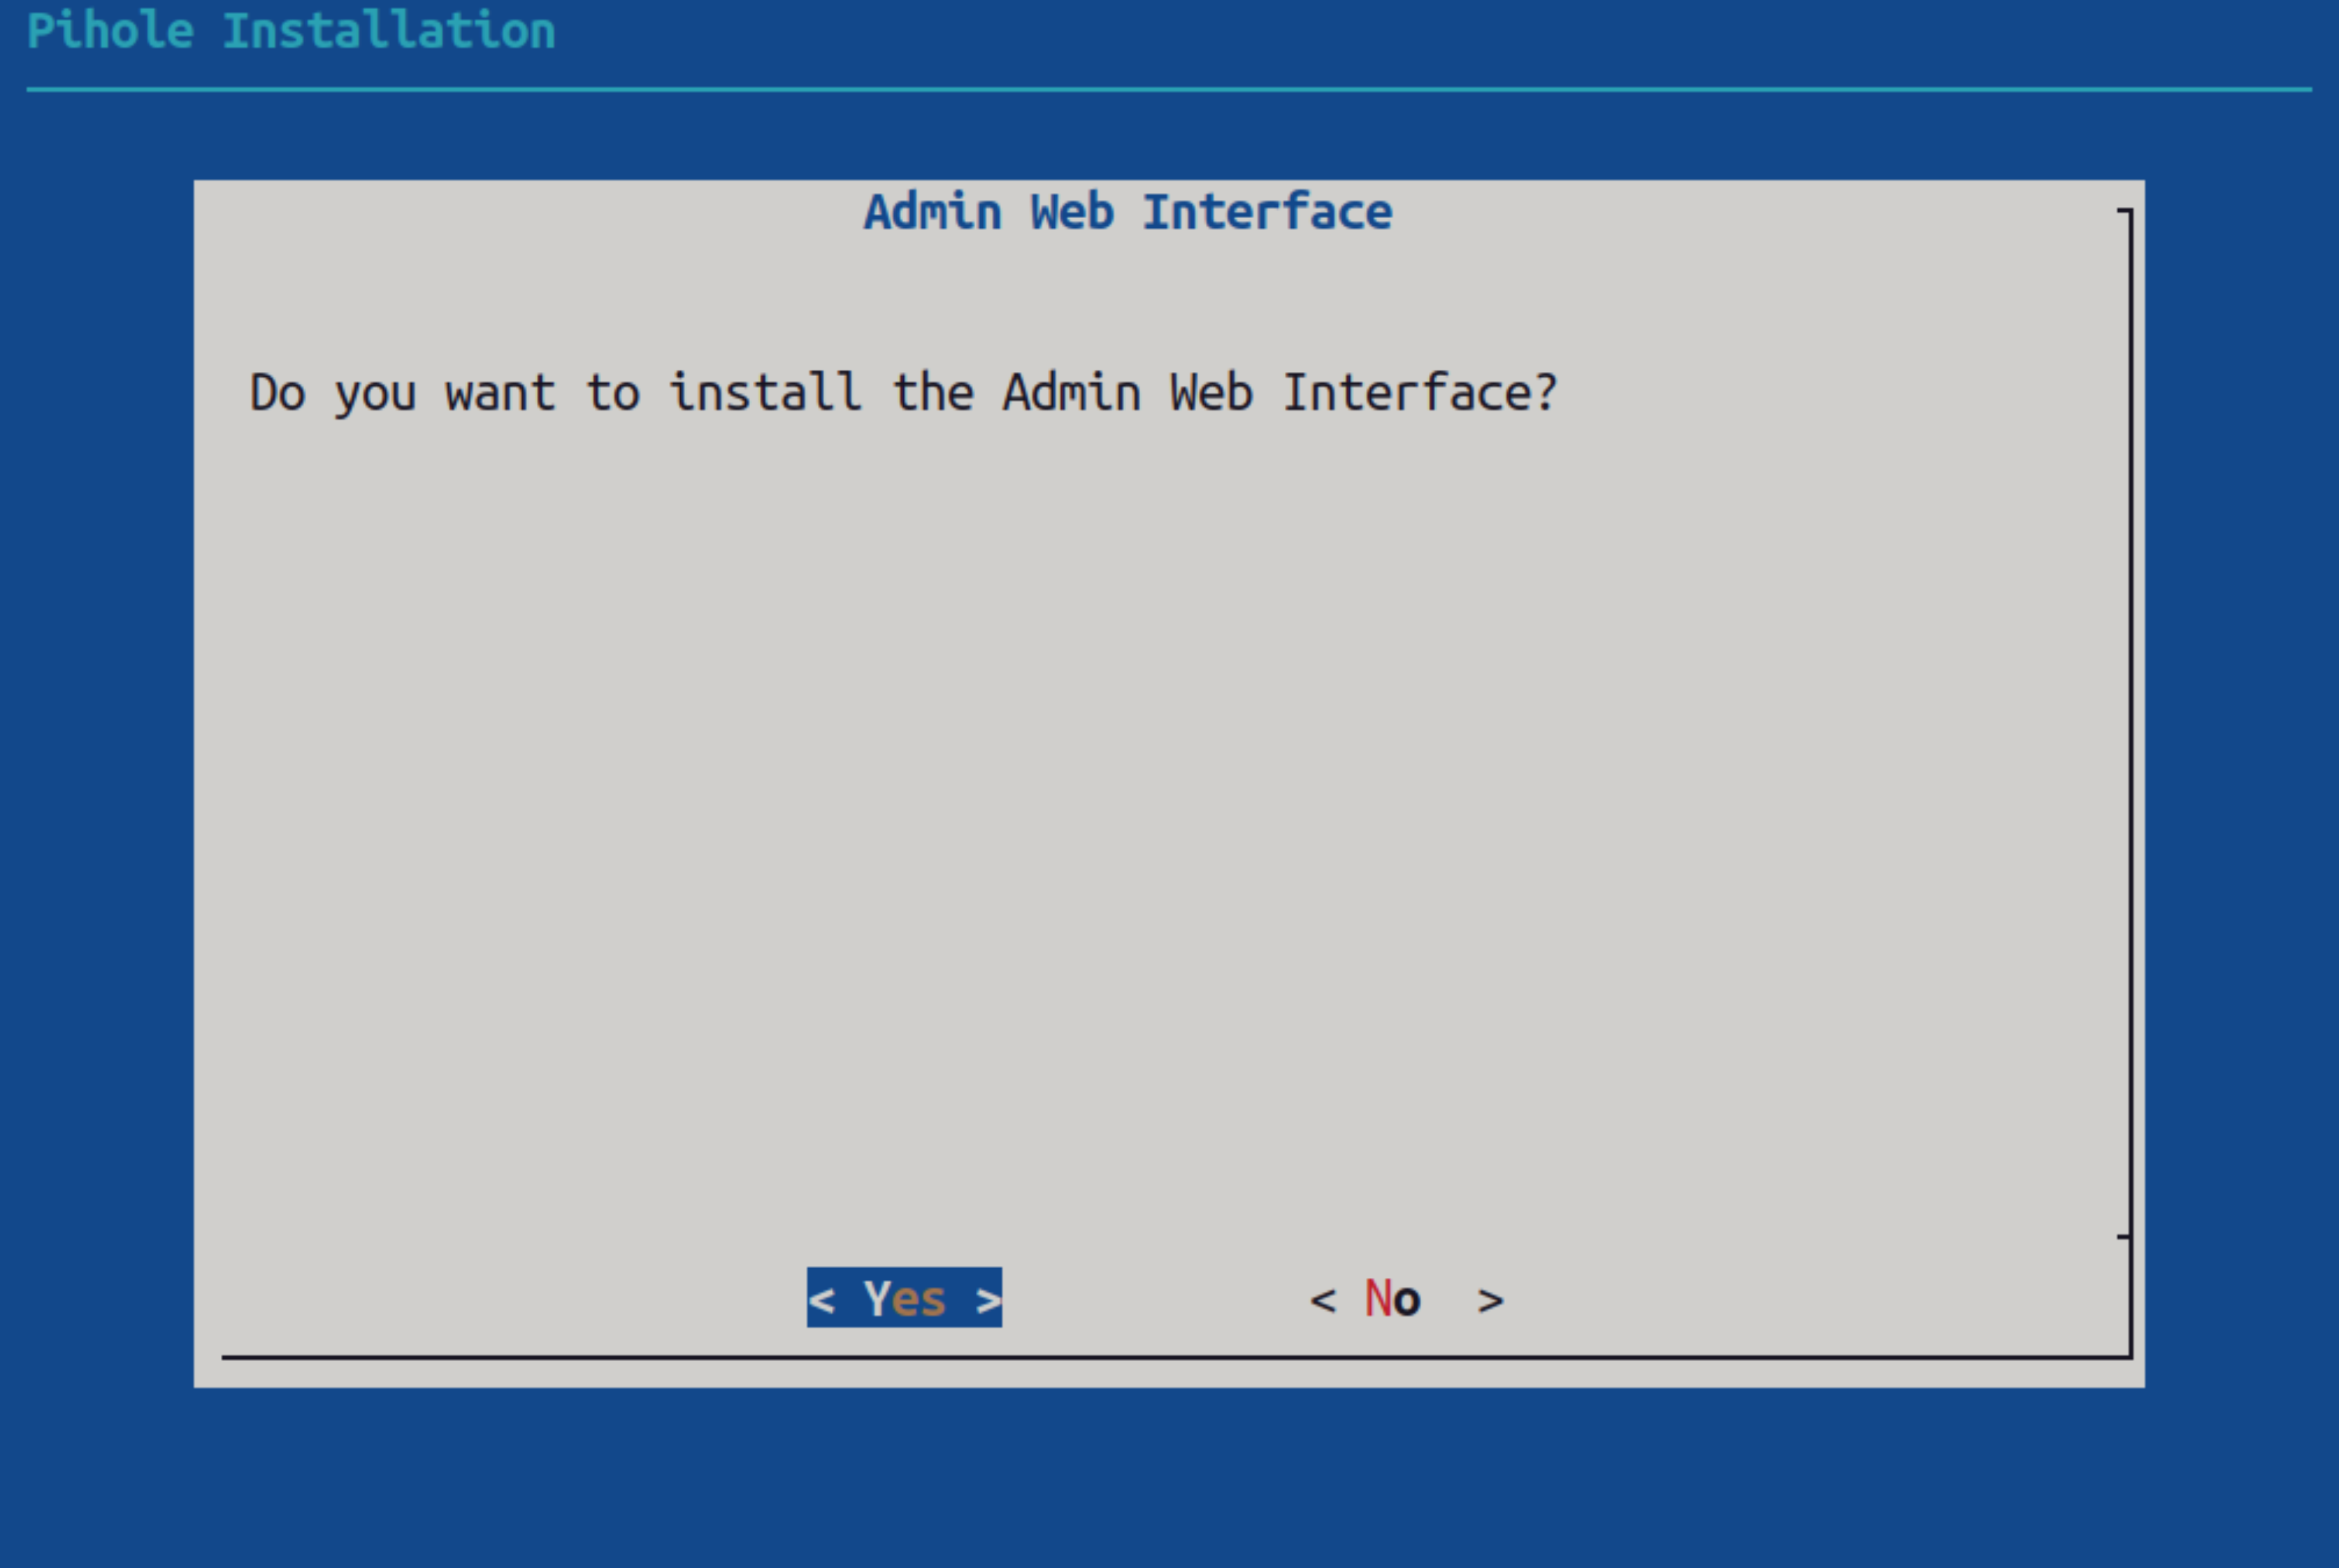
If you want to monitor items like “Number of total DNS queries”, “Number of DNS queries blocked/passed”, etc, you can enable the Web UI to view this data. This is what the Pi-hole Web UI looks like (this is an older announcement and the Web UI may have changed by the time you read this article).
Disabling or enabling the Pi-hole Web UI will not affect the functionality of Pi-hole itself. It is just another way to manage Pi-hole.
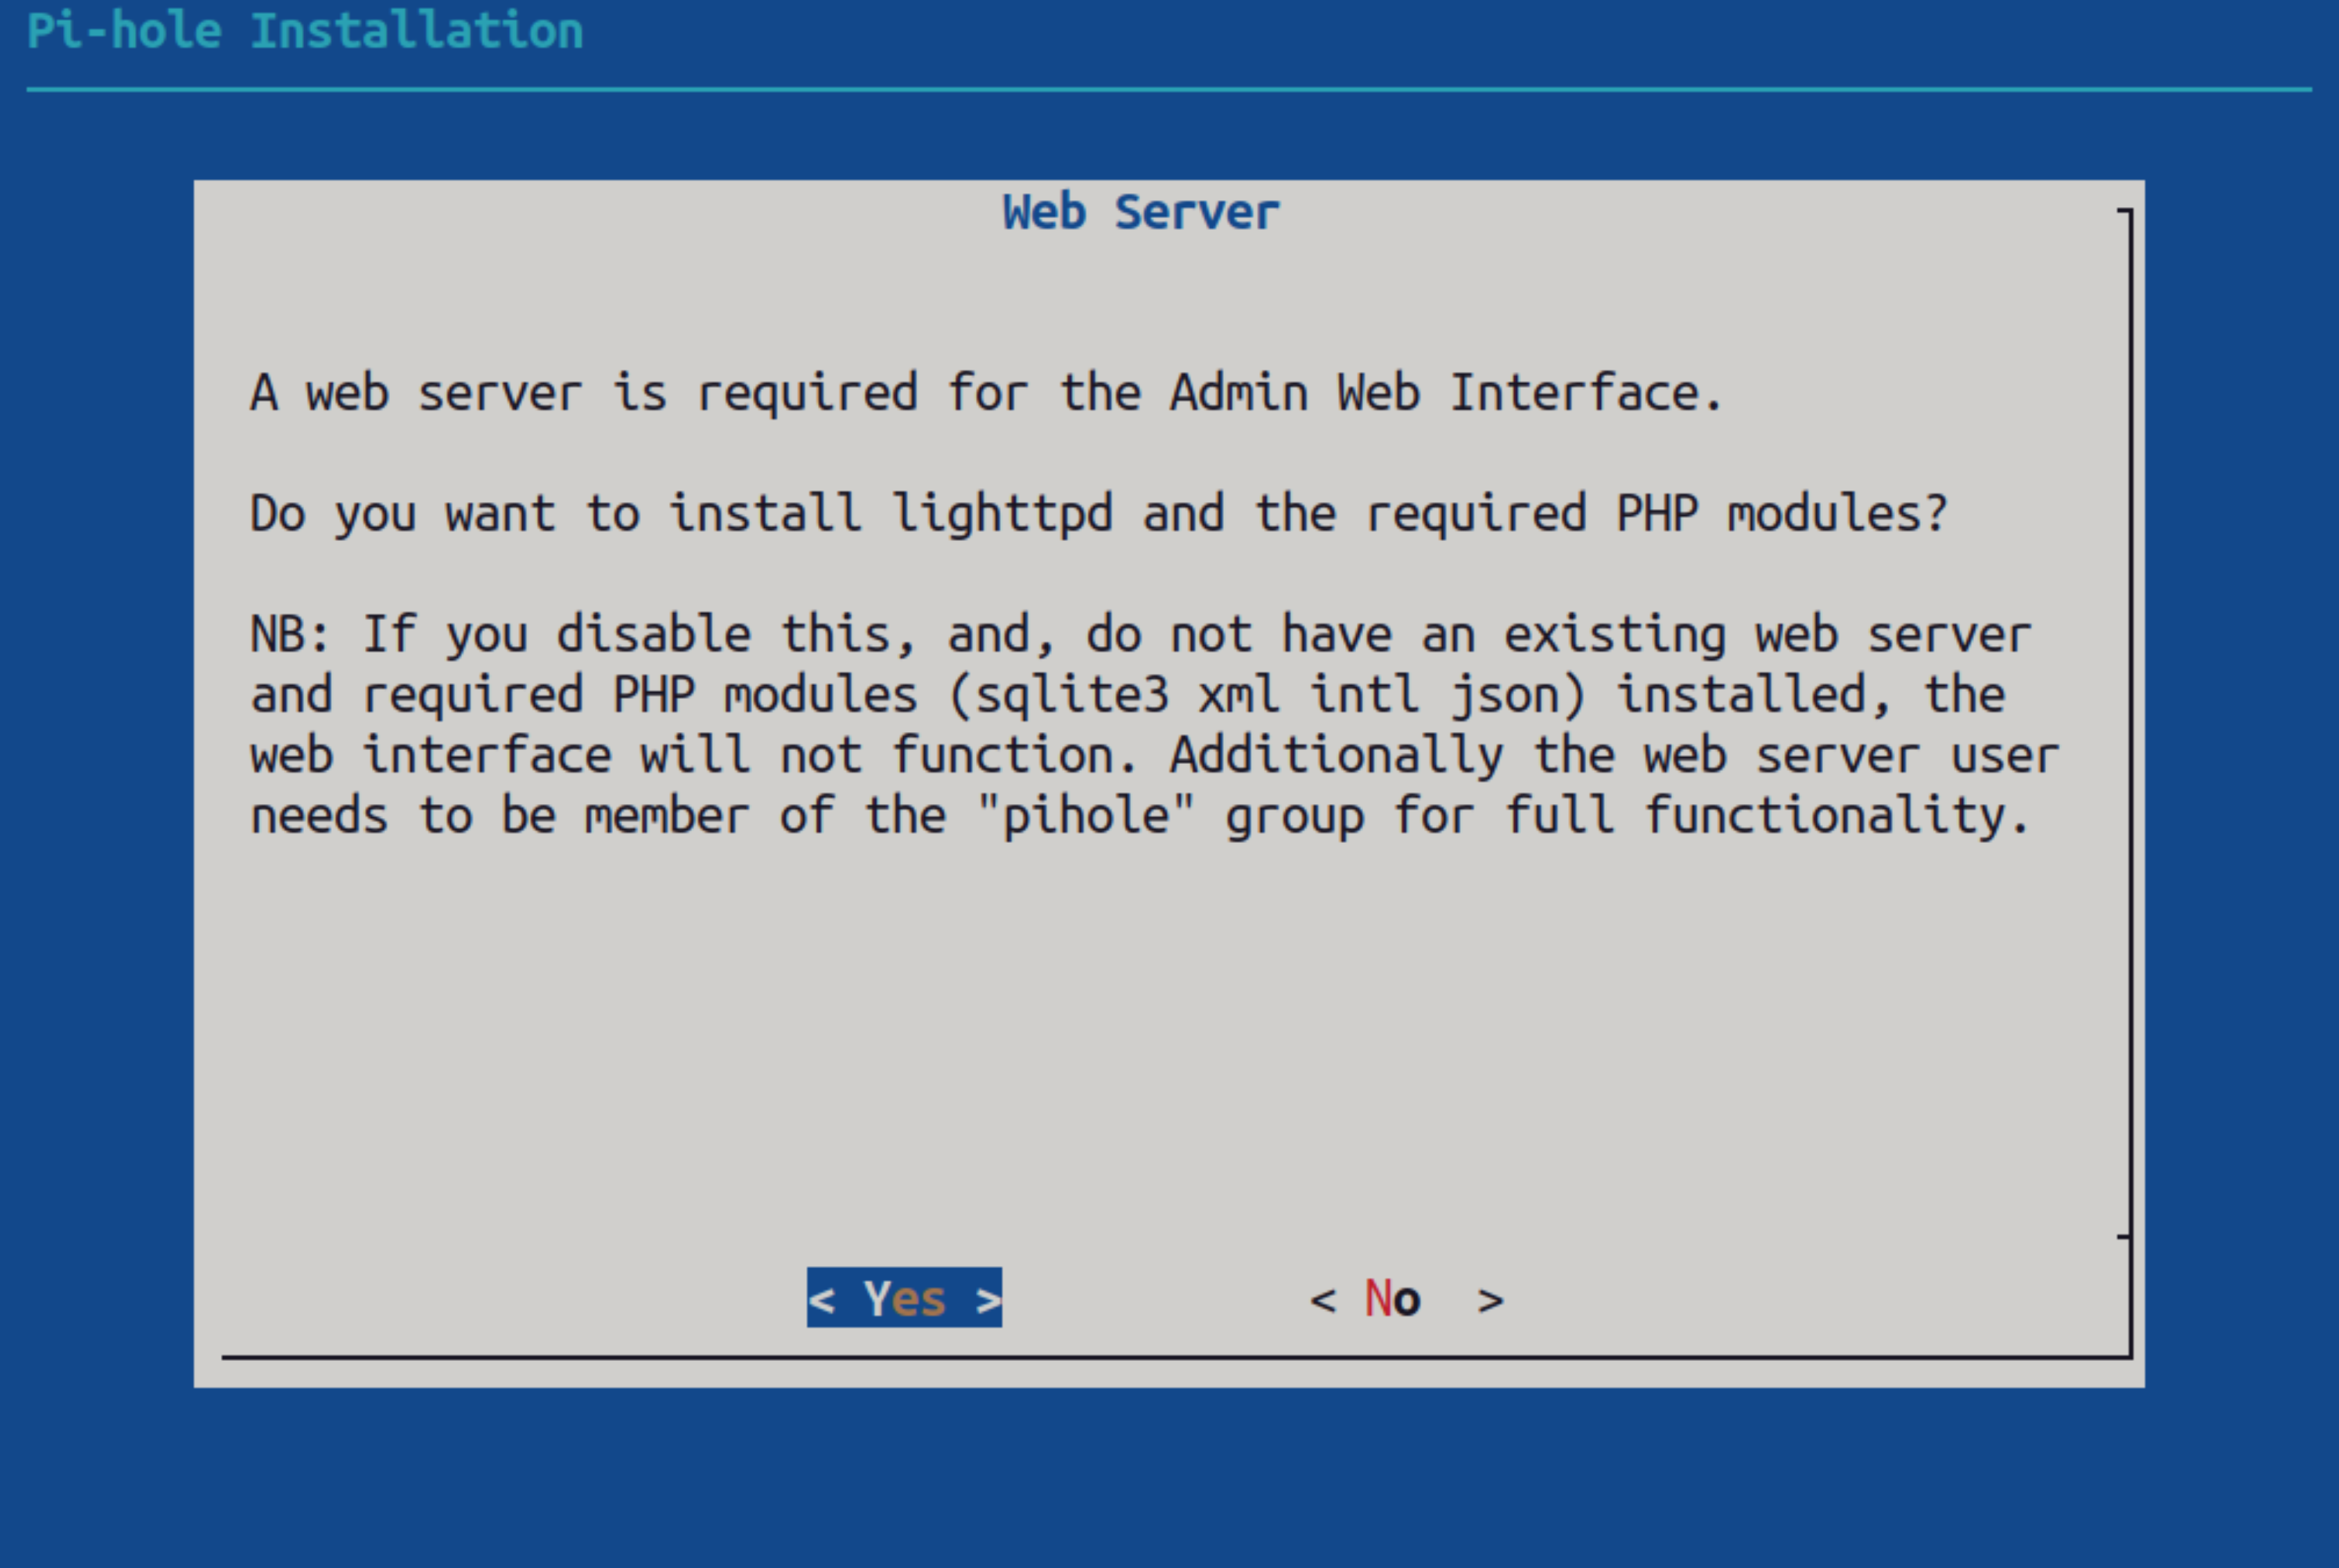
If you chose to install the Pi-hole Web UI, the installer will ask you to if you want to install the “lighttpd” web server. This is unnecessary if you already have a web server like Apache. But if you do not already have a web server installed already, I recommend you let the Pi-hole installer handle the installation and setup of the lighttpd web server.
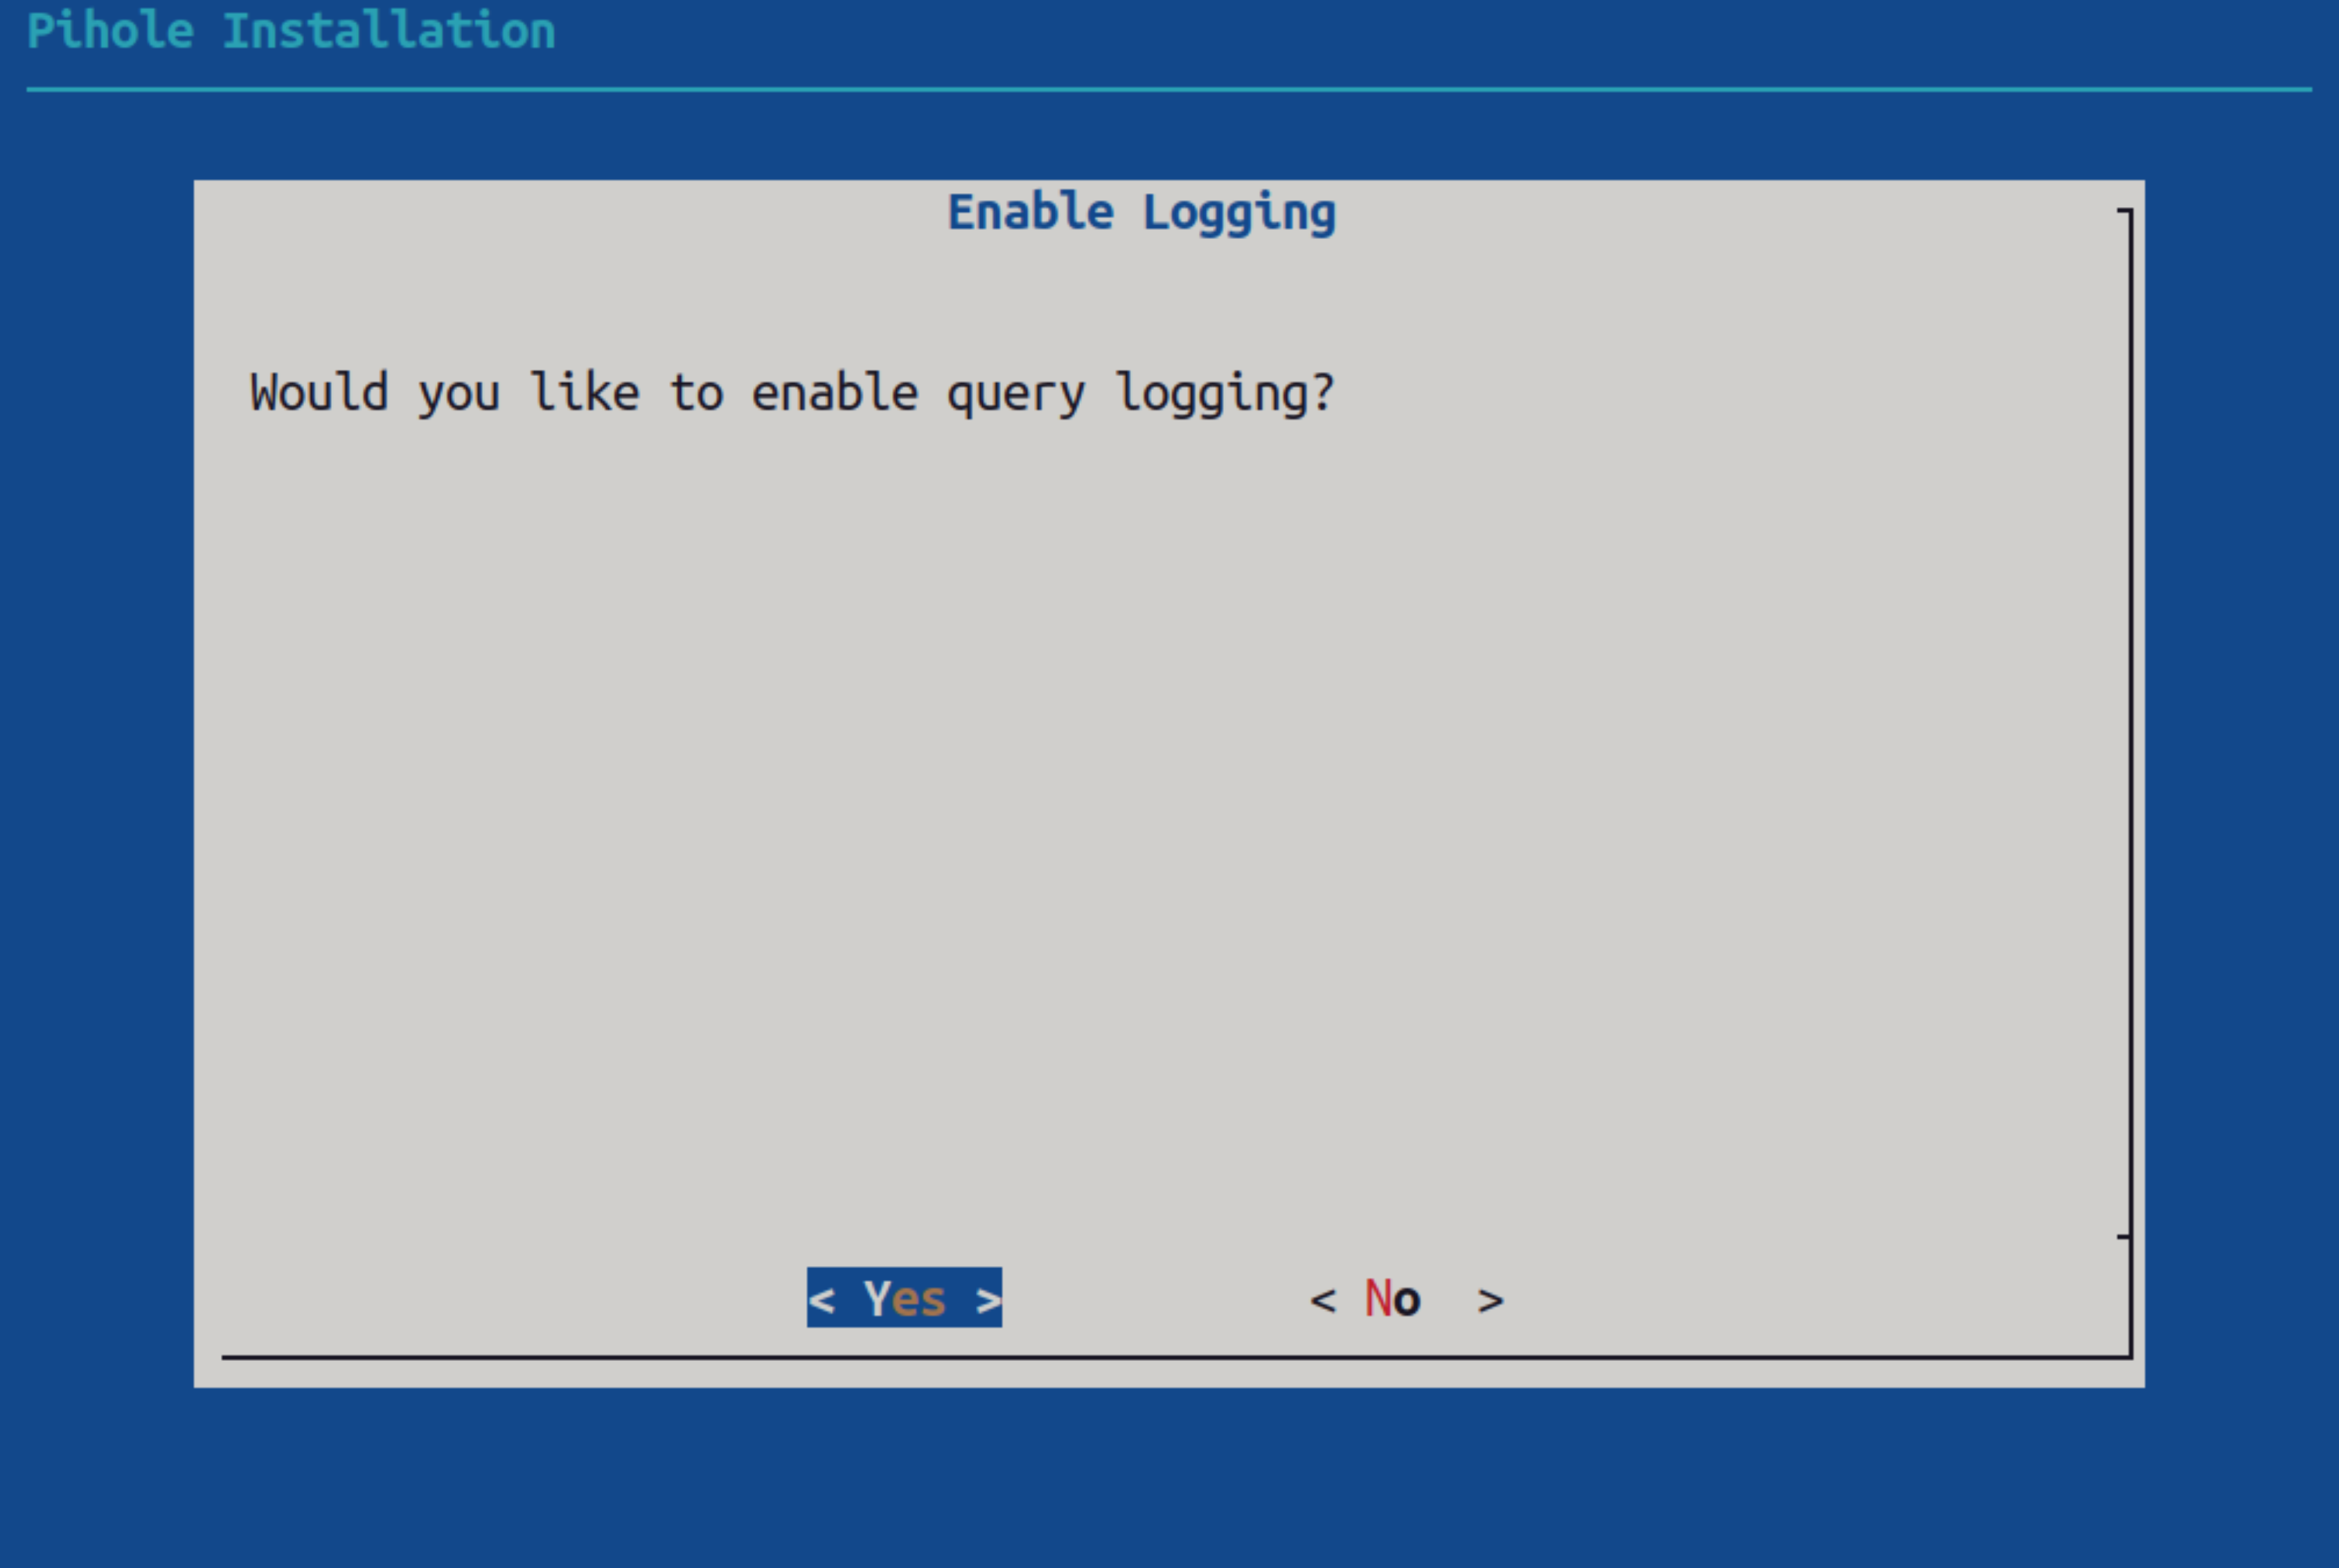
For the Pi-hole Web UI to show accurate statistics, the data needs to be logged. The next step is asking if you want to enable logging of queries. It logs items like which computer made a query for which domain name and if it was blocked or allowed, etc.
If you have enabled the Pi-hole Web UI, I recommend that you enable this.
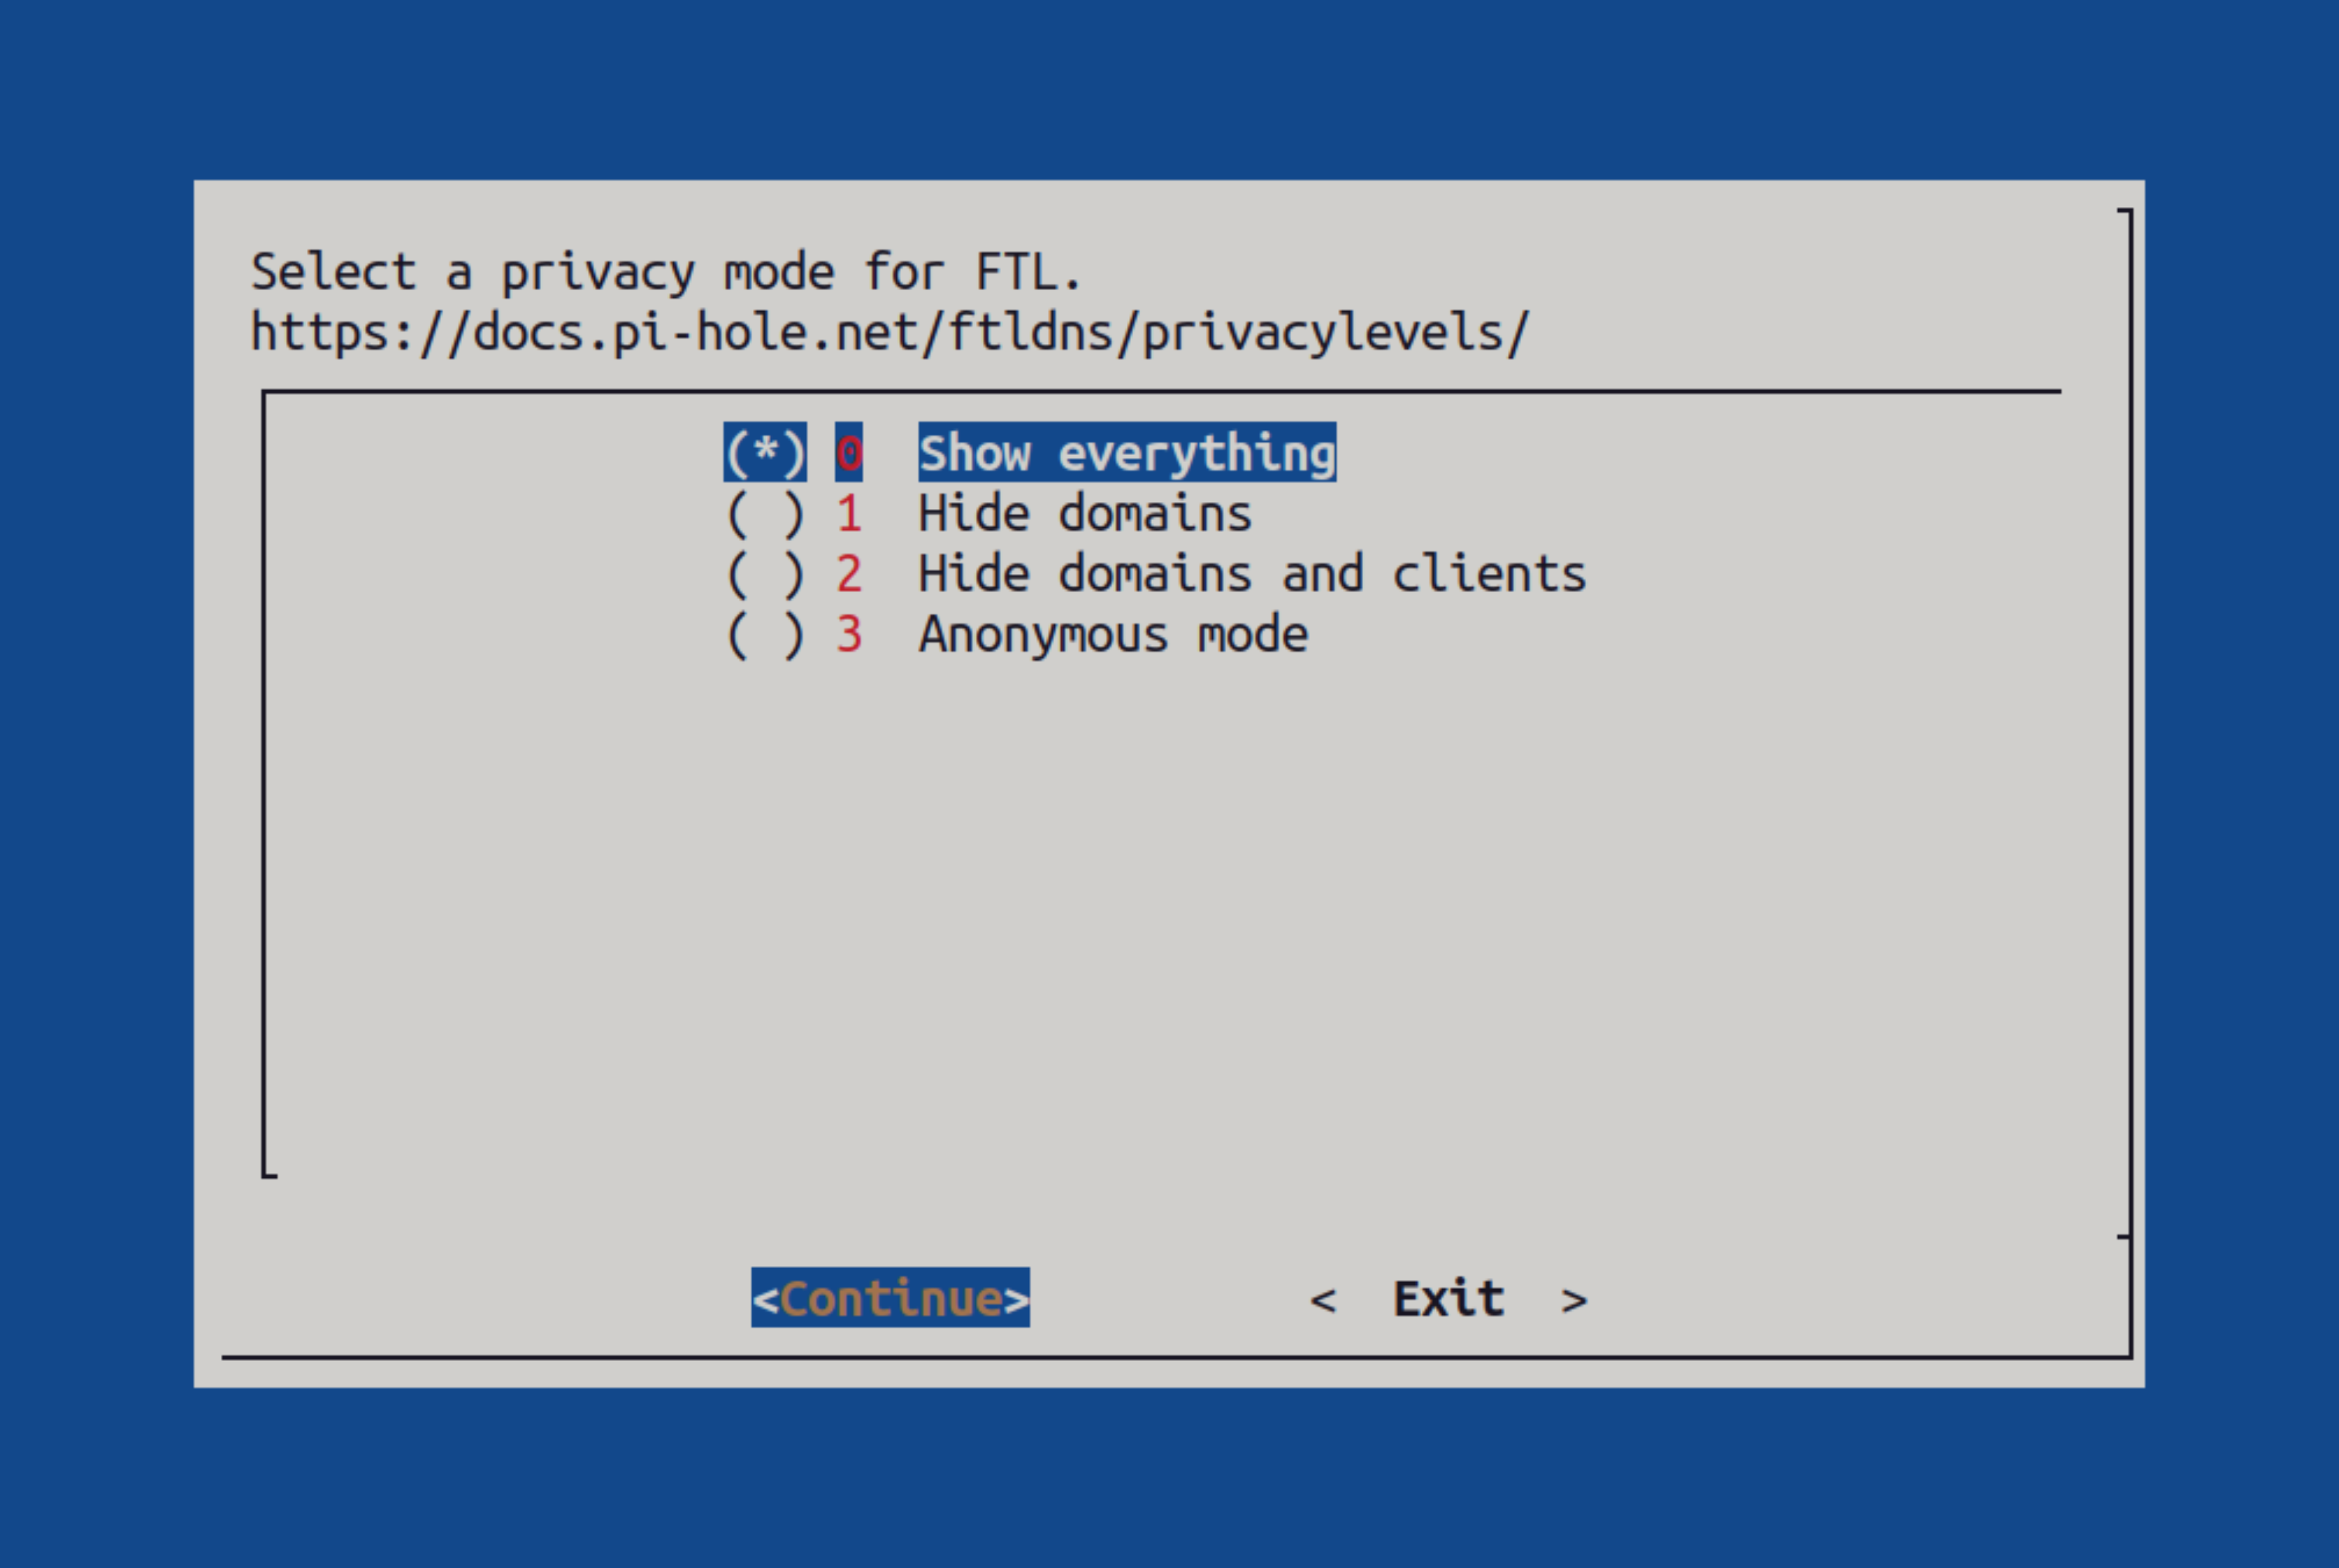
If you enabled query logging in the previous step, you will now be asked for the verbosity of logging. Choose the logging level that you are most comfortable with and proceed with the next step.
The installation is now complete! Pi-hole is up and running now.
But don’t close this window just yet! If you have enabled the Pi-hole Web UI, you will be given a password that will be used to log in the Pi-hole Web UI. Please note this down.
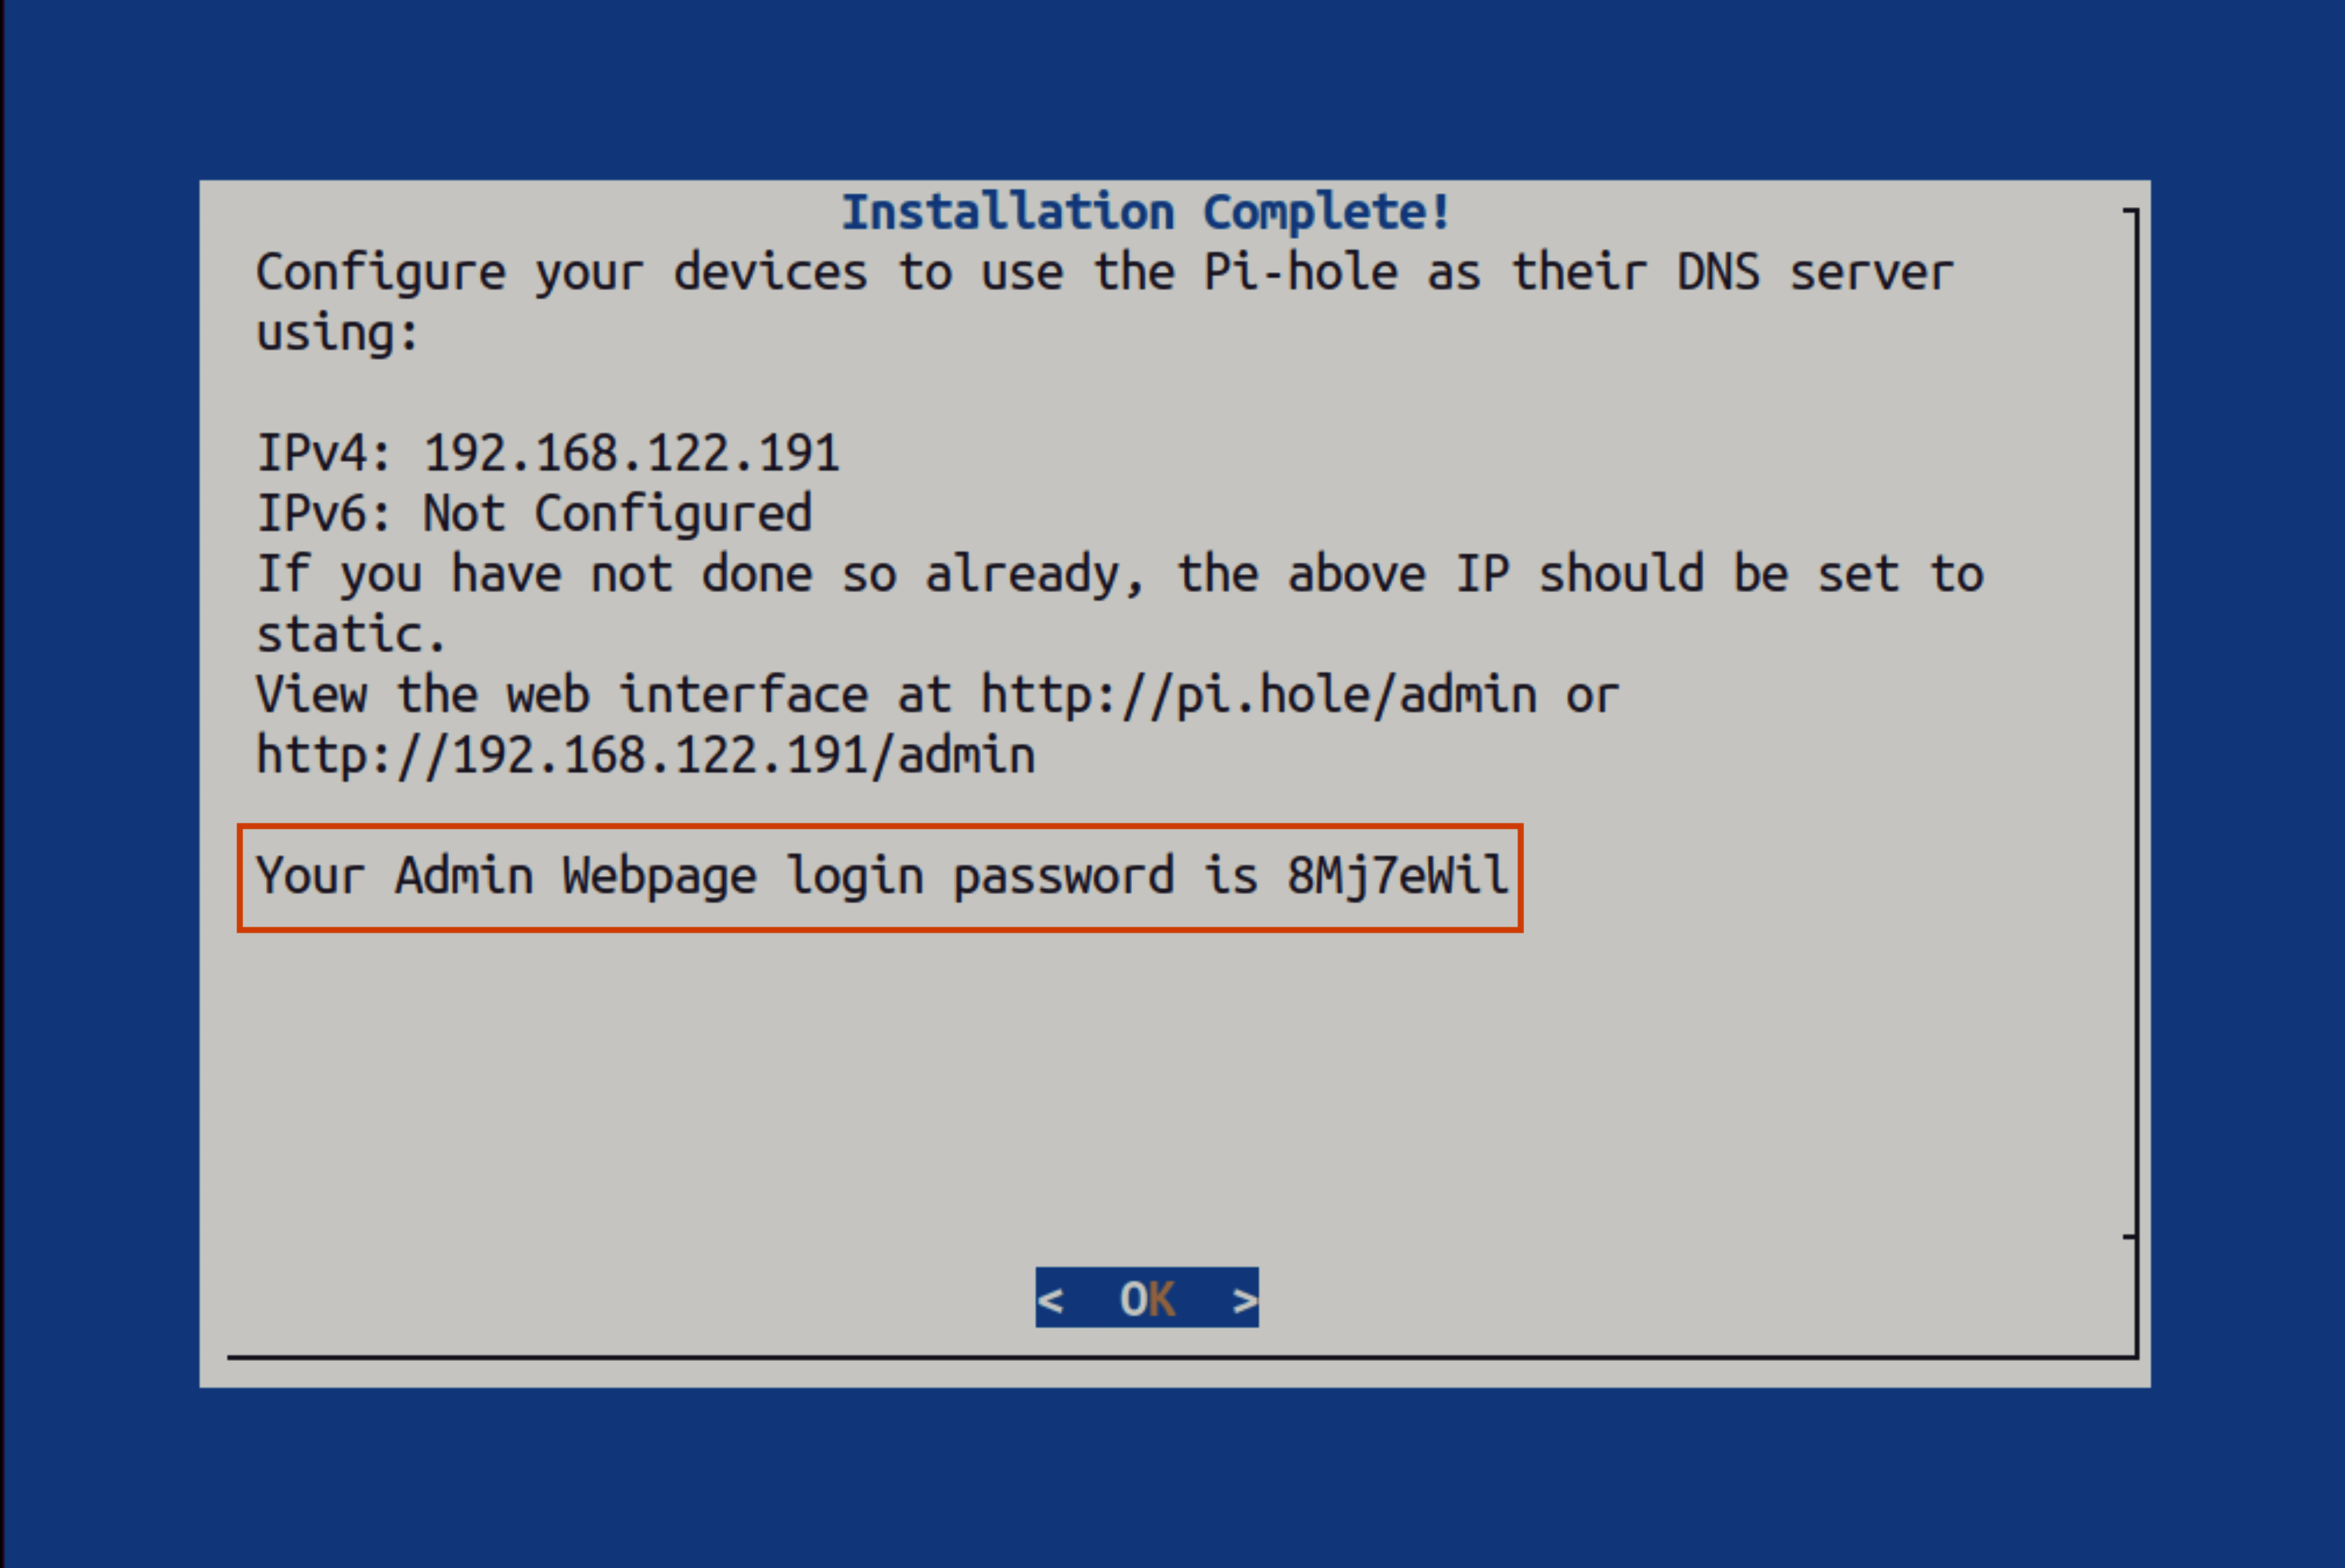
Once the installation finishes, you will be shown the methods for accessing Pi-hole.
In my case, since the computer’s IP address is “192.168.122.191”, I will type the address http://192.168.122.191/admin in my web browser to access Pi-hole Web UI.
Or, if I am already using “192.168.122.191” as my DNS server, I can simply type in http://pi.hole/admin to view it.
Method 2: Install Pi-hole using Podman/Docker
This is the recommended method:
- If you want to deploy Pi-hole without much hassle and/or do not wish to interact with any installer prompts (it is only a 3-step process!)
- If you want to test Pi-hole without actually having to install it and without having your config files modified
- If you want a “reproducible” setup without having to configure everything exactly like before
For this method, you must have either Podman or Docker installed. For this tutorial, I will be using Docker on Ubuntu 22.04 LTS. However, you can follow the steps on any Linux distribution.
Step 1: Install Docker
As discussed above, you must have Docker installed. If you don’t have it installed, we have covered the procedure about installing Docker on Ubuntu.
Step 2: Create a docker-compose file
The easiest way to get a container like Pi-hole up and running via Docker is by using the docker-compose file.
You can create the docker-compose file anywhere you wish; its location does not matter. Below are the contents of the docker-compose.yml file:
version: '3'

services:
  pihole:
    image: docker.io/pihole/pihole:latest
    container_name: pihole-aditi
    restart: unless-stopped
    ports:
      - '53:53/tcp'
    volumes:
      - './pi-hole/etc-pihole:/etc/pihole'
      - './pi-hole/etc-dnsmasq.d:/etc/dnsmasq.d'
    environment:
      TZ: 'Asia/Kolkata'
      WEBPASSWORD: 'your-password-here'
Please replace the string your-password-here with a safe and strong password. This is the password for the Pi-hole Web UI. Additionally, I recommend that you take a look at Docker Secrets for the best security practices for managing sensitive data like passwords.
Step 3: Disabling systemd-resolved’s “DNSStubListener”
Systemd provides the systemd-resolved service that provides DNS resolution to local applications. It does this by listening on port 53, which is the standard network port for DNS protocol. Since Pi-hole is also a DNS resolver, this creates a problem for us. We can either let Pi-hole listen on this port or we can let systemd-resolved listen on this port. No two applications can listen on the same port.
To let Pi-hole listen on this port, we must disable the “DNSStubListener” option of systemd-resolved. This won’t adversely affect the host computer since Pi-hole caches DNS queries too.
To achieve this, open the file /etc/systemd/resolved.conf with super user privileges. I recommend using the sudoedit command like so:
sudoedit /etc/systemd/resolved.confOnce you have the resolved.conf file open, find the DNSStubListener option. If it is present, change the boolean value to no. If absent, add the following line:
DNSStubListener=noOnce that change is made, save the file and exit the editor. Now, restart the systemd-resolved service with the following command:
sudo systemctl restart systemd-resolved.serviceBut wait, now our DNS queries go unresolved! That’s not good.
To solve this, issue the following commands:
sudo rm /etc/resolve.conf
sudo ln -s /run/systemd/resolve/resolv.conf /etc/resolv.conf
Step 4: Starting the Pi-hole container
We have a few prerequisites to satisfy before starting the Pi-hole container.
The first pre-requisite is to create a few directories. Do so by running the following command in your terminal:
mkdir -vp pi-hole/etc-{pihole,dnsmasq.d}These directories will store only the configuration files, so their size will not be greater than a few hundred MBs. These directories should be created in the same location as the docker-compose.yml file.
This next step is optional but if you are following this guide on Fedora or a RHEL-based distribution, you need to open port 53 in your firewall.
sudo firewall-cmd --add-service=dns --permanent
sudo firewall-cmd --reload
Once this is done, we can start out Pi-hole container! Do so by running the following command:
docker-compose up -dExecuting the above command will automatically fetch the latest Pi-hole image and start a container for you. Logging into the Pi-hole Web UI is the same as the previous method. Either type in the IP address of your computer or the pi.hole address in your web browser followed by the /admin string.
Both of the following methods are valid for accessing the Pi-hole Web UI:
http://<IP_ADDRESS>/adminhttp://pi.hole/admin
You now have Pi-hole installed on your comptuer using Docker! How cool is that?!
Setting up Pi-hole
To start using Pi-hole, you must follow either of the following methods:
- Add the computer’s IP address with Pi-hole installed as the DNS server for your router. This is the most recommended method since it enables blocking ads on tricky devices to configure. Please refer to your router’s manual on how this can be achieved.
- You can add the IP address of the computer hosting Pi-hole as the DNS server for every computer, phone or tablet on your network. This can be tedious but useful in cases where you wish to allow ads on particular devices. I do not recommend this unless you know what you are doing.
Once you have followed either method 1 or method 2, you can check whether Pi-hole is working.
dig +short @<IP_ADDRESS_OF_YOUR_PI-HOLE_SERVER> ads.google.comThe dig utility is helpful for looking up corresponding IP address for each domain name. In this command, you are querying our Pi-hole server to get the IP address of “ads.google.com” is. The website “ads.google.com” is used to serve ads. So, if you get back 0.0.0.0, your Pi-hole is working!
Below is the output from my computer:
$ dig +short @192.168.122.191 ads.google.com
0.0.0.0
As you can see, the IP address I got back from Pi-hole is infact an invalid IP address. Meaning any communication to Google’s Ad servers is blocked. Yay!
But let us also see if “google.com” is working. Where will we go to solve our future problems if it doesn’t work? So let’s see that too!
You can run the same command as above but with “google.com” instead of “ads.google.com”. If the Pi-hole is working correctly, we should get a valid IP address in return. Let’s see what happens on my computer.
$ dig +short @10.0.0.14 google.com
216.58.203.46
As expected, “google.com” works but “ads.google.com” is blocked. Our Pi-hole server is working as intended. Perfect!
Conclusion
It requires some effort and expertise to set up Pi-hole to get an ad-free internet experience. As you can see, it’s not entirely complicated. You need to be patience with such DIY projects.
For a Raspberry Pi lover like me, using Pi-hole gives good practice for building projects with amazing single-board computers.
I have tried giving all the proper steps but I understand if it doesn’t work for you. If you face any issues, please let me know in the comments and I’ll try to help you out.
If this helped you, consider supporting It's FOSS
It's FOSS has been helping people use Linux for the past 14 years. Help us stay independent from big tech. Become a Plus member, enjoy ad-free reading and get 5 eBooks.
