
Beginner-friendly Arch Linux based distribution Antergos has announced that the project is being discontinued.
Arch Linux has always been considered a no-go zone for the beginners. Antergos challenged this status quo and made Arch Linux accessible to everyone by providing easier installation method. People who wouldn’t dare installing Arch Linux, opted for Antergos.
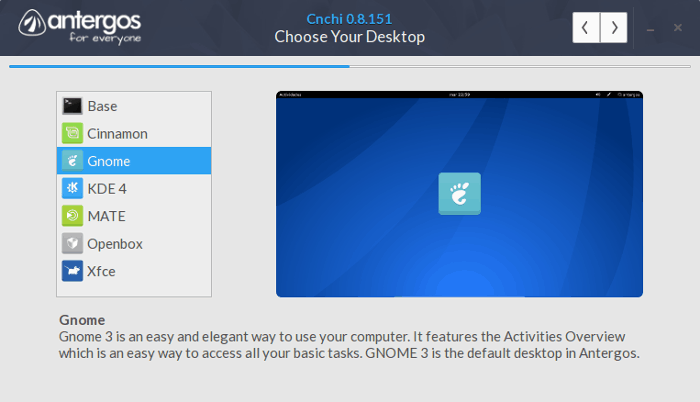
The project started in 2012-13 and started gaining popularity around 2014. I used Antergos, liked it and covered it here on It’s FOSS and perhaps (slightly) contributed to its popularity. In last five years, Antergos was downloaded close to a million times.
But for past year or so, I felt that this project was stagnating. Antergos hardly made any news. Neither the forum nor the social media handles were active. The community around Antergos grew thinner though a few dedicated users still remain.
The end of Antergos Linux project
On May 21, 2019, Antergos announced its discontinuation. Lack of free time cited as the main reason behind this decision.
Today, we are announcing the end of this project. As many of you probably noticed over the past several months, we no longer have enough free time to properly maintain Antergos. We came to this decision because we believe that continuing to neglect the project would be a huge disservice to the community.
Antergos Team
Antergos developers also mentioned that since the project’s code still works, it’s an opportunity for interested developers to take what they find useful and start their own projects.
What happens to Existing Antergos users?
If you are an Antergos user, you don’t have to worry a lot. It’s not that your system will be unusable from today. Your system will continue to get updates directly from Arch Linux.
Antergos team plans to release an update to remove the Antergos repositories from your system along with any Antergos-specific packages that no longer serve a purpose as the project is ending. After that any packages installed from the Antergos repo that are in the AUR will begin to receive updates from AUR.
The Antergos forum and wiki will be functional but only for some time.
If you think using an ‘unmaintained’ project is not a good idea, you should switch your distribution. The most appropriate choice would be Manjaro Linux.
Manjaro Linux started around the same time as Antergos. Both Antergos and Manjaro were sort of competitors as both of them tried to make Arch Linux accessible for everyone.
Manjaro gained a huge userbase in the last few years and its community is thriving. If you want to remain in Arch domain but don’t want to install Arch Linux itself, Manjaro is the best choice for you.
Just note that Manjaro Linux doesn’t provide all the updates immediately as Arch or Antergos. It is a rolling release but with stability in mind. So the updates are tested first.
Inevitable fate for smaller distributions?
Here’s my opinion on the discontinuation on Antergos and other similar open source projects.
Antergos was a niche distribution. It had a smaller but dedicated userbase. The developers cited lack of free time as the main reason for their decision. However, I believe that lack of motivation plays a bigger role in such cases.
What motivates the people behind a project? They start it mostly as a side project and if the project is good, they start gaining users. This growth of userbase drives their motivation to work on the project.
If the userbase starts declining or gets stagnated, the motivation takes a hit.
If the userbase keeps on growing, the motivation increases but only to a certain point. More users require more effort in various tasks around the project. Keeping the wiki and forum along with social media itself is a challenging part, leave aside the actual code development. The situation becomes overwhelming.
When a project grows in considerable size, project owners have two choices. First choice is to form a community of volunteers and start delegating tasks that could be delegated. Having volunteers dedicated to project is not easy but it can surely be achieved as Debian and Manjaro have done it already.
Second choice is to create some revenue generation channel around the project. The additional revenue may ‘justify’ those extra hours and in some cases, it could drive the developer to work full time on the project. elementary OS is trying to achieve something similar by developing an ecosystem of ‘payable apps’ in their software center.
You may argue that money should not be a factor in Free and Open Source Software culture but the unfortunate truth is that money is always a factor, in every aspect of our life. I am not saying that a project should be purely driven by money but a project must be sustainable in every aspect.
We have see how other smaller but moderately popular Linux distributions like Korora has been discontinued due to lack of free time. Solus creator Ikey Doherty had to leave the project to focus on his personal life. Developing and maintaining a successful open source project is not an easy task.
That’s just my opinion. Please feel free to disagree with it and voice your opinion in the comment section.
