
This step-by-step guide shows you how to install OxygenOS on OnePlus One in Linux.
OnePlus gained immense popularity after its debut for mainly two reasons. First and foremost, it’s a beast when it comes to hardware and performance but has a very reasonable price tag. Second reason is that it comes officially with CyanogenMod. If you use OnePlus, you won’t be surprised that it has been named best Android smartphone of the year by many reputed blogs.
But things went sour between OnePlus and CyanogenMod when CyanogenMod decided to ditch OnePlus for Micromax. That was the deciding moment for OnePlus to work on it’s own OxygenOS. Good thing is that OxygenOS first stable version has been released couple of weeks back and is available for OnePlus user to flash Cyanogen OS and install the new one instead.
Considering that you are a OnePlus user and want to try the new Android Lollipop based OS, I am going to detail each and every step so that you can easily install OxygenOS on your OnePlus device in Linux. But before we see that, let’s first see what are the prerequisites.
Prerequisites to flash OxygenOS on OnePlus
You’ll need the following:
- A OnePlus device of course
- A Linux based computer with good internet connection. OxygenOS itself is around 700 MB in size. Besides that, you need to install a few tools to carry out the procedure.
- Data cable to connect OnePlus with the computer
I have performed the tutorial in Ubuntu 14.04 but I believe the steps remain the same for other Linux distributions as well, except for the installation method of Android development tools. But good thing with this method is that you do not need to root OnePlus.
Before you go on installing OxygenOS on OnePlus, I must warn you that you take a little bit of precaution. I believe you know what you are doing. Your data will be wiped out completely, so prepare a backup beforehand. I should not be held responsible for any mishap. You have been warned :)
Install OxygenOS on OnePlus One in Linux
Step 1: Download OxygenOS
First thing first, download OxygenOS. The file is a little more than 700 MB, so please mind your internet connection. You can get the installation file from the link below:
Download OxygenOS Installation Files
The downloaded files will be compressed in zip format. Extract it.
Step 2: Install Android development tools
You’ll need adb and fastboot Android dev tools. Open a terminal and use the following commands to install it in Ubuntu and other Ubuntu based Linux distributions such as Linux Mint, elementary OS etc.
sudo apt-get install android-tools-adb
sudo apt-get install android-tools-fastboot
Step 3: Enable debugging mode in OnePlus
- On your OnePlus, go to Settings->About Phone->Build Number. Tap on build number 7 times to enable the developer mode.
- Go back one step i.e. on Settings menu, move down to bottom to see the Developer Options here. Go in it and enable the USB Debugging option. Also make sure to uncheck the option of Update CM Recovery.
I took the screenshots butt forgot to copy it to my computer and hence I lost them. But you can follow a similar screenshot tutorial for enabling debug option.
Step 4: Unlock the bootloader
Now we need to unlock the bootloader.
- Turn off the device and boot in to fastboot mode by holding the volume up and power button simultaneously for few seconds. You will see a screen like this:

- Now connect your device to you computer via the data cable. Open a terminal and use the following command to unlockthebootloader:
sudo fastboot oem unlock
It will reboot the device while taking some time. You’ll have to reconfigure the device as if it’s brand new.Of course, You’ll lose all the data as I had warned already. I would advise not to waste time in re-configuring the device because we will have to erase all the data again. So, no need to enter network password and configuring Google account etc.
Step 5: Repeat Step 3
Once you unclock the bootloader, enable developer option and uncheck Update CM Recovery option again.
Step 6: Flash TWRP recovery
Next we need to download and install a custom recovery. We’ll be using the TWRP for this purpose. Go to the link below and download the most recent version. OnePlus One is codenamed bacon, just for information.
Download latest TWRP recovery for OnePlus One
The recovery files will be around 10 MB in size. Once you have downloaded the files, we need to flash it to the device:
- Turn the device off and bootinfastboot mode again as you did step 4 by holding volume up and power button simultaneously. Once infastboot mode, connect the device to the computer again use the following command to install a custom recovery (I am considering that you have downloaded the files in Download directory):
cd ~/Downloads

sudo fastboot flash recovery twrp*
Basically, you need to provide the path to the downloaded custom recovery image file.
- Now use the command below to reboot the device:sudo fastboot reboot
You have the custom recovery installed. Now we come to the last step and which is to install OxygenOS on OnePlus.
Step 7: Install OxygenOS on OnePlus
- After rebooting, boot into recovery mode by pressing volume down and power button at the same time.
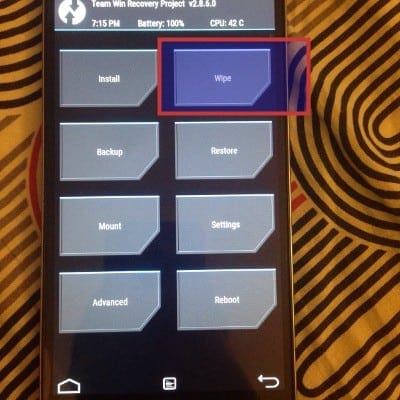
- In the recovery mode, click on Wipe to reset the device. The screen will look like this:
 In next screen, do factory reset swipe to do a factory reset.
 - After doing the factory reset, go back to the main recovery screen. At this stage, connect your device to computer again and copy the extracted folder of OxygenOS in to the Downloads folder of OnePlus.
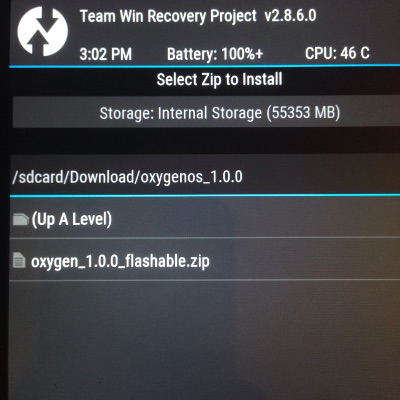
- Once you have the installation files on the device, click on the install option on the main recovery menu. It will ask you to give the path to the installation files. I presume you can do that:
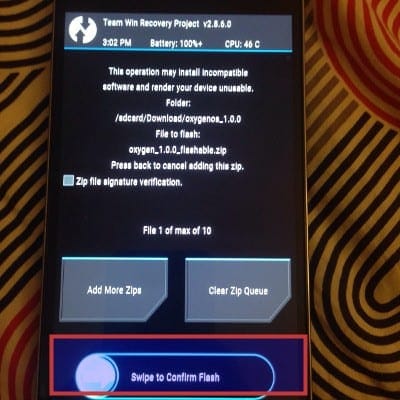
- Swipe to confirm flash:
- You’ll see a screen with commands running. Don’t bother yourself with the red error lines. Just wait for the end result to see whether or not the process was successful:
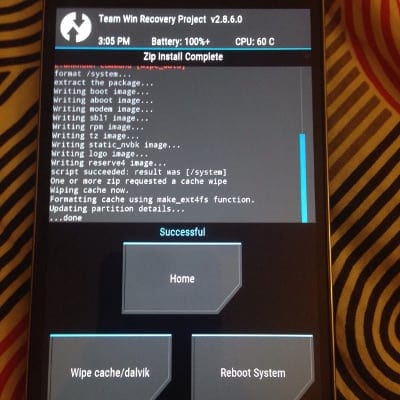
Note: If you see an error like “no MD5 file found… error flashing zip”, it means you have not pointed out the correct flashable file. Make you extract the downloaded OxygenOS files to see a flashable zip and MD5 files in it. Copy this extracted directory to OnePlus.
It will take some time to flash OxygenOS to OnePlus. Once it is successful, reboot the system from the given options. Congratulations! You have successfully installed OxygenOS on OnePlus One.
Did it work for you?
If you follow all the steps as mentioned above, it should take around 10-15 minutes to install OxygenOS on OnePlus One (not considering the time in downloading the files). Give it a try and let me know if you face any issues. Also, feel free to share your experience with OxygenOS :)
