

Open Source projects rule the world with their [usually] good code quality, but more importantly because they are available for free. This also means that the usage-to-contribution ratio is very low.
In other words, a few hundred contributors work on maintaining/improving those open-source projects compared to thousands or millions of users.
Hacktoberfest is one such event from DigitalOcean that encourages you to contribute back to your favorite projects. In exchange for your contributions, you either get a gift from DigitalOcean, or you can choose to plant a tree instead.
Who Can Participate in Hacktoberfest?
Everyone is welcome to participate in Hacktoberfest 2024.
You do not need to be a developer or a computer science student. Whether you’re an artist, a writer, or a translator, anyone can contribute back to open-source projects in one way or the other.
Why Should You Participate in Hacktoberfest?
With Hacktoberfest, DigitalOcean is trying to bring awareness around open-source projects. It aims to encourage users to explore the adventure of an open-source project developer.
You also realize the value of the developer who makes the code available for free by investing in their time, effort, and mental energy.
The Hacktoberfest event encourages you to support your favorite open-source projects. So, you can ensure that the project/tool you love constantly improves, and you get to use it for your requirements.
After all, open-source is all about community efforts and preventing vendor lock-in. So, you cannot expect the developer to do all the work for your benefit, right?
“But what do I get out of it?”
This event encourages you to contribute back to the project you feel is most impactful to you. Doing so will ensure that the project will get its bug fixed and new features added. Not just limited to your responsibility of giving back, more perks include:
- Boosting your creativity.
- Experiencing what happens behind open-source project development (can help you professionally as well).
- Getting rewards like a Hacktoberfest T-Shirt.
The benefits mentioned above are only what almost everyone is talking about. But there are other benefits as well. Contributing to an open source project will improve your portfolio and tell your future employer that you can work with the open source community.
It also helps you learn about maintaining your open source project in the future if you choose to do so. Learning how the community interacts with each other will help you shape your or your employer’s open source project in a way that benefits you and the community at large.
Not to mention, all this exposure to new people around the globe will show you “how to do x” in a different way that will be new to you. Things like that help you think out of the box when you are cornered with a challenging problem.
What Projects Do I Contribute To?
Technically, you can contribute to any project that you want. But, there are projects that do not align with the values of Hacktoberfest; contributing to those projects will not be counted against your total objectives to complete the event.
So it is best to look for projects on GitHub or GitLab that have the “Hacktoberfest” topic.
Please ensure that the project you are contributing to has the “Hacktoberfest” topic. Contributions made to other projects may not be counted towards your end goal.
What Can I Do and How to Get Started?
First, please ensure that you have registered for Hacktoberfest using your GitHub or GitLab account.
“But I do not know to program, is that okay?”
Yes, that is completely fine! Contributing to open source does not mean you must know how to write code. Code is only one part of open source. There are many things an open-source project might need. Below are just a few off the top of my mind:
- Adding/Fixing Code: This is the obvious thing one might think about contributing to open-source projects. You can send in bug fixes, new features, or even fix a security issue. Send in a pull request for a feature that you have always wanted!
- Improving Documentation: Documentation is essential for every project. Developers read it, and users need it. You can help improve/fix the documentation.
- Helping in Translation: Being open source means anyone around the globe can access your project. But that also means that there will be people who do not be able to write/read/speak English.
Translation made available in their native language will boost collaboration. - Creating Graphics: Some software projects do not have anyone who can create graphics like a good Logo. You can help with such tasks as well.
- UI/UX design: If you can’t contribute with graphics, you can help with the UI/UX design.
You can also help spread the word, and share the project with the world to improve its social presence.
Additionally, you can support the projects financially if you do not have time to participate in Hacktoberbest.
Things to Know Before Joining the Hacktoberfest
It is easy to participate, but there are a few things to know to complete Hacktoberfest (read: “win Hacktoberfest”):
- Be a registered Hacktoberfest user.
- Any pull requests you have sent either in GitLab or GitHub must be dated between October 1st and October 31st (inclusive).
- At least four of your pull requests must be merged or accepted in the respective repositories.
- Your pull request must be sent to repositories that have the topic “Hacktoberfest” in it, or it must be labeled as “Hacktoberfest-accepted“.
Participants in Hacktoberfest 2024 get a customizable digital badge from Holopin that gains new characteristics with each of your pull/merge requests. In earlier versions of Hacktoberfests, you could get actual swag and merchandises like t-shirts/stickers etc but people started issuing it by submitting dummy pull requests.
There are a few more conditions that could affect your participation, those include:
- More than two pull requests labeled as “spam” will disqualify you for this Hacktoberfest and future DigitalOcean events.
- Any pull requests labeled as “Invalid” (by the maintainer) will be discarded from your total goal.
- Any pull request sent to repositories that do not align with Hacktoberfest’s values will not be counted against your total. At the moment, there is no official list that notifies you of any such repositories. If unsure, ask a question on the official Hacktoberfest Discord server.
- Please avoid sending pull requests that are only slightly beneficial or are there just for the sake of introducing a minor change. Examples include “Fixed whitespaces“, “Fix typos“, “Reformat code using spaces instead of tabs“, and “Increment from 0 to i instead of decrementing i to 0“.
How Do I Know The Contributing Guidelines for Projects?
The repositories accepting pull requests for Hacktoberfest will have a file named CONTRIBUTING.md, which includes all the necessary information for your first contribution to the said repository.
While I discuss the process of contributing to a project in the next section, you should check every project’s guidelines before you proceed.
The CONTRIBUTING.md file will usually contain some of the following items:
- Code of Conduct: Please read this VERY CAREFULLY. This refers to the acceptable behavior of an individual for said project. If you fail to uphold this, your future contributions may go unnoticed; they might even get rejected outright.
- Code Formatting: Each project has its coding style. It is best to format the code according to the code formatting laid out in the CONTRIBUTING.md
- ToC: Some projects require you to accept the terms and conditions (about your rights to your contributed code) before your pull request merges. Please read this carefully and ensure you are comfortable with the restrictions (if any apply).
- License: Please read the license under which the repository’s code is made available. You must adhere to said license.
- Contributor Resources: Since this file (CONTRIBUTING.md) is intended for first-time contributors, you will also be given some contributor resources to help you understand how a code review takes place, and what things need to be done a pull request to be merged.
- PR tags: Some maintainers expect you to create a pull request using a tag. Some of these tags might be “bug fix”, “new feature”, “good first issues”, etc. This helps the maintainer(s) and the community to focus on the issues of their interest.
- Issue templates: If you send in a pull request, sometimes you are required to run a few commands. These commands may do a few things like “cleanup build files”, “remove custom configuration files”, etc.
- How to set up a development environment: Sometimes, the CONTRIBUTING.md file will also list all the packages you need to build the software project. Optionally, you will also be told: “how to package this”. These items will be included so that you can test if your changes break something before you send in a pull request.
- Ownership info: This section will include details like “Person X handles pull requests for bug fixes”, so if your pull request for a bug fix does not get accepted, you can ask person X for input and how you can improve your pull request, so it gets accepted.
How Does The Entire Process Work?
Now that you are aware of the prerequisites. How do you proceed? How do you make your first pull request? Is it too technical for first-time users?
Not really. You just have to type in a few commands, and follow a step-by-step method carefully. There’s nothing overwhelming. You just have to be patient with the entire process.
To sum up, here’s what you have to do:
- Install and Setup Git.
- Create a GitHub or GitLab account.
- Fork the repository you want to contribute to.
- Work with the repository using Git.
- Submit the code/change to the repository.
How To Make Your First Pull Request?
Fret not, I will provide you all the steps in the correct order to get you started.
1. Install Git on Your System

Git is one of the most used version control tools in the industry. Linus Torvalds created it. Yes, the same person that created Linux.
Before I give you a basic overview of using git, let me first tell you how you can install git on your computer.
Install git on Linux
Users of Debian/Ubuntu-based Linux distributions can use the apt package manager to install git can be done with the following command:
sudo apt install git git-manUsers of Fedora/RHEL-based Linux distributions can install git using the dnf package manager like so:
sudo dnf install git git-core git-core-docUsers of Arch Linux can install git using the pacman package manager with the following command:
sudo pacman -Sy gitInstall git on macOS
macOS users can install git using either the brew or macports package managers.
# brew users
brew install git

# macports users
sudo port install git
Install git on Windows
Windows users that prefer an installable .exe file, you can download it from GitHub releases.
Or, if you prefer using a package manager on Windows, use winget with the command:
winget install --id Git.Git -e --source winget2. Setup Git
Once you have git installed, some configuration needs to be made. Git needs your name and e-mail address to log a commit.
You can add your name and e-mail address to git using the following commands:
git config --global user.name "your name here"
git config --global user.email "your email here"
Doing so will help others know who made which change and how to contact them. Not to forget that without a name and an e-mail provided to git, you will not be able to create any commits.
You can refer to our Git command guide to explore other essential commands.
3. Creating a GitHub or GitLab account
Once Git is installed and set up, we can proceed to create a GitHub or GitLab account. If you already have an account, skip to the next step.
To create a GitHub account, click here. If you want to create a GitLab account, click here.
Provide your name, and e-mail address, and choose a suitable username and a strong password. Once your account is set-up, it is highly advised that you also set-up two-factor authentication. The documentation to enable 2FA on GitHub can be found here, and GitLab users should look here.
4. How do I send a pull request?
To participate in Hacktoberfest 2022, you must have 4 of your pull requests accepted/merged. I will demonstrate how you can send a pull request.
My personal preference is GitLab, but GitHub is more popular among the people new to the open source community, so I will demonstrate the procedure using GitHub. The steps will be same for GitLab users, with only minor UI differences.
a. Fork a repository
The action of “forking a repository” refers to creating your own copy of the repository to work on it. So let us find some Hacktoberfest repositories on GitLab and GitHub to fork.
I have selected the compress-pdf repository on GitHub for this demonstration. Visit the repository of your choice and look for the “Fork” button.
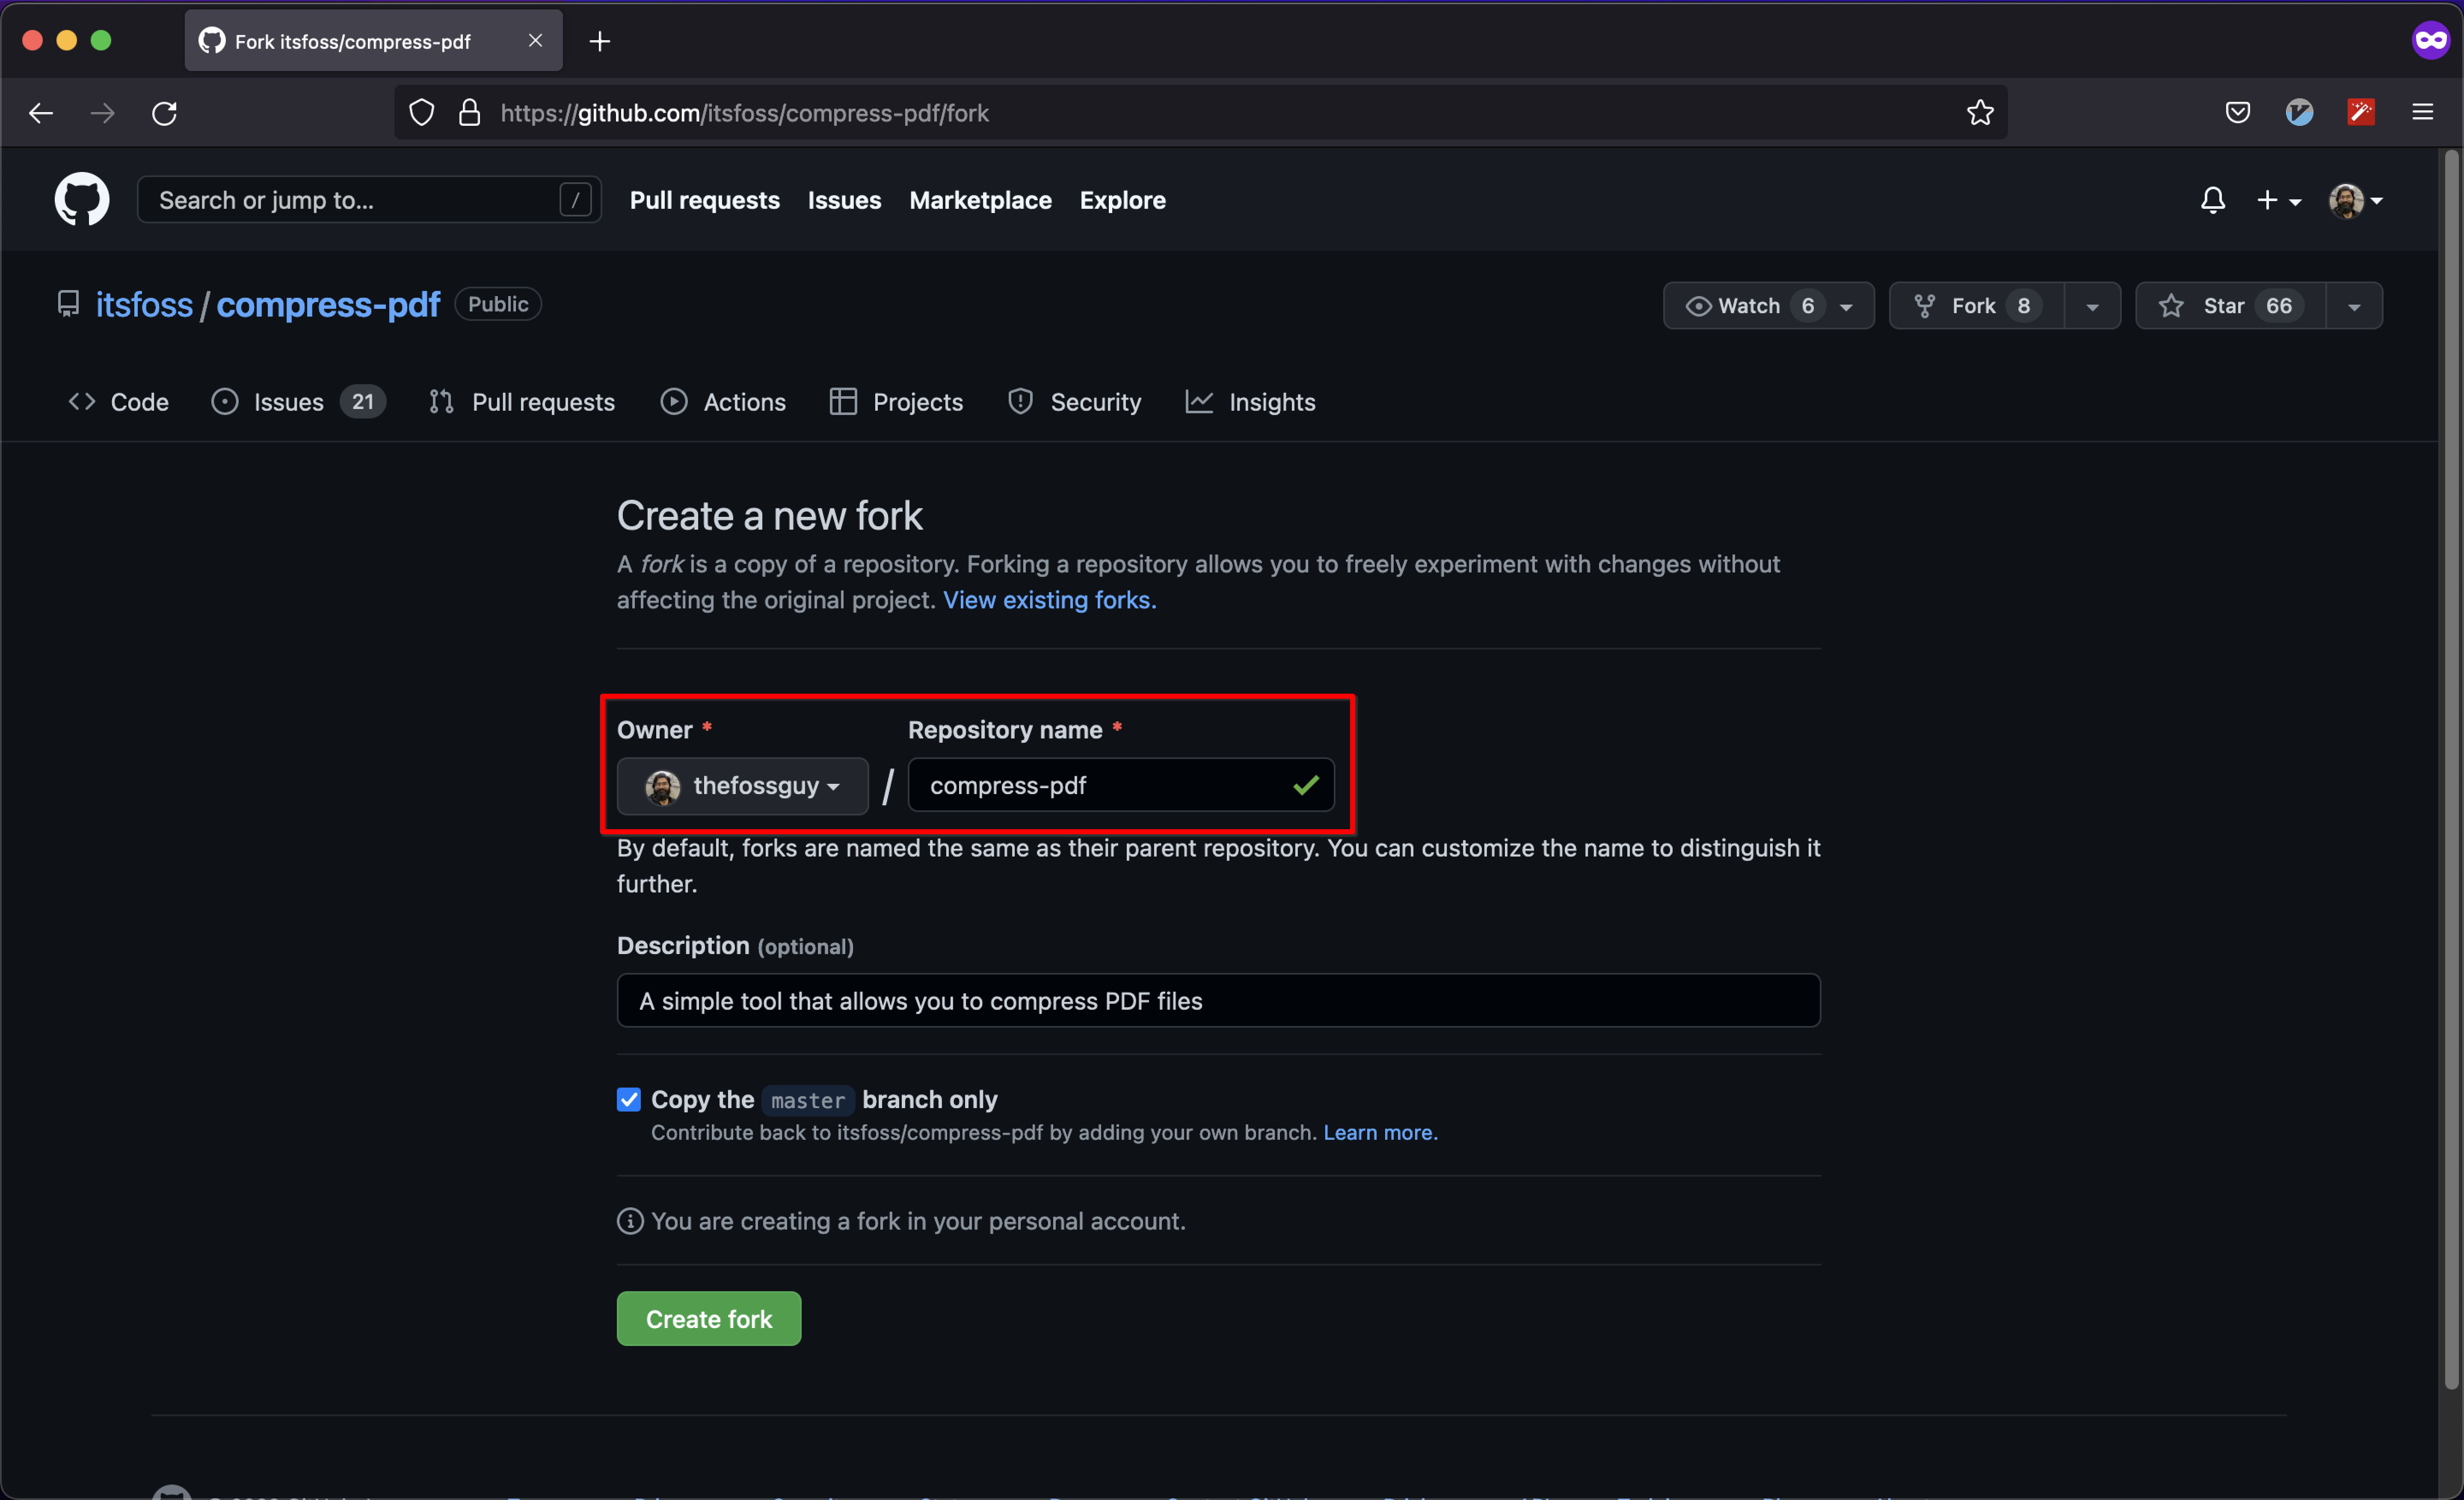
Once you click on it, you will be taken to a screen that is similar to the screenshot attached below. You will be asked to give this repository a name. It is best to keep the same name, but you can modify it if you want to do so. Then, click on the Create fork button. That will create a fork of a given repository.
Once you have your fork of the repository, clone it. My personal preference is to clone via SSH. If you haven’t setup SSH, you can refer to its official documentation.
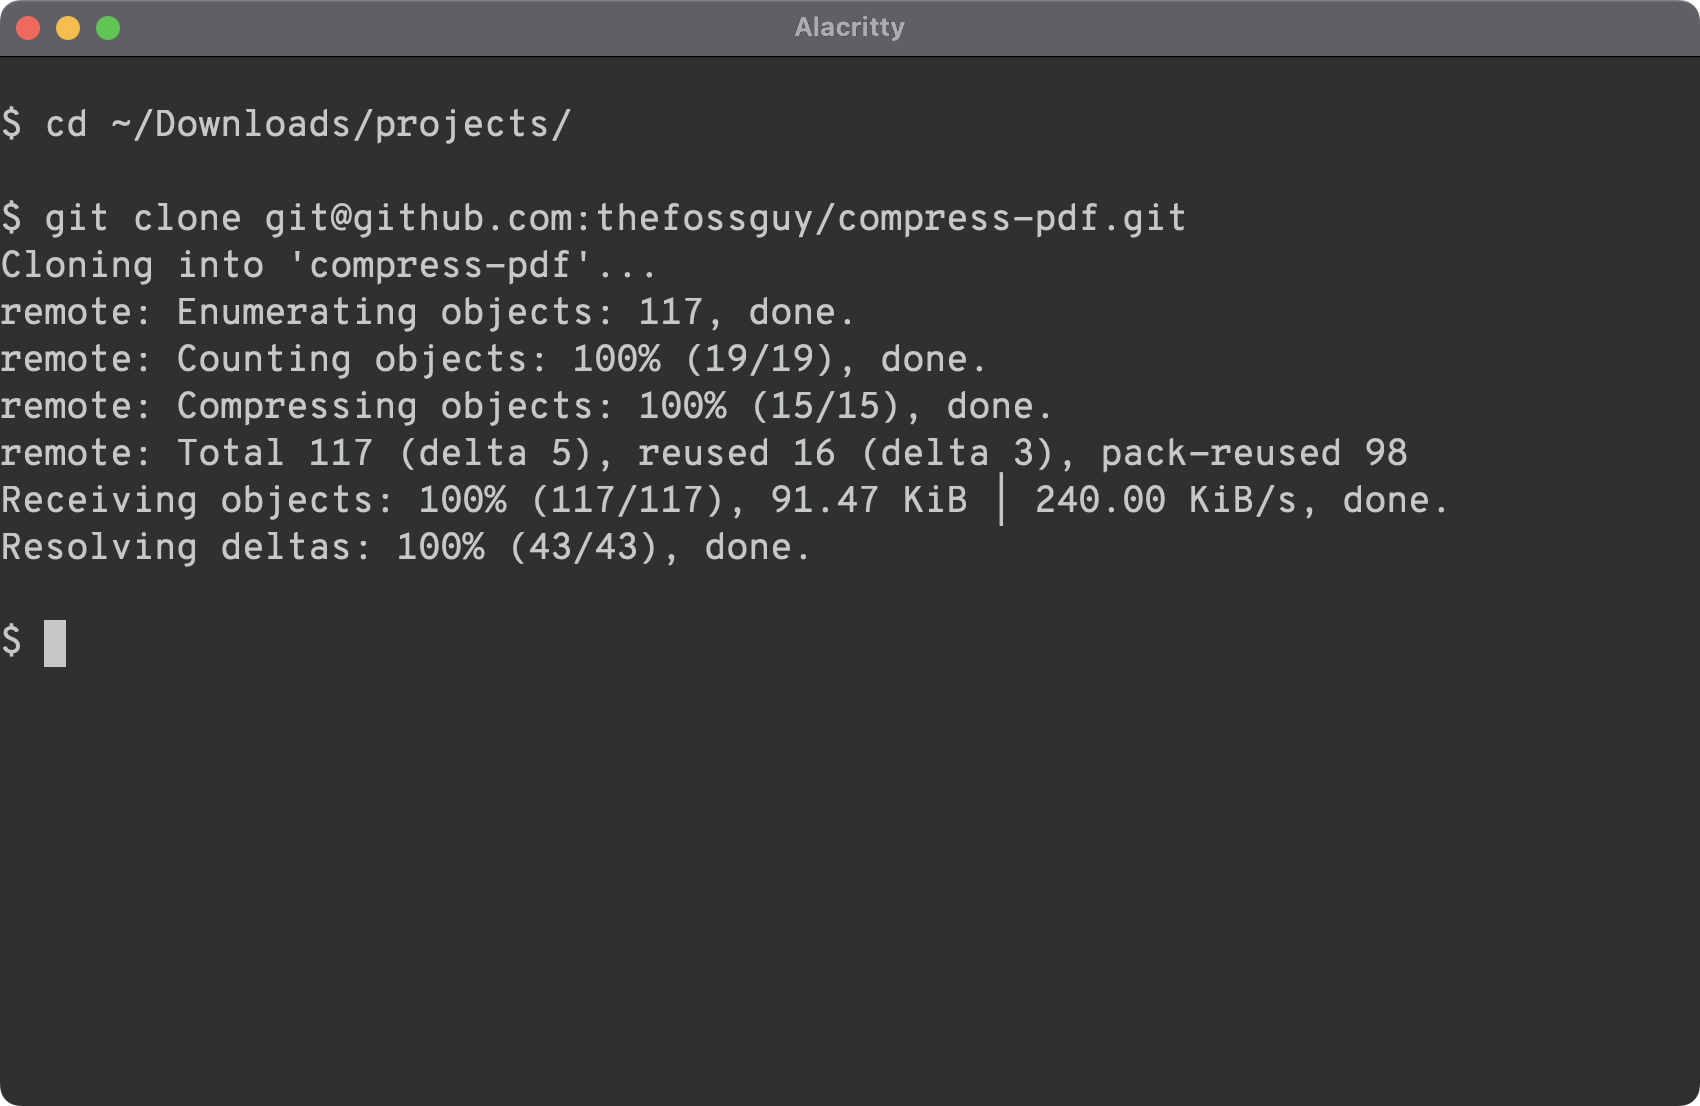
After you clone the repository, you can start working on it locally.
Next, I will demonstrate how to do this as well as how to send these changes back “upstream” in form of pull requests.
b. Working with a Git repo, locally
Once you have cloned a repository locally, immediately create a new branch. Use an appropriate name that best describes your changes. Below is the command to create a new branch in git:
git checkout -b BRANCH-NAMEBy using the git checkout command along with the -b option, you will automatically be switched to this branch and you can get started with your work.
You can see your modifications using the git diff command.
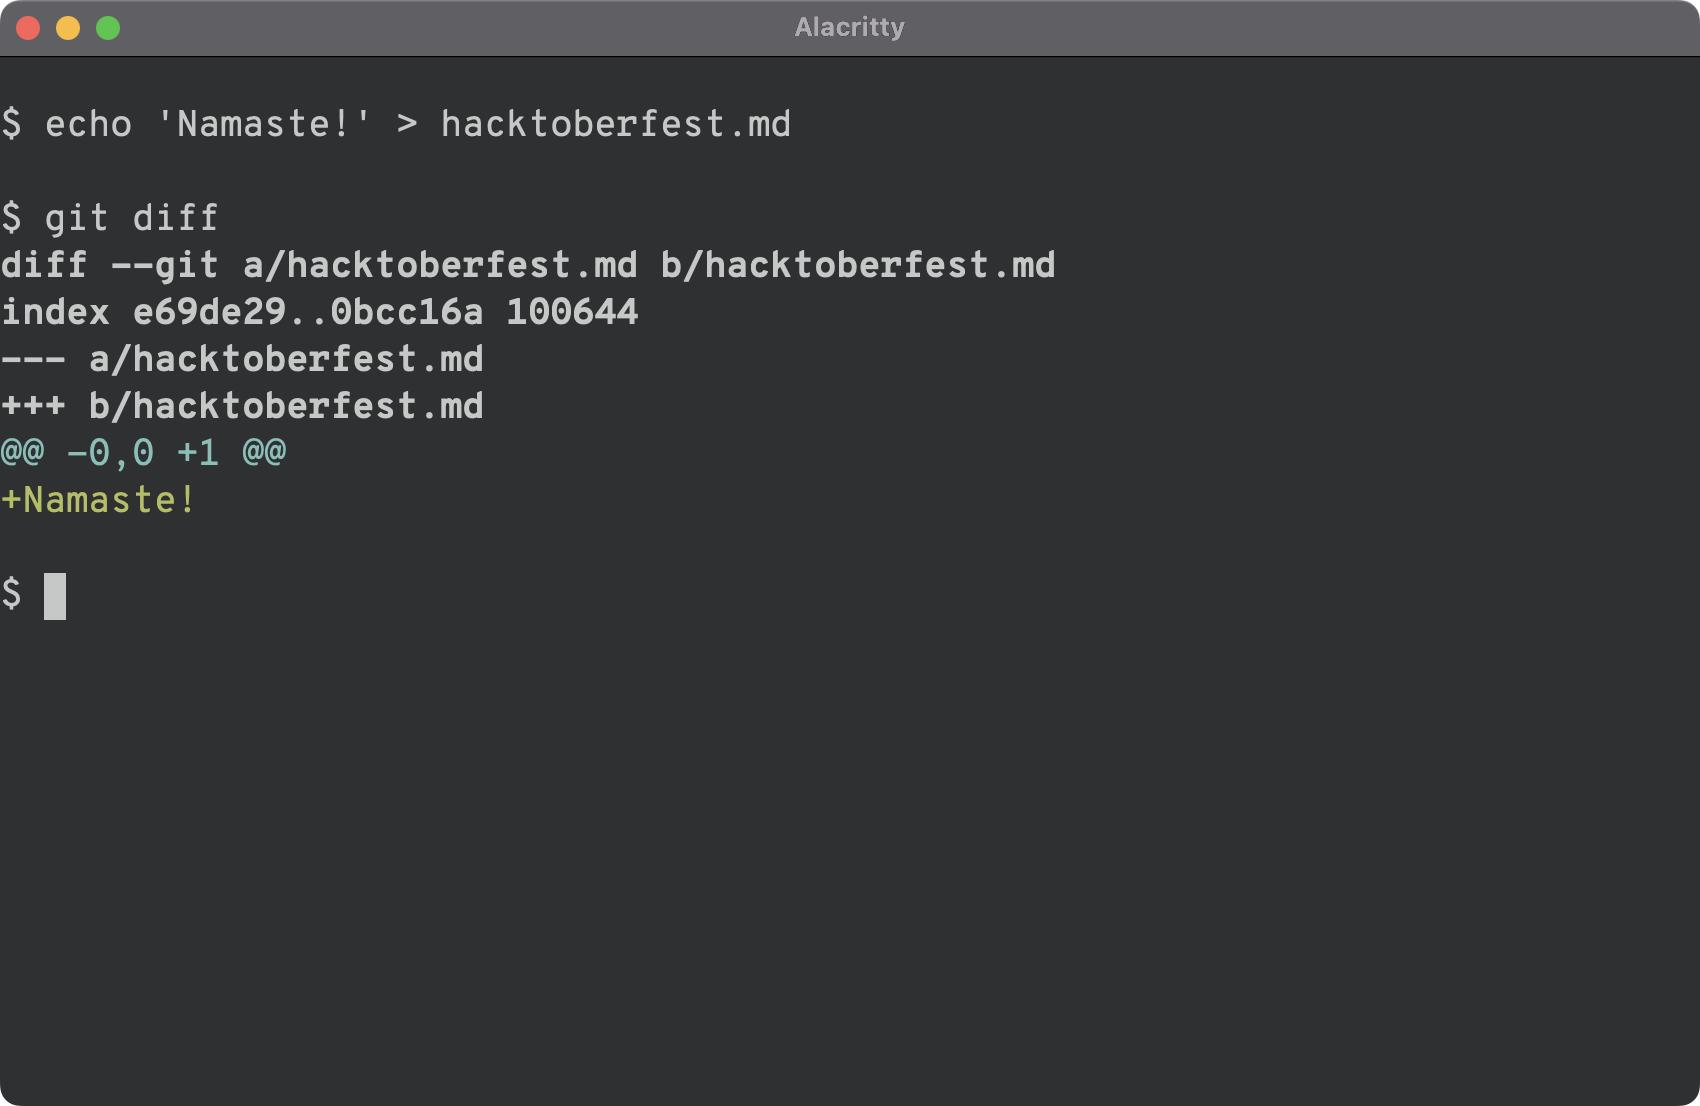
If you are satisfied with your changes, now is the best time to check if they work or not. Once that is verified, you can use the git add command to add those changes to the staging area.
Then, use git commit to create a commit along with a useful message.

c. Pushing code to the repository
Now that you have worked on implementing something or changing existing way of doing something and committed it, it is now time to send that code back to the original repository. Before that is done, our changes need to go in our forked repository.
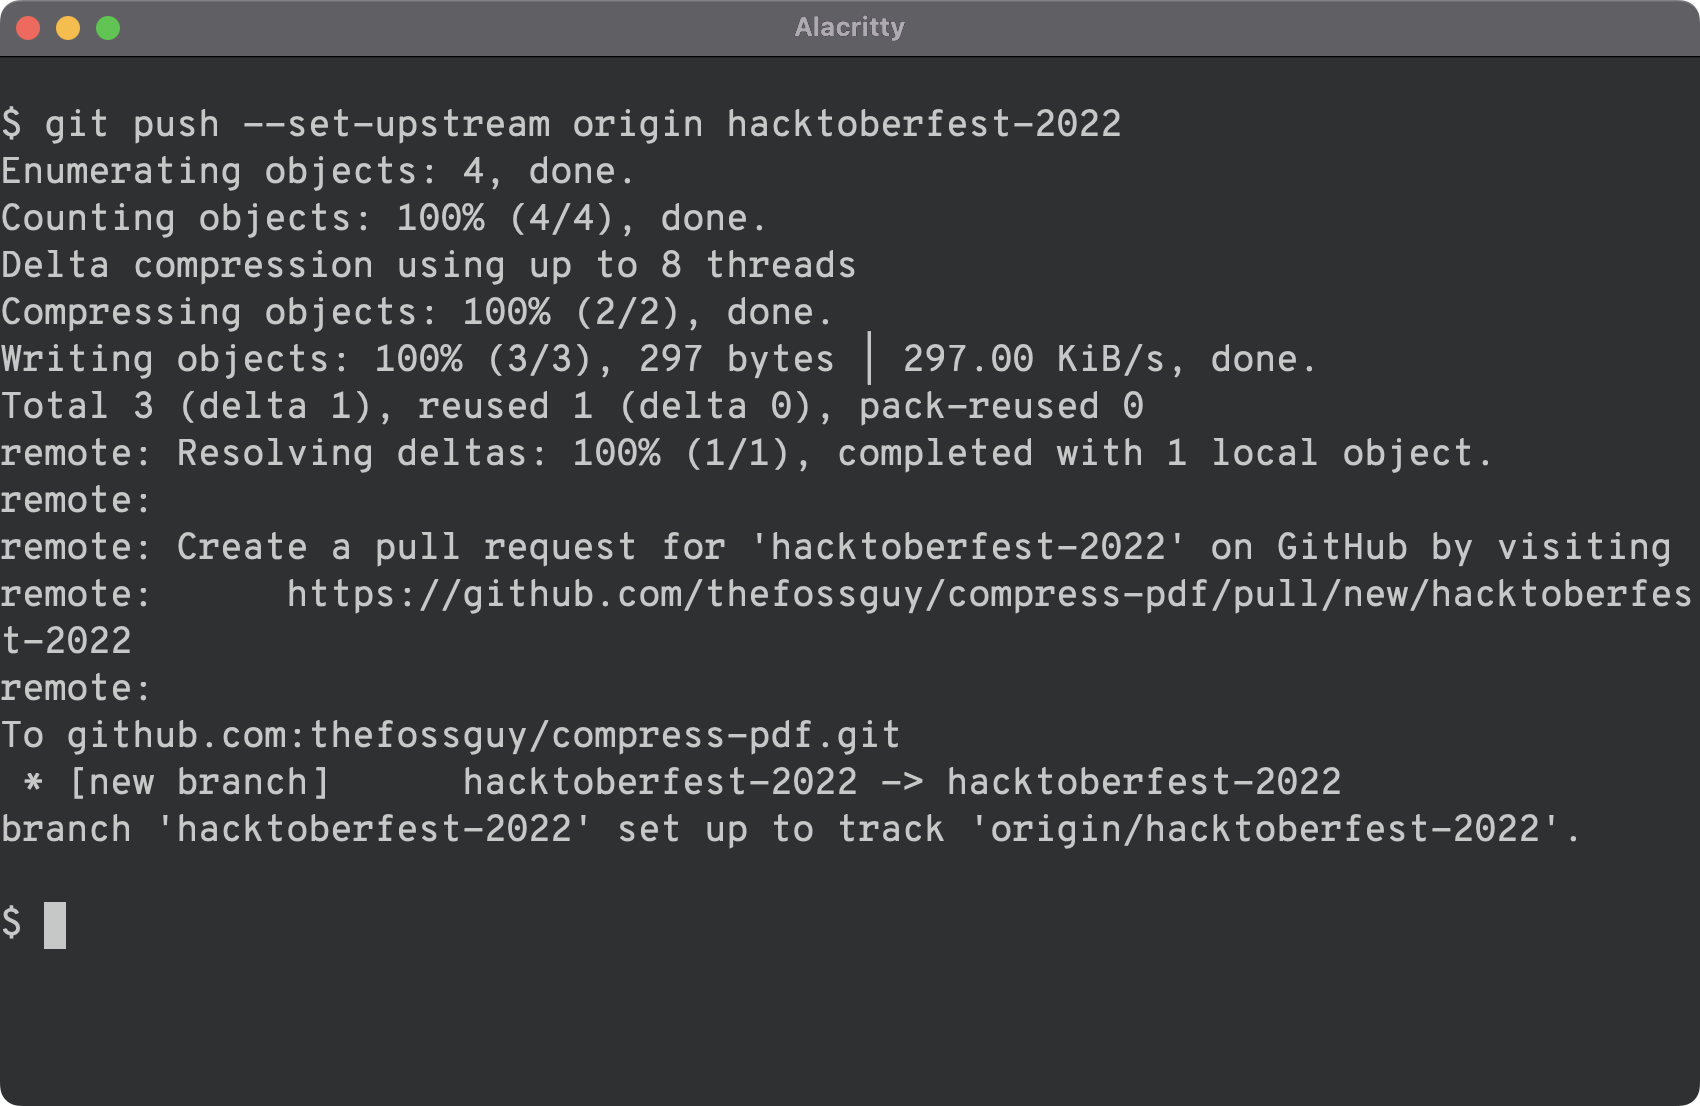
To send our changes (that were made in a separate branch), use the git push command in following fashion:
git push --set-upstream origin BRANCH-NAMEThe branch that you created earlier will be sent to the forked repository.
After the operation completes, if you are using GitHub, you will see a message that will provide you with a link. Visiting that link will create a pull request for your branch. Since this is specific to GitHub, I will show an alternative method to create a pull request.
In your browser, browse to the your fork of the repository. You will see a button that says “Compare & pull request”.
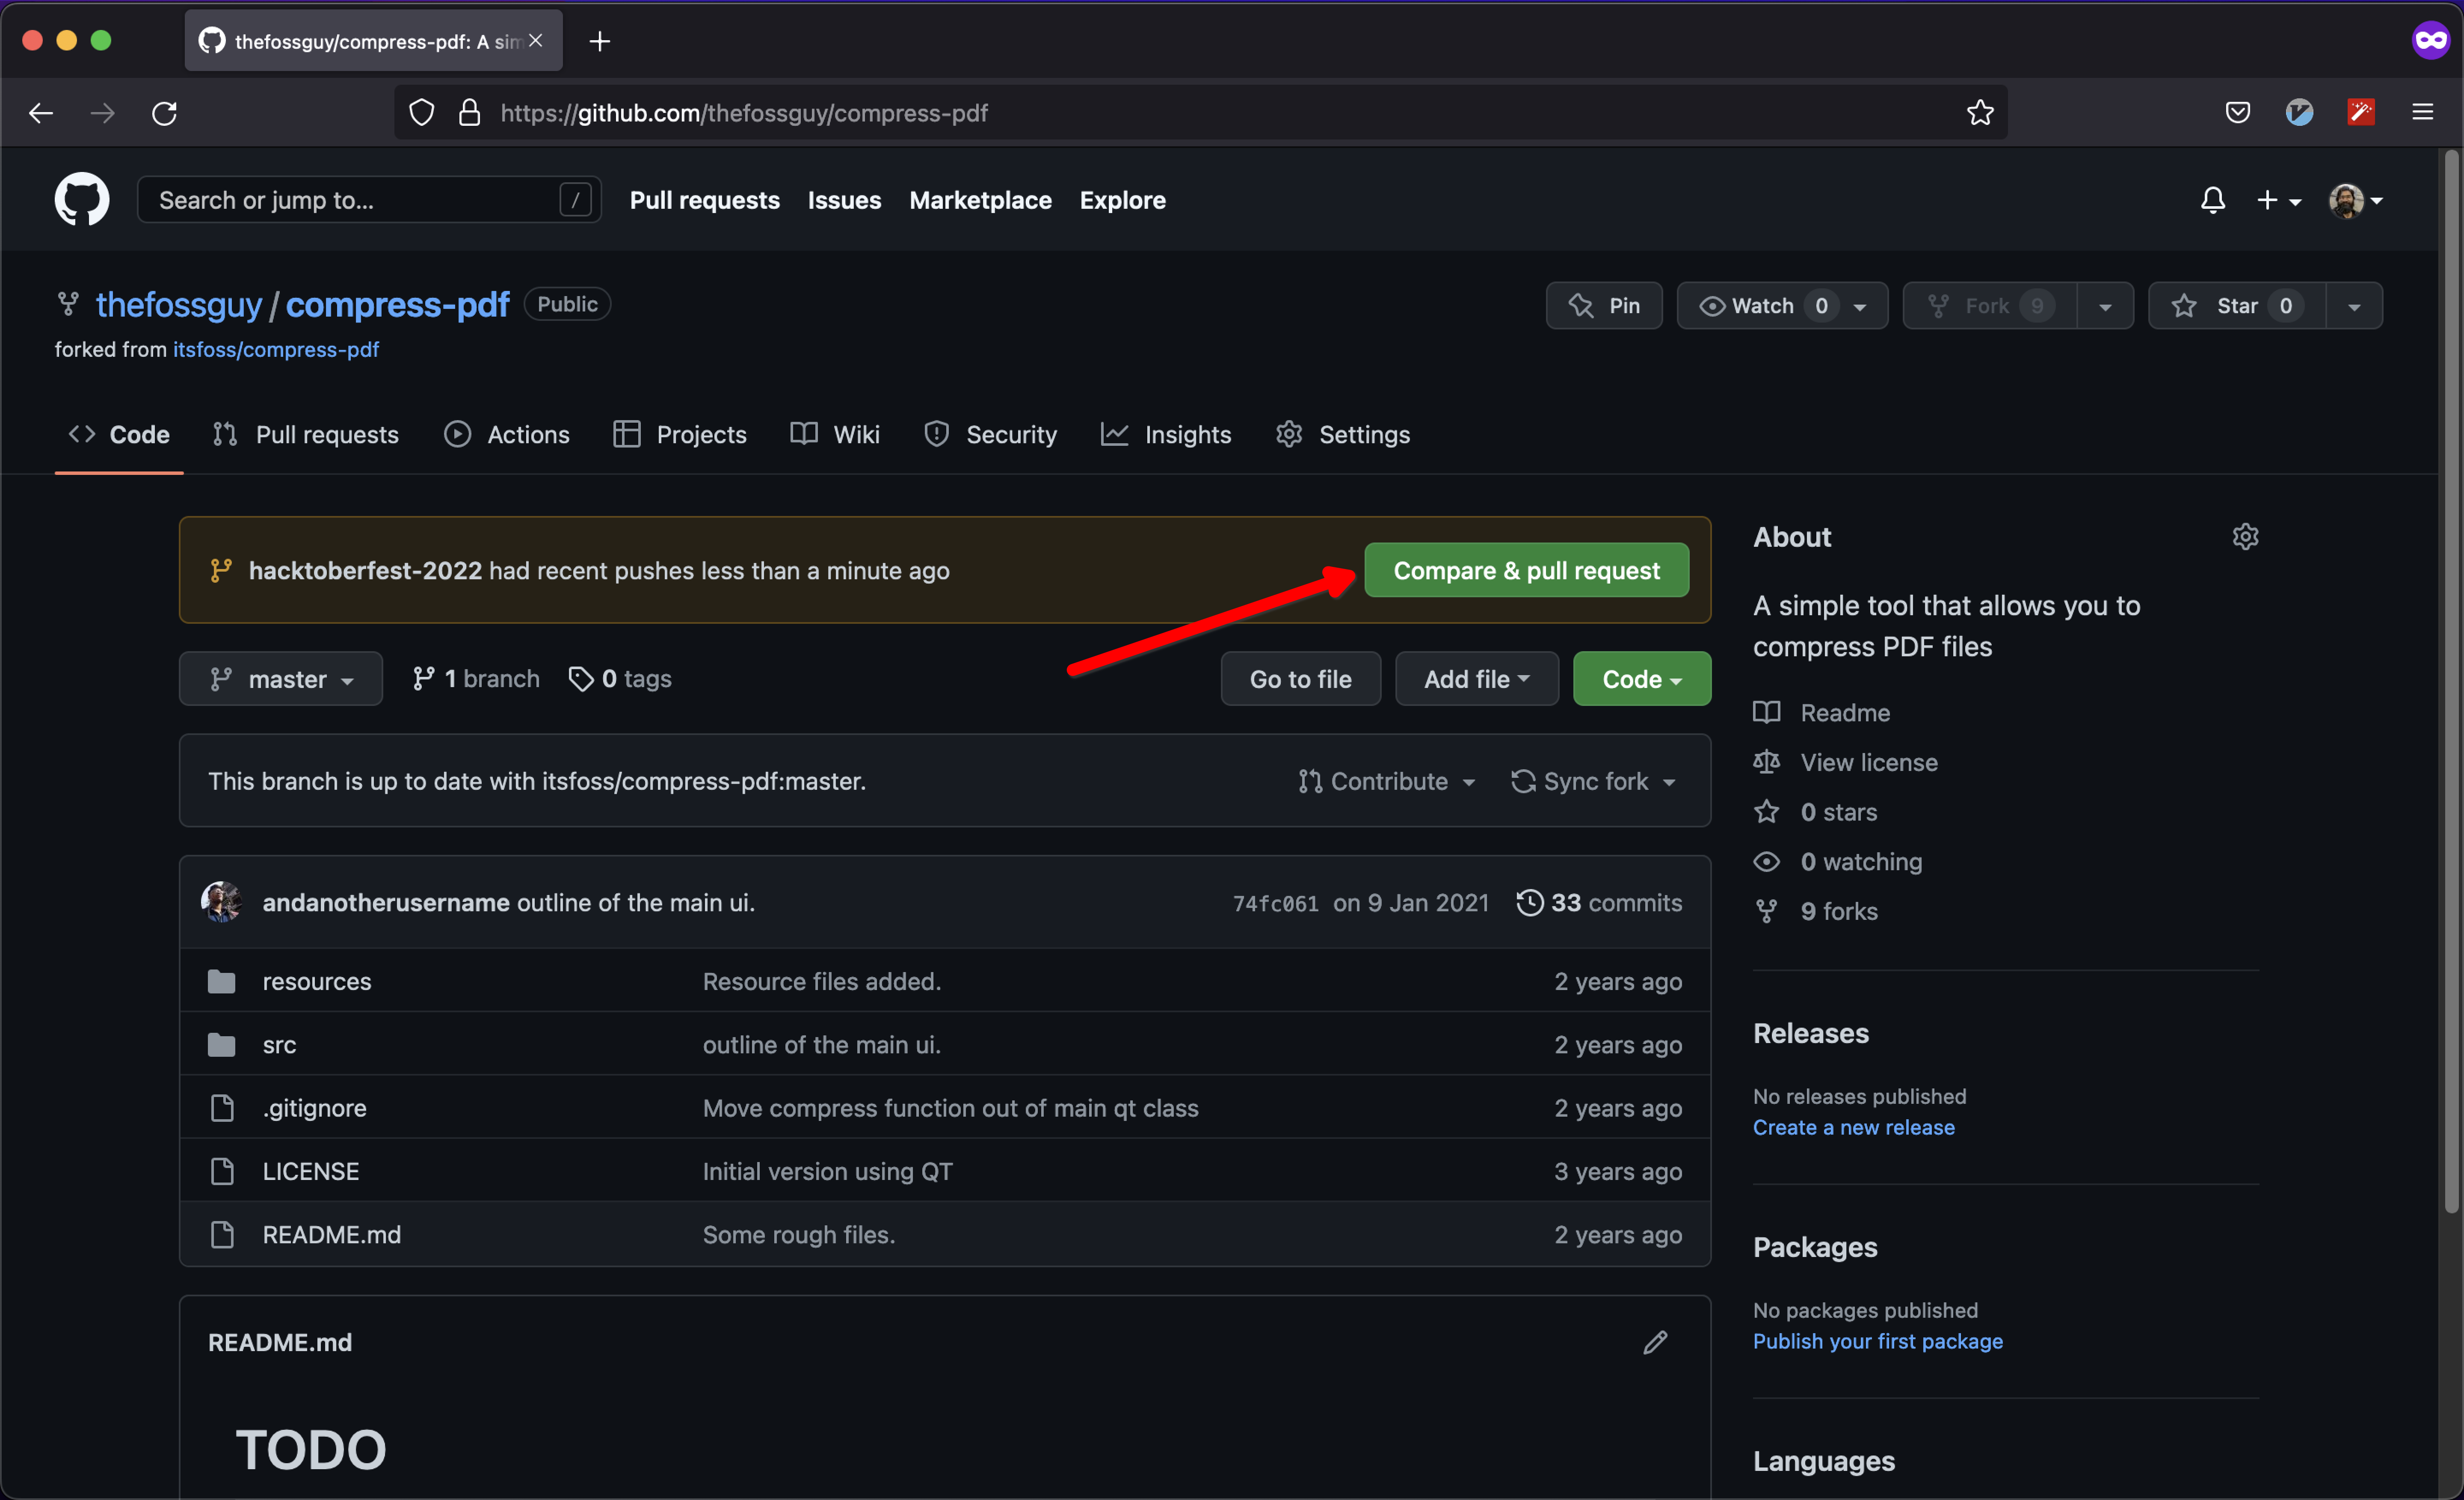
Clicking on it will take you to a web page that will ask for a comment. This is where you describe things like “Why is my commit useful”, “What does my commit provide”, “If merging my commit will break any existing code”, etc.
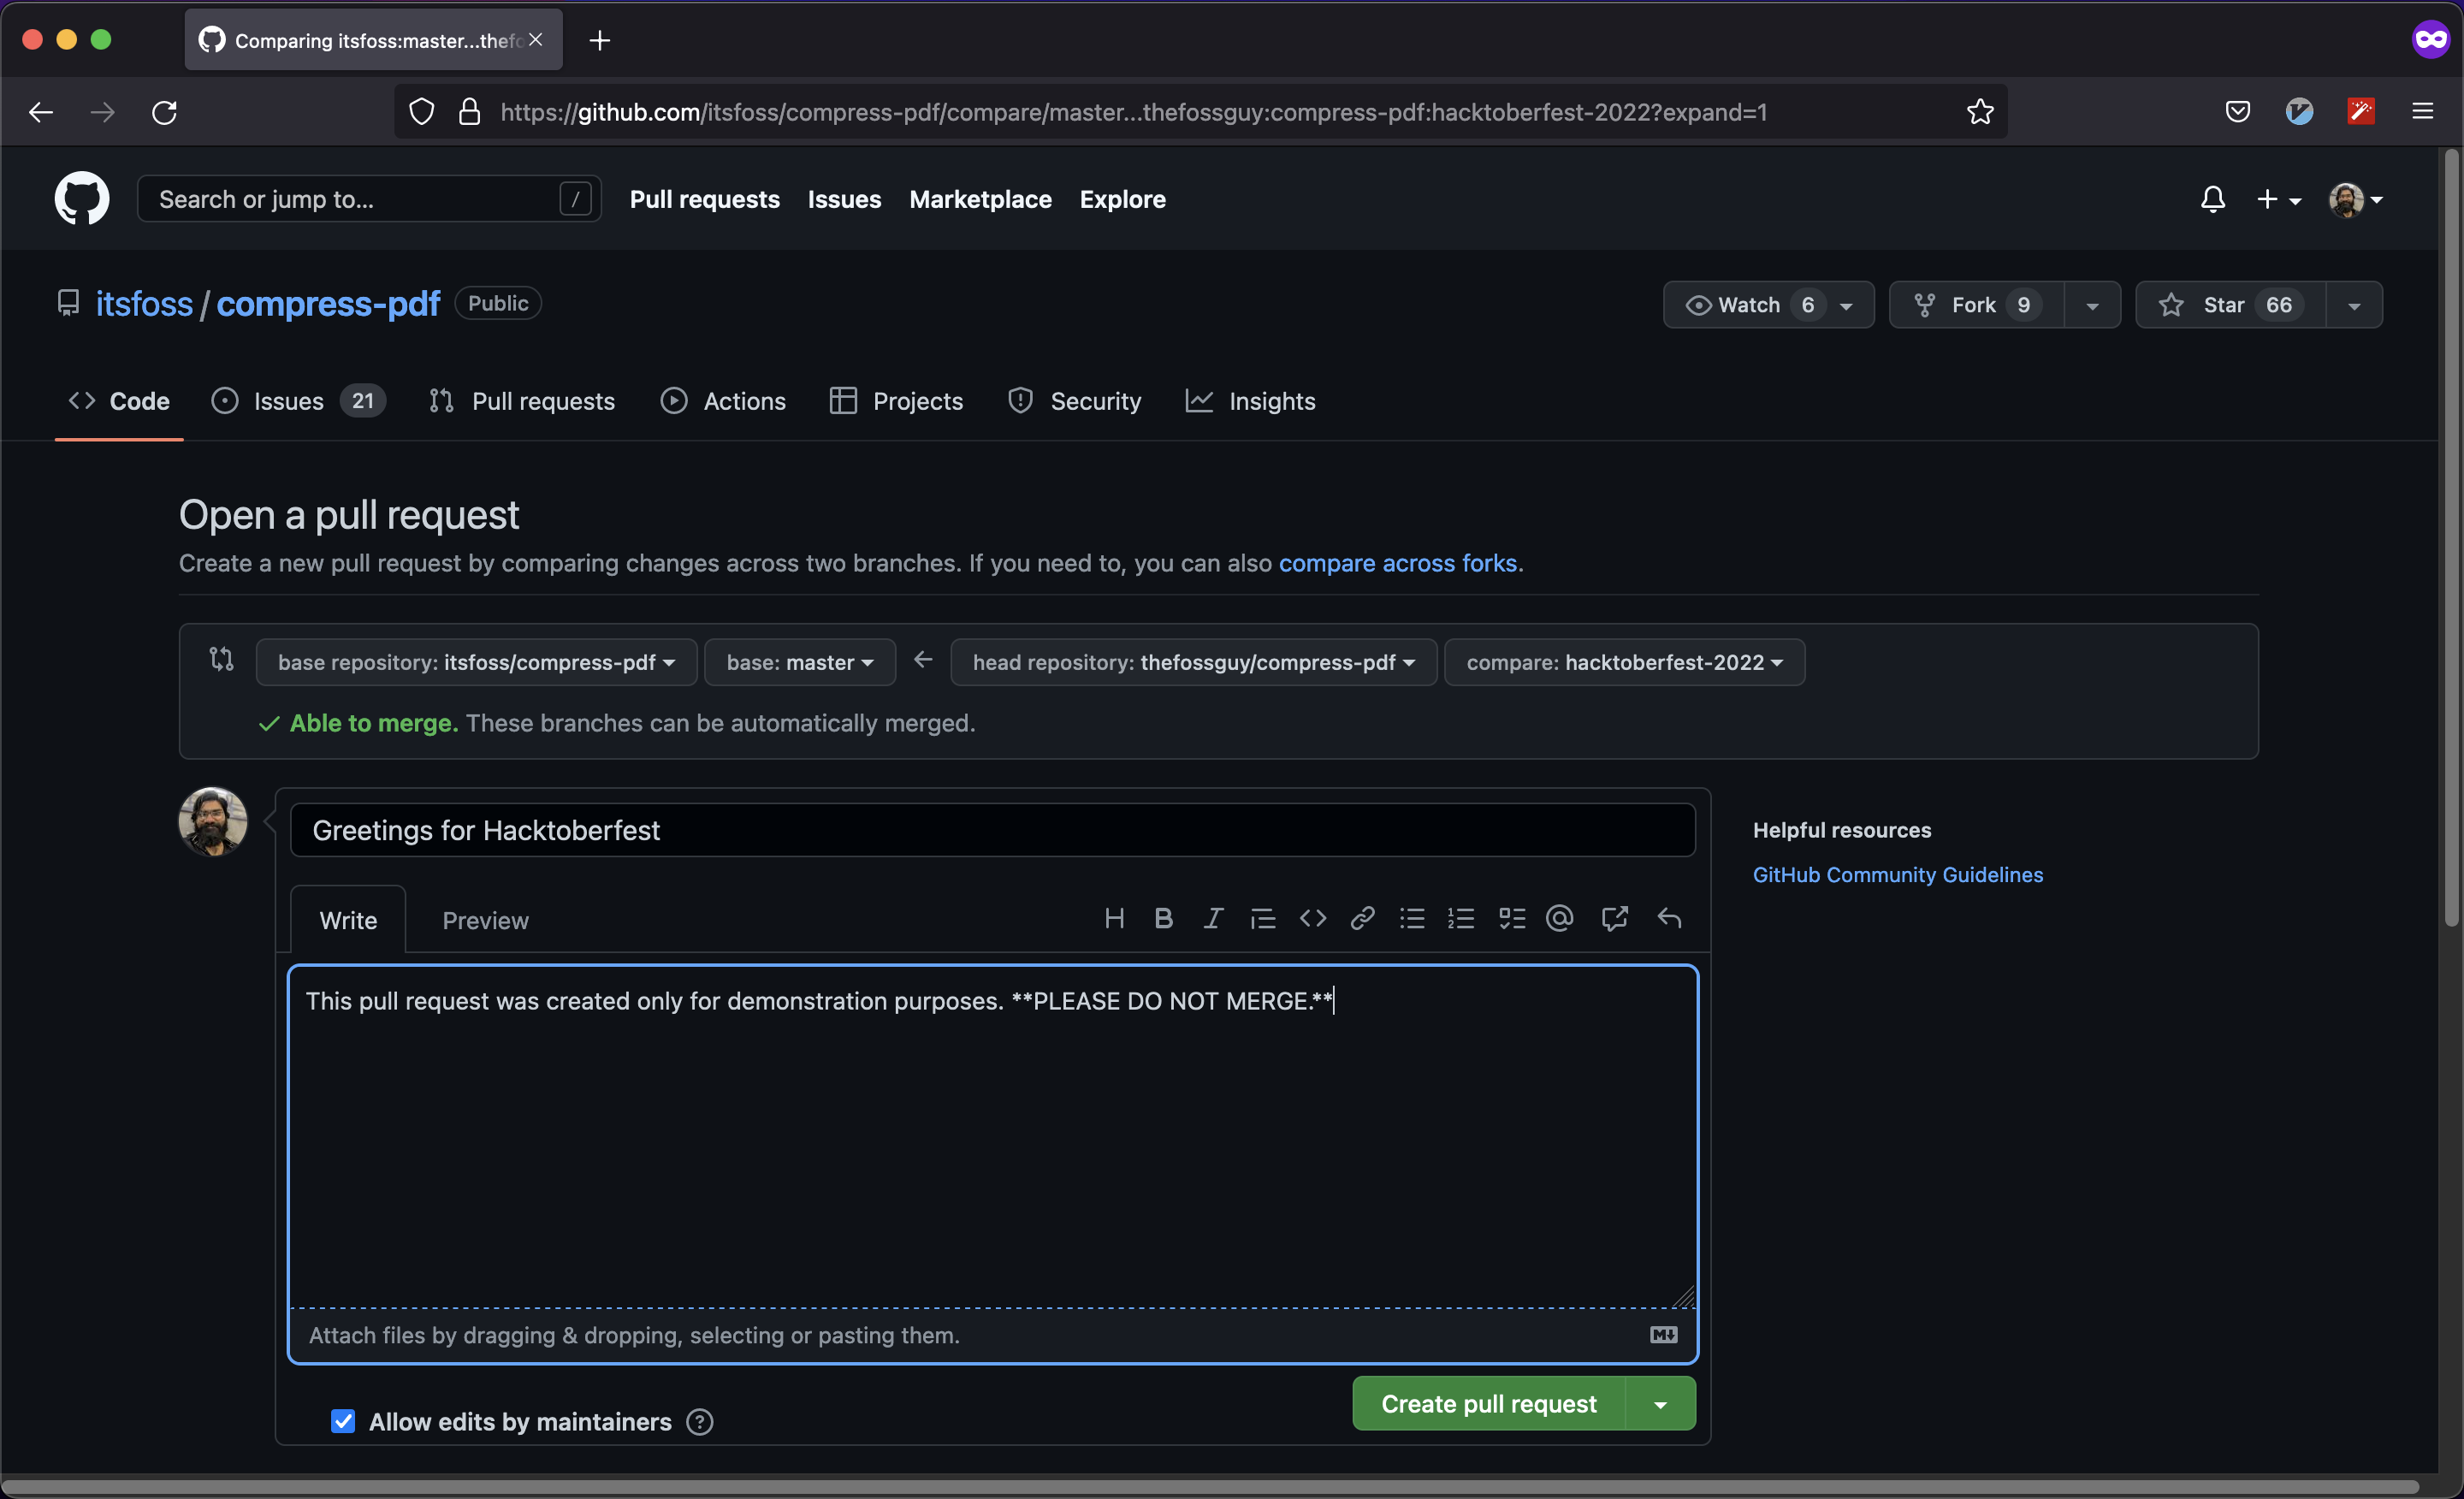
Once you have written a comment with all the details, click on the “Create pull request” button. Congratulations!
You just sent in your first pull request!
It’s Your First, Hopefully You Can Contribute More
The first few pull requests will always make you feeling nervous about the changes that you just sent. Do not worry, that nervousness will go away after you get comfortable.
As the project owner or the maintainer gets free enough, they will take a look at your pull request. If all the changes look okay to them, the pull request will get merged. How exciting!
In case your pull request does not get merged, do not worry. Politely approach the person who rejected your pull request. Ask them feedback as to where the problem was and what could be done to get your change merged.
Did you introduce a new library/dependency that had a better alternative? Or, is there something that can be rectified?
Of course, the maintainers may not respond to every query you have. So, make sure you do not bother them repeatedly after you have sent your doubt regarding the pull request.
Not having one pull request merged is not the end of the world. Try with other projects utilizing your passion and creativity, and it should be good to go!
If this helped you, consider supporting It's FOSS
It's FOSS has been helping people use Linux for the past 14 years. Help us stay independent from big tech. Become a Plus member, enjoy ad-free reading and get 5 eBooks.
