

You might have come across dope screenshots (especially via r/unixporn Subreddit), where users customize their desktops to their heart's desire and share it with the world. Linux lets you customize every aspect of your desktop experience, which is why it is possible.
And, the result? Something that feels and looks way better than any Mac or Windows system.
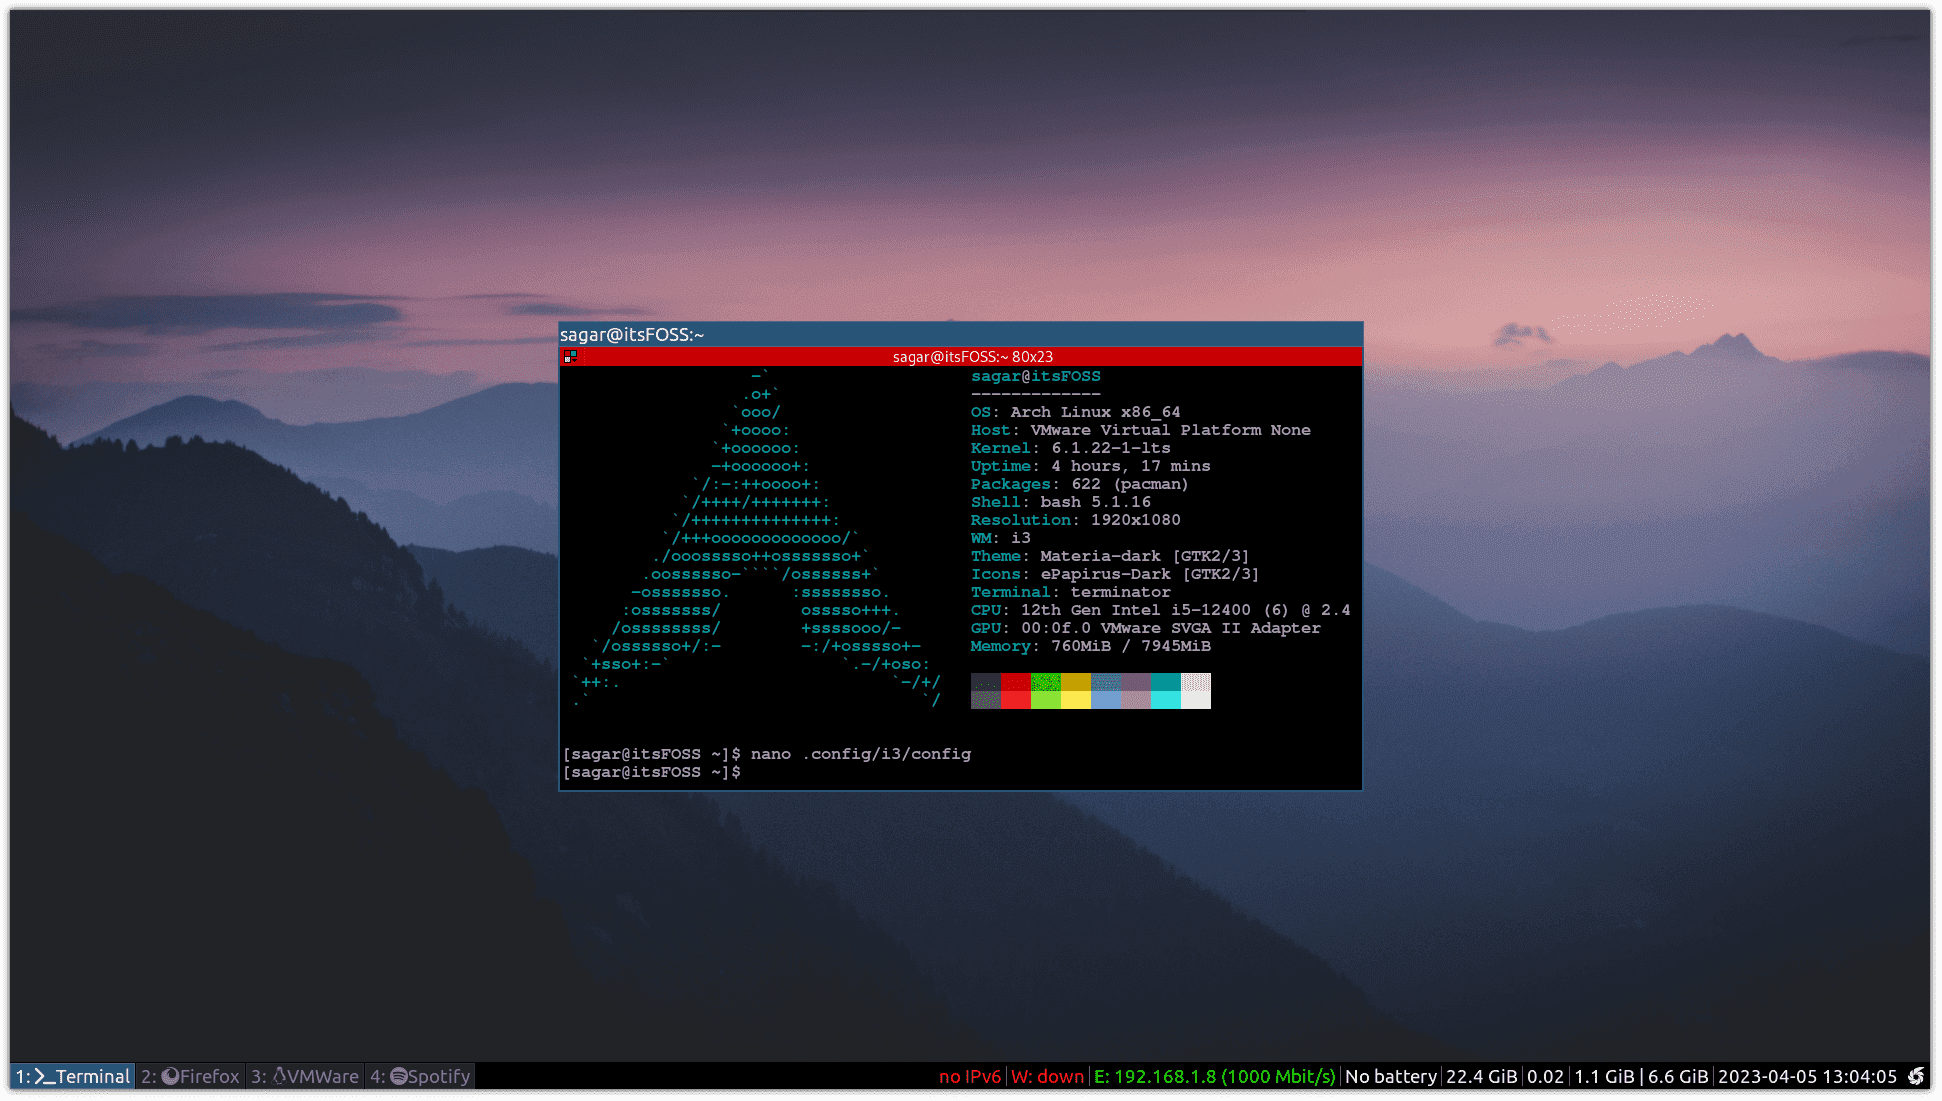
Just look at this 😌
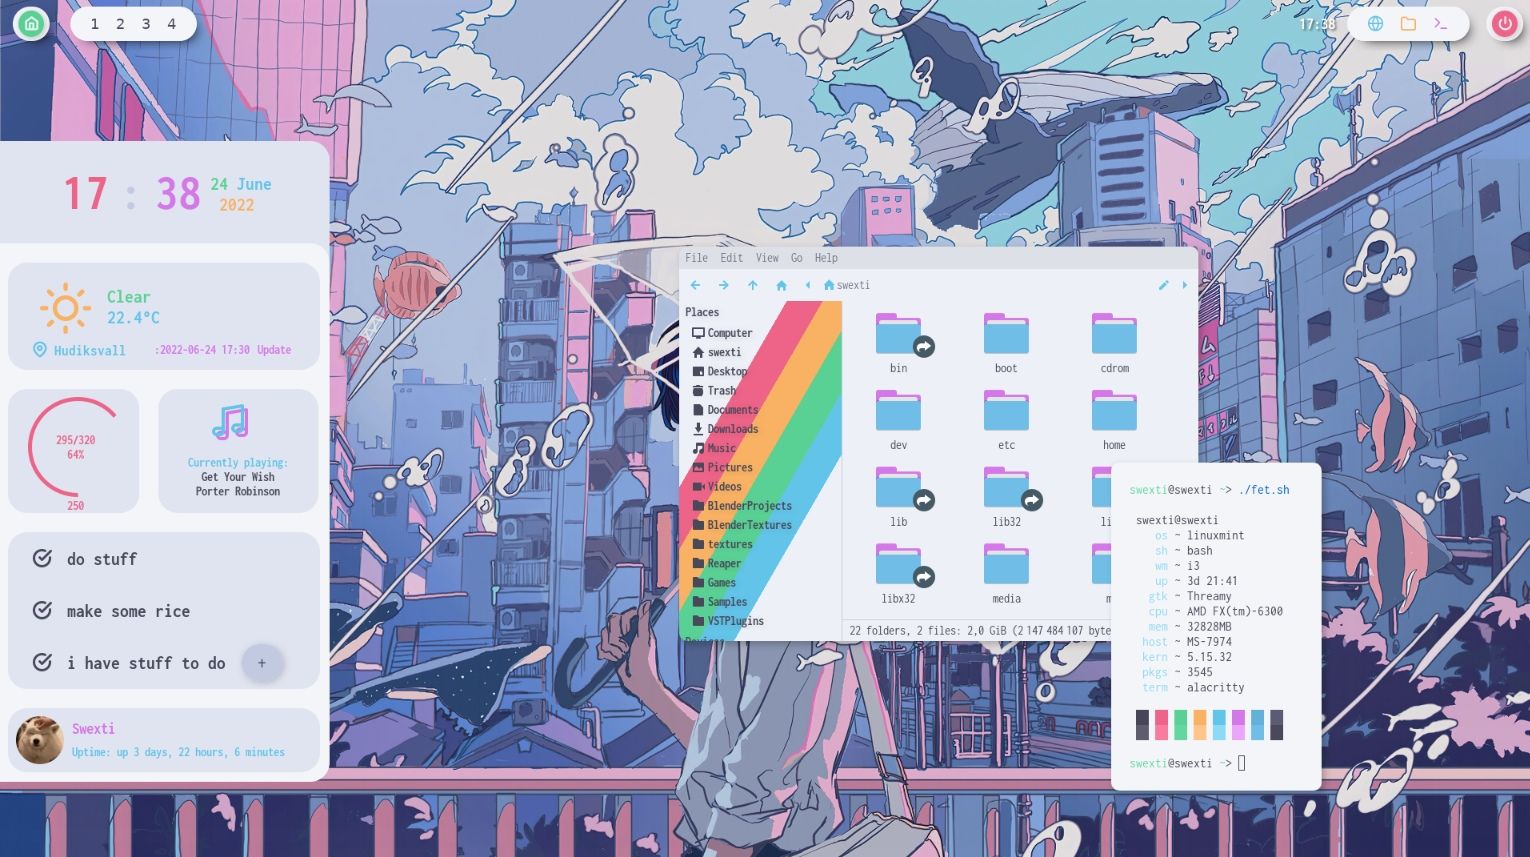
Does it look like a Linux Mint system? 😲
But how can you achieve something like that? It is tough to customize the look of your Linux desktop.
The answer to your questions lies in the window manager. If you can configure a window manager, you can customize the look.
For this guide, I will walk you through a basic configuration you can do with the i3 window manager. It is one of the best window managers for Linux.
Via /r/unixporn
Things you should know before following this guide:
- In this guide, I will use Arch Linux to demonstrate the steps, but you can use any of your preferred distros and have the same result.
- Remember, this guide will be a basic foundation for the i3 ricing.
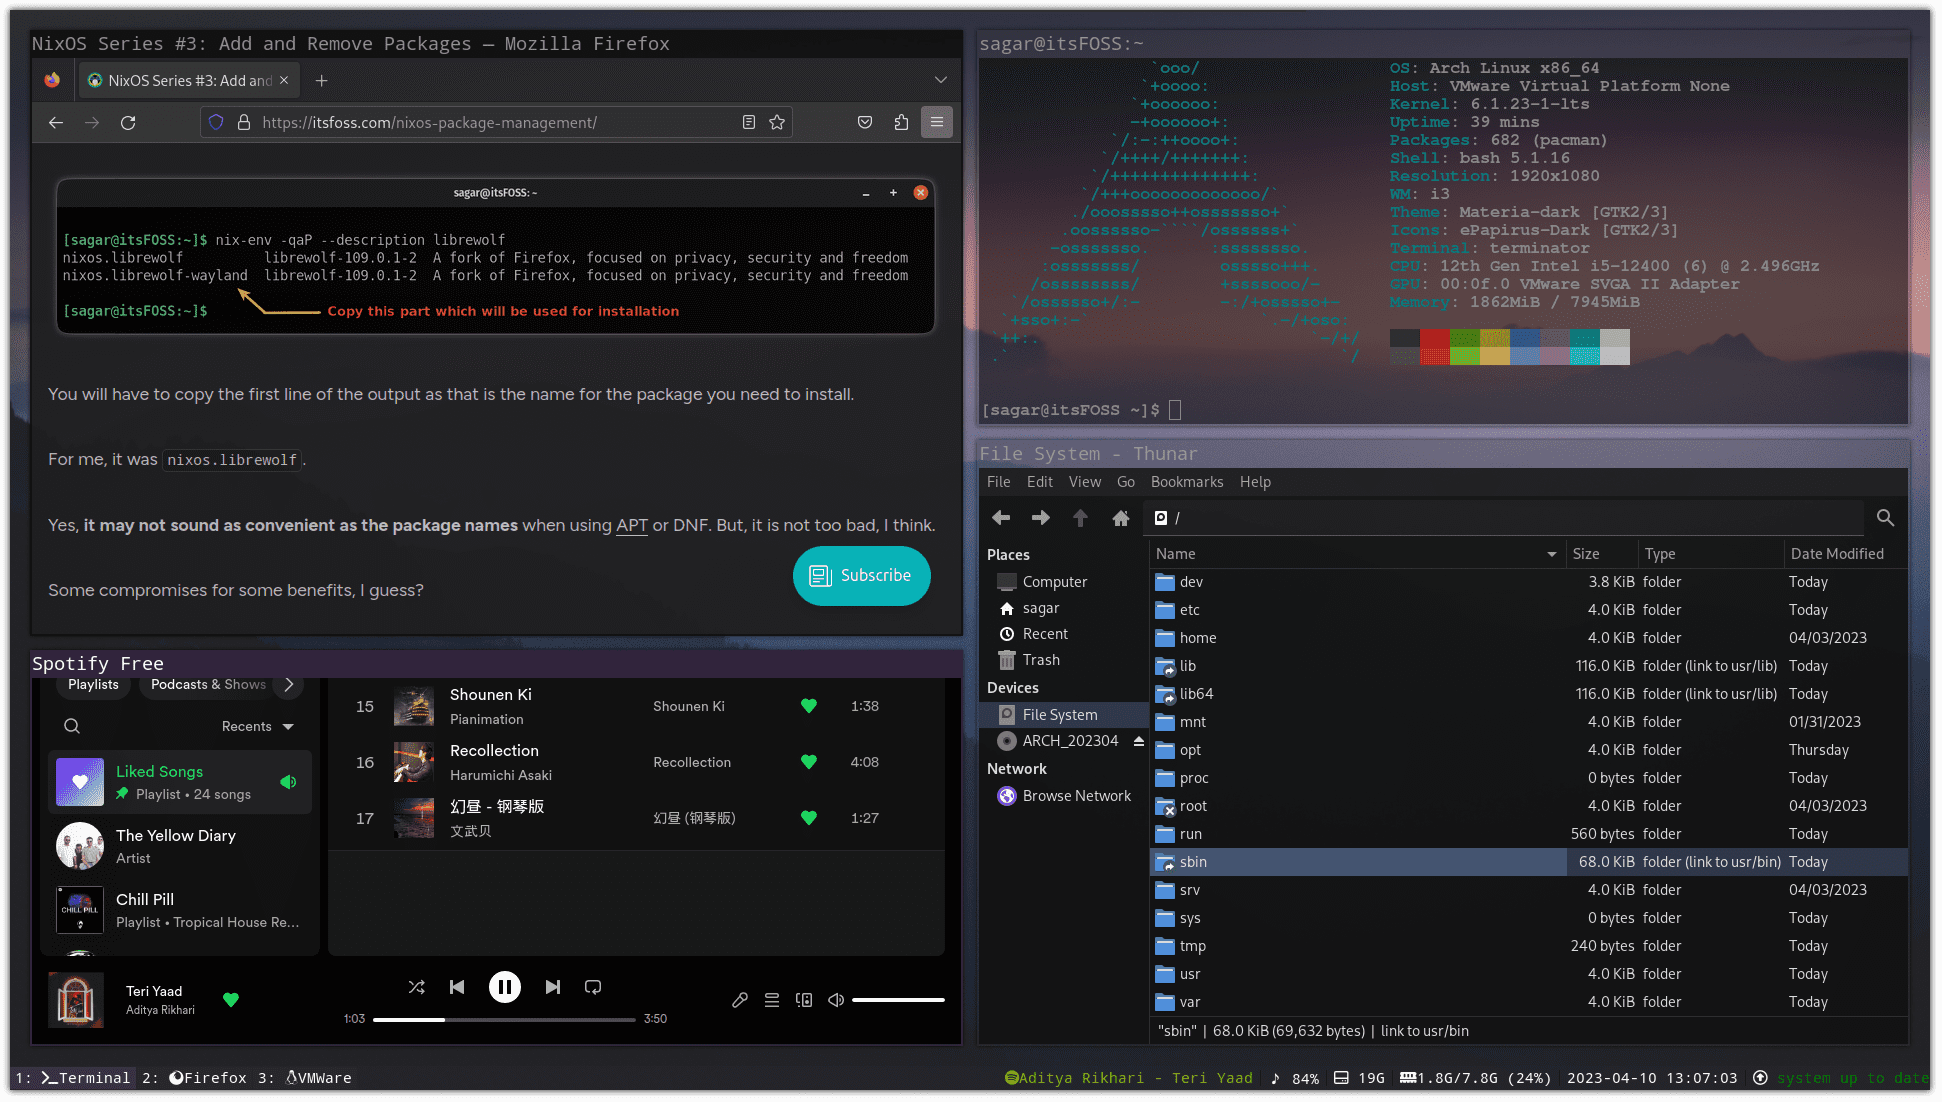
And here's the result of what you should expect after following this guide:
First, let's start with installing the i3 window manager.
Install i3 Window Manager on Linux
For Ubuntu/Debian base:
sudo apt install xorg lightdm lightdm-gtk-greeter i3-wm i3lock i3status i3blocks dmenu terminatorFor Arch Linux:
sudo pacman -S xorg lightdm lightdm-gtk-greeter i3-wm i3lock i3status i3blocks dmenu terminatorOnce you are done with the installation, enable the lightdm service using the following command:
sudo systemctl enable lightdm.serviceAnd start the lightdm service:
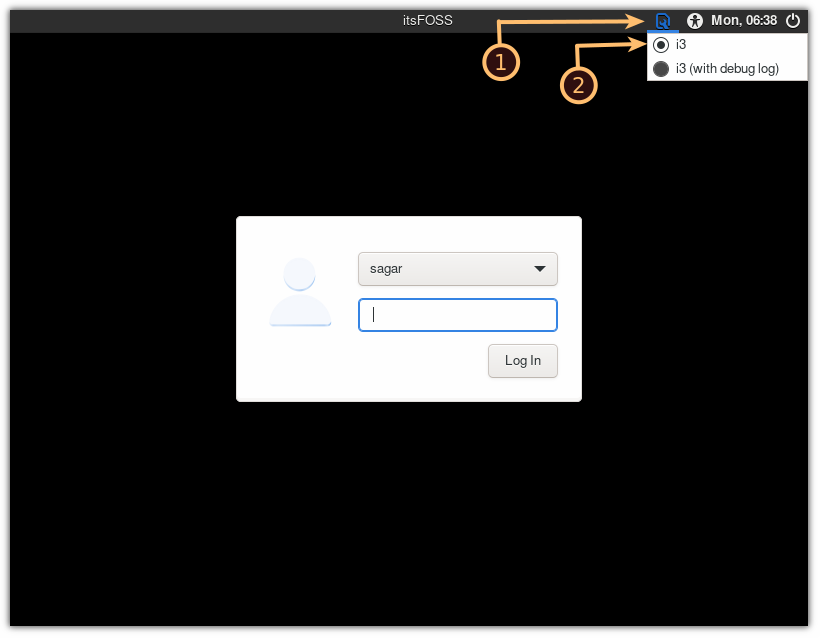
sudo systemctl start lightdm.serviceThat will start the lightdm greeter that will ask you to enter the password for your username.
And if you have multiple desktop environments installed, you can choose i3 from the selection menu:
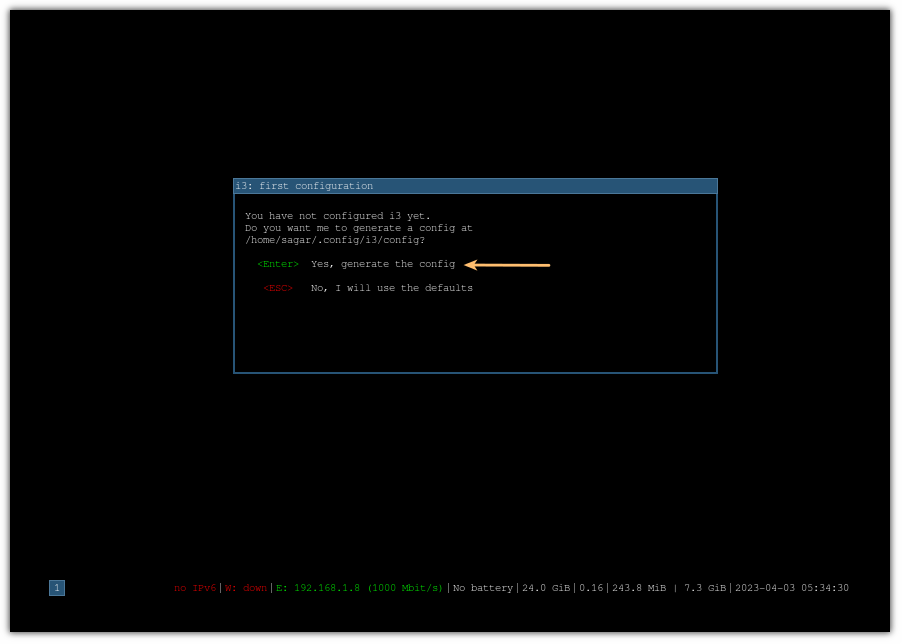
Once you log in to your first i3 instance, it will ask you whether you want to create an i3 config file.
Press Enter to create a new i3 config file:
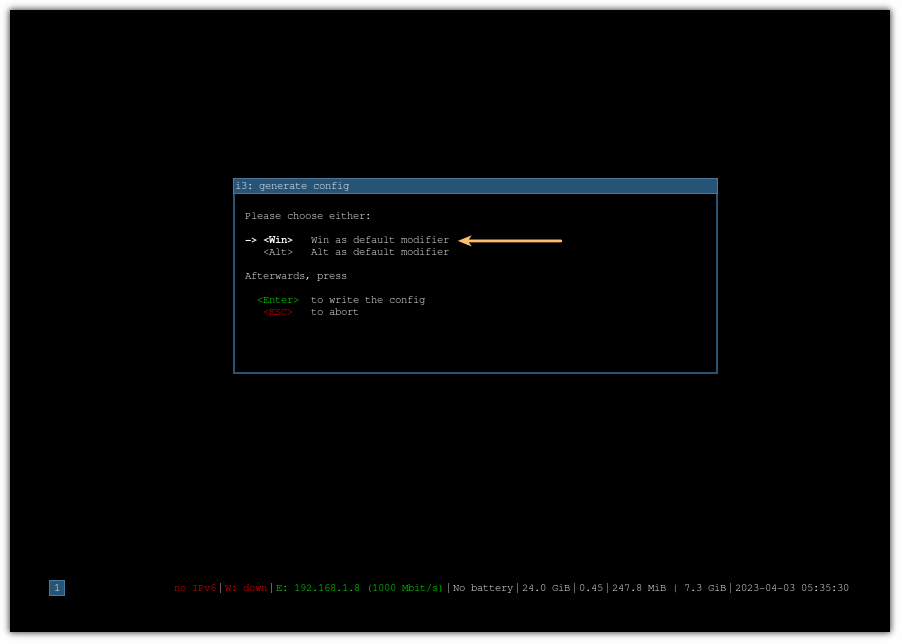
Next, it will ask you to choose between Win and Alt key, which should behave as mod key.
I would recommend you go with the Win (or the Super) key as most of the users are already used to it for shortcuts:
And your i3 window manager is ready to use.
But before we jump to the customization part, let me walk you through how you can use the i3 in the first place.
Keybindings of i3 Window Manager
So let's start with the basics.
The basic functionality of the window manager is to frame multiple windows horizontally and vertically, so you can monitor multiple processes simultaneously.
And the result looks like this:
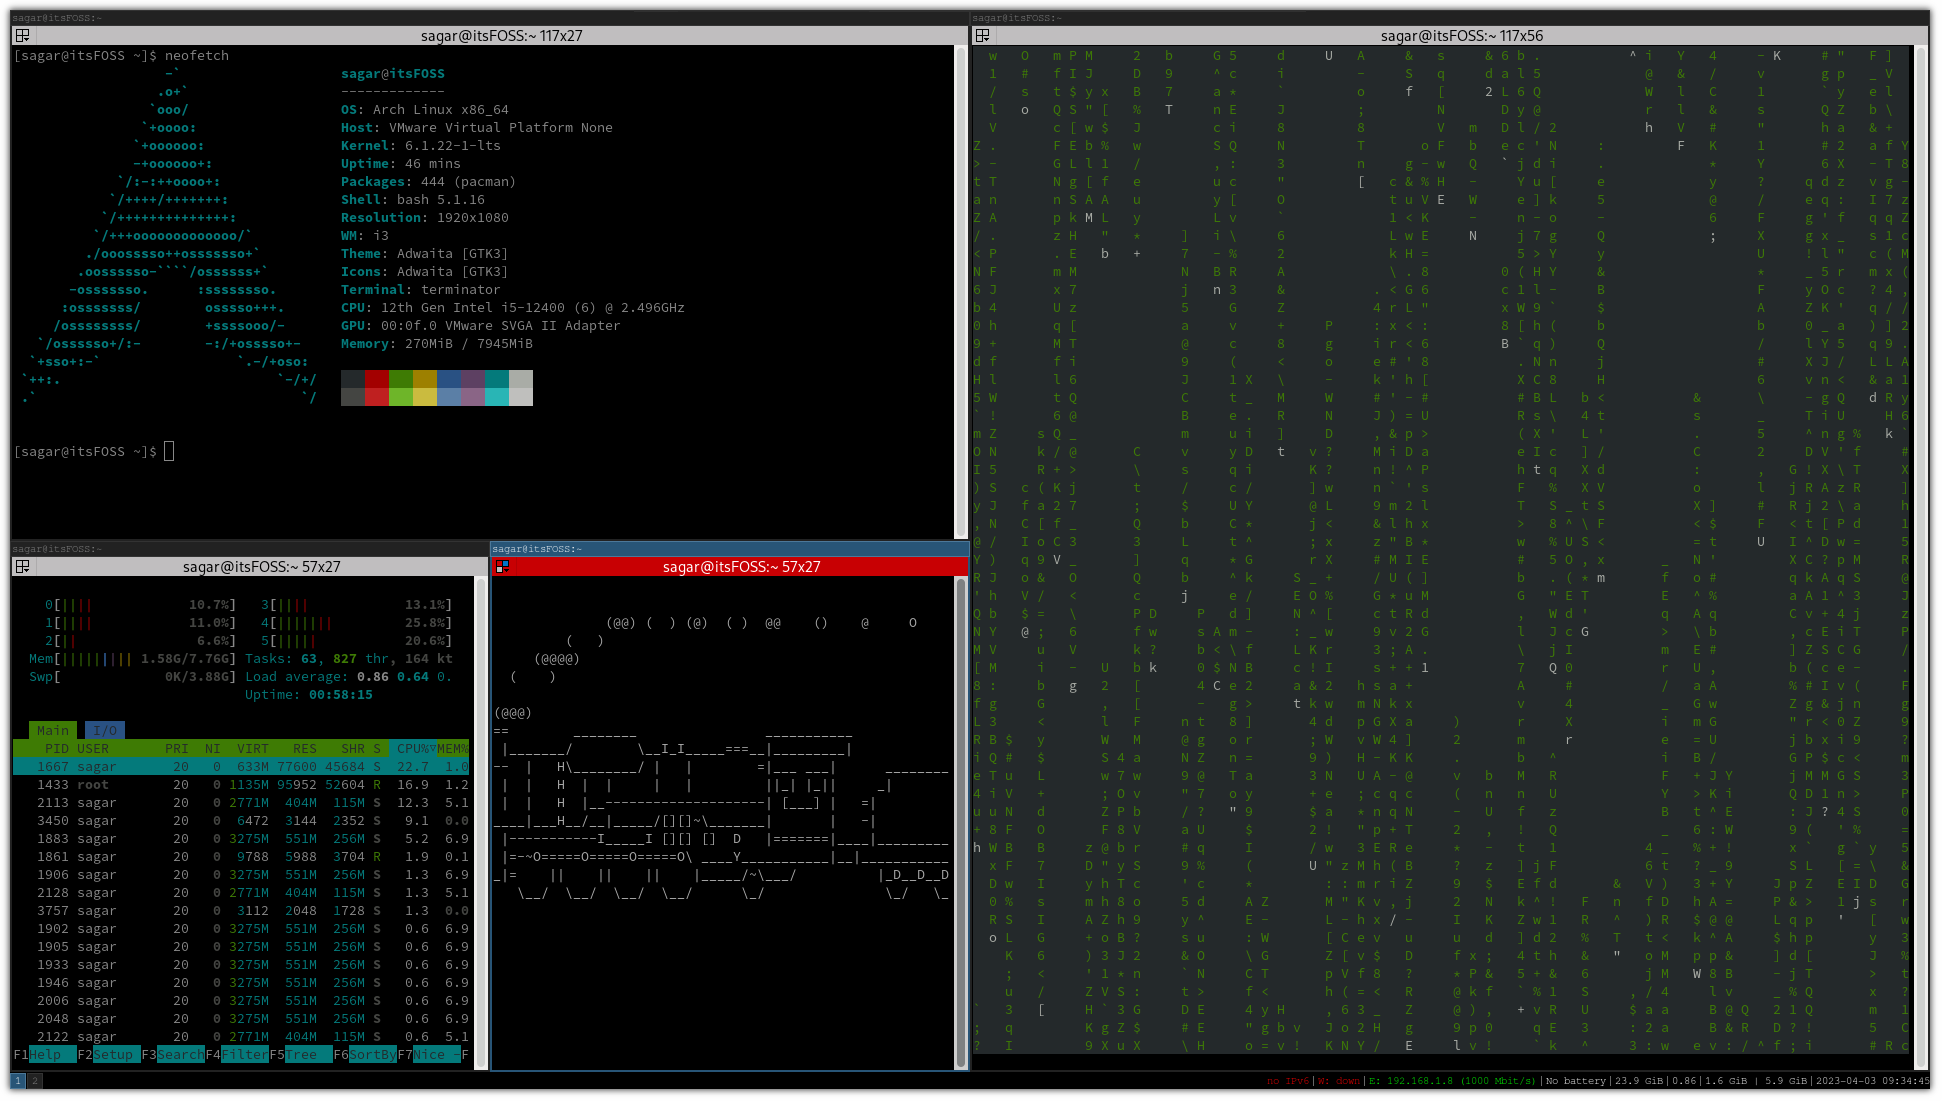
You can do a lot more than this using the following keybindings:
| Keybiding | Description |
|---|---|
Mod + Enter |
Open terminal. |
Mod + ← |
Focus left. |
Mod + → |
Focus right. |
Mod + ↑ |
Focus up. |
Mod + ↓ |
Focus down. |
Mod + Shift + ← |
Move the window to the left side. |
Mod + Shift + → |
Move the window to the right side. |
Mod + Shift + ↑ |
Move the window up. |
Mod + Shift + ↓ |
Move the window down. |
Mod + f |
Toggle the focused window to full-screen. |
Mod + v |
The next window will be placed vertically. |
Mod + h |
The next window will be placed horizontally. |
Mod + s |
Enables the stacked window layout. |
Mod + w |
Enables the tabbed window layout. |
Mod + Shift + Space |
Enables the floating window (for focused window). |
Mod + Left-mouse-click |
Drag the entire window using the mouse. |
Mod + 0-9 |
Switch to another workspace. |
Mod + Shift + 0-9 |
Move the window to another workspace. |
Mod + d |
Open the application launcher (D menu). |
Mod + Shift + q |
Kills the focused window. |
Mod + Shift + c |
Reloads the I3 config file. |
Mod + Shift + r |
Restart the I3 WM. |
Mod + Shift + e |
Exit I3 WM. |
I know an overwhelming number of keybindings are available, but if you practice them daily, you'll get used to them in no time.
And if you are wondering, you can change the keybindings at your convenience, which I will share in the later part of this guide.
Now, let's have a look at the configuration part.
Enable AUR in Arch Linux
So if you have a fresh installation of Arch Linux, you may not have enabled the AUR.
This means you are missing out on the most crucial feature of the Arch.
To enable the AUR, you'd need AUR to utilize the AUR package helper. Here, I will be using the yay.
 Dimitrios
First, install the git:
sudo pacman -S gitNow, clone the yay repository and change your directory to yay:
git clone https://aur.archlinux.org/yay-git.git && cd yayAnd finally, build the package:
makepkg -siThere are some other AUR package helpers like Paru, so if you want to use something else apart from yay, you can proceed, or explore other options.
Change resolution of i3 WM
You will face issues, especially if you are using a virtual machine for window manager where the display resolution may be locked at 1024x768, as is in my case.
So you will have to execute the following command by specifying the desired display resolution:
xrandr --output [Display_name] --mode [resolution]To find the name of the connected display, you will have to use the xrandr command in the following manner:
xrandr | grep -w 'connected'
In my case, it is Virtual-1.
So if I want to change the resolution to 1920*1080, I will have to execute the following:
xrandr --output Virtual-1 --mode 1920x1080But this will only work temporarily. To make it permanent, you will have to make changes in the i3 config file.
First, open the config file:
nano ~/.config/i3/configGo to the end of the file in nano by pressing Alt + / and use the following syntax to change the display resolution permanently:
# Display Resolution
exec_always xrandr --output [Display_name] --mode [Resolution]
The result should look like this:

Once done, save changes and exit from the nano text editor.
Now, restart the i3 WM using the Mod + Shift + r to take effect from the changes you've made to the config file and that's it!
Change wallpaper in the i3 Window manager
By default, i3 will look dated, and you may want to switch back to your previous desktop environment.
But by changing the wallpaper itself, you can start changing the whole vibe of the system.
And there are various ways to change the wallpaper in i3, but here, I will be showing you how you can use the feh utility.
First, let's start with the installation itself:
For Arch-based distros:
sudo pacman -S fehFor Ubuntu/Debian based-distros:
sudo apt install fehOnce done, you can download your favorite wallpaper from the internet. Next, open the i3 config file:
nano ~/.config/i3/configGo to the end of the file and use the feh command as mentioned:
# Display Wallpaper
exec_always feh --bg-fill /path/to/wallpaper
In my case, the wallpaper was in the Downloads directory, so my command would look like this:
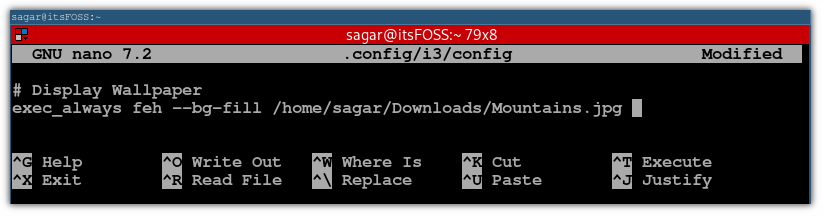
Save changes and exit from the nano text editor.
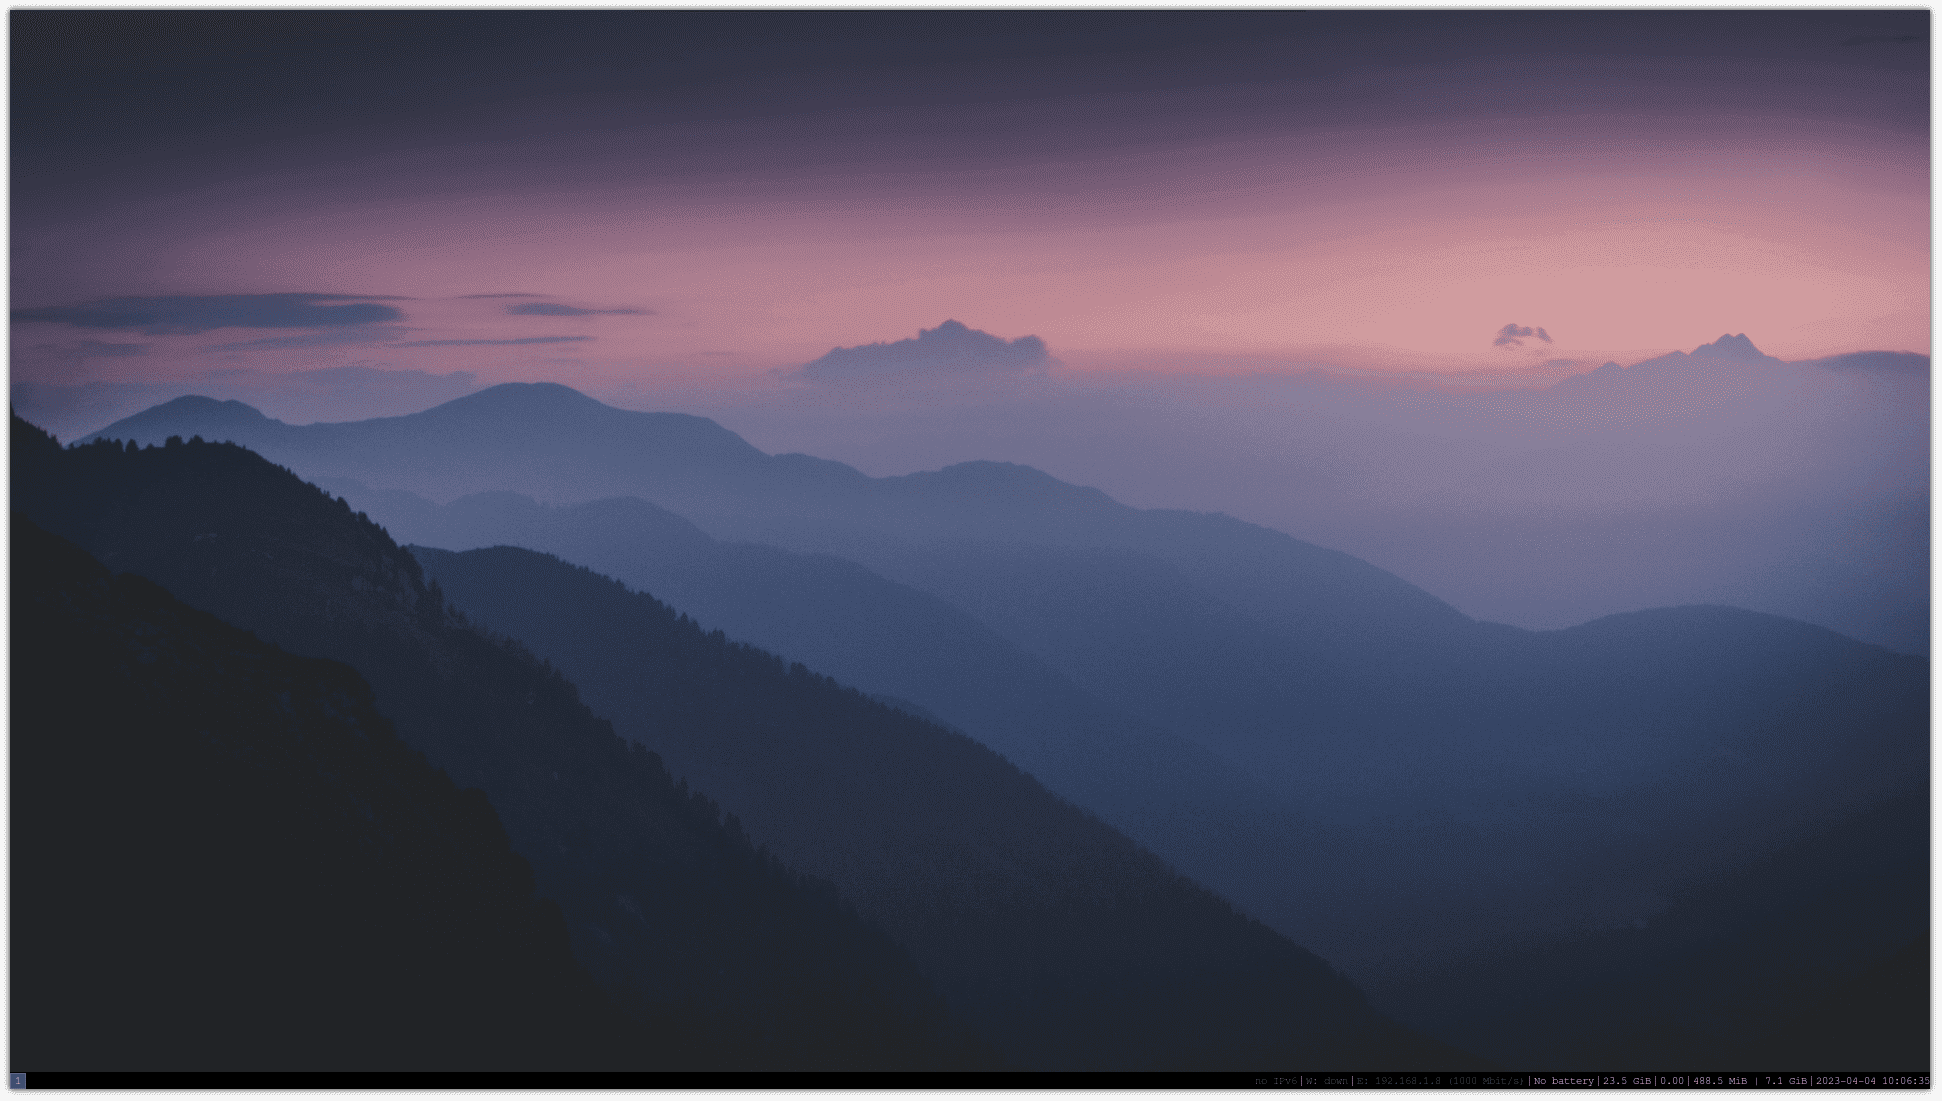
To take effect from the changes you made to the config file, restart the i3 window manager using Mod + Shift + r.
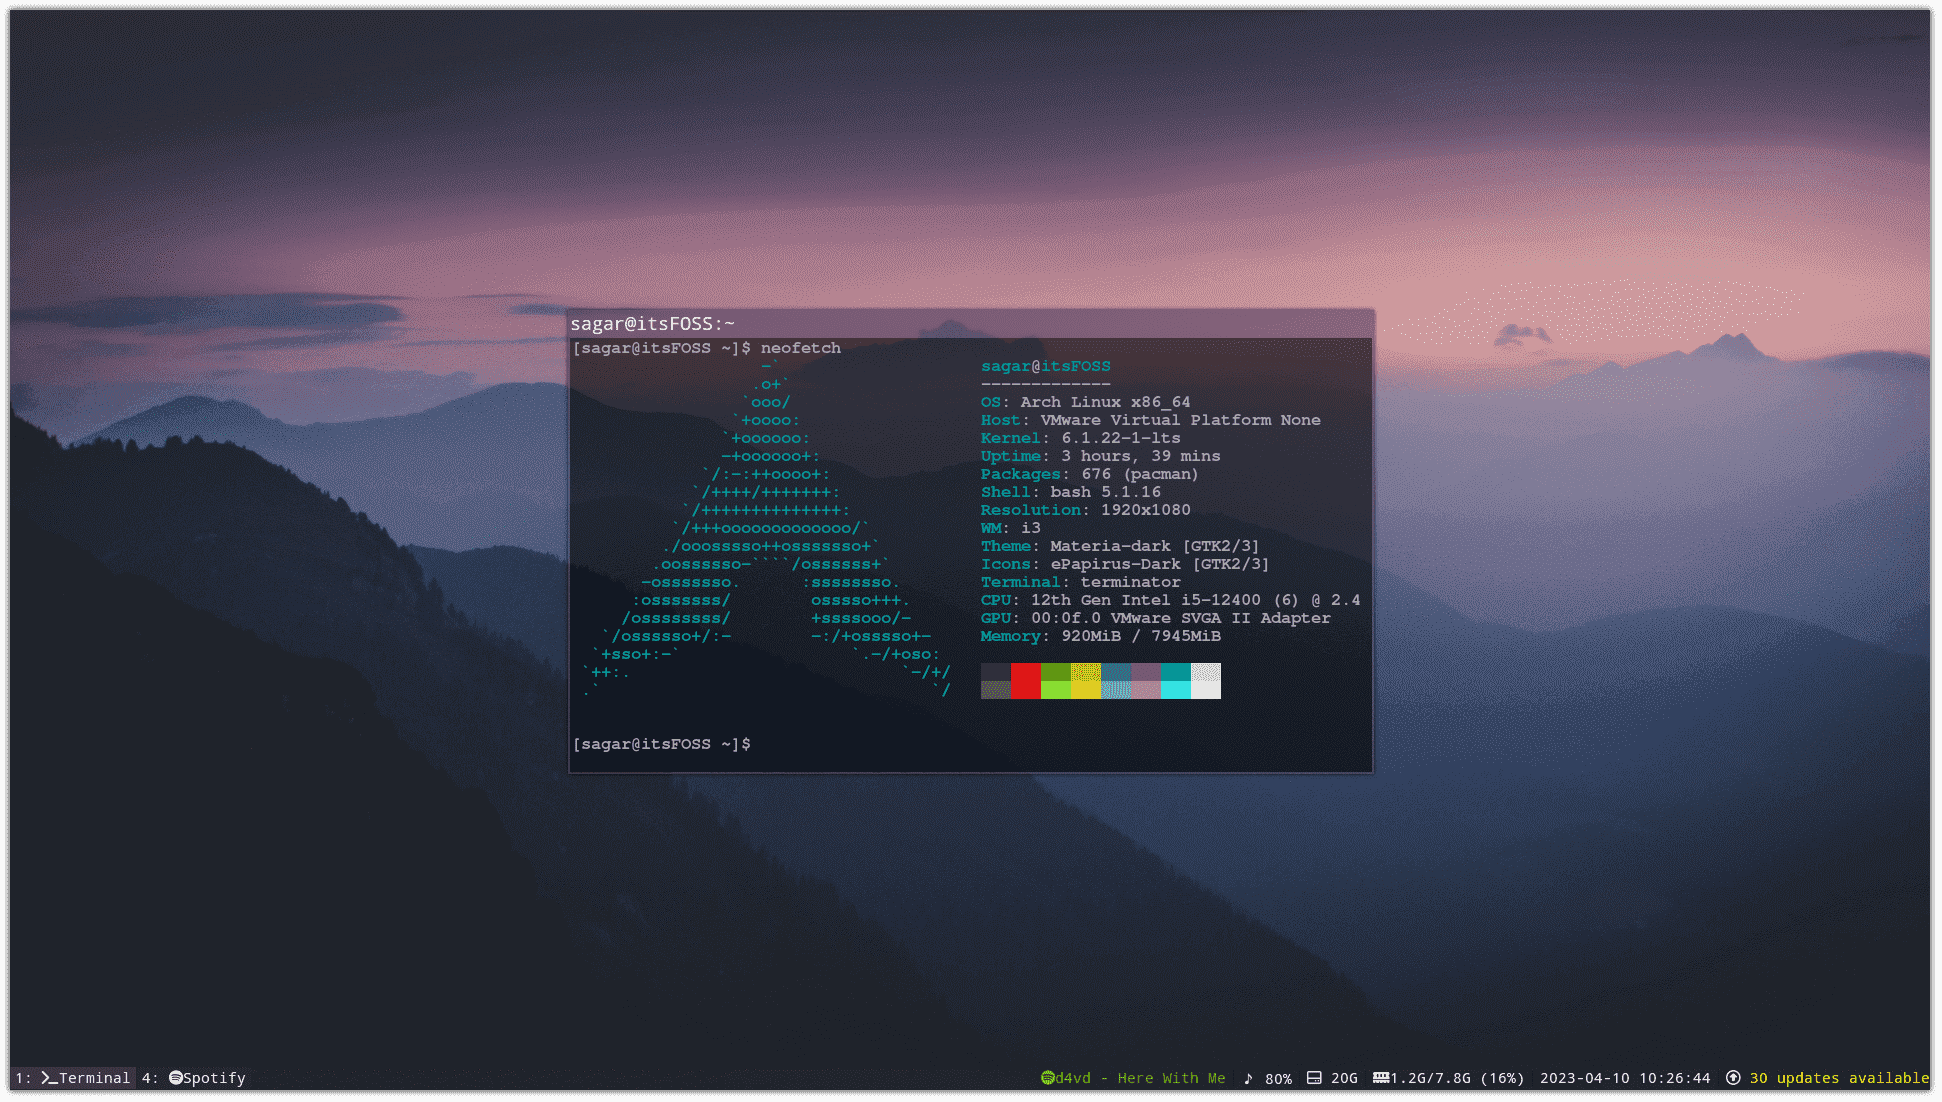
Mine looks like this:
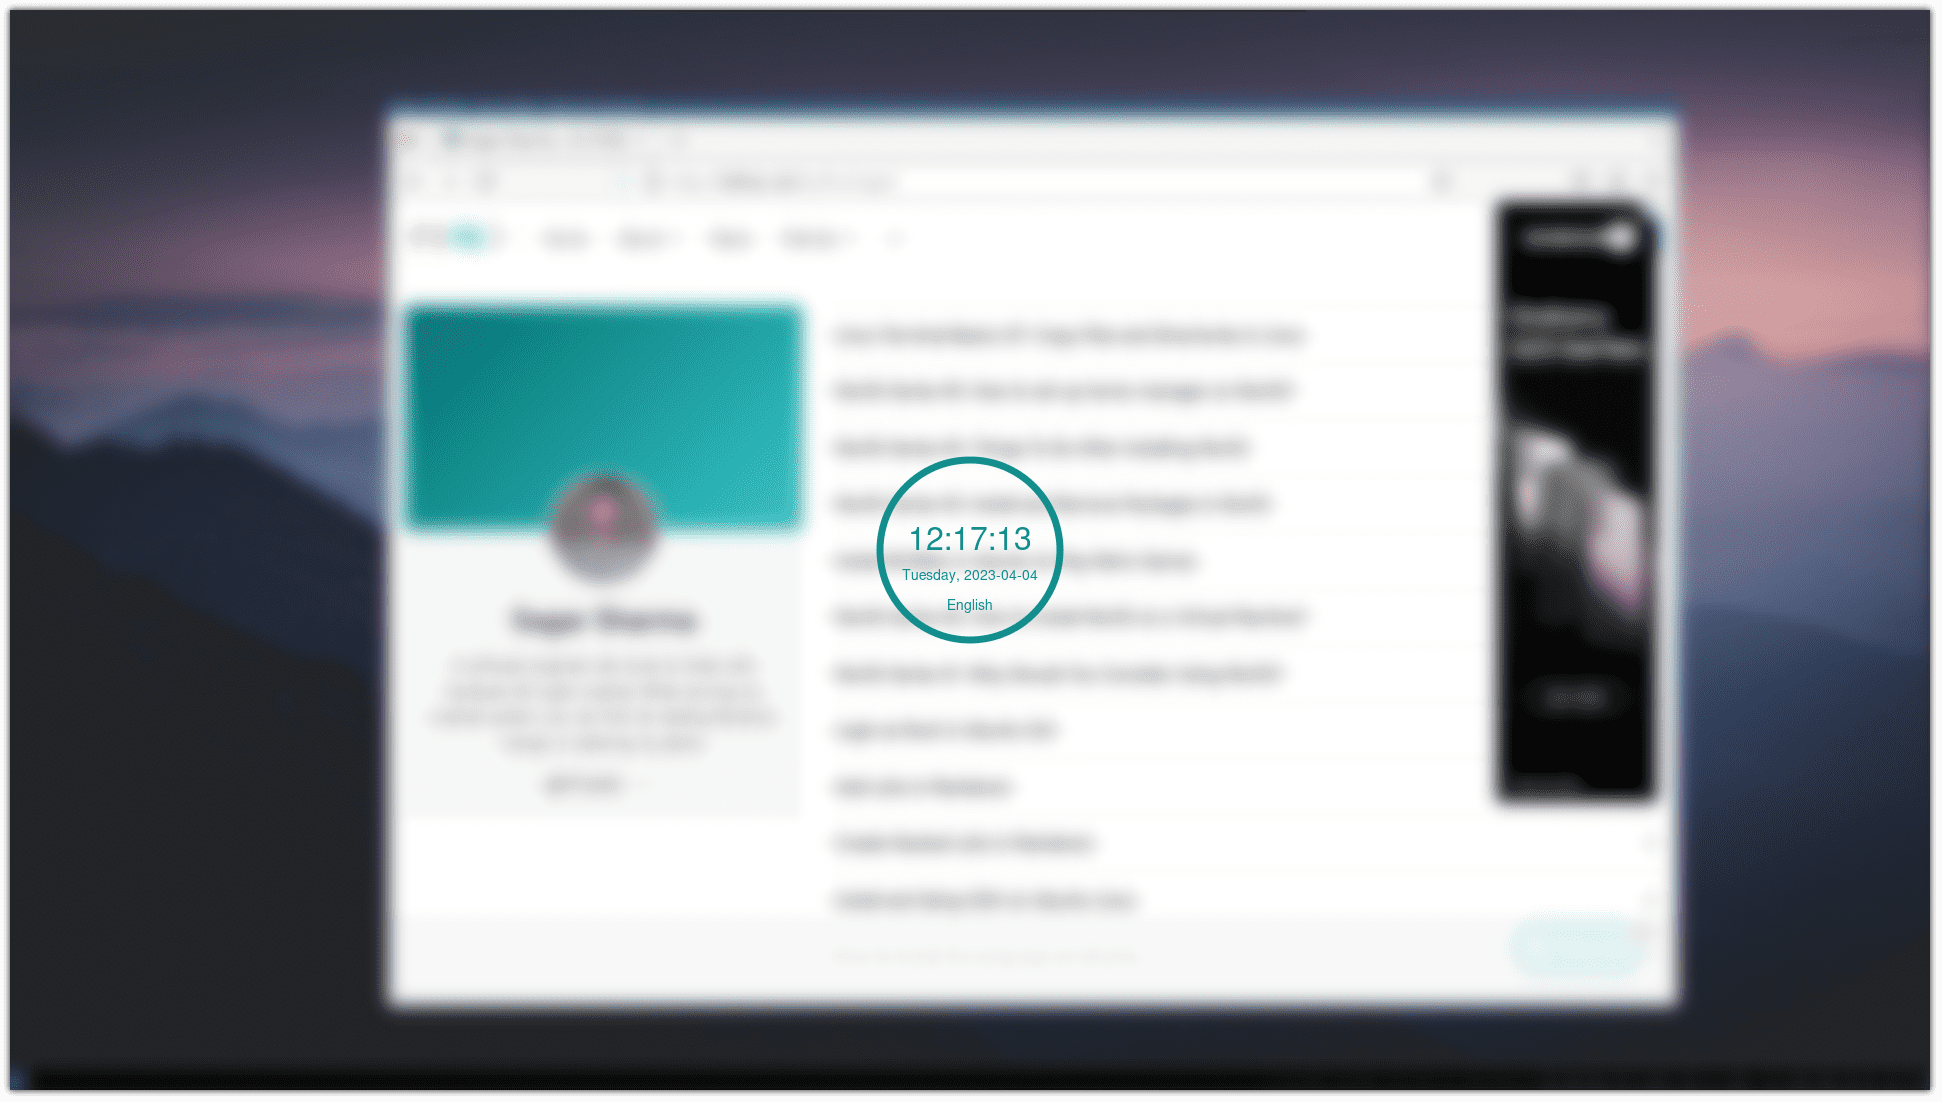
Customize i3 lock screen
By default, if you want to lock the system, you will have to execute the following command:
i3lock And the lock screen looks like this:
So here, I will show you:
- How to create a custom shortcut to lock the i3 session
- How to change the lock screen wallpaper
To make the lock screen beautiful, you'd have to use the i3lock-color package.
But first, you'd have to remove the existing i3lock as it will conflict with the i3lock-color:
To remove it from Arch:
sudo pacman -R i3lockFor Ubuntu/Debian users:
sudo apt remove i3lockOnce done, you can install the i3lock-color using the AUR helper:
yay i3lock-colorAnd if you're on an Ubuntu base, you'd have to build it from scratch. You can find detailed instructions on their GitHub page.
Once you are done with the installation, let's create a new directory and make a new file to store the configuration for the lock screen:
mkdir ~/.config/scripts && nano ~/.config/scripts/lockAnd paste the following file contents to define the lock screen styling:
#!/bin/sh

BLANK='#00000000'
CLEAR='#ffffff22'
DEFAULT='#00897bE6'
TEXT='#00897bE6'
WRONG='#880000bb'
VERIFYING='#00564dE6'

i3lock \
--insidever-color=$CLEAR     \
--ringver-color=$VERIFYING   \
\
--insidewrong-color=$CLEAR   \
--ringwrong-color=$WRONG     \
\
--inside-color=$BLANK        \
--ring-color=$DEFAULT        \
--line-color=$BLANK          \
--separator-color=$DEFAULT   \
\
--verif-color=$TEXT          \
--wrong-color=$TEXT          \
--time-color=$TEXT           \
--date-color=$TEXT           \
--layout-color=$TEXT         \
--keyhl-color=$WRONG         \
--bshl-color=$WRONG          \
\
--screen 1                   \
--blur 9                     \
--clock                      \
--indicator                  \
--time-str="%H:%M:%S"        \
--date-str="%A, %Y-%m-%d"       \
--keylayout 1                \
Save changes and exit from the text editor.
Now, make this file executable using the chmod command:
sudo chmod +x .config/scripts/lockNext, you'd have to introduce some changes to the config file to add the path to this config file to make it work.
Furthermore, here's where I will show you how you can use the custom keyboard shortcut for the lock screen.
First, open the config file:
nano ~/.config/i3/configJump to the end of the line using Alt + / and paste the following lines:
# Shortcut for Lockscreen
bindsym $mod+x exec /home/$USER/.config/scripts/lock
In the above, I have used mod + x as a shortcut to lock the screen, you can use any of your preferred ones.
And the end would look like this:
Pretty neat. Isn't it?
Change theme and icons in the i3 Window manager
I know what you might be thinking.
Why would you need icons in the first place? But you don't need only to be using CLI tools with the window manager.
There are times when opting for GUI is more convenient, such as using a file manager. So, when dealing with such utilities, you want to make it look better (and prettier?)
So in this section, I will show you:
- How to change the theme in i3
- How to change the icons in i3
Let's start with the installation of the theme.
Here, I will be using the materia-gtk-theme and papirus icons. But you can use any of your preferred ones.
To install the theme in Arch, use the following:
sudo pacman -S materia-gtk-theme papirus-icon-themeFor Ubuntu/Debian base:
sudo apt install materia-gtk-theme papirus-icon-themeBut installing won't get the job done. You'd have to apply the theme as you use the GNOME tweaks to change the theme.
In i3, you can use the lxappearance utility to change the theme and icons.
To install lxappearance in Arch, use the following:
sudo pacman -S lxappearanceFor Ubuntu/Debian base:
sudo apt install lxappearanceOnce you are done with the installation, start the dmenu using Mod + d and type lxappearance, and hit enter on the first result.
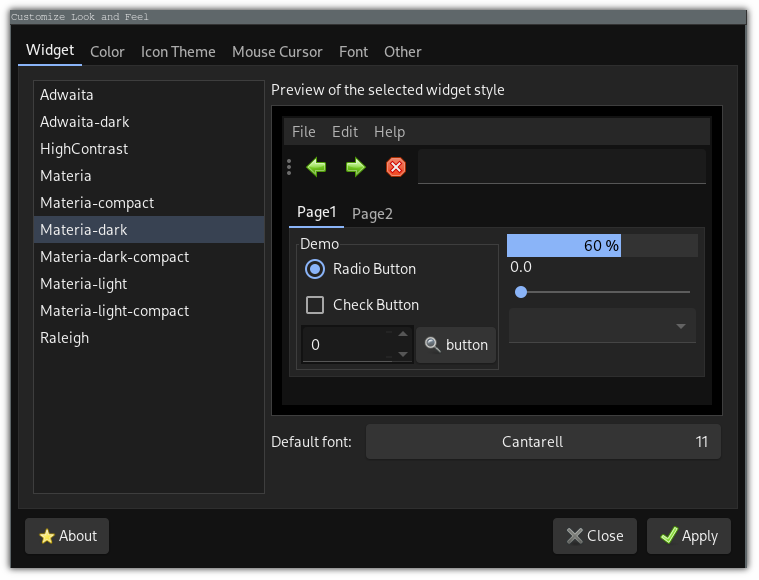
Here, choose the theme of your liking. I'm going with the Materia-dark here.
Select the theme and click on the apply button to apply the changes:
Similarly, to change the icon, select the Icon Theme, choose the icon theme and hit the apply button:
After applying the theme and icons, my file manager looks like this:
Set icons for workspaces in the i3 window manager
By default, the workspaces are indicated by numbers only, which is not the most ideal way you want to use the workspace.
So in this section, I will walk you through how you can change the name of the workspaces with appropriate icons.
To use the icons in the config file, first, you will have to install new fonts named Awesome:
For Arch-based distros:
sudo pacman -S ttf-font-awesomeFor Ubuntu/Debian base:
sudo apt install fonts-font-awesomeOnce done, open the i3 config file:
nano ~/.config/i3/configIn this config file, look for the workspace section where you will be given variables for each workspace:
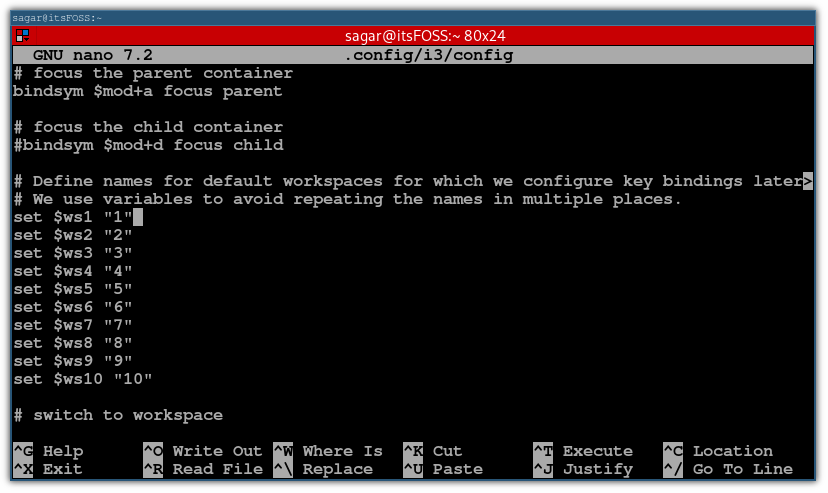
In this section, you must interchange the number given to the workspace with what you want to name it.
I will be naming it as programs as in the later part of this tutorial, I will show how you can allocate the specific workspace to the specific application.
I mostly use the first 5 workspaces, so I will name them accordingly:
# Define names for default workspaces for which we configure key bindings later on.
# We use variables to avoid repeating the names in multiple places.
set $ws1 "1: Terminal"
set $ws2 "2: Firefox"
set $ws3 "3: VMWare"
set $ws4 "4: Spotify"
set $ws5 "5: Shutter"
set $ws6 "6"
set $ws7 "7"
set $ws8 "8"
set $ws9 "9"
set $ws10 "10"
Now let's add the icons for each application mentioned in the config file.
You can refer to the cheatsheet of the awesome font to find the appropriate icon.
Copy and paste the icons in front of the name:
# Define names for default workspaces for which we configure key bindings later>
# We use variables to avoid repeating the names in multiple places.
set $ws1 "1: Terminal"
set $ws2 "2: Firefox"
set $ws3 "3: VMWare"
set $ws4 "4: Spotify"
set $ws5 "5: Shutter"
set $ws6 "6"
set $ws7 "7"
set $ws8 "8"
set $ws9 "9"
set $ws10 "10"Don't worry if it looks horrific!
Once done, exit i3 using the Mod + e and log back in again to take effect from the changes you've just made.
Mine looks like this:
Do fonts look too small? It's time to address this!
Change the font of the title window and bar in the i3
First, let's install new fonts. (I will be using Ubuntu fonts here).
To install the Ubuntu fonts in Arch, use the following:
sudo pacman -S ttf-ubuntu-font-familyAnd if you are on Ubuntu, you already have them installed!
Once done, open the config file:
nano ~/.config/i3/configIn the config file, look for the font pango:monospace 8 line as this is the default font.
Once you find that line, add the name of the font and size as shown:
font pango:Ubuntu Regular 14Now, restart the window manager using the Mod + Shift + r and that should do the job:
Allocate applications to workspaces in the i3 window manager
After naming the workspaces, you will want to allocate specific software to that workspace.
Such as, if I named my second workspace Firefox then I would want to use Firefox only inside that workspace.
So how do you do that?
To do so, you must find the name of the class of each application you want to allocate.
Sounds complex? Let me tell you how to do so.
First, run start the application and terminal side by side. For example, here, I opened the Firefox and terminal side by side:
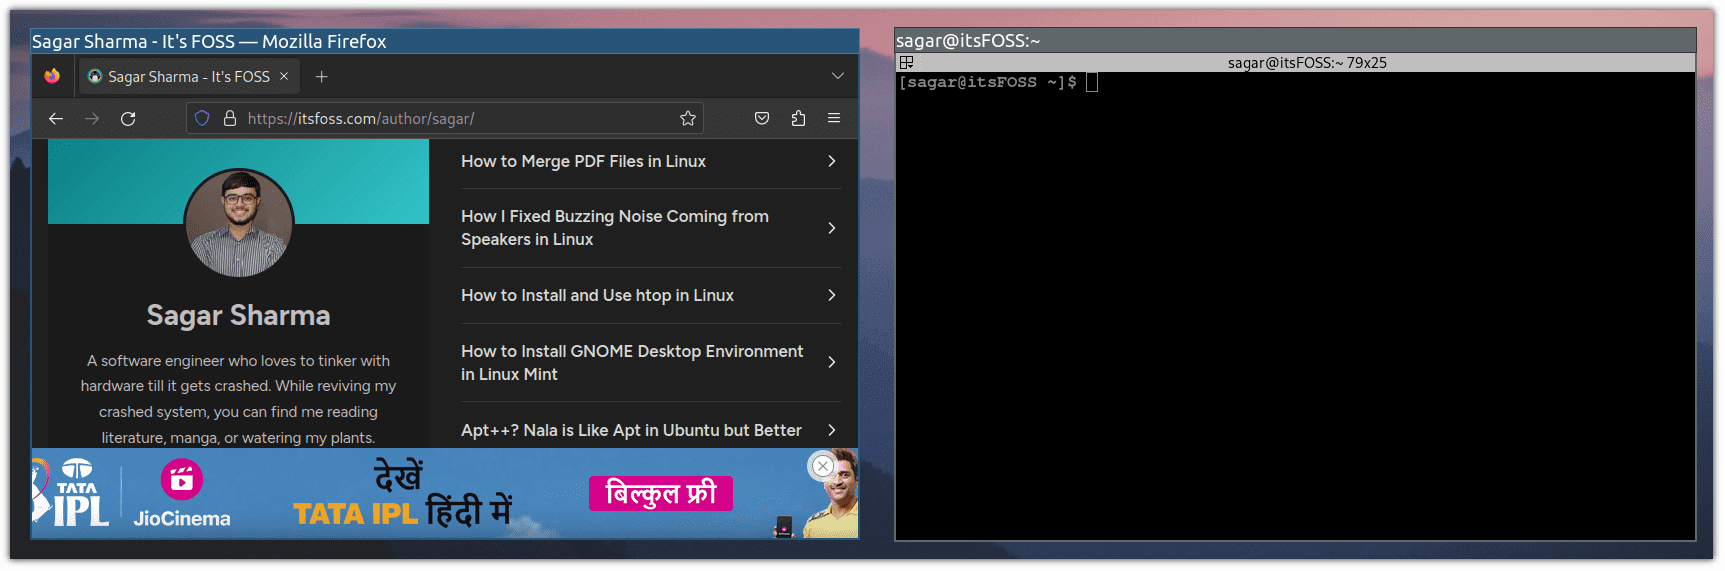
Now, execute the xprop command in the terminal, and it will change the cursor shape:
xpropNext, hover the cursor on the application and click anywhere inside the application window as shown:
The class name will be found in the last sting of characters in the following line:
WM_CLASS(STRING) = "Navigator", "firefox"In my case, the class name for the Firefox browser will be firefox.
Repeat the process for all the applications you want to allocate to workspaces.
Once you know the class names for every application you want to allocate a workspace, open the configuration file:
nano ~/.config/i3/configGo to the end of the file in the nano using Alt + / and use the following syntax to allocate the applications to the workspace:
# Allocate applications to workspaces
for_window [class="class_name"] move to workspace $[workspace_variable]
For reference, here's how my config looks like after allocating 4 workspaces to different applications:
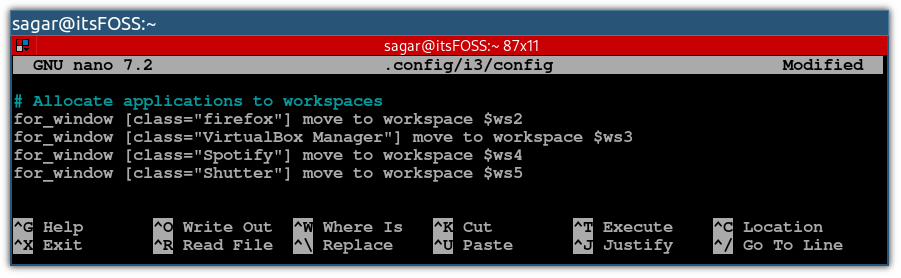
And now, if you open any application from any workspace, it will be placed in to configured workspace automatically. Pretty handy! 😊
Make the terminal transparent in the i3 window manager
To enable transparency, you must install a picom compositor and make a few changes to the config file.
So let's start with the installation.
For Arch-based distro:
sudo pacman -S picomFor Ubuntu/Debian base:
sudo apt install picomAfter the installation, you'd need to instruct the system to use the picom.
So open the config file first:
nano ~/.config/i3/configGo to the end of the line in the config file and paste the following line:
# Transparency with picom compositor
exec_always picom -f
Here, I have used the -f flag is used to enable the fading effect while switching between workspaces, opening new applications, etc.
Save and exit from the text editor.
Now, restart i3 using Mod + Shift + r.
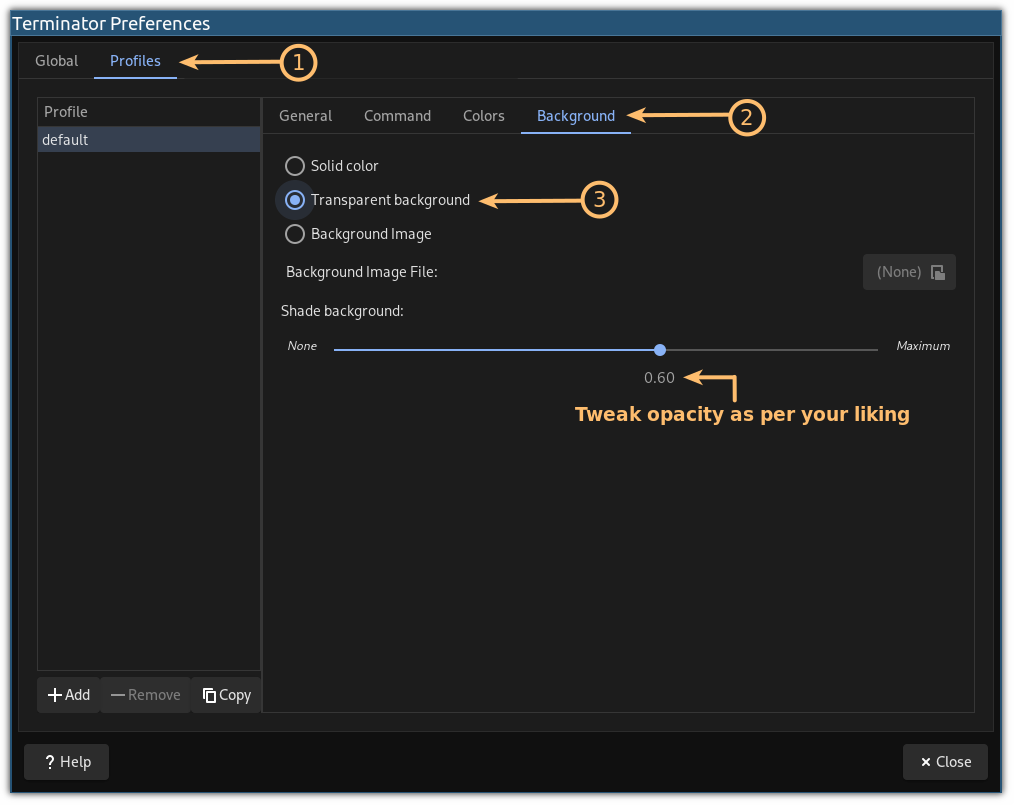
Next, open the terminal, open Preference, and now, click on the Profiles, select Background, and select the Transparent background option.
From here, you can choose the transparency:
Customize the status bar in the i3 WM
By default, the status bar shows all sorts of information with no icons.
So in this section, I will be showing how you can remove some elements from the status bar and how you can add icons to them.
But here, I will be creating a copy of the original status bar available in /etc/i3status.conf as if you make any mistake, you can always roll back to the default one.
First, create a new directory inside the .config using the following:
mkdir .config/i3statusIn the following command, I've used the cp command to copy files:
sudo cp /etc/i3status.conf ~/.config/i3status/i3status.confNext, change the ownership using the chown command which will allow you to make desired changes:
sudo chown $USER:$USER ~/.config/i3status/i3status.confNow, you must instruct the window manager to use the new i3status config file by modifying the i3 config. So first, open the config file:
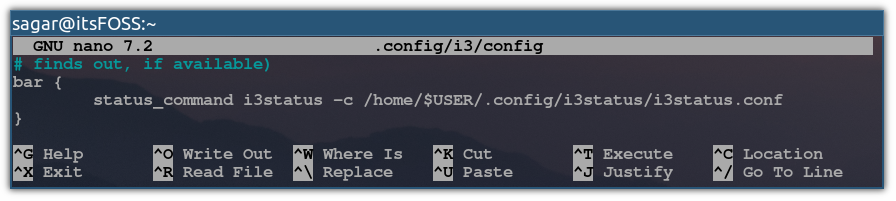
nano ~/.config/i3/configIn this config file look for the status_command i3status line. This is the line where you will be providing the path to the new status config file.
Once you find that line, make the following changes:
bar {
        status_command i3status -c /home/$USER/.config/i3status/i3status.conf
}
So, the end result should look like this:
Save changes and exit from the text editor.
Now, let's remove the unnecessary indicators from the status bar.
To do so, first, open the i3status config file:
nano .config/i3status/i3status.confHere, you can comment out the names starting with "order" which are nothing but variables for the indicator.
For example, here, I disabled ipv6, wireless _first_, battery all and load as they were unnecessary for me:
#order += "ipv6"
#order += "wireless _first_"
order += "ethernet _first_"
#order += "battery all"
order += "disk /"
#order += "load"
order += "memory"
order += "tztime local"
Now, open the awesome font cheat sheet in the browser and find relevant icons for the items that are listed in the status bar.
In my setup, I have removed the following:
- Removed line indicating available RAM
- Removed line showing speed for my ethernet connection
And in the end, my bar looks like this:
Change the color scheme in the i3 window manager
This is the most crucial section of this guide, as the most attractive thing in the window manager is the colors you choose to decorate windows.
So first, open the I3 config file:
nano ~/.config/i3/configAnd go to the end of the file by using Alt + / and use the following syntax to add variables to store colors:
# Color shemes for windows
set $bgcolor    #523d64
set $in-bgcolor #363636
set $text       #ffffff
set $u-bgcolor  #ff0000
set $indicator  #a8a3c1
set $in-text    #969696
#                       border          background      text            indicator (a line which shows where the next window will be placed)
client.focused          $bgcolor        $bgcolor        $text           $indicator
client.unfocused        $in-bgcolor     $in-bgcolor     $in-text        $in-bgcolor
client.focused_inactive $in-bgcolor     $in-bgcolor     $in-text        $in-bgcolor
client.urgent           $u-bgcolor      $u-bgcolor      $text           $u-bgcolor
Here,
bgcolorindicates the background color.in-bgcolorindicates background color for inactive windows.textis for the text color.u-bgcolorindicates the background for urgent action.indicatoris color for the line, which indicates where the next window will be placed.in-texttext color when inactive.
And for this guide, I have only used 4 basic classes which are:
client.focuseddefines colors for the focused windows.client.unfocuseddecides how to decorate windows when not focused.client.focused_inactiveshows colors when one of the containers is focused but does not have the focus at the moment.client.urgentdefines colors when urgent action is needed.
Once you make changes to the config file, restart the I3 using Mod + Shift + r.
And if you followed my color scheme, the setup should look like this:
But what about the changing colors for the status bar? Why not!
Changing the color scheme for the status bar in i3
In this section, you'd realize why I used variables to store colors, as I will use the same variables to color my status bar!
To use colors in the status bar, you will have to make changes in the bar {...} section of the I3 config file.
First, open the configuration file:
nano ~/.config/i3/configIn the configuration file, look for the bar {...} section.
Once you find the section, create a color section and define colors and classes for the status bar as the same you did for Windows:
bar {
        status_command i3status -c /home/$USER/.config/i3status/i3status.conf
        colors {
                background $bgcolor
                separator #191919
                #                       border          background      text
                focused_workspace       $bgcolor        $bgcolor        $text
                inactive_workspace      $in-bgcolor     $in-bgcolor     $text
                urgent_workspace        $u-bgcolor      $u-bgcolor      $text

        }
}
Here, I have used 3 classes: focused_workspace, inactive_workspace, and urgent_workspace which will define the colors accordingly.
Once you make changes, save them and restart the I3 and the status bar will have colors too.
Make i3 bar transparent
This section will show you how to make the i3 bar transparent.
But before that, let's change the fonts for the i3 bar.
Here, I will use the droid fonts to make it look clean and with a nerdy theme.
To install droid fonts in Arch, use the following:
sudo pacman -S ttf-droidAnd for Ubuntu/Debian base:
sudo apt install fonts-droid-fallbackOnce done, open the config file:
nano ~/.config/i3/configAnd go to the bar {...} section and enter the font name with the size as shown:
font pango: Droid Sans Mono 11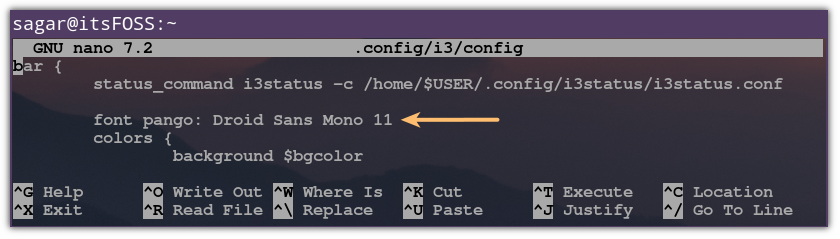
Once done, restart the i3, and the fonts will be changed!
To make the bar transparent, you can use the extra two digits in the existing hexadecimal code to define the transparency.
And if you want to control transparency, I would recommend you check out this guide which gives codes ranging from 0 to 100% transparency.
For this purpose, I will use two new variables in the config file. So first, open the config file:
nano ~/.config/i3/configHere, I changed and added a transparency of 60% to the background color and added 30% transparency to the inactive background color:
set $bgcolor    #523d6499
set $in-bgcolor #3636364D
If you notice closely, I've added two-digit numbers in the existing hex color code defining transparency. Such as 99 is used for 60% transparency whereas 4D is used for the 30% transparency.
Also, I added two new variables with different transparency and the same color as a background to make it look better:
set $focused-ws #523d6480
set $bar-color  #523d640D
Once you do so, let's change the bar section to apply transparency.
Here, you'd have to add two new lines in the bar {...}:
i3bar_command i3bar --transparency
tray_output none
Remember, using the tray_output none line, it won't show any icons in the tray so if you don't want this behavior, skip this and only add the 1st line for transparency.
Once done, change the color scheme for the bar such as changing the background color, border, and background for the focused workspace.
After making changes, the config should look like this:
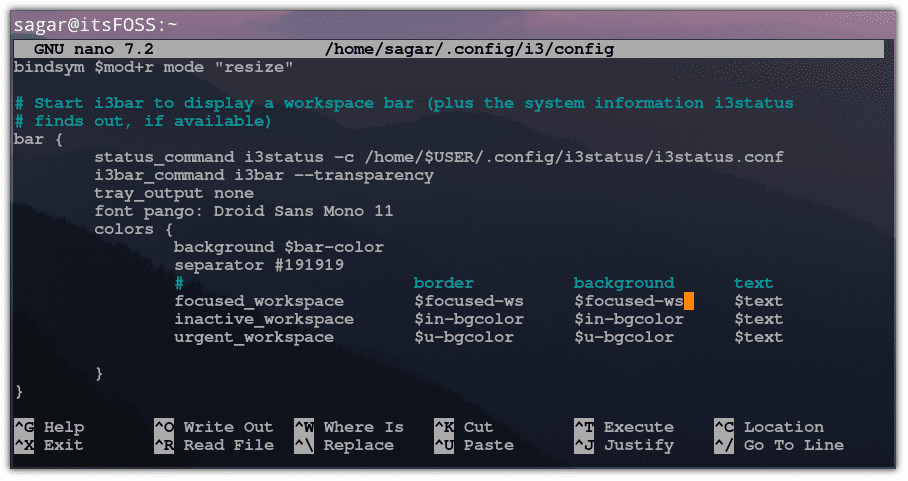
To take effect from the changes you've made, restart the i3 and you'd have transparent windows and bar:
Use i3 Blocks in the window manager
The default bar you get with i3 is useless (in my opinion); how about making it functional?
In this part, I will explain how you can add:
- Package updates
- Memory usage
- Disk usage
- Volume indicator
- Spotify indicator
But before that, you'd have to make some arrangements to store scripts and instruct i3 to use the configuration of i3block instead of i3bar.
If you followed the given instructions at the beginning of this guide, the i3blocks is already installed, and the config file is located at /etc/i3blocks.conf.
Want to download the block config files to quickly set them up without reading the rest? Considering you know what you are doing by now, you can download them here:
For this tutorial, I will create a copy and use that instead of the original config file so let's create a directory first to store the copy of the config file:
mkdir ~/.config/i3blocksNow, create a copy for the original config file:
sudo cp /etc/i3blocks.conf ~/.config/i3blocks/And finally, use the chown command to change the owner of the file which will let you make the desired changes:
sudo chown $USER:$USER ~/.config/i3blocks/i3blocks.confTo enable the i3blocks, you have to make some changes to the i3 config file:
nano ~/.config/i3/configGo to the bar {...} section and here, you'd have to change the status_command with i3blocks and add the path to the i3blocks config file as shown:
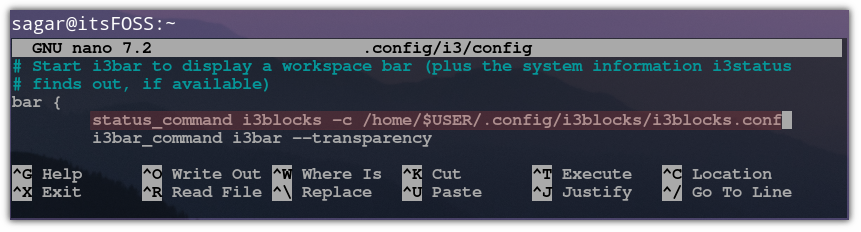
Once done, restart the I3 window manager using Mod + Shift + r and the entire status bar will be changed and look like this:

Don't worry; you will make it more valuable and good-looking than your previous i3bar in no time.
Adding disk block
Add this block if you want to display the space left on the disk.
Here, I will use the nano to create and open the config file for the disk block.
nano ~/.config/scripts/diskAnd paste the following lines:
#!/usr/bin/env sh
DIR="${DIR:-$BLOCK_INSTANCE}"
DIR="${DIR:-$HOME}"
ALERT_LOW="${ALERT_LOW:-$1}"
ALERT_LOW="${ALERT_LOW:-10}" # color will turn red under this value (default: 10%)

LOCAL_FLAG="-l"
if [ "$1" = "-n" ] || [ "$2" = "-n" ]; then
    LOCAL_FLAG=""
fi

df -h -P $LOCAL_FLAG "$DIR" | awk -v label="$LABEL" -v alert_low=$ALERT_LOW '
/\/.*/ {
	# full text
	print label $4
	# short text
	print label $4
	use=$5
	# no need to continue parsing
	exit 0
}
END {
	gsub(/%$/,"",use)
	if (100 - use < alert_low) {
		# color
		print "#FF0000"
	}
}
'
Save changes and exit from the text editor.
Now, make this file executable:
sudo chmod +x ~/.config/scripts/diskNext, open the I3blocks config file :
nano ~/.config/i3blocks/i3blocks.confAnd paste the following lines according to whether you want to place the disk block:
[disk]
command=/home/$USER/.config/scripts/disk
LABEL=
#DIR=$HOME
#ALERT_LOW=10
interval=30Once done, save the changes and restart the I3 using Mod + Shift + r and the available disk space will reflect with the disk icon in the status bar.
Suggested Read 📖
Sreenath
Adding memory block
This will be a block in the status bar indicating the memory used in the system.
First, create and open a new file for a new block:
nano ~/.config/scripts/memoryAnd paste the following line in the new file:
#!/usr/bin/env sh
TYPE="${BLOCK_INSTANCE:-mem}"
PERCENT="${PERCENT:-true}"

awk -v type=$TYPE -v percent=$PERCENT '
/^MemTotal:/ {
	mem_total=$2
}
/^MemFree:/ {
	mem_free=$2
}
/^Buffers:/ {
	mem_free+=$2
}
/^Cached:/ {
	mem_free+=$2
}
/^SwapTotal:/ {
	swap_total=$2
}
/^SwapFree:/ {
	swap_free=$2
}
END {
	if (type == "swap") {
		free=swap_free/1024/1024
		used=(swap_total-swap_free)/1024/1024
		total=swap_total/1024/1024
	} else {
		free=mem_free/1024/1024
		used=(mem_total-mem_free)/1024/1024
		total=mem_total/1024/1024
	}
	pct=0
	if (total > 0) {
		pct=used/total*100
	}
	# full text
	if (percent == "true" ) {
		printf("%.1fG/%.1fG (%.f%%)\n", used, total, pct)
	} else {
		printf("%.1fG/%.1fG\n", used, total)
	}
	# short text
	printf("%.f%%\n", pct)
	# color
	if (pct > 90) {
		print("#FF0000")
	} else if (pct > 80) {
		print("#FFAE00")
	} else if (pct > 70) {
		print("#FFF600")
	}
}
' /proc/meminfo
Save changes and exit from the text editor.
Now, to make this work, you'd have to make this file executable using the following command:
sudo chmod +x ~/.config/scripts/memoryNext, open the I3blocks config file:
nano ~/.config/i3blocks/i3blocks.confAnd paste the following at the place where you want to show the RAM consumption in the status bar:
[memory]
command=/home/$USER/.config/scripts/memory
label=
interval=30Save changes and exit from the text editor. Restart i3 to take effect from the changes!
Adding the update indicator block
This is the most helpful indicator, as it shows the number of old packages that need to be updated.
First, install use the following command to install dependencies to make this work:
sudo pacman -S pacman-contribNow, create a new file that will be used to store the script:
nano ~/.config/scripts/arch-updateAnd paste the following:
#!/usr/bin/env python3
import subprocess
from subprocess import check_output
import argparse
import os
import re


def create_argparse():
    def _default(name, default='', arg_type=str):
        val = default
        if name in os.environ:
            val = os.environ[name]
        return arg_type(val)

    strbool = lambda s: s.lower() in ['t', 'true', '1']
    strlist = lambda s: s.split()

    parser = argparse.ArgumentParser(description='Check for pacman updates')
    parser.add_argument(
        '-b',
        '--base_color',
        default = _default('BASE_COLOR', 'green'),
        help='base color of the output(default=green)'
    )
    parser.add_argument(
        '-u',
        '--updates_available_color',
        default = _default('UPDATE_COLOR', 'yellow'),
        help='color of the output, when updates are available(default=yellow)'
    )
    parser.add_argument(
        '-a',
        '--aur',
        action = 'store_const',
        const = True,
        default = _default('AUR', 'False', strbool),
        help='Include AUR packages. Attn: Yaourt must be installed'
    )
    parser.add_argument(
        '-y',
        '--aur_yay',
        action = 'store_const',
        const = True,
        default = _default('AUR_YAY', 'False', strbool),
        help='Include AUR packages. Attn: Yay must be installed'
    )
    parser.add_argument(
        '-q',
        '--quiet',
        action = 'store_const',
        const = True,
        default = _default('QUIET', 'False', strbool),
        help = 'Do not produce output when system is up to date'
    )
    parser.add_argument(
        '-w',
        '--watch',
        nargs='*',
        default = _default('WATCH', arg_type=strlist),
        help='Explicitly watch for specified packages. '
        'Listed elements are treated as regular expressions for matching.'
    )
    return parser.parse_args()


def get_updates():
    output = ''
    try:
        output = check_output(['checkupdates']).decode('utf-8')
    except subprocess.CalledProcessError as exc:
        # checkupdates exits with 2 and no output if no updates are available.
        # we ignore this case and go on
        if not (exc.returncode == 2 and not exc.output):
            raise exc
    if not output:
        return []

    updates = [line.split(' ')[0]
               for line in output.split('\n')
               if line]

    return updates


def get_aur_yaourt_updates():
    output = ''
    try:
        output = check_output(['yaourt', '-Qua']).decode('utf-8')
    except subprocess.CalledProcessError as exc:
        # yaourt exits with 1 and no output if no updates are available.
        # we ignore this case and go on
        if not (exc.returncode == 1 and not exc.output):
            raise exc
    if not output:
        return []

    aur_updates = [line.split(' ')[0]
                   for line in output.split('\n')
                   if line.startswith('aur/')]

    return aur_updates

def get_aur_yay_updates():
    output = check_output(['yay', '-Qua']).decode('utf-8')
    if not output:
        return []

    aur_updates = [line.split(' ')[0] for line in output.split('\n') if line]

    return aur_updates


def matching_updates(updates, watch_list):
    matches = set()
    for u in updates:
        for w in watch_list:
            if re.match(w, u):
                matches.add(u)

    return matches


label = os.environ.get("LABEL","")
message = "{0}<span color='{1}'>{2}</span>"
args = create_argparse()

updates = get_updates()
if args.aur:
    updates += get_aur_yaourt_updates()
elif args.aur_yay:
    updates += get_aur_yay_updates()

update_count = len(updates)
if update_count > 0:
    if update_count == 1:
      info = str(update_count) + ' update available'
      short_info = str(update_count) + ' update'
    else:
      info = str(update_count) + ' updates available'
      short_info = str(update_count) + ' updates'

    matches = matching_updates(updates, args.watch)
    if matches:
        info += ' [{0}]'.format(', '.join(matches))
        short_info += '*'
    print(message.format(label, args.updates_available_color, info))
    print(message.format(label, args.updates_available_color, short_info))
elif not args.quiet:
    print(message.format(label, args.base_color, 'system up to date'))
Save changes and exit from the text editor.
Now, make this file executable using the following:
sudo chmod +x ~/.config/scripts/arch-updateNext, open the i3blocks config file:
nano ~/.config/i3blocks/i3blocks.confAnd paste the following lines at desired space:
[arch-update]
command=/home/$USER/.config/scripts/arch-update
interval=3600
markup=pango
LABEL=Save the changes and reload the i3 window manager, and it will show the number of packages that need to be updated.
And if you are using Ubuntu, you can follow these instructions on the GitHub page.
Adding volume indicator block
Adding a volume indicator block takes a little bit more effort as you want to behave as you would expect. So, the things that you need to achieve with the block are:
- Adding key bindings to manage volume with media control keys
- Adding a volume block indicating the volume
But to do so, first, you'd have to install some dependencies.
So if you are using Arch, use the following:
sudo pacman -S pulseaudio-alsa pulseaudio-bluetooth pulseaudio-equalizer pulseaudio-jack alsa-utils playerctlAnd if you're using Ubuntu/Debian base, use the following:
sudo apt install pulseaudio-module-bluetooth pulseaudio-equalizer pulseaudio-module-jack alsa-utils playerctlNow, let's look at how you can enable the media control keys in the i3 window manager.
First, open the i3 config file:
nano ~/.config/i3/configGo to the end of the file and paste the following:
# Key bindings for Media control keys
bindsym XF86AudioPlay exec playerctl play
bindsym XF86AudioPause exec playerctl pause
bindsym XF86AudioNext exec playerctl next
bindsym XF86AudioPrev exec playerctl previous
Now, let's create a new file for this block:
nano ~/.config/scripts/volumeAnd paste the following:
#!/usr/bin/env bash
if [[ -z "$MIXER" ]] ; then
    MIXER="default"
    if command -v pulseaudio >/dev/null 2>&1 && pulseaudio --check ; then
        # pulseaudio is running, but not all installations use "pulse"
        if amixer -D pulse info >/dev/null 2>&1 ; then
            MIXER="pulse"
        fi
    fi
    [ -n "$(lsmod | grep jack)" ] && MIXER="jackplug"
    MIXER="${2:-$MIXER}"
fi
if [[ -z "$SCONTROL" ]] ; then
    SCONTROL="${BLOCK_INSTANCE:-$(amixer -D $MIXER scontrols |
                      sed -n "s/Simple mixer control '\([^']*\)',0/\1/p" |
                      head -n1
                    )}"
fi

# The first parameter sets the step to change the volume by (and units to display)
# This may be in in % or dB (eg. 5% or 3dB)
if [[ -z "$STEP" ]] ; then
    STEP="${1:-5%}"
fi

NATURAL_MAPPING=${NATURAL_MAPPING:-0}
if [[ "$NATURAL_MAPPING" != "0" ]] ; then
    AMIXER_PARAMS="-M"
fi

#------------------------------------------------------------------------

capability() { # Return "Capture" if the device is a capture device
  amixer $AMIXER_PARAMS -D $MIXER get $SCONTROL |
    sed -n "s/  Capabilities:.*cvolume.*/Capture/p"
}

volume() {
  amixer $AMIXER_PARAMS -D $MIXER get $SCONTROL $(capability)
}
Save changes and exit from the config file.
Next, open the I3blocks config file:
nano ~/.config/i3blocks/i3blocks.confAnd paste the following:
[volume]
command=/home/$USER/.config/scripts/volume
LABEL=♪
#LABEL=VOL
interval=1
signal=10
#STEP=5%
MIXER=default
#SCONTROL=[determined automatically]
#NATURAL_MAPPING=0
Save changes and reload the I3 and from now on, the volume shortcuts will work and the indicator will work as expected!
systemctl --user disable --now pipewire.{socket,service} && systemctl --user mask pipewire.socketAdding Spotify block
I will be using a script from firatakandere to add this. You can check it out before going through it.
First, create and open a new file for the Spotify block:
nano ~/.config/scripts/spotify.pyAnd paste the following:
#!/usr/bin/python

import dbus
import os
import sys


try:
    bus = dbus.SessionBus()
    spotify = bus.get_object("org.mpris.MediaPlayer2.spotify", "/org/mpris/MediaPlayer2")


    if os.environ.get('BLOCK_BUTTON'):
        control_iface = dbus.Interface(spotify, 'org.mpris.MediaPlayer2.Player')
        if (os.environ['BLOCK_BUTTON'] == '1'):
            control_iface.Previous()
        elif (os.environ['BLOCK_BUTTON'] == '2'):
            control_iface.PlayPause()
        elif (os.environ['BLOCK_BUTTON'] == '3'):
            control_iface.Next()

    spotify_iface = dbus.Interface(spotify, 'org.freedesktop.DBus.Properties')
    props = spotify_iface.Get('org.mpris.MediaPlayer2.Player', 'Metadata')

    if (sys.version_info > (3, 0)):
        print(str(props['xesam:artist'][0]) + " - " + str(props['xesam:title']))
    else:
        print(props['xesam:artist'][0] + " - " + props['xesam:title']).encode('utf-8')
    exit
except dbus.exceptions.DBusException:
    exit
Once done, use the following command to make it executable:
sudo chmod +x ~/.config/scripts/spotify.pyNow, open the I3blocks config file:
nano ~/.config/i3blocks/i3blocks.confAnd paste the following lines (I would recommend you paste them at the beginning of the block):
[spotify]
label=
command=/home/$USER/.config/scripts/spotify.py
color=#81b71a
interval=5Save changes, exit from the config file, and restart the I3.
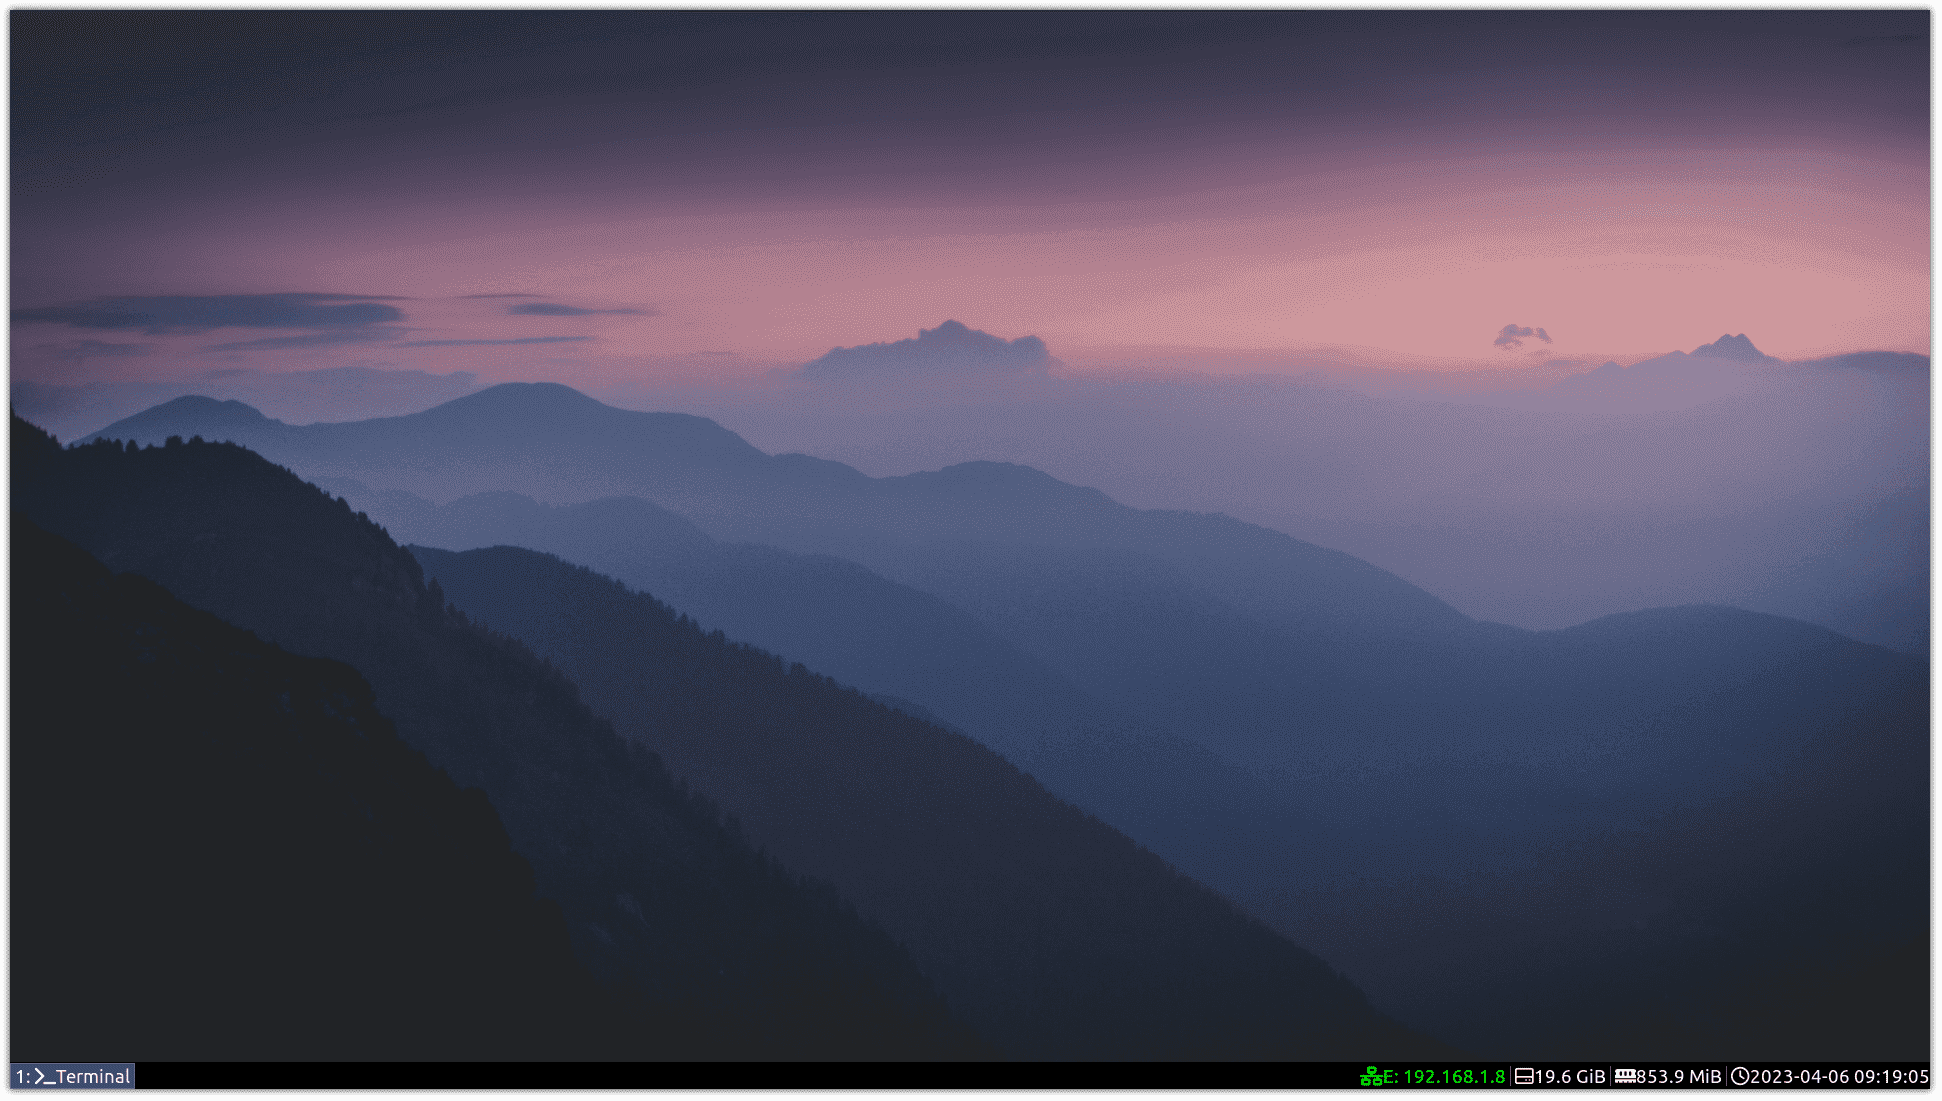
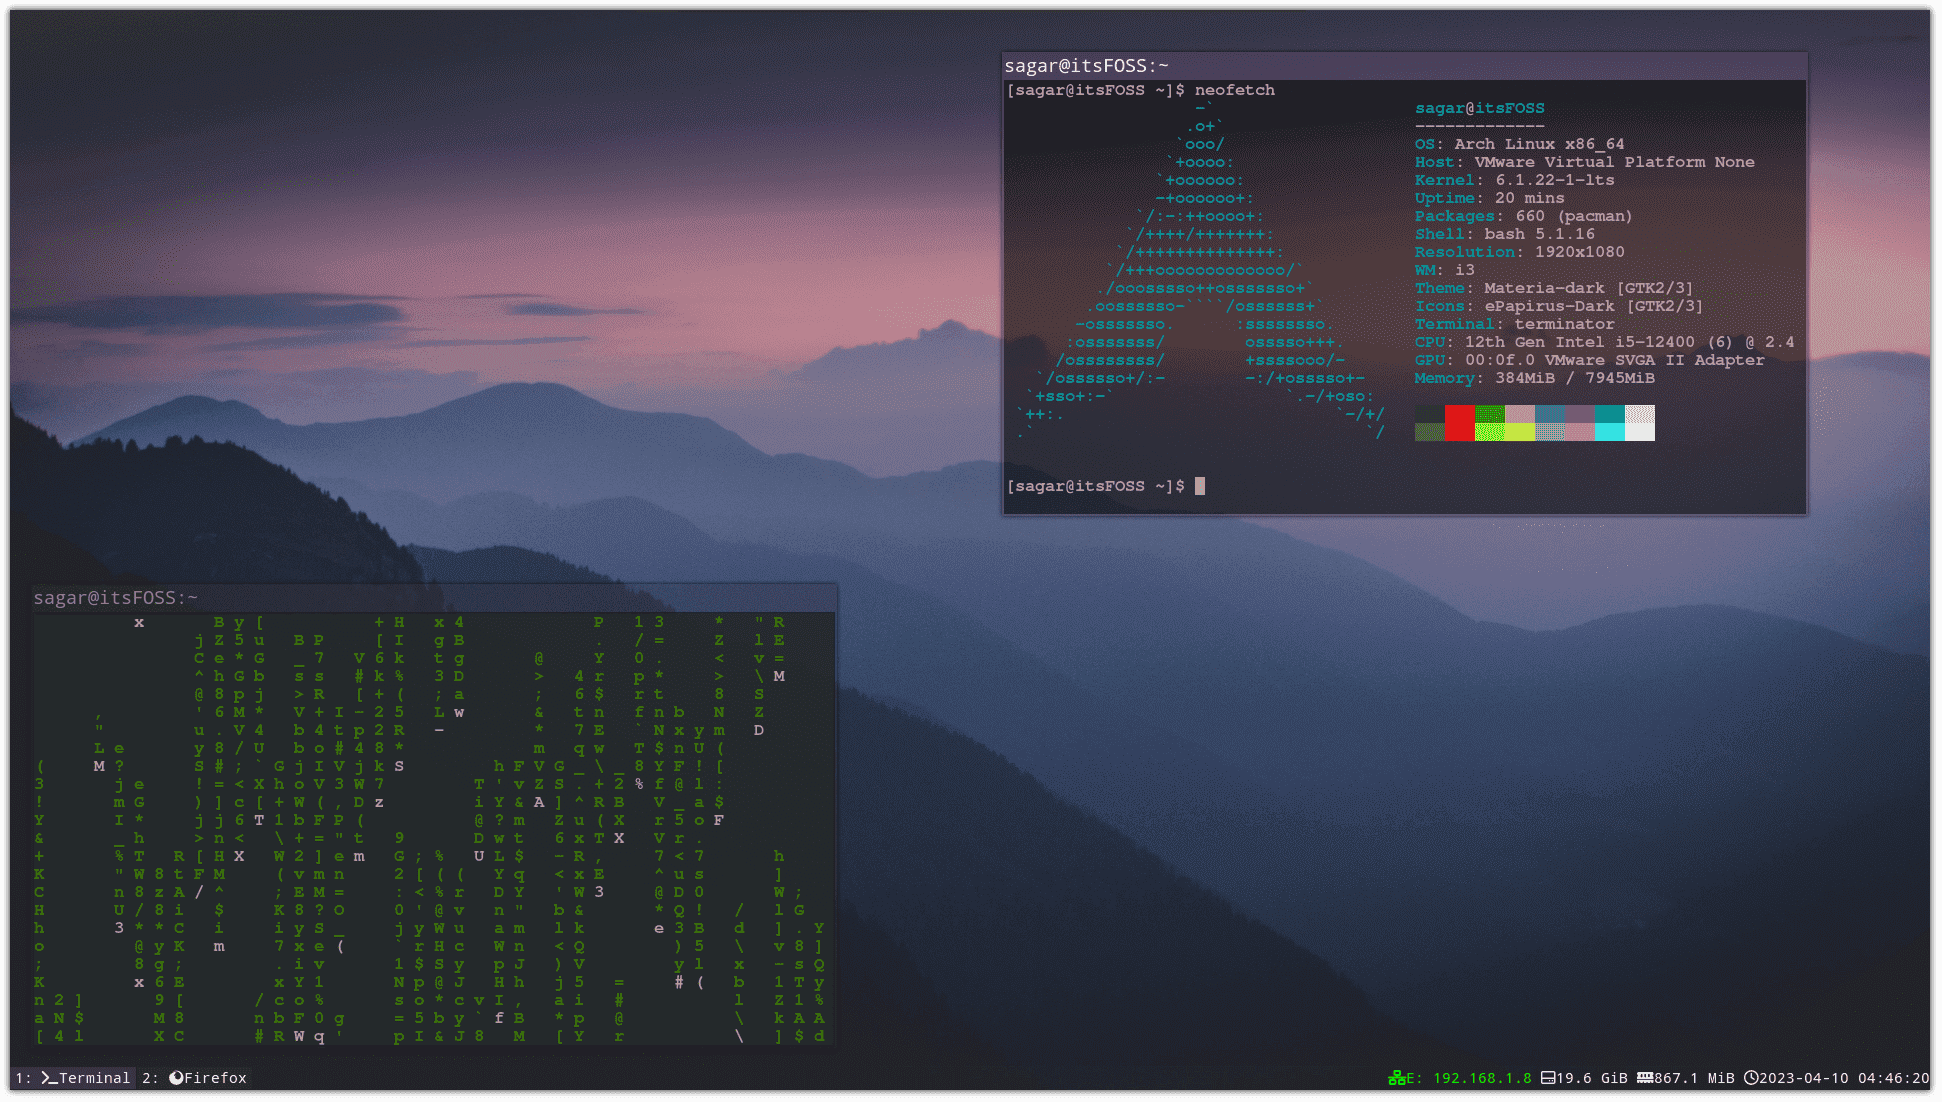
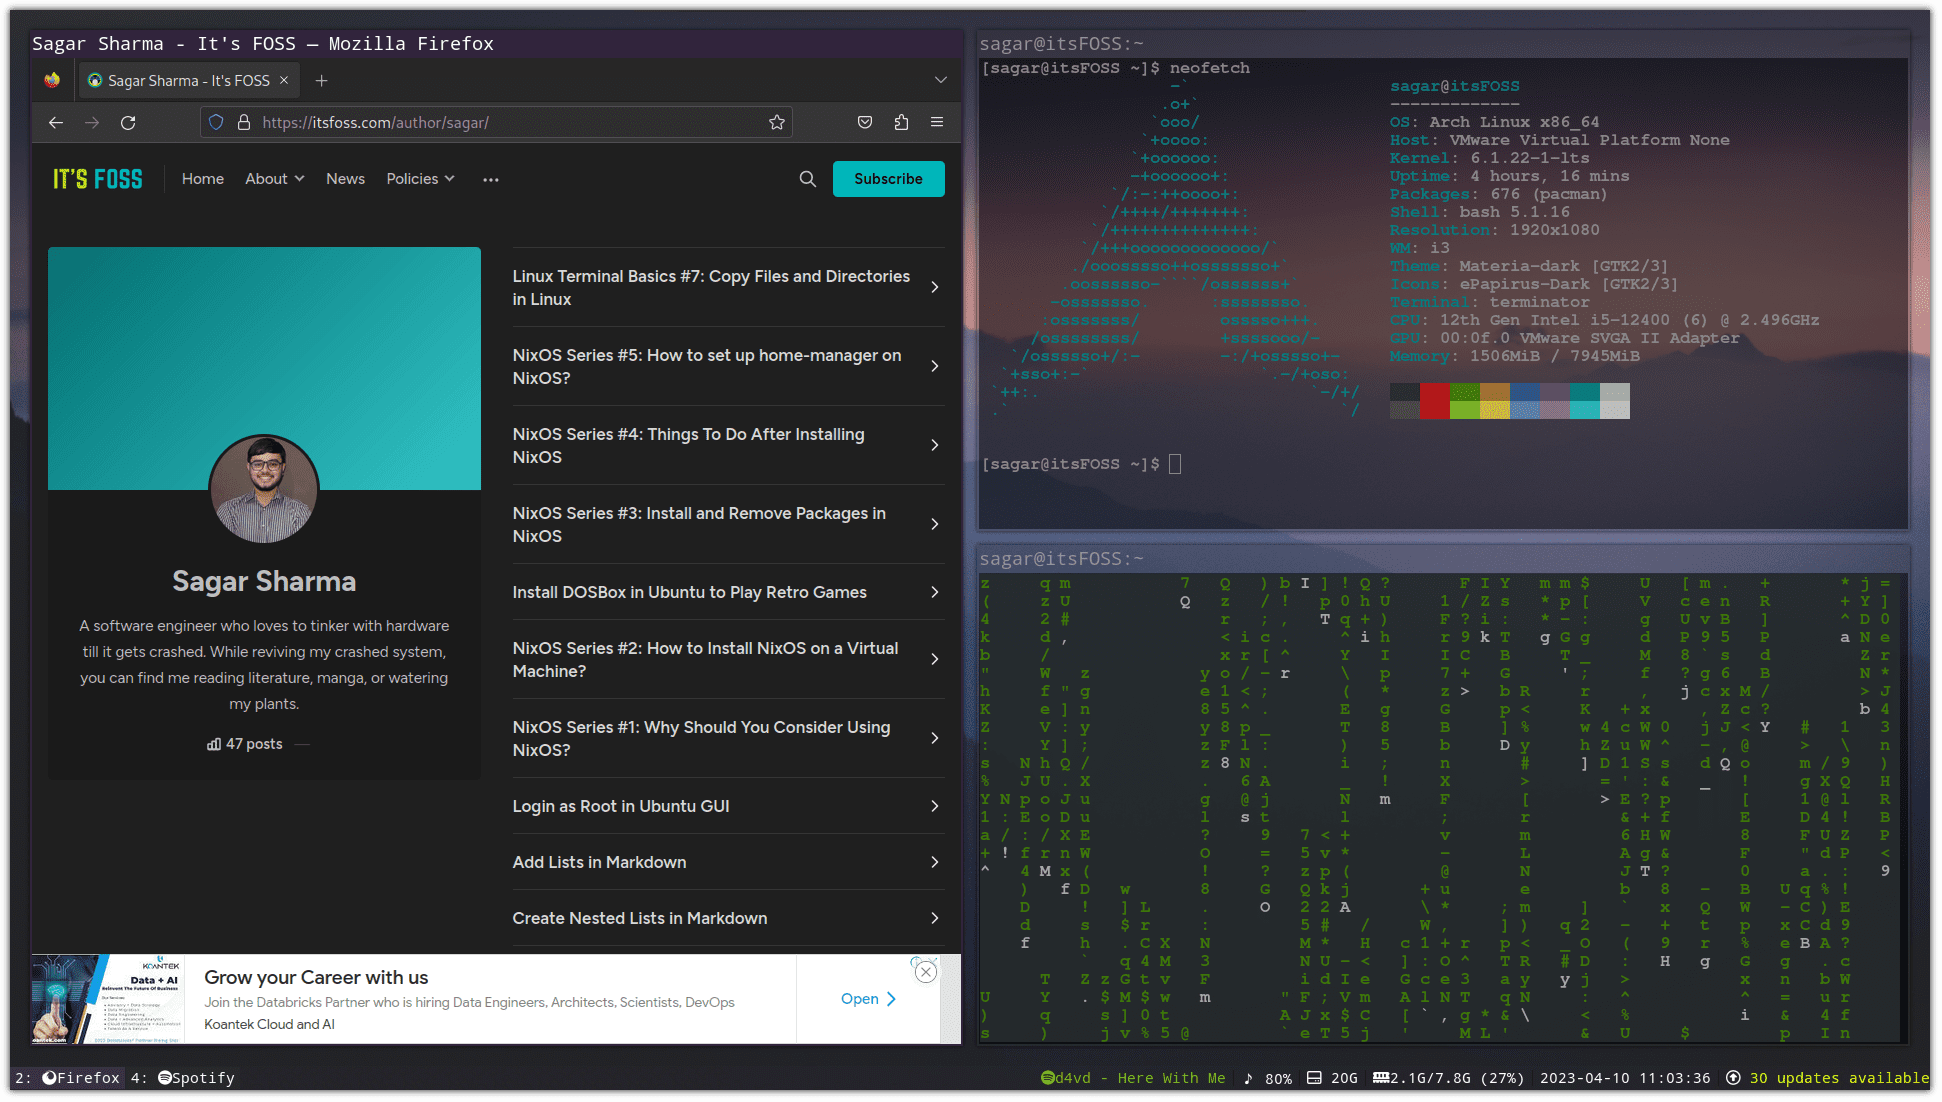
Once you added the blocks I mentioned, the bar will look like this:

You can take a look at my home screen with the blocks (by clicking on the image below).
Use I3 gaps in Linux
If you want to have gaps between the windows, you can use i3gaps and after color schemes, I3gaps is the most crucial element in this guide.
To use the gaps, you must make some changes in the i3 config file.
So open the I3 config file:
nano ~/.config/i3/configGo to the end of the file and paste the following:
# default gaps
gaps inner 15
gaps outer 5

# gaps
set $mode_gaps Gaps: (o)uter, (i)nner, (h)orizontal, (v)ertical, (t)op, (r)ight, (b)ottom, (l)eft
set $mode_gaps_outer Outer Gaps: +|-|0 (local), Shift + +|-|0 (global)
set $mode_gaps_inner Inner Gaps: +|-|0 (local), Shift + +|-|0 (global)
set $mode_gaps_horiz Horizontal Gaps: +|-|0 (local), Shift + +|-|0 (global)
set $mode_gaps_verti Vertical Gaps: +|-|0 (local), Shift + +|-|0 (global)
set $mode_gaps_top Top Gaps: +|-|0 (local), Shift + +|-|0 (global)
set $mode_gaps_right Right Gaps: +|-|0 (local), Shift + +|-|0 (global)
set $mode_gaps_bottom Bottom Gaps: +|-|0 (local), Shift + +|-|0 (global)
set $mode_gaps_left Left Gaps: +|-|0 (local), Shift + +|-|0 (global)
bindsym $mod+Shift+g mode "$mode_gaps"

mode "$mode_gaps" {
        bindsym o      mode "$mode_gaps_outer"
        bindsym i      mode "$mode_gaps_inner"
        bindsym h      mode "$mode_gaps_horiz"
        bindsym v      mode "$mode_gaps_verti"
        bindsym t      mode "$mode_gaps_top"
        bindsym r      mode "$mode_gaps_right"
        bindsym b      mode "$mode_gaps_bottom"
        bindsym l      mode "$mode_gaps_left"
        bindsym Return mode "$mode_gaps"
        bindsym Escape mode "default"
}

mode "$mode_gaps_outer" {
        bindsym plus  gaps outer current plus 5
        bindsym minus gaps outer current minus 5
        bindsym 0     gaps outer current set 0

        bindsym Shift+plus  gaps outer all plus 5
        bindsym Shift+minus gaps outer all minus 5
        bindsym Shift+0     gaps outer all set 0

        bindsym Return mode "$mode_gaps"
        bindsym Escape mode "default"
}
mode "$mode_gaps_inner" {
        bindsym plus  gaps inner current plus 5
        bindsym minus gaps inner current minus 5
        bindsym 0     gaps inner current set 0

        bindsym Shift+plus  gaps inner all plus 5
        bindsym Shift+minus gaps inner all minus 5
        bindsym Shift+0     gaps inner all set 0

        bindsym Return mode "$mode_gaps"
        bindsym Escape mode "default"
}
mode "$mode_gaps_horiz" {
        bindsym plus  gaps horizontal current plus 5
        bindsym minus gaps horizontal current minus 5
        bindsym 0     gaps horizontal current set 0

        bindsym Shift+plus  gaps horizontal all plus 5
        bindsym Shift+minus gaps horizontal all minus 5
        bindsym Shift+0     gaps horizontal all set 0

        bindsym Return mode "$mode_gaps"
        bindsym Escape mode "default"
}
mode "$mode_gaps_verti" {
        bindsym plus  gaps vertical current plus 5
        bindsym minus gaps vertical current minus 5
        bindsym 0     gaps vertical current set 0

        bindsym Shift+plus  gaps vertical all plus 5
        bindsym Shift+minus gaps vertical all minus 5
        bindsym Shift+0     gaps vertical all set 0

        bindsym Return mode "$mode_gaps"
        bindsym Escape mode "default"
}
mode "$mode_gaps_top" {
        bindsym plus  gaps top current plus 5
        bindsym minus gaps top current minus 5
        bindsym 0     gaps top current set 0

        bindsym Shift+plus  gaps top all plus 5
        bindsym Shift+minus gaps top all minus 5
        bindsym Shift+0     gaps top all set 0

        bindsym Return mode "$mode_gaps"
        bindsym Escape mode "default"
}
mode "$mode_gaps_right" {
        bindsym plus  gaps right current plus 5
        bindsym minus gaps right current minus 5
        bindsym 0     gaps right current set 0

        bindsym Shift+plus  gaps right all plus 5
        bindsym Shift+minus gaps right all minus 5
        bindsym Shift+0     gaps right all set 0

        bindsym Return mode "$mode_gaps"
        bindsym Escape mode "default"
}
mode "$mode_gaps_bottom" {
        bindsym plus  gaps bottom current plus 5
        bindsym minus gaps bottom current minus 5
        bindsym 0     gaps bottom current set 0

        bindsym Shift+plus  gaps bottom all plus 5
        bindsym Shift+minus gaps bottom all minus 5
        bindsym Shift+0     gaps bottom all set 0

        bindsym Return mode "$mode_gaps"
        bindsym Escape mode "default"
}
mode "$mode_gaps_left" {
        bindsym plus  gaps left current plus 5
        bindsym minus gaps left current minus 5
        bindsym 0     gaps left current set 0

        bindsym Shift+plus  gaps left all plus 5
        bindsym Shift+minus gaps left all minus 5
        bindsym Shift+0     gaps left all set 0

        bindsym Return mode "$mode_gaps"
        bindsym Escape mode "default"
}
Save changes and exit from the config file.
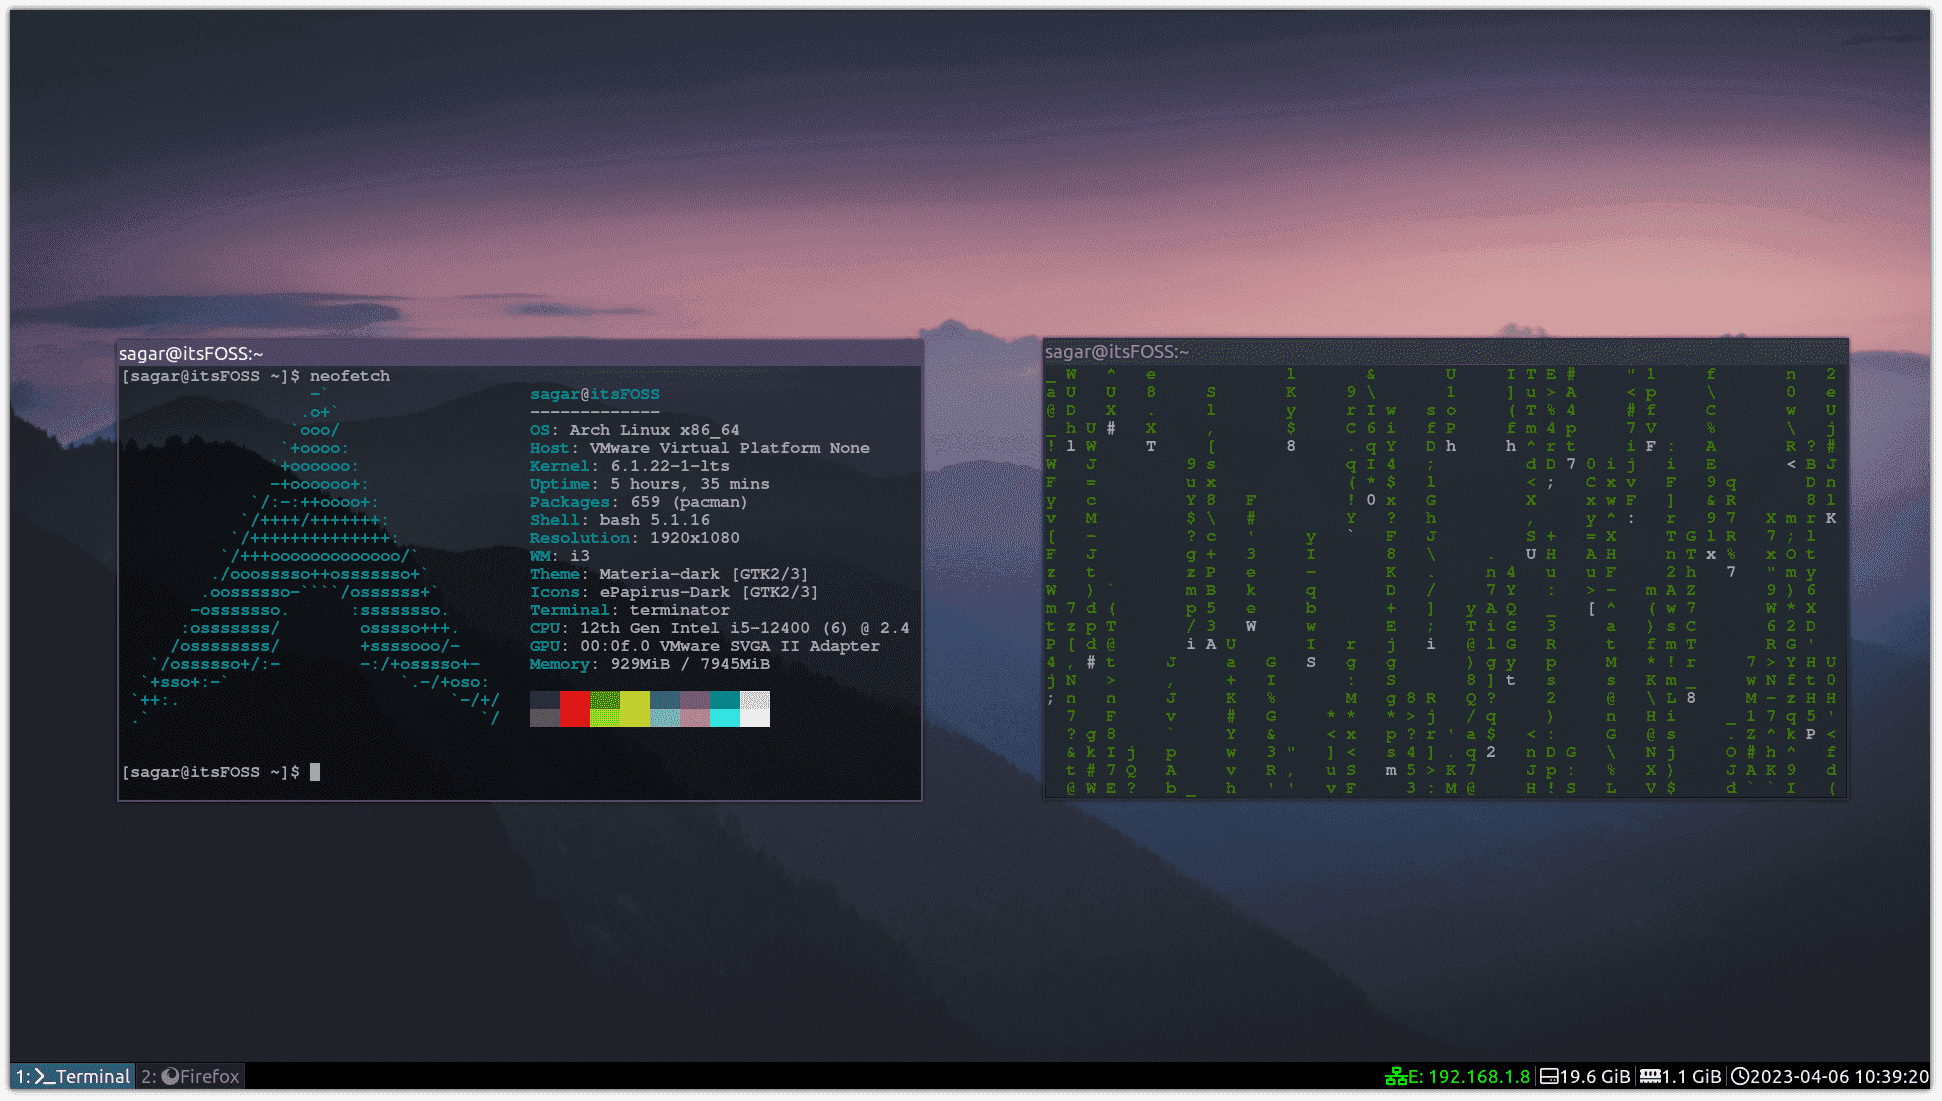
Reload i3 using Mod + Shift + r and you'd see the gaps between windows:
But what if you want to resize the gaps? It is quite simple and can be done in simple steps:
- Press
Mod + Shift + gto enter the gaps mode - Choose what you want to change by using the given options
- Use
+or-to increase/decrease gaps - Once done, press the
Esckey to exit the gaps mode
And that's it!
Did we forget to customize the Terminal?
Fret not; you can switch to ZSH, a different shell, to make the terminal look different or explore some lesser-known Linux shells.
Either way, you can customize the existing terminal or pick different terminal emulators.
I hope you will no longer fear ricing! 😎
If you have any suggestions or want to show off your setup, please do so in the comments section.
If this helped you, consider supporting It's FOSS
It's FOSS has been helping people use Linux for the past 14 years. Help us stay independent from big tech. Become a Plus member, enjoy ad-free reading and get 5 eBooks.

