
The other day I bought an Acer Predator laptop (affiliate link) to test various Linux distributions. It’s a bulky, heavy-built laptop which is in contrast to my liking of smaller, lightweight laptops like the awesome Dell XPS.
The reason why I opted for this gaming laptop even though I don’t game on PC is NVIDIA Graphics. Acer Predator Helios 300 comes with NVIDIA Geforce GTX 1050Ti. It would allow me to cover NVIDIA Graphics related tutorials.
This laptop has Windows 10 installed on the 120 GB SSD and 1 TB HDD for storing data. I dual booted Windows 10 with Ubuntu 18.04. The installation was quick, easy and painless.
I booted into Ubuntu. It was showing the familiar purple screen and then I noticed that it froze there. The mouse won’t move, I couldn’t type anything and nothing else could be done except turning off the device by holding the power button.
And it was the same story at the next login try. Ubuntu gets stuck at the purple screen even before reaching the login screen.
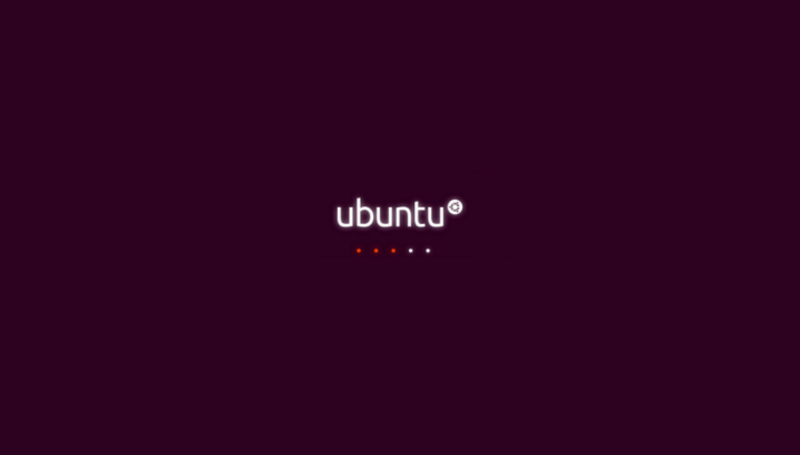
Sounds familiar? Let me show you how you can fix this problem of Ubuntu freezing at login.
Fix Ubuntu freezing at boot time because of graphics drivers
You can see how to fix this issue in the following video.
Without further delay, let’s see how to fix this problem.
Step 1: Editing Grub
When you boot your system, just stop at the Grub screen like the one below. If you don’t see this screen, keep holding Shift key at the boot time.
At this screen, press ‘E’ key to go into the editing mode.
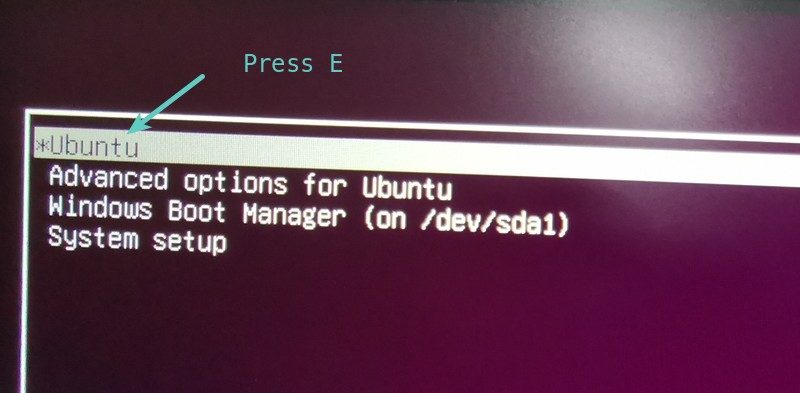
You should see some sort of code like the one below. You should focus on the line that starts with Linux.
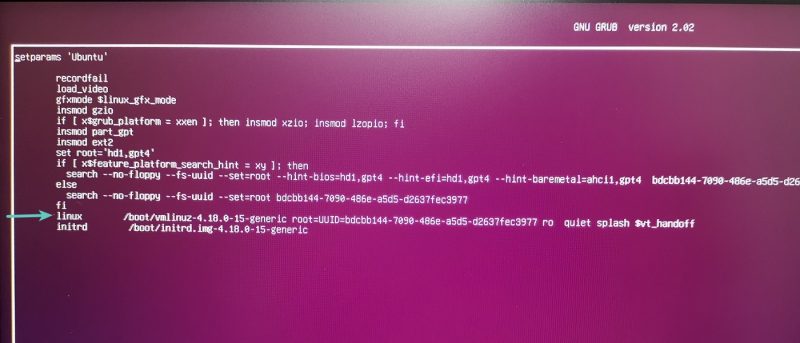
Step 2: Temporarily Modifying Linux kernel parameters in Grub
Remember, our problem is with the NVIDIA Graphics drivers. This incompatibility with open source version of NVIDIA drivers caused the issue so what we can do here is to disable these drivers.
Now, there are several ways you can try to disable these drivers. My favorite way is to disable all video/graphics card using nomodeset.
Just add the following text at the end of the line starting with Linux. You should be able to type normally. Just make sure that you are adding it at the end of the line.
nomodesetNow your screen should look like this:
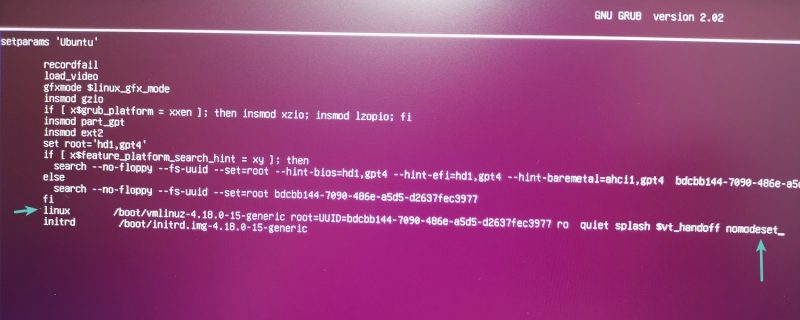
Press Ctrl+X or F10 to save and exit. Now you’ll boot with the newly modified kernel parameters here.
Explanation of what I did here
So, what did I just do here? What’s that nomodeset thing? Let me explain it to you briefly.
Normally, the video/graphics cards were used after the X or any other display server was started. In other words, when you log in to your system and see a graphical user interface.
But lately, the video mode settings were moved to the kernel. Among other benefits, it enables you to have beautiful, high-resolution boot splash screens.
If you add the nomodeset parameter to the kernel, it instructs the kernel to load the video/graphics drivers after the display server is started.
In other words, you disabled loading the graphics driver at this time and the conflict it was causing goes away. After you login to the system and see everything because the graphics card is loaded again.
Troubleshoot: Cannot boot even after using nomodeset?
If using nomodeset in the grub didn’t work and you can still not boot, try some other parameters instead of nomodeset.
Follow the same steps as mentioned above. While editing grub, add nouveau.noaccel=1 in place of nomodeset. Save and exit grub and see if you can boot now.
If even that doesn’t work, try adding noapic noacpi nosplash irqpoll instead of quiet splash in the grub.
If you are using Nvidia's open source Nouveau driver, you may try disabling it by adding this in the Grub:
modprobe.blacklist=nouveau
Step 3: Make permanent changes in Grub (if you can boot and there is no issue with graphics)
Don’t be too happy yet just because you are able to login to your system now. What you did was temporary and the next time you boot into your system, your system will still freeze because it will still try to load the graphics drivers.
Does this mean you’ll always have to edit Kernel from the grub screen? Thankfully, the answer is no.
What you can do here to change the grub configuration so that the Linux kernel will not try to load the graphics driver before the display server.
To do that, open the terminal (use Ctrl+Alt+T shortcut) and then use the following command to open the grub configuration file in Gedit editor:
sudo gedit /etc/default/grub You’ll have to use your password to open this file. Once you have the text file opened, look for the line that contains: GRUB_CMDLINE_LINUX_DEFAULT="quiet splash".
Change this line to: GRUB_CMDLINE_LINUX_DEFAULT="quiet splash nomodeset"
It should look something like this:
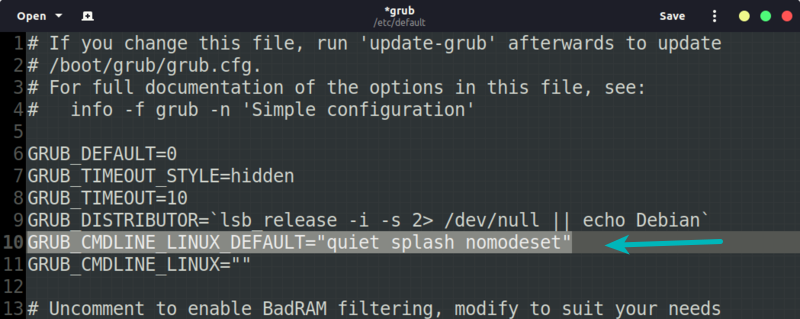
Save the file and update grub so that changes are taken into effect. Use this command:
sudo update-grubOnce it is complete, reboot your system and it should not freeze anymore.
Alternate Step 3: You can boot but the graphics look weird. Update your system and install proprietary graphics drivers
If you don’t want to change the Grub config as mentioned in the previous step, alternatively, you can install additional drivers in Ubuntu for NVIDIA and AMD. Ubuntu won’t freeze at boot time while using these proprietary drivers.
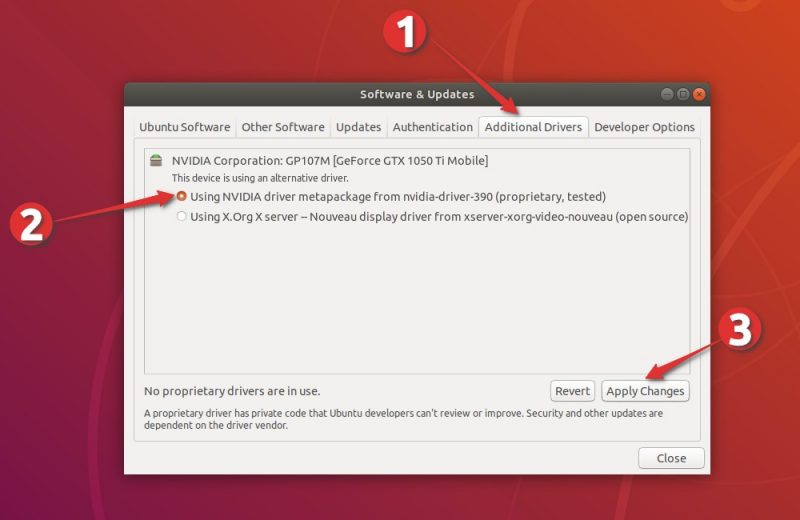
In Ubuntu and many other distributions, you have an easy way to install proprietary drivers. Search for “Additional Drivers” in Ubuntu menu. In here, you may find additional graphics drivers for your system.
Installing proprietary NVIDIA drivers (detailed steps)
I am assuming that it’s your first login to a freshly installed system. This means you must update Ubuntu before you do anything else. Open a terminal using Ctrl+Alt+T keyboard shortcut in Ubuntu and use the following command:
sudo apt update && sudo apt upgrade -yYou may try installing additional drivers in Ubuntu right after the completion of the above command but in my experience, you’ll have to restart your system before you could successfully install the new drivers. And when you restart, you’ll have to change the kernel parameter again the same way we did earlier.
After your system is updated and restarted, press Windows key to go to the menu and search for Software & Updates.

Now go to the Additional Drivers tab and wait for a few seconds. Here you’ll see proprietary drivers available for your system. You should see NVIDIA in the list here.
Select the proprietary driver and click on Apply Changes.

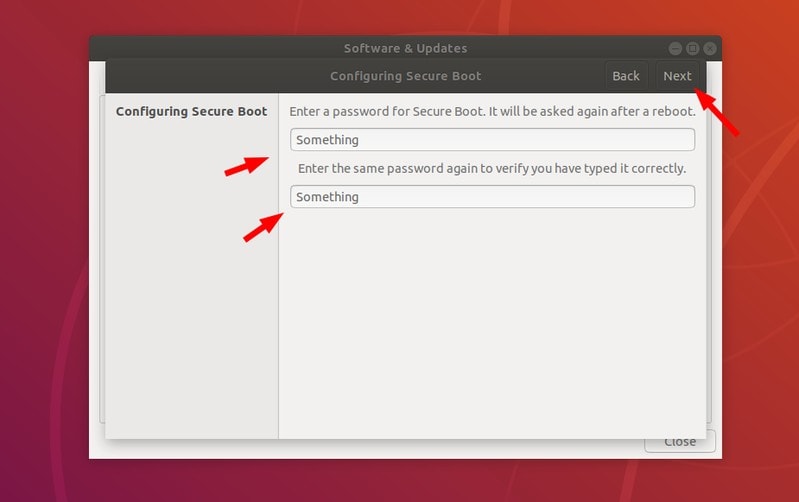
It will take some time in the installation of the new drivers. If you have UEFI secure boot enabled on your system, you’ll be also asked to set a password. You can set it to anything that is easy to remember. I’ll show you its implications later in step 4.
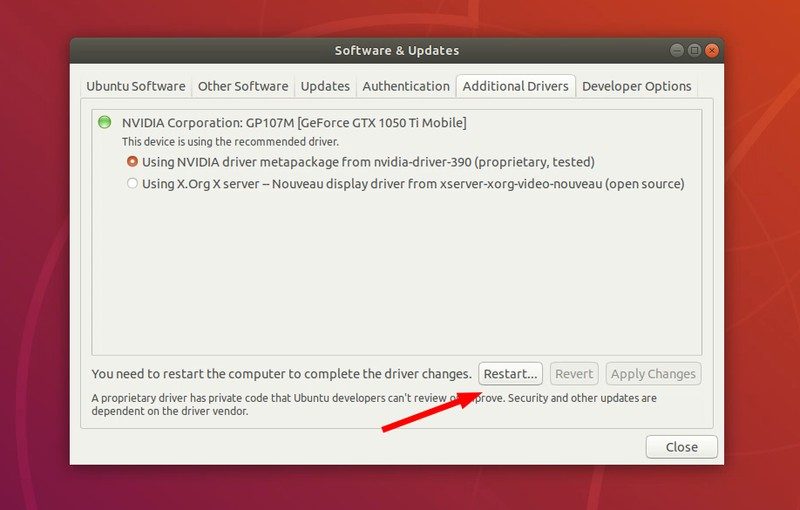
Once the installation finishes, you’ll be asked to restart the system to take changes into effect.
Dealing with MOK (only for UEFI Secure Boot enabled devices)
If you were asked to setup a secure boot password, you’ll see a blue screen that says something about “MOK management”. It’s a complicated topic and I’ll try to explain it in simpler terms.
MOK (Machine Owner Key) is needed due to the secure boot feature that requires all kernel modules to be signed. Ubuntu does that for all the kernel modules that it ships in the ISO. Because you installed a new module (the additional driver) or made a change in the kernel modules, your secure system may treat it as an unwarranted/foreign change in your system and may refuse to boot.
Hence, you can either sign the kernel module on your own (telling your UEFI system not to panic because you made these changes) or you simply disable the secure boot.
Now that you know a little about secure boot and MOK, let’s see what to do at the next boot when you see the blue screen at the next boot.
If you select “Continue boot”, chances are that your system will boot like normal and you won’t have to do anything at all. But it’s possible that not all features of the new driver work correctly.
This is why, you should choose Enroll MOK.
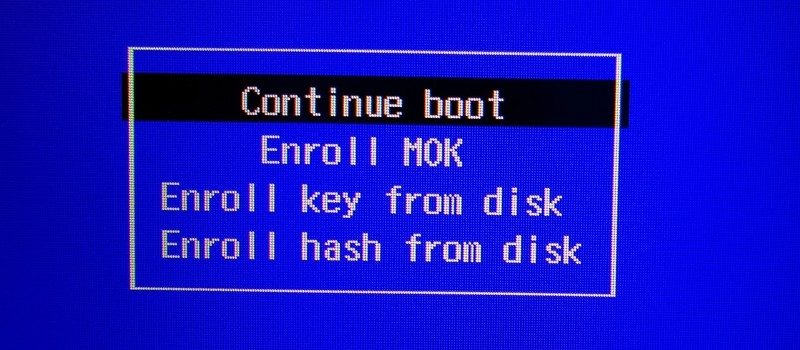
It will ask you to Continue in the next screen followed by asking a password. Use the password you had set while installing the additional drivers in the previous step. You’ll be asked to reboot now.
Once the new driver is installed, you’ll have to restart your system again. Don’t worry! Things should be better now and you won’t need to edit the kernel parameters anymore. You’ll be booting into Ubuntu straightaway.
Step 4: Enjoy Ubuntu Linux

I hope this tutorial helped you to fix the problem of Ubuntu freezing at the boot time and you were able to boot into your Ubuntu system.
If you have any questions or suggestions, please let me know in the comment section below.

