

ffmpeg is a CLI (command line based) utility for processing media files. It is a framework with a multitude of features and, because of it’s open source license, it is the base for many widespread apps such as VLC, YouTube, iTunes and many more. A number of Linux video editors use ffmpeg underneath the GUI.
What I love even more about ffmpeg is that it can be used on it’s own to accomplish many processing tasks in a very simple manner (with one or two commands). However, it’s a very powerful program that can be used in more complex ways and even replace an editing workflow.
In this ffmpeg tutorial, I’ll show you how to install ffmpeg and I’ll be covering it’s different uses. I’ll even get into some more complex features.
Here are the sections of this guide:
- Installing ffmpeg
- Basic Usage of ffmpeg
- Advanced Usage of ffmpeg
- Filter basics
I’ll be explaining everything in detail so you can understand what is going on even if you are new to the Linux world.
I’ll be using Ubuntu, but these commands should work for other distributions too.
Let’s get for it!
Installing ffmpeg on Ubuntu & other Linux
Installing ffmpeg is a straightforward process. It’s a popular application and is available in most of the Linux distribution through the package manager.
Install ffmpeg in Ubuntu
In Ubuntu, ffmpeg is available in the Universe repository so make sure to enable universe repository. and then update the packages list and install ffmpeg. You can do all these using the below commands in a terminal:
sudo add-apt-repository universe
sudo apt update
sudo apt install ffmpeg
That should be it! You can verify the installation with:
ffmpegThis should display some text describing your ffmpeg configuration (including version).

As you can see from the screenshot above, the installed version is 3.4.4.
Install ffmpeg in Arch-based distributions
To install ffmpeg in Arch-based distributions, use the pacman command:
sudo pacman -S ffmpegInstall ffmpeg in Fedora-based distributions
To install ffmpeg in Fedora-based Linux distributions, you can use this command:
sudo dnf install ffmpegHow to use ffmpeg: The Basics
With ffmpeg installed, I’ll go over basic commands to get you started using this powerful tool.
0. ffmpeg Commands
The basic form a ffmpeg command is:
ffmpeg [global_options] {[input_file_options] -i input_url} ... {[output_file_options] output_url} ...You have to keep in mind that all file options apply only to the file that follows them (you’ll have to write them again for the next file).
Any file not preceded by -i is considered an output file. Ffmpeg uses as many inputs and outputs as you provide. You can also use the same name for both an input and an output file, but you’ll have to add the -y tag before the output file name.
1. Get media file information
The first use of ffmpeg is displaying information about a media file. This can be done by not entering any output files. Simply type:
ffmpeg -i file_nameThis works for both audio and video files:
ffmpeg -i video_file.mp4
ffmpeg -i audio_file.mp3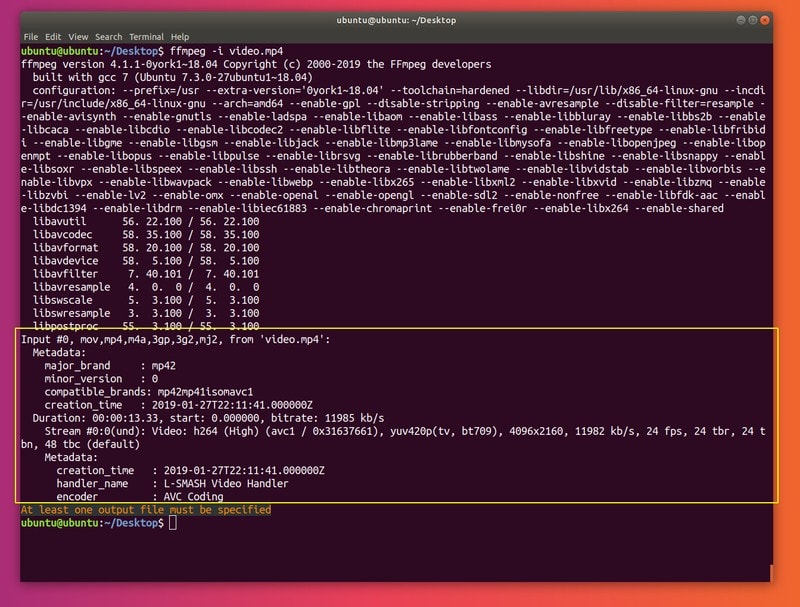
Although useful, this command will display way too much information that isn’t relevant to your file (information about ffmpeg). To omit that, add the -hide_banner flag:
ffmpeg -i video_file.mp4 -hide_banner
ffmpeg -i audio_file.mp3 -hide_banner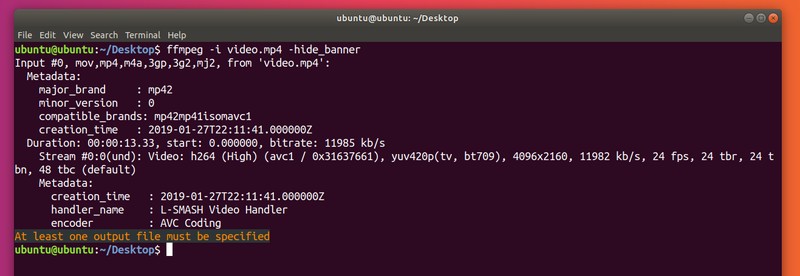
As you can see, the command now outputs only details concerning the media file you specified (encoder, streams etc.).
2. Convert Media Files
Another very useful way to use ffmpeg is for hassle-free conversion between different media formats. You only have to specify input and output files, since ffmpeg will get the required format from the file extensions. This works for video-to-video and audio-to-audio conversions.
Here are some examples:
ffmpeg -i video_input.mp4 video_output.avi
ffmpeg -i video_input.webm video_output.flv
ffmpeg -i audio_input.mp3 audio_output.ogg
ffmpeg -i audio_input.wav audio_output.flac
You can even specify more output files:
ffmpeg -i audio_input.wav audio_output_1.mp3 audio_output_2.oggThis will convert the input files to all specified formats.
To see a list of all supported formats, use:
ffmpeg -formatsAgain, you can add -hide_banner to omit information about the app.
You can specify the -qscale 0 parameter before the output file to preserve the quality of a video file:
ffmpeg -i video_input.wav -qscale 0 video_output.mp4Additionally, you could specify codecs you want to use, adding -c:a (for audio) and -c:v (for video) followed by the name of the codecs, or copy if you want to use the same codecs as the original file:
ffmpeg -i video_input.mp4 -c:v copy -c:a libvorbis video_output.aviNote: This might make the file extension rather deceiving, so be careful.
3. Extract Audio from Video
To extract audio from a video file, you do a simple conversion and add the -vn flag:
ffmpeg -i video.mp4 -vn audio.mp3Note that this command will utilize the bit rate of the original file. It’s a good idea to set it yourself; you can use -ab (audio bit rate):
ffmpeg -i video.mp4 -vn -ab 128k audio.mp3Some common bit rates are 96k, 128k, 192k, 256k, 320k (highest bitrate supported by mp3).
Other common options are -ar (audio frequency: 22050, 441000, 48000), -ac (number of audio channels), -f (audio format, although normally automatically detected). -ab can also be replaced by -b:a. For example:
ffmpeg -i video.mov -vn -ar 44100 -ac 2 -b:a 128k -f mp3 audio.mp34. Mute Audio in Video
Similar to the last task, to accomplish this we’ll add a simple tag: -an (instead of -vn).
ffmpeg -i video_input.mp4 -an -video_output.mp45. Extract Images from Video
This might come in handy for a lot of people. For example, you might have a series of images (e.g. a slideshow) and you want to get all images out of that. Simply enter:
ffmpeg -i video.mp4 -r 1 -f image2 image-%3d.pngLet’s take that apart for a second.
-r specifies the frame rate (how many frames are extracted into images in one second, default: 25), -f specifies the output format (image2 actually stands for image2 sequence.
The last parameter (the output file) has a somewhat interesting naming: it uses %3d at the end. This simply numbers your images with 3 digits (000, 001, etc.). You can also use %2d (2 digit format) or even %4d (4 digit format) if you want. Feel free to experiment and use whatever works for you!
6. Change Video Resolution or Aspect Ratio
Another simple task for ffmpeg. All you have to do to resize a video is specify a new resolution after the -s flag:
ffmpeg -i video_input.mov -s 1024x576 video_output.mp4Additionally, you might want to specify -c:a to make sure the audio codecs of the output file is the right one:
ffmpeg -i video_input.h264 -s 640x480 -c:a video_output.movYou can also change the aspect ratio using -aspect:
ffmpeg -i video_input.mp4 -aspect 4:3 video_output.mp47. Add Poster Image to Audio
This is a great way to turn audio into video, using a single photo (such as a album cover) for the audio. This is a very useful feature when you want to upload audio files to sites that don’t allow anything other than video/images (YouTube and Facebook are two examples of such sites).
Here is an example:
ffmpeg -loop 1 -i image.jpg -i audio.wav -c:v libx264 -c:a aac -strict experimental -b:a 192k -shortest output.mp4Just change the codecs (-c:v specifies video codecs, -c:a specifies audio codecs) and the names of your files.
8. Add Subtitles to Video
Equally as useful and as simple to do with ffmpeg is to add subtitles to a video (for example a movie). Enter the following:
ffmpeg -i video.mp4 -i subtitles.srt -c:v copy -c:a copy -preset veryfast -c:s mov_text -map 0 -map 1 output.mp4Of course, you can specify any codecs that you want (and any other additional options related to audio/video). You can read this article about editing subtitles in Linux, graphically.
9. Compress Media Files
Compressing files greatly reduces file size, saving you a lot of space. This can be important for transferring files. With ffmpeg, there are multiple methods to reduce file size.
First of all, for audio files, simply reduce the bit rate (using -b:a or -ab):
ffmpeg -i audio_input.mp3 -ab 128k audio_output.mp3
ffmpeg -i audio_input.mp3 -b:a 192k audio_output.mp3
Again, some different bit rate values are: 96k, 112k, 128k, 160k, 192k, 256k, 320k. The higher the bit rate, the higher the file size and the quality.
For video files, you have more options. One way would be to reduce the video bit rate (using -b:v):
ffmpeg -i video_input.mp4 -b:v 1000k -bufsize 1000k video_output.mp4You could set the -crf flag (Constant Rate Factor). A lower crf means a higher bit rate. Also, using libx264 as video codec helps. Here’s a very efficient size reduction with very small reduction in quality:
ffmpeg -i video_input.mp4 -c:v libx264 -crf 28 video_output.mp4A crf of 20 to 30 is common, but feel free to play around with the specific value.
Reducing the frame rate might work in some cases (although it might very easily make the video feel sluggish):
ffmpeg -i video_input.mp4 -r 24 video_output.mp4-r specifies the frame rate (in this case 24).
You could also try reducing the size of the video (already explained how do to that). An additional tip is to compress the audio too, making it stereo and reducing the bit rate. For example:
ffmpeg -i video_input.mp4 -c:v libx264 -ac 2 -c:a aac -strict -2 -b:a 128k -crf 28 video_output.mp4Note: -strict -2 and -ac 2 take care of the stereo part. I already covered the part that reduces the bit rate.
10. Cut Media Files (Basic)
To trim files from the beginning you have to specify a duration using -t:
ffmpeg -i input_video.mp4 -t 5 output_video.mp4
ffmpeg -i input_audio.wav -t 00:00:05 output_audio.wav
As you can see, this works for both video and audio files. Both of the commands above do the same thing: save the first 5 seconds of the input file to the output file. I have used to different ways of inputting the duration: a single number (number of seconds) and HH:MM:SS (hours, minutes, seconds). The second version acts more like an end time.
You can go even further by specifying a start time with -ss, and even an end time with -to:
ffmpeg -i input_audio.mp3 -ss 00:01:14 output_audio.mp3
ffmpeg -i input_audio.wav -ss 00:00:30 -t 10 output_audio.wav
ffmpeg -i input_video.h264 -ss 00:01:30 -to 00:01:40 output_video.h264
ffmpeg -i input_audio.ogg -ss 5 output_audio.ogg
You can see start time (-ss HH:MM:SS), duration (-t duration) in seconds, end time (-to HH:MM:SS), and start time (-s duration) in seconds (starting after duration seconds).
All these are valid commands and you can work with any part of a media file using them.
How to use ffmpeg: Advanced Usage
I’ll now cover slightly more advanced features (such as screen casting, using devices etc.). Let’s get right to the first point!
1. Split Media Files
I already covered trimming files. What you have to do to split a file into multiple parts is to specify multiple trims (specifying start times, end times or duration before each output files).
Observe this example:
ffmpeg -i video.mp4 -t 00:00:30 video_1.mp4 -ss 00:00:30 video_2.mp4The syntax is quite simple. I specified -t 00:00:30 as duration for the first part (the first part will consist of the first 30 seconds of the original video). Next, I specified that I’d like the rest to be part of a second video (starting from the end of the last part, 00:00:30).
This can be done for as many parts as you want! Have fun playing with this feature, since it is very powerful. Keep in mind that it works with audio too.
2. Concatenate Media Files
ffmpeg can also do the opposite process: putting multiple parts together.
To do so, you’ll have to create a new text file and start editing it using your preferred editor.
Since I like using the terminal, I’ll use touch and vim. It doesn’t matter what you call this file. I’ll call mine join.txt and create the file using touch:
touch videos_to_join.txtNow, I’ll edit it using vim:
vim videos_to_join.txtYou can use whatever tools you want (nano, gedit, etc.), this is just what it’s the easiest for me to use.
Here, enter the full paths to all the files you wish to join (they will be joined in the order you write them here), one per line. Make sure they have the same extension (e.g. mp4). Here’s mine:
/home/ubuntu/Desktop/video_1.mp4
/home/ubuntu/Desktop/video_2.mp4
/home/ubuntu/Desktop/video_3.mp4
Save the file you just edited. This method works for any audio or video files.
Now enter the following:
ffmpeg -f concat -i join.txt output.mp4Note: My output file is output.mp4, but that’s because all my input files have the mp4 extension.
This should join all the files you wrote down in join.txt (or however you named that file) into one single output file.
3. Join Images into a Video
This is how you can put together a slideshow or anything similar. I’ll show you how to add audio too.
The first thing I recommend doing is making sure the photos you want to put together are located in the same directory. I’ll put mine in a directory called my_photos. The extensions recommended for the pictures are .png and .jpg. Whichever you choose, make sure all images have the same extension (otherwise, using ffmpeg might have unintended effects). You could simply convert the .png files to .jpg or vice-versa (see Basic Usage).
The format (-f) of our conversion should be image2pipe. For the input, you’ll have to provide a hyphen (–). What image2pipe allows you to do is pipe (using | in the terminal)the results of a command such as cat into ffmpeg instead of inputting all names one by one. That’s exactly what I’ll do. For this to work, we’ll also have to mention that we want the video codecs to be copied (-c:v copy) (to properly use the images):
cat my_photos/* | ffmpeg -f image2pipe -i - -c:v copy video.mkvIf you play this file, you might think only some pictures were added to the slideshow. Actually, all of your pictures have been added, but ffmpeg cycles through them as fast as possible. This means 1 frame per photo; ffmpeg (by default) runs at around 23 fps.
To change that, you’ll have to specify the frame rate (-framerate) you want:
cat my_photos/* | ffmpeg -framerate 1 -f image2pipe -i - -c:v copy video.mkvIn my example, I set the frame rate to 1, that means that each frame (that also means each images) appears for 1 second.
To add audio, such as a background song, we’ll have to specify the audio file as input file (-i audo_file) and copy the audio codecs (-c:a copy). For the codecs, you could copy both audio and video codecs at the same time with -c copy. Make sure you set the codecs right before specifying the output file. You could also set the frame rate so that all of your pictures synchronize with the duration of the audio you want to use. To get that, divide the number of pictures by the duration of the audio (in seconds). For my example, I have a 22 seconds long audio file and 9 images. 9 / 22 is approximately 0.40, so that’s what I’ll use for my frame rate:
cat my_photos/* | ffmpeg -framerate 0.40 -f image2pipe -i - -i audio.wav -c copy video.mkv4. Record Your Screen
Screencasting with ffmpeg is not a hard job. The format (-f) you need to use is x11grab. This will capture your XSERVER. As input you’ll have to specify your screen display number (main screen should normally be 0:0). However, this will only capture a top-left portion of the screen. You should add a screen size (-s). Mine is 1920×1080. The screen size should be mentioned before the input:
ffmpeg -f x11grab -s 1920x1080 -i :0.0 output.mp4Press q or CTRL+C at any time to stop the screencast.
Bonus trick: You can make the size of the output file fullscreen with inputting this after for the size (instead of 1920×1080 or any other set resolution):
-s $(xdpyinfo | grep dimensions | awk '{print $2;}')Here’s the full command:
ffmpeg -f x11grab -s $(xdpyinfo | grep dimensions | awk '{print $2;}') -i :0.0 output.mp45. Record Your Webcam
Recording input from your webcam (or another device, such an usb camera) is even easier. In Linux, devices are stores in /dev as /dev/video0, /dev/video1, etc.:
ffmpeg -i /dev/video0 output.mkvAgain, q or CTRL+C to stop recording.
6. Record Your Audio
Linux handles audio mainly through ALSA and pulseaudio. ffmpeg can record both, but I’ll cover pulseaudio, since Debian-based distributions include it by default. The syntax is a little different for the two methods.
For pulseaudio, you have to force (-f) alsa and specify default as input (-i default):
ffmpeg -f alsa -i default output.mp3Note: In your distribution sound settings, make sure the default recording device is the one you want to record.
I play guitar quite a lot and I have an audio interface so I can record it. I had a pleasant surprise when ffmpeg recorded my guitar with no problems.
Bonus Tips on Recording
For any type of recording you can also specify codecs, of course (already covered). You can choose a specific frame rate (-r). You can combine recording audio with webcam/screen recording too!
ffmpeg -i /dev/video0 -f alsa -i default -c:v libx264 -c:a flac -r 30 output.mkvInstead of recording audio, you can just as easily add an audio file as input to be recorded on top of your screencast/webcam:
ffmpeg -f x11grab -s $(xdpyinfo | grep dimensions | awk '{print $2;}') -i :0.0 -i audio.wav -c:a copy output.mp4Basic usage of Filters in ffmpeg
Filters are an incredibly powerful feature of ffmpeg. There is a crazy amount of filters available for you to use, making ffmpeg completely capable of handling any editing needs. Since there are so many filters and this article is already comprehensive, I’ll only cover some simple filters.
The basic structure for using a filter is:
ffmpeg -i input.mp4 -vf "filter=setting_1=value_1:setting_2=value_2,etc" output.mp4
ffmpeg -i input.wav -af "filter=setting_1=value_1:setting_2=value_2,etc" output.wav
As you can see, I am specifying video filters (-vf, short for -filter:v) and audio filters (-af, short for -filter:a). The actual filters are written inside double quotes (“) and can be chained by separating them with commas (,). You can specify as many filters as you want (I’ve written etc to note additional filters, it isn’t actually part of the command).
The general form of a filter is:
filter=setting_2=value_2:setting_2=value_2The different filter settings and their values are separated by colons.
You can also execute mathematical operations as values for the different settings.
Note: More detailed coverage of different constants to be used in expressions and different settings can be found in the official ffmpeg filter documentation.
I’ll cover both video and audio filters. Let’s see some examples!
1. Video Scaling
This is a very simple filter. The only settings are width and height:
ffmpeg -i input.mp4 -vf "scale=w=800:h=600" output.mp4I mentioned that you can use mathematical operations for values too:
ffmpeg -i input.mkv -vf "scale=w=1/2*in_w:h=1/2*in_h" output.mkvThis command sets the output size to half (1/2) of the input size (in_w, in_h).
2. Video Cropping
As for the scaling filter, the settings are the width and height of the resulting file. Optionally, you can specify coordinates for the top-left corner of the cut (default: center of the input video):
ffmpeg -i input.mp4 -vf "crop=w=1280:h=720:x=0:y=0" output.mp4
ffmpeg -i input.mkv -vf "crop=w=400:h=400" output.mkv
As noted, the second cut will cut in the center of the input file (since I haven’t specified x and y coordinates for the top-left corner). The first command will cut from the top-left corner (x=0:y=0).
Here is an example that uses mathematical expressions as values:
ffmpeg -i input.mkv -vf "crop=w=3/4*in_w:h=3/4*in_h" output.mkvThis command sets the output size to 3/4 of the input size (in_w, in_h).
3. Video Rotation
You can also rotate a video clockwise by a value (in radians). To make things easier, you can specify a value in degrees and convert it to radians by multiplying that value with PI/180:
ffmpeg -i input.avi -vf "rotate=90*PI/180"
ffmpeg -i input.mp4 -vf "rotate=PI"
The first command will rotate the video clockwise 90 degrees. The second command will turn the video upside-down (PI rad = 180 degrees).
4. Audio Channel Remapping
This can be helpful if you somehow only get audio in the right ear or anything similar. You can make the audio audible from both ears (in this particular case) like this:
ffmpeg -i input.mp3 -af "channelmap=1-0|1-1" output.mp3This maps the right (1) audio channel to both the left (0) and the right (1) audio channel. (the left number represents input, the right number represents output).
5. Audio Volume Multiplying
You can multiply the audio volume by any real number (integer or not). You only need to specify the multiplier:
ffmpeg -i input.wav -af "volume=1.5" output.wav
ffmpeg -i input.ogg -af "volume=0.75" output.ogg
The first command amplifies the volume 1.5 times. The second command makes the audio 1/4 (0.25) times quieter.
Bonus Tip: Playback Speed Adjustments
I’ll include both the video (doesn’t affect audio) and audio filters for this task.
1. Video
The filter for video is setpts (PTS = presentation time stamp). This works in a somewhat interesting manner. Since we actually modify the PTS, a bigger coefficient means a slower result and vice-versa:
ffmpeg -i input.mkv -vf "setpts=0.5*PTS" output.mkv
ffmpeg -i input.mp4 -vf "setpts=2*PTS" output,mp4
As I just explained, the first command doubles the playback speed and the second command slows the video to 1/2 of the speed.A
2. Audio
The filter for this is atempo. There’s one little caveat: it can only take values between 0.5 (half the speed) and 2 (double the speed). To get around that, you can chain atempo filters:
ffmpeg -i input.wav -af "atempo=0.75" output.wav
ffmpeg -i input.mp3 -af "atempo=2.0,atempo=2.0" ouutput.mp3
The first command slows the audio by 1/4 of the original speed. The second command speeds up the audio 4 times (2*2).
Wrapping Up
In this comprehensive guide I covered the installation, basic usage, advanced usage and basics of filters.
I hope that this can be a helpful resource for anyone looking to try out ffmpeg, for someone that wants to use ffmpeg for multiple tasks or even just for someone who is willing to get more familiar with the extensive features of this amazing utility.
Let us know if you found this article useful in the comments below and tell us what are you using ffmpeg for! We look forward to any additions of any kind. Thanks for reading our blog and keep an eye out for an article covering more complex filtering. Enjoy!
