

You have some ideas about installing packages in Ubuntu with the apt command. Those packages come from Ubuntu’s repositories.
How about a third-party or external repository? No, I am not talking about PPA here.
Sooner or later, you’ll come across installation instructions that goes in at least four lines. You install something called ‘apt-transport-https’ and then do something with gpg and sources list. After that, you install the package.
Can’t recall completely. Let me share an example for installing the latest version Yarn on Ubuntu:
sudo apt install apt-transport-https curl
curl -sS https://dl.yarnpkg.com/debian/pubkey.gpg | sudo apt-key add -
sudo sh -c 'echo "deb https://dl.yarnpkg.com/debian/ stable main" >> /etc/apt/sources.list.d/yarn.list'
sudo apt update && sudo apt install yarn
You’ll often encounter such installation methods while installing programming tools directly from the developers.
Many people follow the instructions without thinking twice about what’s going on here. Nothing wrong with that but knowing the process actually improves your knowledge on the matter and could also help in troubleshooting.
Let me explain the logic behind those lines.
Understanding the procedure of installation from external repositories
Before you proceed, I highly recommend reading these two articles so that things are a bit more clear to you:
To recall quickly, here’s a visual representation of repositories and package manager in Linux.

The entire idea here is that you add a new, external repository to your system. This way, you’ll be able to download and install packages available from this new repository. If the repository provides an update on the package version, you get to update the installed package along with the system updates (apt update && apt upgrade).
So, how does this work? Let’s go through the lines one by one.
Part 1: Getting HTTPS support for apt
The first line is this:
sudo apt install apt-transport-https curlCurl is a tool for downloading files in Linux terminal. The main part here is the installation of apt-transport-https and frankly speaking not needed anymore.
Confused? This apt-transport-https package allows your system to access repositories over the secure HTTPS protocol. By design, Ubuntu repositories use http, not https.
Take a look at the screenshot below. The https ones are the external repositories I have added into my system. Ubuntu repositories and PPA use http.
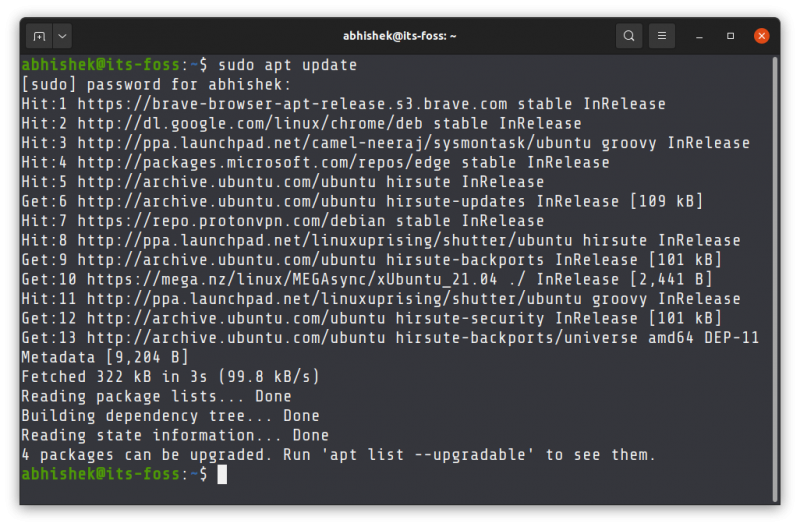
In the older version of apt package manager, https support was not included. apt-transport-https package adds https support to apt. To add a repository that uses https, this package is installed first.
Did I not say it is not needed anymore? Yes because the newer versions of apt (higher than 1.5) support https and thus you do not need to install apt-transport-https anymore.
And yet you see this package mentioned in the instructions. This is more for legacy reasons or for really old distribution versions that might be using an older version of apt.
Now, you may wonder why Ubuntu repositories use http, not https when https is the secure protocol. Is it not a security risk? The next segment will answer that question.
Part 2: Adding GPG key of the remote repository
Linux repositories have this built-in GPG-key based security mechanism. Every repository added its public GPG key to your system’s trusted keys. The packages from the repositories are ‘signed’ by this GPG key and thanks to the stored public key, your system verifies that the package is coming from the repository.
If there is a mismatch between the keys, your system will throw an error instead of installing or updating packages from the said repository.
So far, so good. The next step is to add the public GPG key of the external repository to your Linux system so that it trusts the package from this repository.
curl -sS https://dl.yarnpkg.com/debian/pubkey.gpg | sudo apt-key add -In the above command, you download the GPG key from the given URL using curl. The option sS ensures that you don’t see the flooded output (silent mode) but shows the error (if any). The last - tells apt-key to take stdin instead of a file (which is the output of the curl command in this case).
The download key is added to the system with apt-key add command.
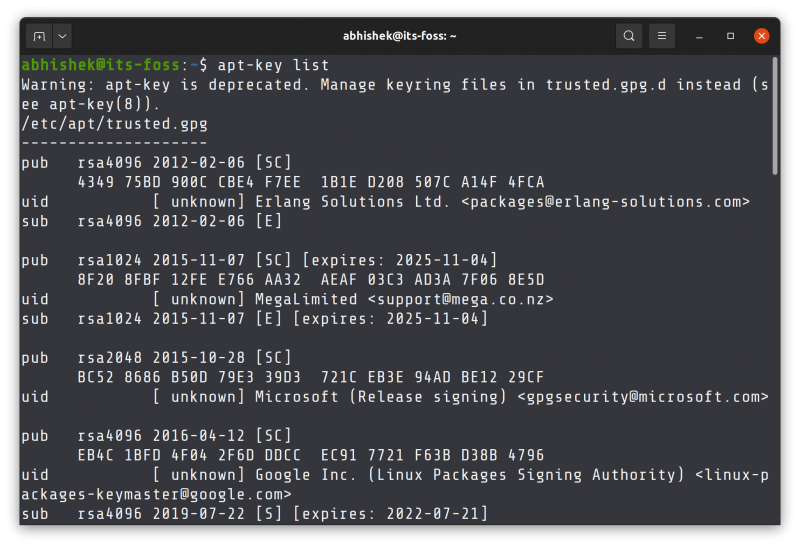
You can see the GPG keys added by various repositories in your system using the apt-key list command.
That’s one way of adding the GPG key to the system. You’ll see some other commands that may look slightly different but do the same job of adding the public key of the repository to your system.
sudo apt-key adv --keyserver keyserver.ubuntu.com --recv-keys E298A3A825C0D65DFD57CBB651716619E084DAB9You’ll notice a warning that apt-key is deprecated. You could still use apt-key command till Ubuntu 22.04 but it will eventually be removed. Let’s not worry about it at the moment.
Part 3: Adding the external repository to your sources list
The next command adds a new entry into the sources list of your system. This way, your system will know that it has to check this repository for packages and updates.
sudo sh -c 'echo "deb https://dl.yarnpkg.com/debian/ stable main" >> /etc/apt/sources.list.d/yarn.list'There is a file /etc/apt/sources.list that contains the details of the Ubuntu repositories. This file should not be touched. All the additional repositories should be placed in their own respective file (ending with .list convention) in the /etc/apt/sources.list.d directory.
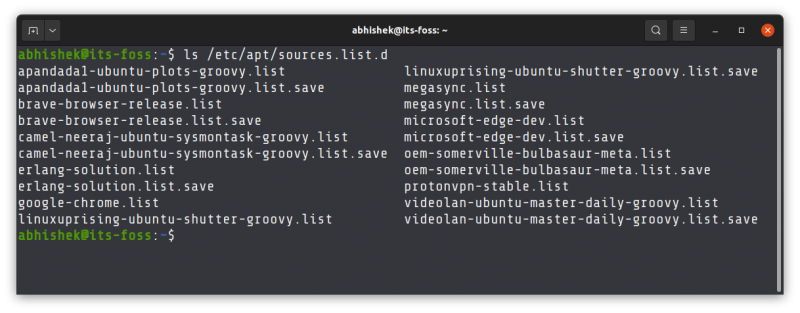
This makes package management easier. If you are removing a repository from the system, you just need to delete the corresponding sources file. No need to mess with the main sources.list file.
Let’s look at the command in a bit more detail.
sudo sh -c 'echo "deb https://dl.yarnpkg.com/debian/ stable main" >> /etc/apt/sources.list.d/yarn.list'With sh, you are asking to run the command in a new shell, instead of the subshell. -c option tells the sh command to read the commands from the operand instead of standard input. Then it runs the echo command which basically adds line deb https://dl.yarnpkg.com/debian/ stable main to /etc/apt/sources.list.d/yarn.list file (file will be created)
Now, there could be numerous ways you can create a .list file in the specified directory and add the line with repository details in it. You could use it like this as well:
echo "deb https://dl.yarnpkg.com/debian/ stable main" | sudo tee /etc/apt/sources.list.d/yarn.listYou get the gist, right?
Part 4: Installing the application from newly added repository
So far, you have added the GPG key of the repository and the URL of the repository to the system.
But your system still does not know about the package available from this new repository. This is why you need to update the local cache of package metadata first with this command:
sudo apt updateYour system will have the information about the packages available from the newly added repository and you can install the package now:
sudo apt install yarnTo save time, you can run the two commands one after another in a single line.
sudo apt update && sudo apt install yarnThe && ensures that the second command only runs when the previous command is completed without any error.
And thus, the process completes.
Did it make things clear or confused you even more?
I explained the logic behind the steps for using external repositories in Ubuntu. I hope you have a better understanding of the topic now, but it is also possible that too much detail could be confusing.
If things are still not clear or if you have additional questions, please let me know. If you notice technical inaccuracies, please let me know in the comment section.
