I am not exaggerating when I say that this is the coolest Raspberry Pi accessory I ever used or even seen.
That's not because it has a tower cooler with two RGB fans. I mean that's also a factor but not the only factor here.
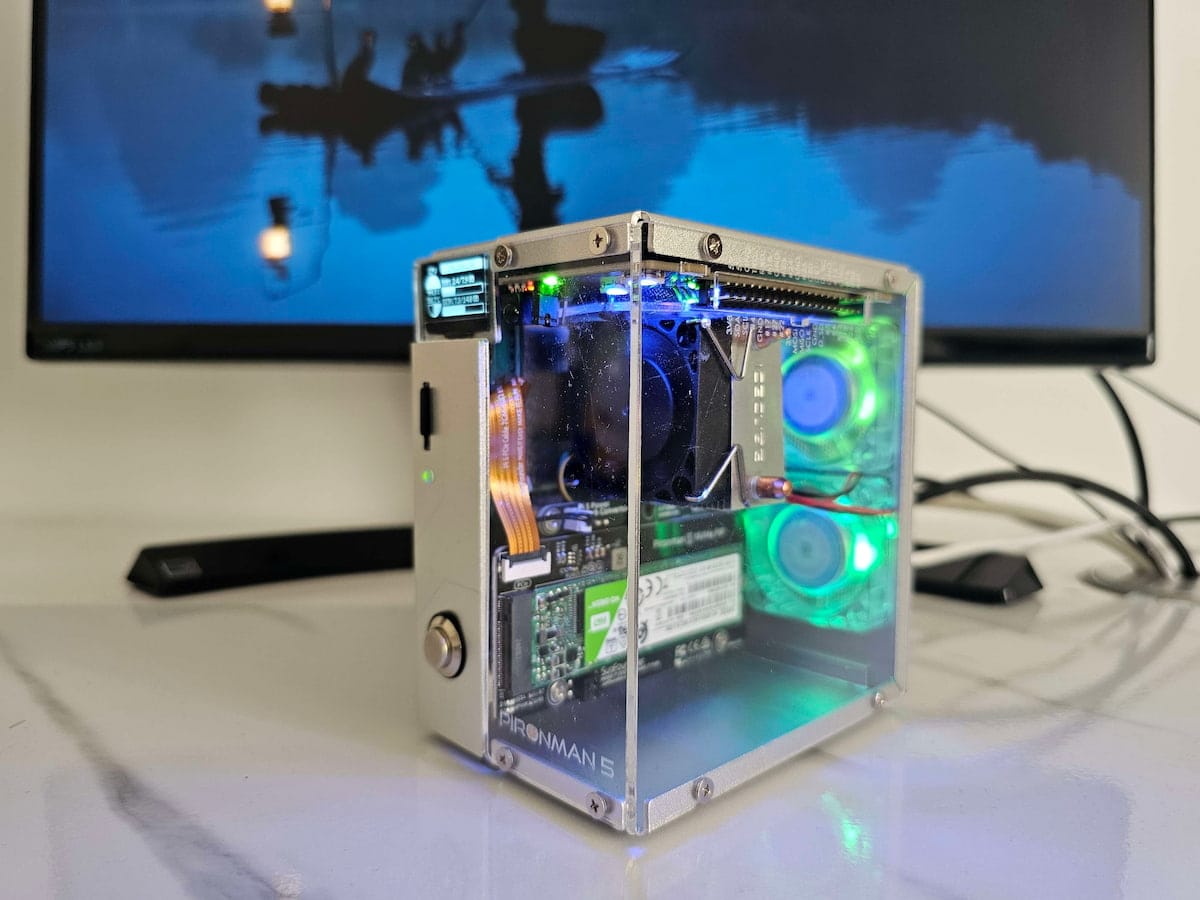
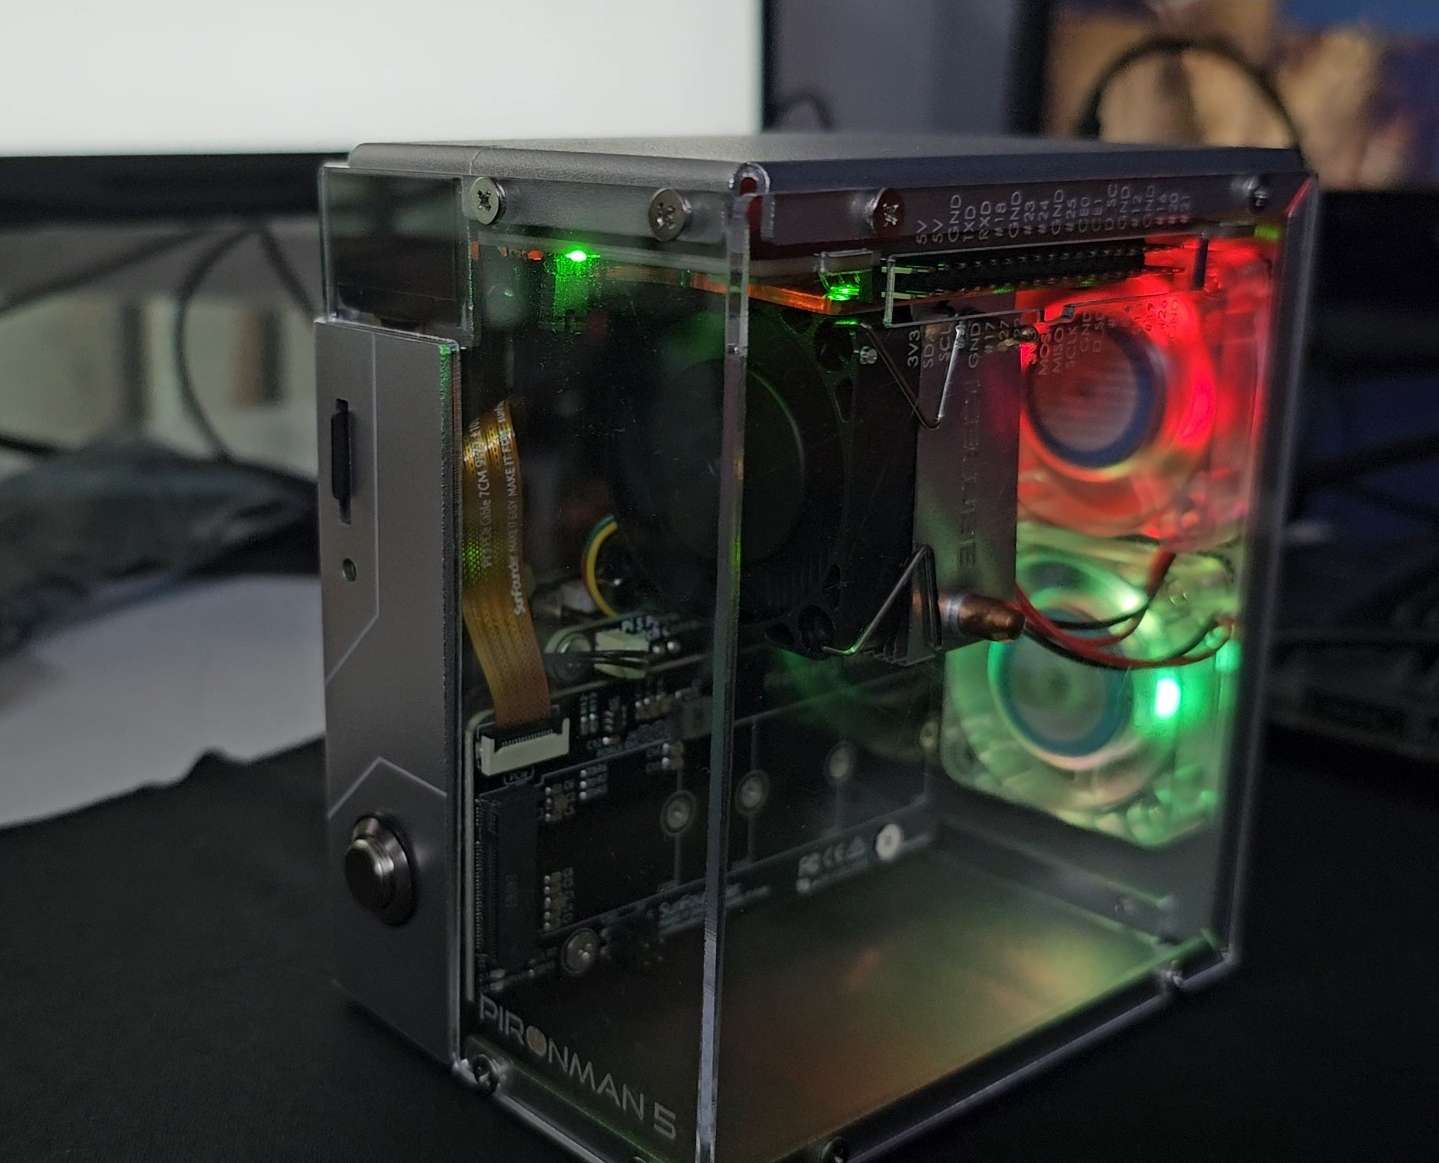
At first look, SunFounder's Pironman 5 looks like a transparent Raspberry 5 case with an active cooler but it is much more than that. It actually turns your single board computer into a mini PC.
Let me share more details about this awesome gadget and my experience with it.
Pironman 5 Features: More than just a Raspberry Pi case
Let's see its features and specifications first.
The Pironman 5 has a part aluminum, part acrylic casing that gives it the feel of a gaming PC in miniature form.
Of course, the tower cooler and the two RGB fans seems the most attractive visible part of it but there is more to it.
It enhances the capabilities of your Pi 5 by providing two standard HDMI ports (Pi 5 has micro HDMI slots) and adding NVMe M.2 SSD support.
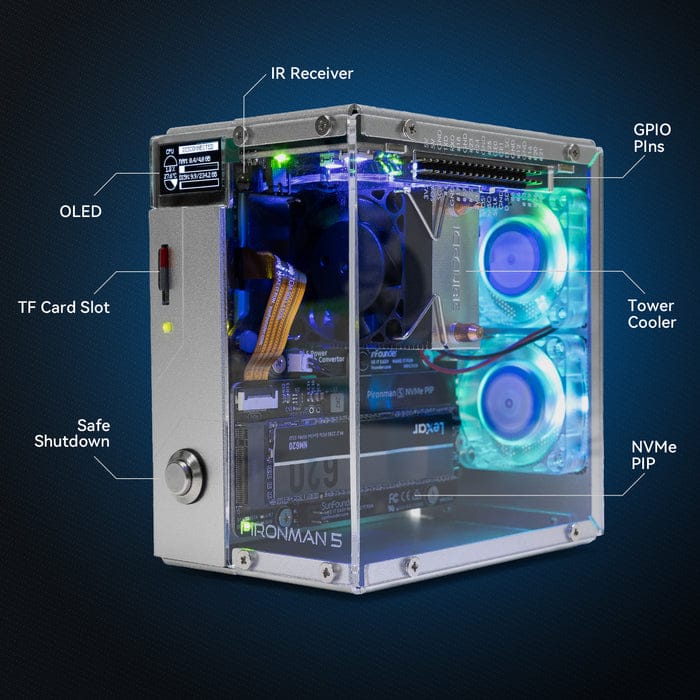
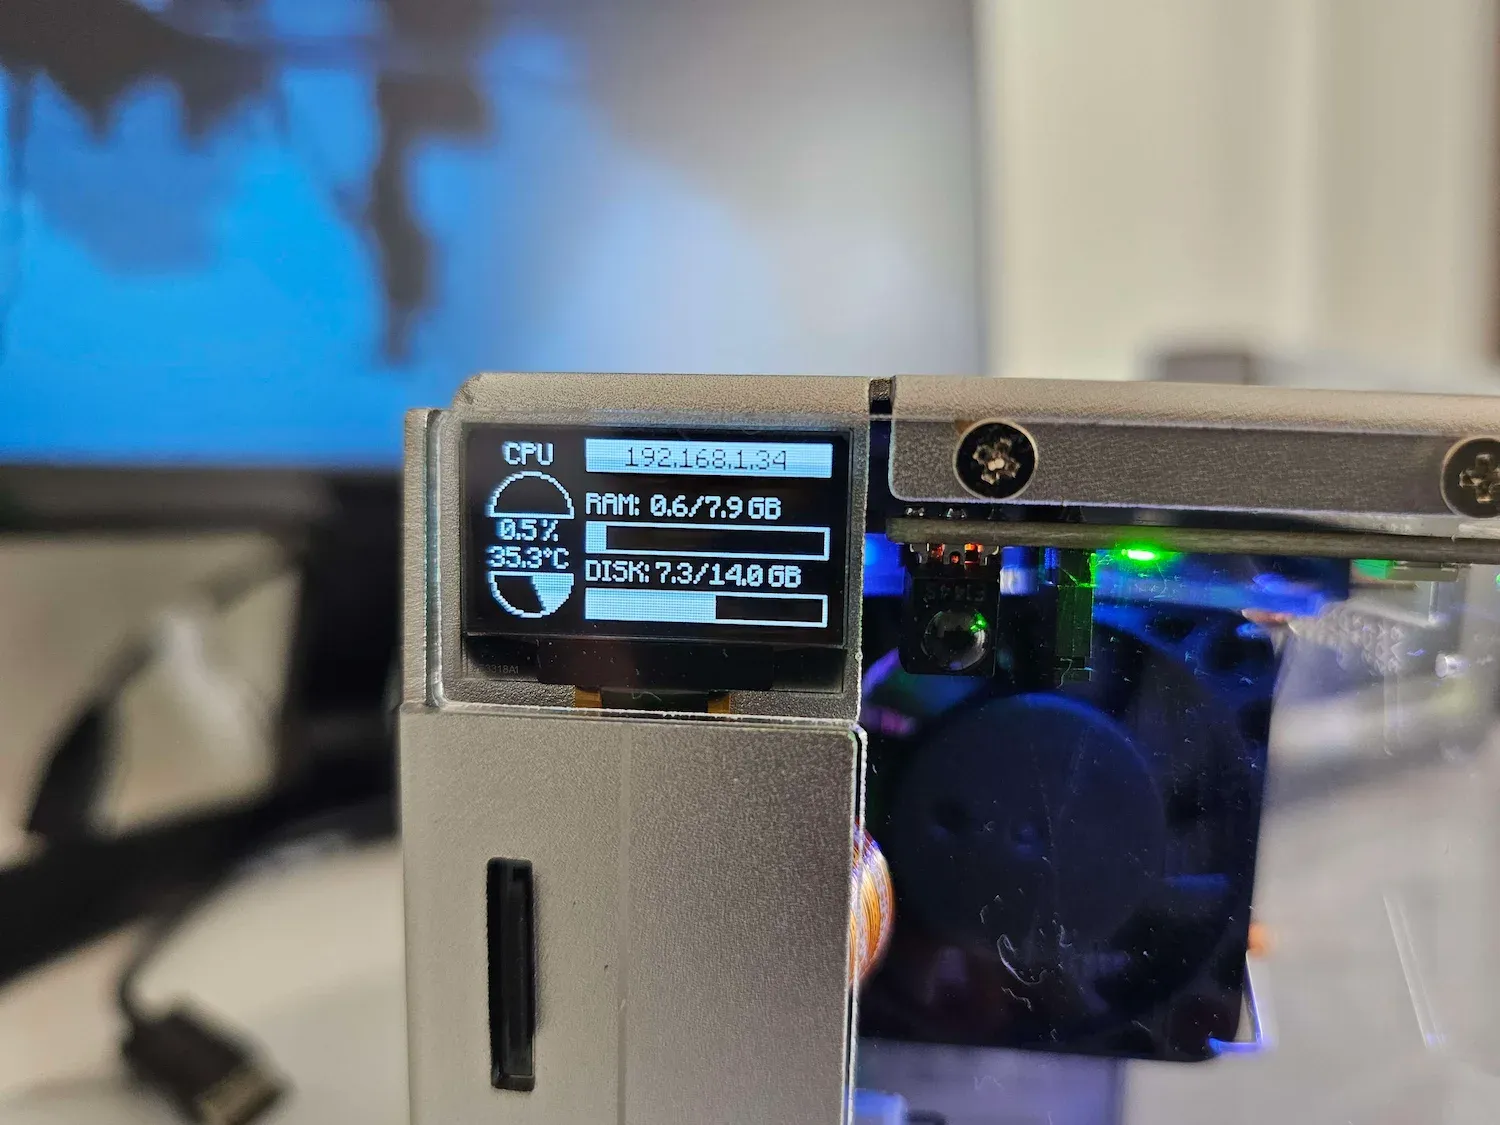
On the outer, you have a 0.96" OLED screen that shows the current CPU and RAM usage, CPU temperature, disk storage, and the Pi's IP address. How cool is that 😍
All the ports you get in your Pi remain accessible from outside the case. The TF card slot, GPIO pins, USB ports, power outlet, etc. It also gives you a power button on the front.
Now that you know what it does, let me share my experience with it so far.
Getting Pironman 5 ready
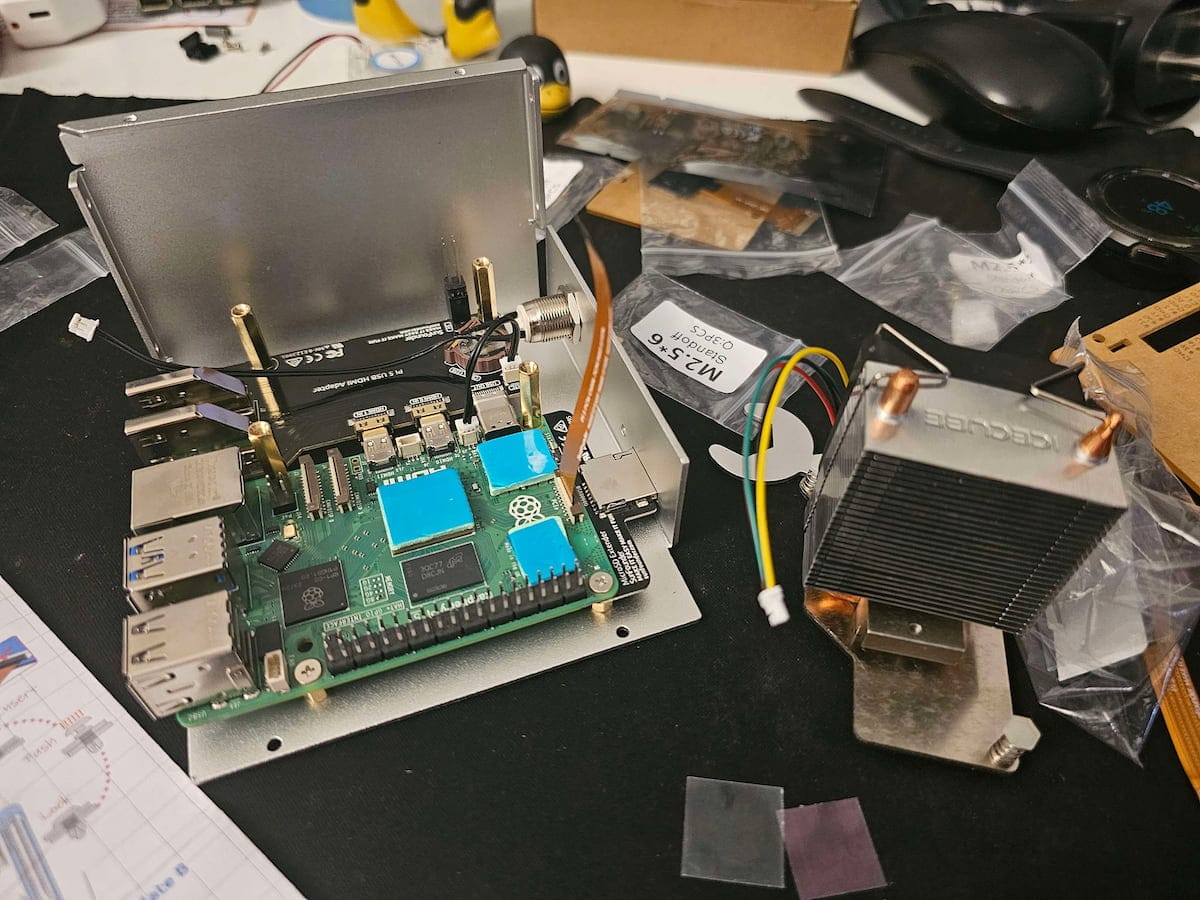
Like most of the SunFounder's gadgets and accessories, Pironman is also a DIY assembly kit. This means that you'll be getting all the parts and screws and you have to put it together.
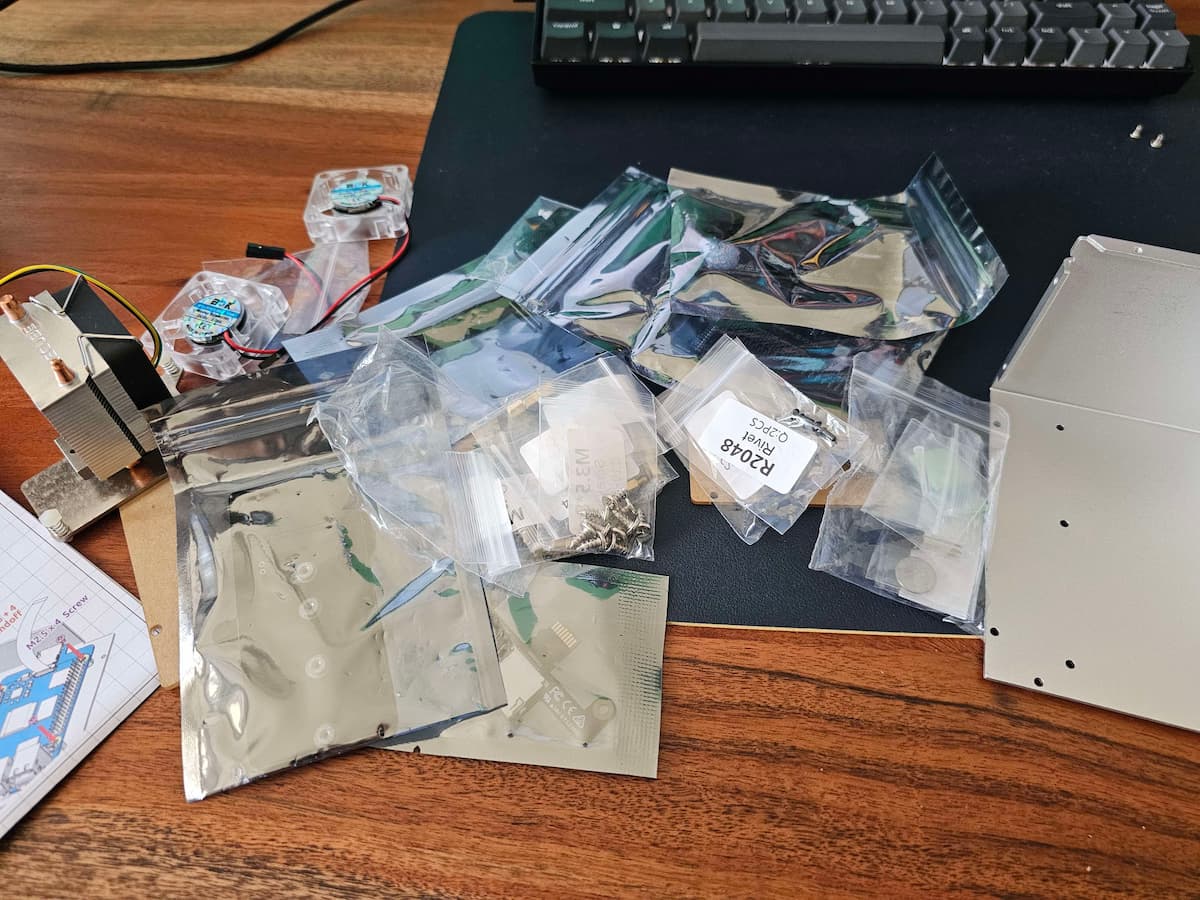
At the time of writing this article, there is no official video for Pironman 5 assembly. However, the assembly diagram was more than sufficient for me. Considering that I already experienced their Pi Dog and Galaxy Rover kit, this assembly was a walk in the park. It took me around 40 minutes to assemble it.
It should not be complicated for most people I believe. If you can assemble Ikea furniture, you could do this one as well. It's similar but tiny.
The glass-like transparent display is actually acrylic and I roughed it up a little against the desk and so it has some scratch marks. They are not visible easily but my OCD can spot them from any corner of the room.
Pironman 5 also has a dedicated document portal which is essential. Why? I tell you in the next section.
Post assembly setup and configuration
When I turned on the Pi inside the Pironman for the first time, I noticed that the OLED screen was not displaying anything. I started doubting the ability of my fat fingers in successfully assemble the kit.
It was only when I was reading the document portal that I realized that a couple of software setups remained.
SunFounder provides a pironman Python module that helps you get the stats on the OLED.
Not only that, you can also configure and control the RGB lighting and fan behavior through it.
By default, there is a blue light in breathing mode. The RGB fans run when the CPU hits 60 degrees Celsius but that was not happening with Tower Cooler doing a good job of reducing the SoC temperature.
So, I changed the config and made the RGB fans run at 50 degrees. They look cool after all. The RGB lighting should be synced between the two fans. However, I noticed a slight delay of a second. I'll see if that can be fixed.
The RGB lighting and OLED remain on when the Pi is shut down. The documentation mentioned additional steps to deactivate the GPIO power to tackle it.
My experience with the Pironman 5
I was using the official Raspberry Pi 5 active cooler earlier and it did a decent job of keeping the Pi 5 cool.
Although I didn't do any benchmarking tests, I feel that Pironman does a better job of keeping the CPU temperature down. That's the important part, right?
The fan noise is not that noticeable, primarily because the temperature remains well under control, and hence, the fans don't run at full speed.
I have attached an NVMe SSD, which is working as additional storage for now. I will experiment by running the Raspberry Pi OS directly from the SSD.
The small OLED display is also helpful. If you are running a homelab setup where Pi runs without a dedicated monitor, you can easily see what IP it is using and how much system resources are consumed.
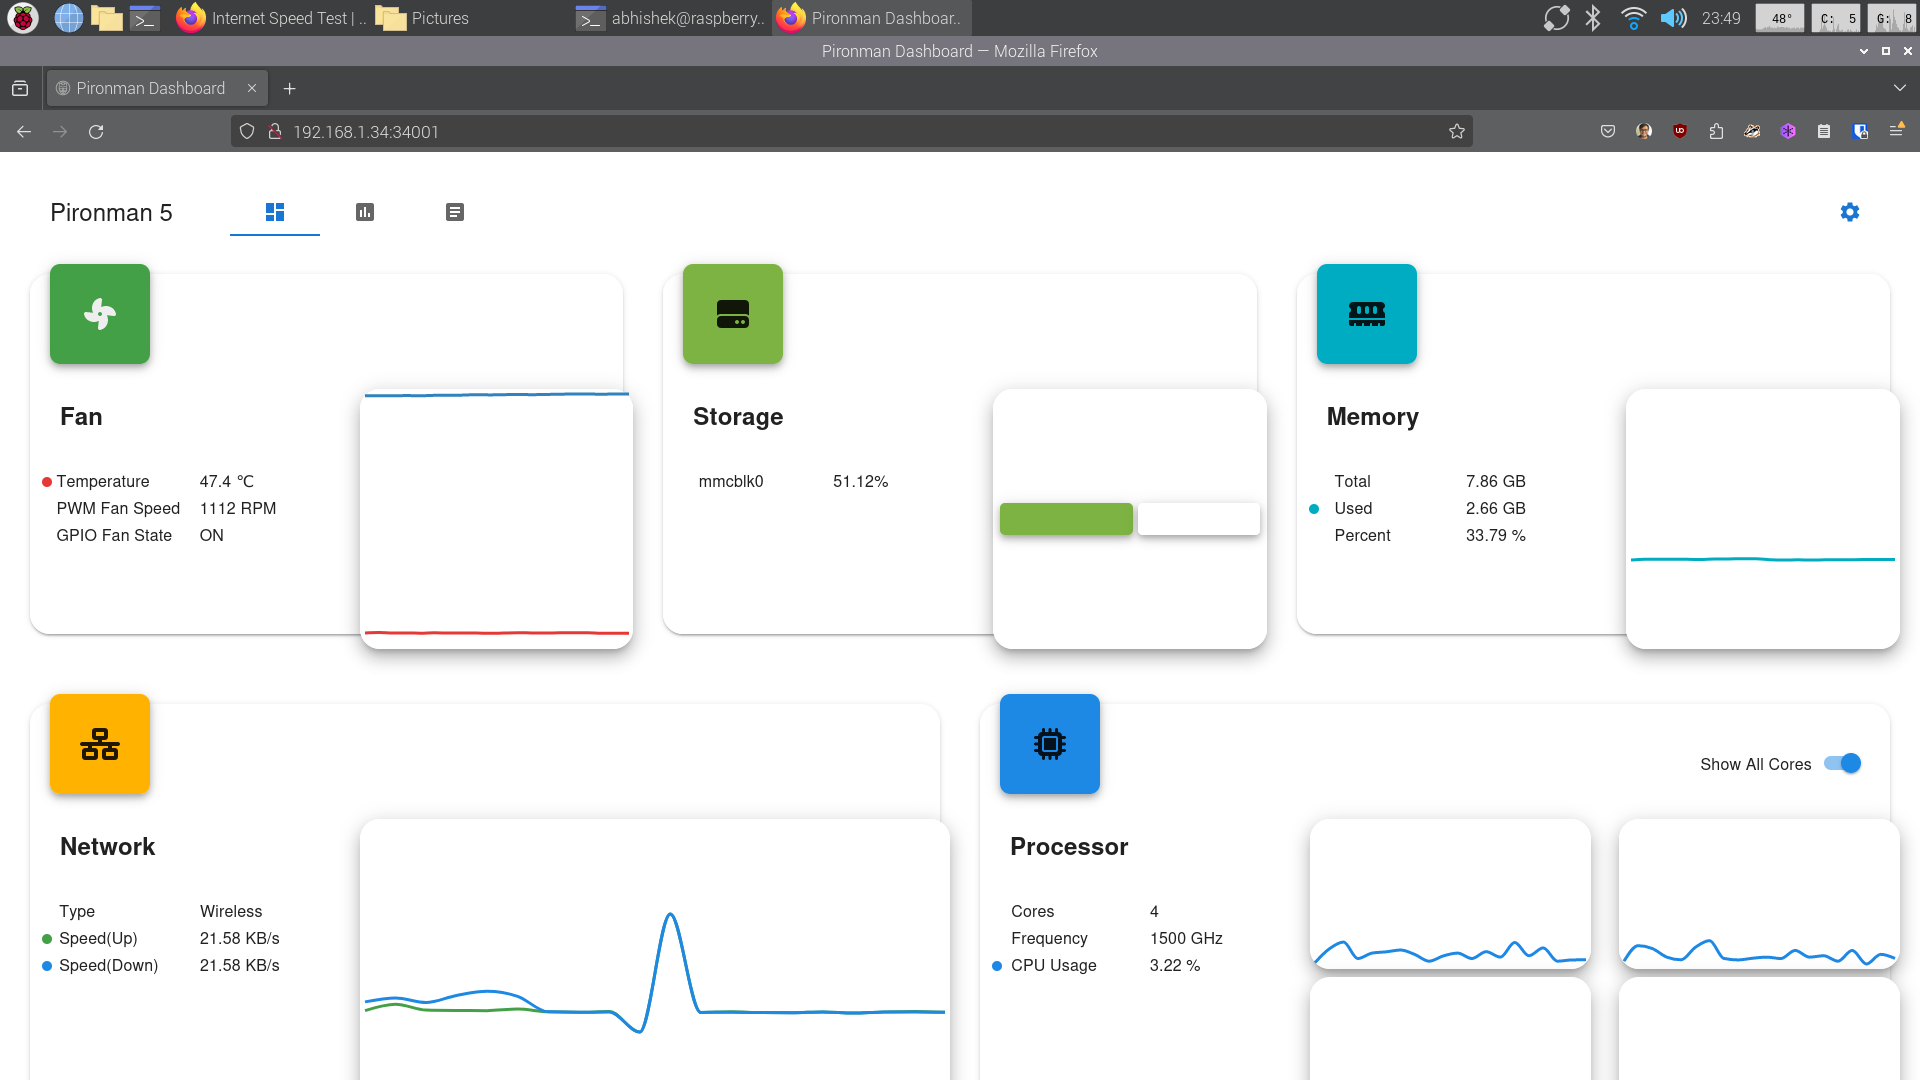
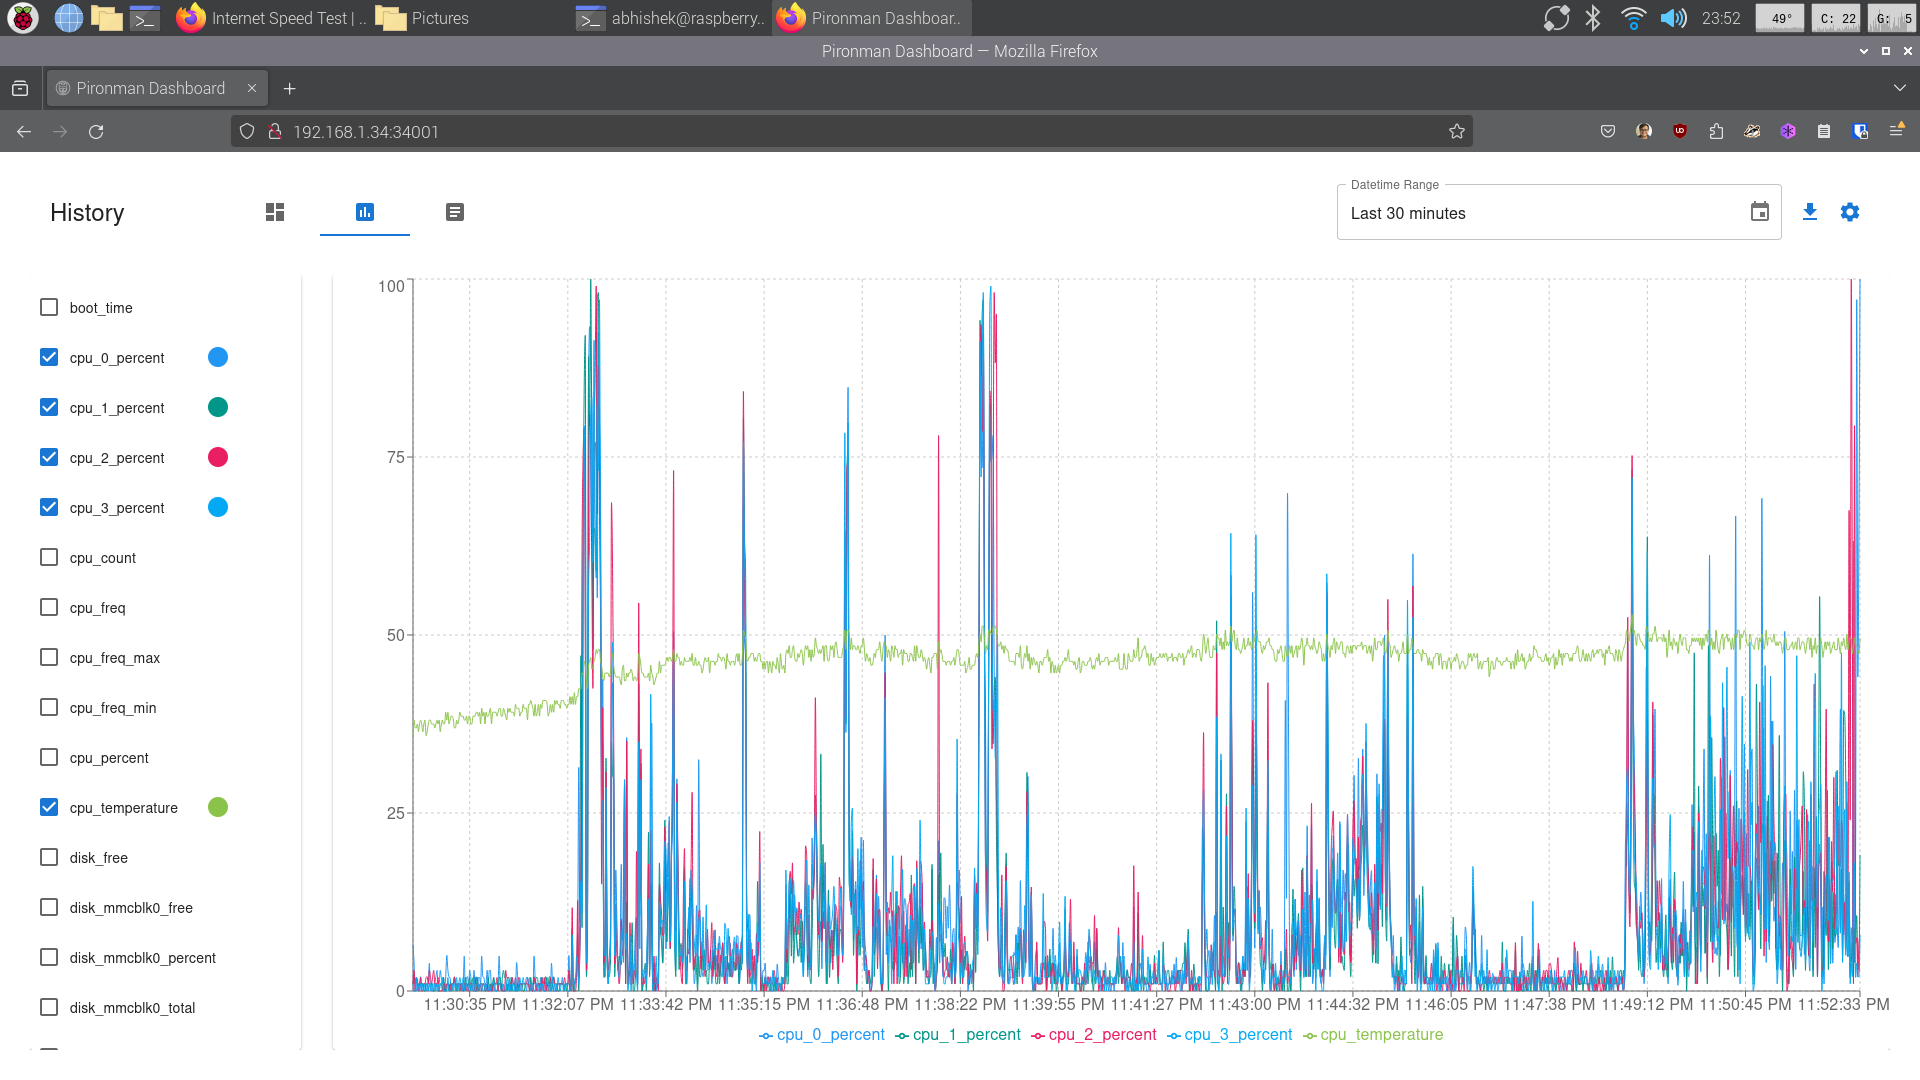
Pironman also has a browser-based dashboard, available at port number 34001. It allows you to see the system stats. You can even plot graphs with those stats. It also allows changing the Pironman configuration. I used it for lowering the threshold for RGB fans.
The power button on the front needs to be pressed twice in quick succession to initiate an immediate shutdown. Single press brings the shutdown menu.
Conclusion
I shared teaser videos on social media platforms. Most people liked Pironman. A few people didn't like the concept of turning the Pi into a mini PC like this.
I think that's subjective. Pironman keeps my Raspberry Pi 5 cool and makes it look cool. I like that. The ability to use standard HDMI and SSD is definitely a plus.
Overall, I am liking the enhanced Raspberry Pi 5 experience with the Pironman 5. I highly recommend it if you are planning to use your Raspberry Pi 5 as a desktop and if you can afford it.
Pironman 5 is priced at $79.99, which is reasonable for the features it offers. I have seen regular tower cooler cases in a similar price range. This one additionally provides standard HDMI and SSD abilities. Note that it doesn't include a Pi 5. You have to own that separately.