
Brief: This article shows you some expert VLC tips that will help you use this great video player for greater causes.
VLC tips to get more out of it

Do you know VLC, the ubiquitous media player, flagship of the VideoLAN project? VLC is a cross-platform tool and you can easily install VLC on Ubuntu or other Linux distributions. There are MacOS and Windows versions too and even versions for your phone/pad/watch running iOS or Android. But that later is only a video player. Anyway, that’s the main VLC use case. Or isn’t it?
In fact, for the desktop, VLC is much more than just a tool to play videos stored on your hard drive! So, stay with me for a tour of the lesser known features of that great software.
1. Using VLC to import videos from an UPnP device
Before talking about the UPnP support build into VLC, maybe it worth taking some time to explain in few words what is UPnP.
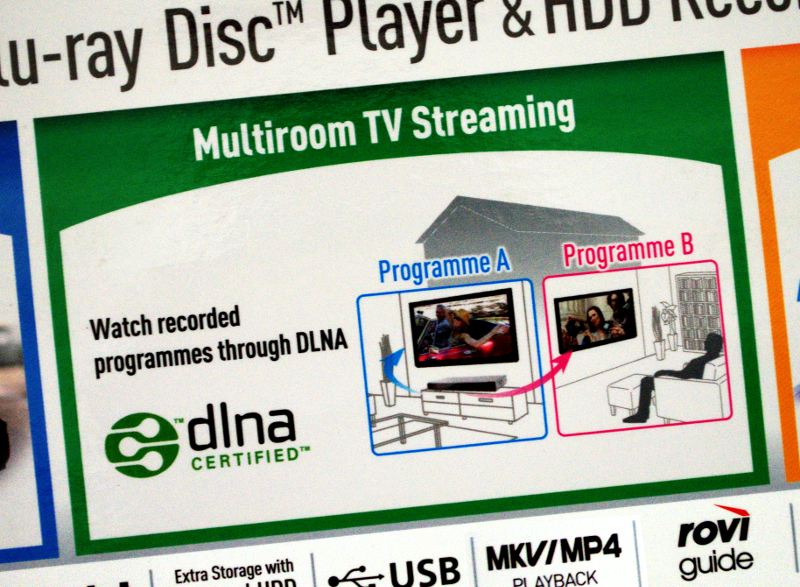
Universal Plug and Play (UPnP) is a set of protocols allowing connected devices to discover each other presence on the network. UPnP aims at making network devices plug’n’play in order to ease adoption by non-technical oriented users. The reason I mention that is many consumer grade audio-video devices do now support UPnP. Sometimes it is not obvious because that capability is rebranded as DLNA — but for our purpose, it mostly covers the same things.
VLC do support UPnP. Unfortunately, at the time of this writing VLC can only act as an UPnP client. Not as an UPnP server. But that’s sufficient if you want to play from VLC some content stored on an external UPnP server, just like a compliant digital video recorder or a combo DVD/BR/HDD home appliance.
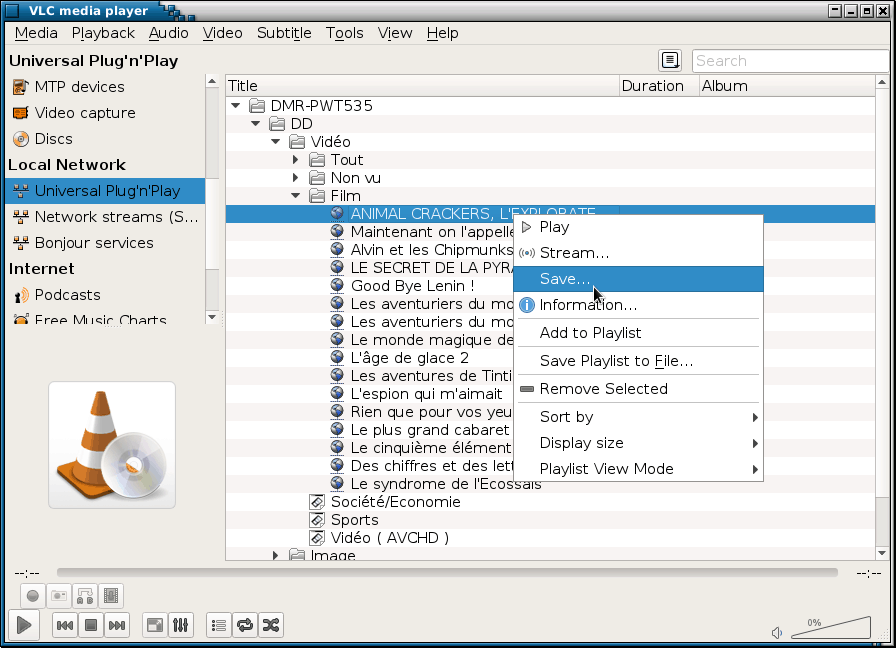
Playing videos from an UPnP network device is rather intuitive. But did you know by right-clicking on a stream you can copy (“save”) from an UPnP device to your local device?
I must admit on my system, it works only for recorded videos, and not for live streams. Is this an issue with my HDD recorder or a VLC limitation? I can’t tell for sure— by the way, if you have some more information about that, don’t hesitate to share that with me using the comment section at the bottom of this article!
As an extra trick, since my HDD recorder uses HTTP as the transport layer, I find it most useful to use VLC to explore the HDD hierarchy, and then to use some command line tool to actually download and/or process the stream. I find that way more “batch friendly”:
# Download raw stream data from my HDD
curl http://10.129.36.11:60001/AV-0-268435456-2-0-268435503-251953200_BDY \
        -o stream.raw
# Transcode the stream from my HDD using `ffmpeg`
ffmpeg -i http://10.129.36.11:60001/AV-0-268435456-2-0-268435503-251953200_BDY \
-seekable 0 \
-codec:a copy \
-codec:v libx264 -preset fast -tune film \
out.mkv2. Using VLC to transcode videos
In the previous example, I used ffmpeg to transcode a video from my HDD recorder. But actually, you don’t need an external tool. VLC can do it. And even from the command line:
cvlc http://10.129.36.11:60001/AV-0-268435456-2-0-268435503-251953200_BDY \
        --sout-x264-preset fast --sout-x264-tune film \
        --sout "#transcode{vcodec=h264,acodec=copy}:file{dst=out.mp4}" \
        vlc://quit
3. Interface-less VLC player
Did you notice in the command above I used the cvlc command instead of vlc? No, cvlc is not a fork. It is just a way to run VLC without the graphical user interface.
For example, if you want to play some video fullscreen without bothering with the UI, just type:
cvlc --play-and-exit  \
        --fullscreen \
        stream.raw
I find cvlc particularly useful when I use VLC for batch processing, or when I have to play videos in “kiosk mode”. Think for example of an in-store PoP/PoS advertising display. For that task, cvlc can be an alternative to ffplay or mplayer.
4. Using VLC to record screen captures
VLC is a great video player. In addition, as we’ve just seen it, it can download and transcode videos too. But it wouldn’t be a complete video solution if it didn’t record videos too.
And it did: using VLC you can record videos from various input devices such as a webcam. Or a DVB-S2 TV Tuner Card.
But there is one input pseudo-device that will specifically grab my attention here: the “Desktop” device.
That device allows you to capture your computer screen just like if it was a “real” input video device. This is a nice option if you want to record your desktop for a tutorial or a screencast for example. The only real drawback being VLC is currently unable to record the cursor on Linux — so it may not be the best screen capture tool. But it works.
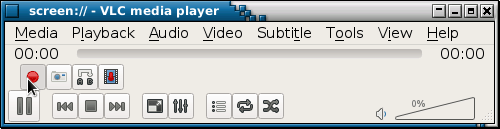
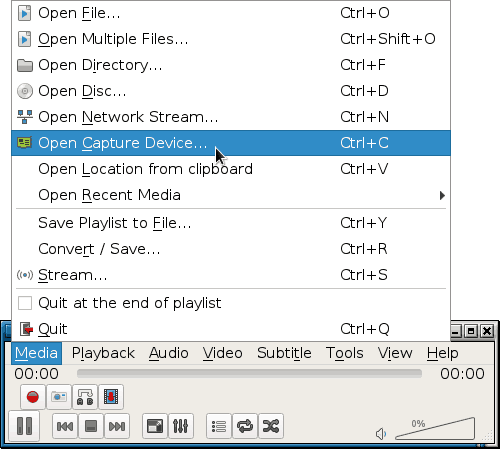
To record your desktop using VLC, just open the capture device dialog, change the settings according to your needs for the “Desktop” input and … press … “play”.
I admit that part was a little bit counter-intuitive to me at first. But using the VLC GUI, you have to press “play” to “open” the device. And only after that, you can press the “record” button to capture the stream.

Warning: On a genuine Debian Stretch/Sid Linux system I had to install the extra package vlc-plugin-access-extra for that to work and get rid of the “VLC is unable to open the MRL ‘screen://'”/”open of `screen://’ failed” error.
As far as I know, there is no feedback in the user interface to notify you where the file is actually recorded. On my system, it goes to ~/Videos/vlc-record-<DATE>-<DEVICE>.avi.
This probably can be changed somewhere in the VLC preferences. But as of myself when I need that feature, I prefer using the command line that gives me a greater control and can be easily integrated as part of a script:
cvlc screen:// \
        --screen-fps=30\
        --sout-x264-preset fast --sout-x264-tune animation \
        --sout "#transcode{vcodec=h264,acodec=copy}:file{dst=out.mp4}"
Doesn’t that feel familiar to you? If it does, that’s right: it’s almost the same command as I used above to transcode a stream from my HDD recorder.
The VLC command line arguments are rather complex, and I will not dig too much into that topic here. But the great thing is once you get a grasp on few basic commands, you can use them whatever is the source of the stream.
5. Using VLC to stream video
Player, transcoder, recorder — the list wouldn’t be complete if I didn’t mention “server”. We’ve seen VLC can act as a client to display a network video stream. And I mentioned it cannot be used as a DLNA server. But it does support some other server protocols, allowing remote clients to fetch and display a video file hosted on your computer.
This can be useful for example to watch on the living room TV a video available on your laptop. Or to broadcast advertisings to be displayed on the various screen scattered through some public place.
For some time, VideoLAN provided the vls (VideoLAN Server) tool for that specific purpose. But VLS have been merged onto VLC— and today VLS is deprecated and as such it hasn’t be maintained for years.
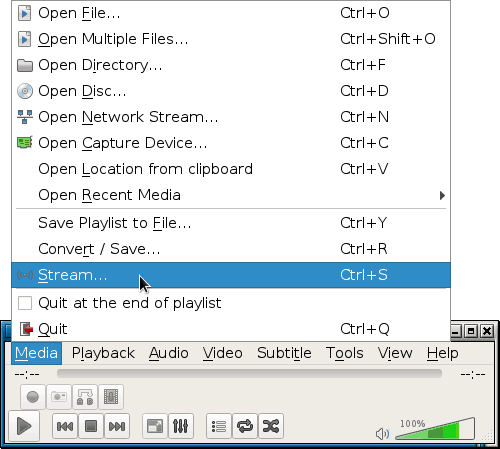
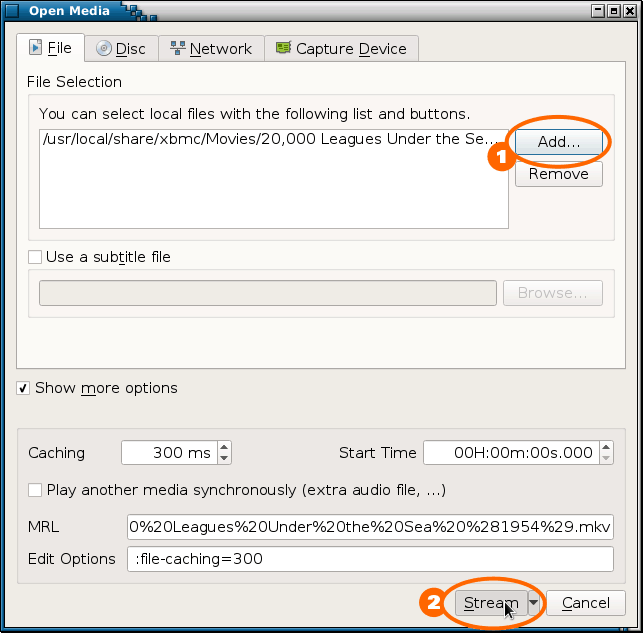
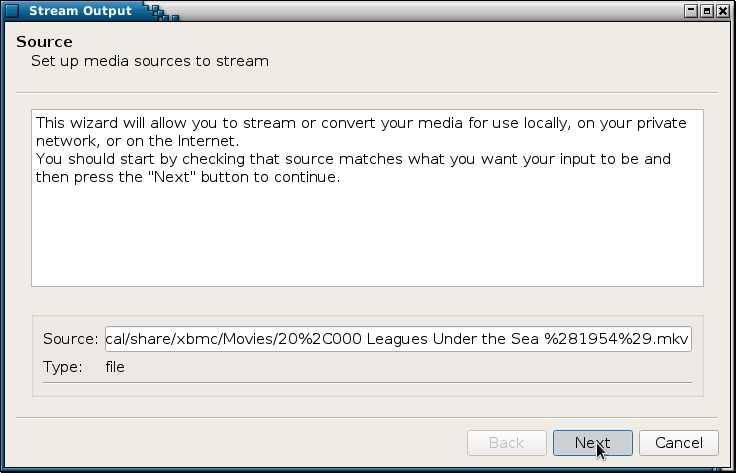
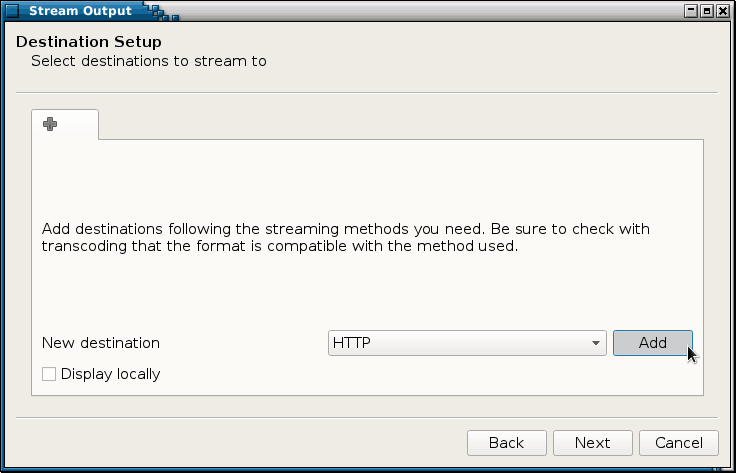
With VLC, you can use the GUI to start streaming videos. Through the “stream” interface, you will choose the videos you want to share, then select the type of sharing you want to use.
In that example, I intended to stream videos using the HTTP protocol as it is rather universally supported.
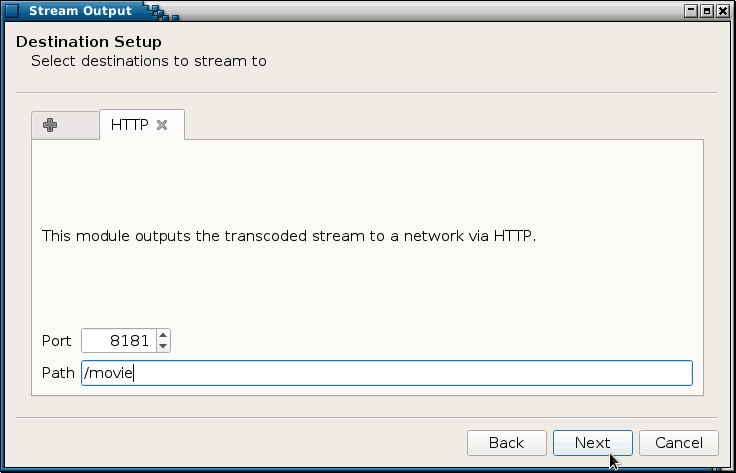
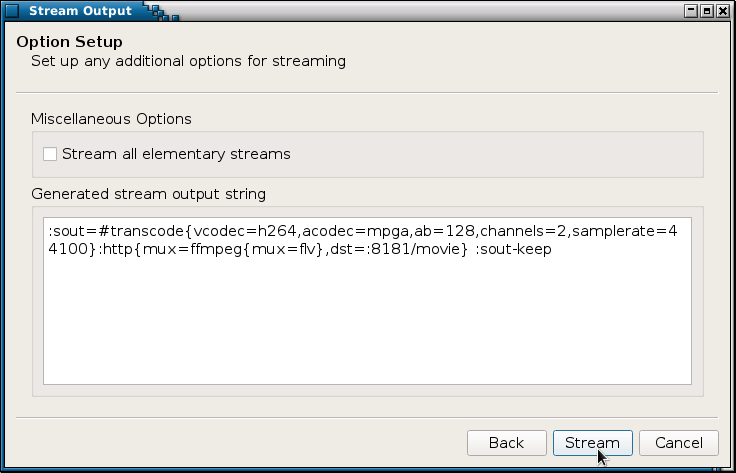
A nice thing about the VLC wizard is on the last screen, you have the actual command line options allowing you to start the streaming server without having to manually go through all the steps again. This allows you to re-use or adapt the settings later and start a VLC streaming server without user supervision.
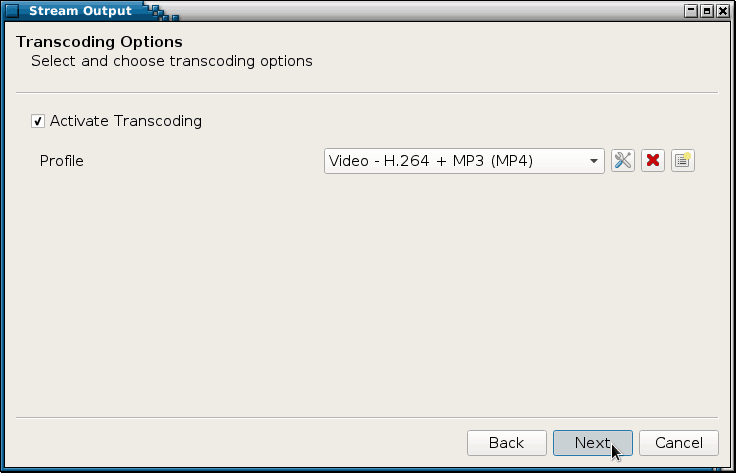
This was, in fact, fortunate when I tested that feature since I had to tweak a little bit the VLC codec option in order to properly stream my video. More precisely, I had to use the MPEG 1 – Audio Layer 3 Codec (MP3) instead of the MPEG 1 – Layer 2 Audio Codec) (mpga). Don’t ask me why, but when transcoding my video file to “MP2”, the transcoded files contained up to 24 empty audio tracks, while the “MP3” transcoded file contained only the “right” audio track. Once again, if you have any idea about that issue, you’re more than welcome to comment this article! Anyway:
cvlc /path/to/my/file.mp4 \
        --sout=#transcode{vcodec=h264,acodec=mp3,ab=128,channels=2,samplerate=44100}:http{mux=ffmpeg{mux=flv},dst=:8181/movie}  \
        --sout-keep
But you have to understand this starts a streaming server. Not just a file server. That means, once the server is up and running, VLC starts “playing” the input stream without waiting for the clients to connect. In other words, if it takes you 5 minutes to start the client and connect to the server— you missed the 5 first minutes of your movie! So you probably need to be ready client-side before starting the server…
# display the video:
vlc http://addr.of.the.server:8181/movie
ffplay http://addr.of.the.server:8181/movie
mplayer http://addr.of.the.server:8181/movie
You can find a list of supported protocols and stream compatibility on the VideoLAN website: http://www.videolan.org/streaming-features.html. Here, I used the HTTP protocol. But for more complex streaming applications, I encourage you to explore the Real-time Transport Protocol (RTP) instead. The nice thing with RTP is it supports multicasting. Without going too deep into the details, HTTP is based on the TCP protocol which is designed for reliable one-to-one communication (unicast). Whereas RTP is based on UDP which is less reliable but can be used for one-to-many communications ([multicast]](https://en.wikipedia.org/wiki/Multicast)).
Simply said, when using the HTTP protocol, the server has to send the data individually to each client. That means if you have 100 clients, using the HTTP protocol, VLC has to send each data packet 100 times. Once for each connected client. But, with RTP you can use a multicast address and the same packet can be routed to several clients at once. If you have 100 clients connected to the same multicast address, the VLC server has to send each data packet only once. To the multicast address. And the LAN infrastructure (routers, switch) takes the responsibility to dispatch that packet to all clients. Obviously, that reduces bandwidth usage and server’s load.
HTTP, RTP unicast and RTP multicast are currently the only three streaming protocols supported by VLC.
# Start VLC as a multicast RTP server
cvlc -vvv ~/some-video.avi \
        --sout='#transcode{vcodec=h264,acodec=mp3,ab=128,channels=2,samplerate=44100}:rtp{mux=ts,dst=224.0.0.10,port=1234}'\
        --sout-keep
VLC streaming capabilities are quite mature and through transcoding, you can stream almost any video file. That being said, if you plan to use the streaming feature on regular basis, you should definitely consider processing your files in advance, eventually using a more specialized tool like ffmpeg. Not only this will reduce the load on the server compared to live transcoding — but in addition transcoding files containing several audio- or video-tracks with VLC can be challenging.
5. Getting help with VLC
You may have noticed I mentioned several times ffmpeg. One reason I particularly like that tool is because of the great documentation associated with that project.
There is no offense in saying the VLC documentation is much less … hem … “exhaustive” than its ffmpeg counterpart. One feature I actually discovered (and used!) while writing this article is the inline help available for the various VLC modules. For example, we have previously used –among others– the transcode and HTTP modules. You can get (some) help about the various options supported by those modules using the following commands:
vlc -p transcode --advanced
vlc -p http --advanced
This inline help is not very detailed either. But at the very least, after having used that, you have some clues about the keywords to type in your favorite search engine!
Weatherwax, Rincewind and the others
My last VLC “trick” is not really a trick. But I wouldn’t conclude that article without mentioning the VLC release names.
I am using now VLC “Weatherwax” (v2.2.x). And my first VLC experience probably dates back to “The Luggage” (v1.1.x). If you ever wonder where those fancy release names are coming from, they are actually names of iconic characters of the Discworld series of books by Terry Pratchett (†2015). Being the first version released after his death, VLC 2.2.1 was codenamed “Terry Pratchett” as an homage.
As you’ve noticed, by exploring VLC beyond its most basic capabilities, we’ve strayed into a zone with a high magical index. And we barely scratched the surface. There are still tons of things to say about that tool. If on your side, you know some cool VLC tricks or encountered original use cases, don’t hesitate to share that with us by using the comment section below. It is there exactly for that purpose!
