

Apple released the Swift programming language back in 2014 to replace Objective C.
Swift is open source and is not limited to the Apple platforms. If you want to learn about using Swift in Linux, then I have a basic tutorial for you. It won't teach you Swift programming but it can surely help you with creating the programming environment.
In this tutorial, I'll share:
- How to install Swift on Ubuntu
- How to create a simple Hello World program in Swift
Installing Swift on Ubuntu Linux
To install Swift, you need to install a handful of dependencies first. The process may seem a bit complicated and requires that you are familiar with the basic Linux commands. An official Snap package would have made things a lot easier.
I am using Ubuntu 22.04 for this tutorial, but the steps for 20.04 and even 18.04 are similar, except for the package files.
Step 1: Install the dependencies
You’ll have to install a few dependencies to make Swift work in Linux. For Ubuntu 22.04, use the command below to install them. The download size is around 260 MB.
sudo apt-get install binutils \
          git \
          gnupg2 \
          libc6-dev \
          libcurl4-openssl-dev \
          libedit2 \
          libgcc-9-dev \
          libpython3.8 \
          libsqlite3-0 \
          libstdc++-9-dev \
          libxml2-dev \
          libz3-dev \
          pkg-config \
          tzdata \
          unzip \
zlib1g-devFor Ubuntu 20.04 and 18.04, use the following command to install the dependencies.
sudo apt-get install \
          binutils \
          git \
          gnupg2 \
          libc6-dev \
          libcurl4 \
          libedit2 \
          libgcc-9-dev \
          libpython2.7 \
          libsqlite3-0 \
          libstdc++-9-dev \
          libxml2 \
          libz3-dev \
          pkg-config \
          tzdata \
          uuid-dev \
          zlib1g-dev
Step 2: Download the files
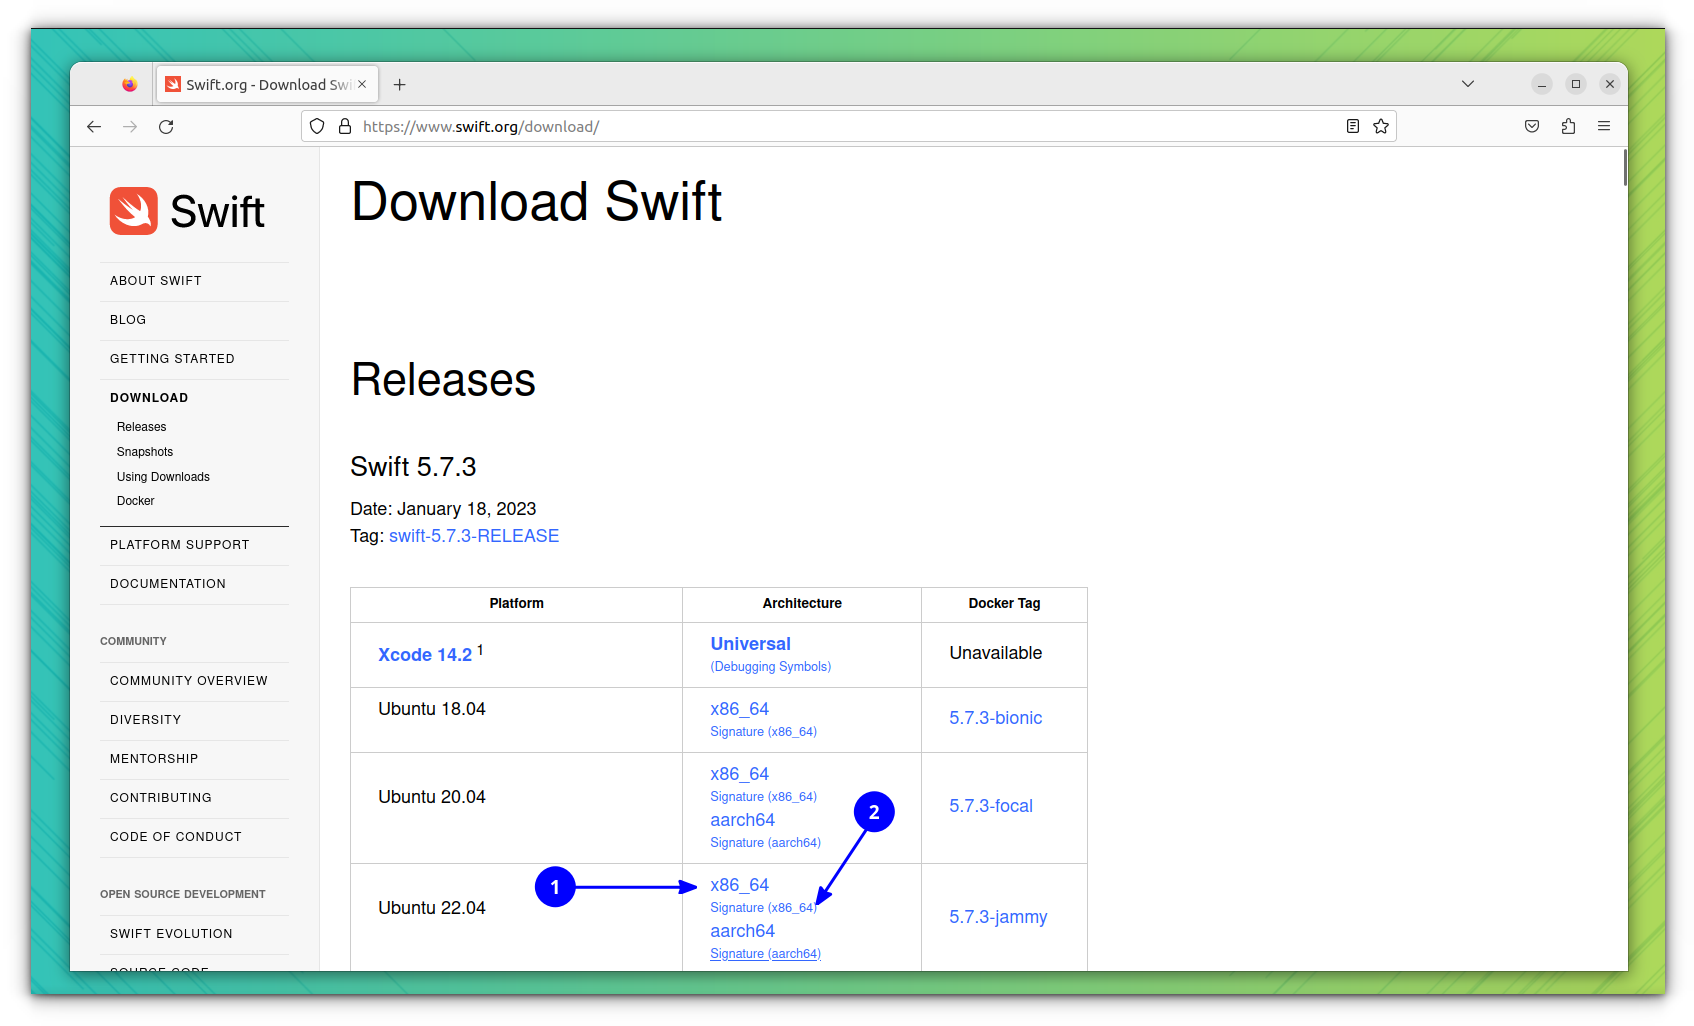
Apple has provided snapshots for various Ubuntu LTS releases, CentOS7, etc. You can download the files from the link below.
Files are around 500 MB in size. You need to download both the Swift release file and the signature file (for verification), as shown in the screenshot below.
Step 3: Verify the Files
If you are downloading Swift packages for the first time, import the PGP keys into your keyring. You can skip this step if you have already imported the keys in the past.
Go to the directory where you have downloaded the tar file and signature file; in my case, the ~/Downloads directory:
cd ~/DownloadsNow follow the below commands to verify your installation file.
wget -q -O - https://swift.org/keys/all-keys.asc | gpg --import -First, refresh the keys to download new key revocation certificates, if any are available:
gpg --keyserver hkp://keyserver.ubuntu.com --refresh-keys SwiftThen, use the signature file to verify that the archive is intact:
gpg --verify swift-<VERSION>-<PLATFORM>.tar.gz.sigThis will give you a "Good Signature" and you can proceed to installation securely.
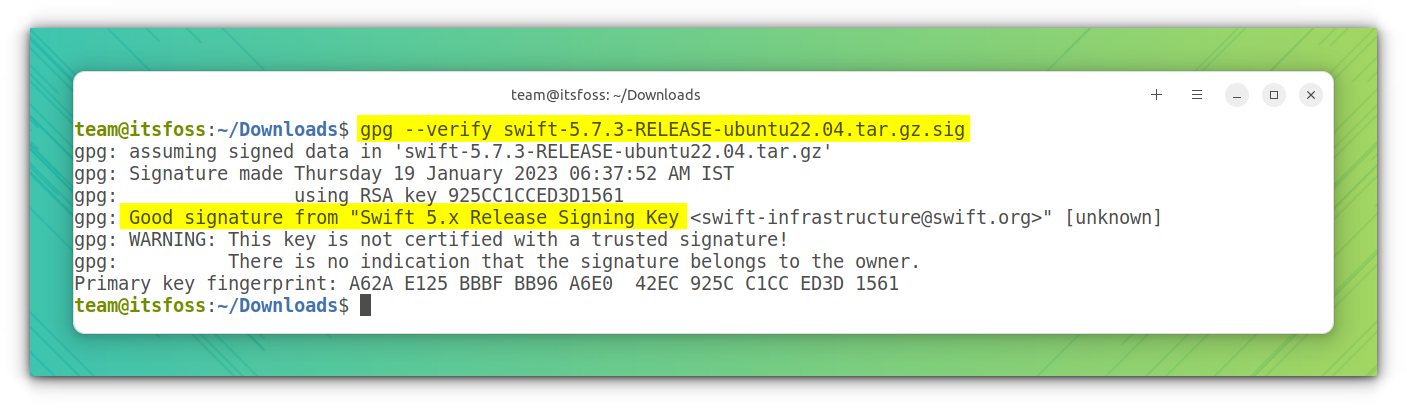
gpg fails to verify and reports “BAD signature”, do not use the downloaded toolchain. You can get the details of various signing keys from their official downloads page.
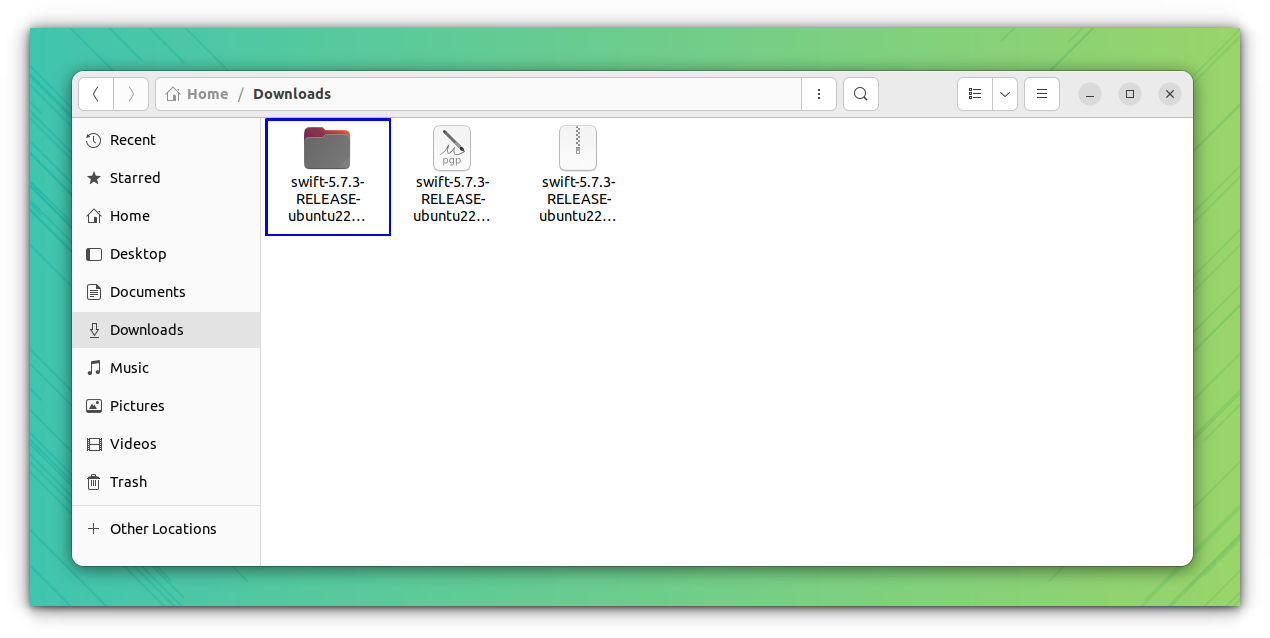
Step 4: Extract the files
Once you verify the integrity of your installation files, extract them to start the installation:
tar xzf swift-<VERSION>-<PLATFORM>.tar.gzThis will create a directory with a similar name to the archive in your ~/Downloads directory.
Step 5: Set up environment variables
Once you have extracted the files, it is time to set up the path to binaries so that you could execute the programs.
There is a usr/bin directory in your extracted directory. You need to add this path to the PATH environment variable.
For this, you would need the absolute path to the extracted directory. Considering that you have followed the exact steps I mentioned, your extracted files would be in /home/<USERNAME>/Downloads location.
Just for the sake of beginners, I advise you to do this:
cd ~/Downloads/<extracted-swift-directoy>
cd usr/bin
pwd
The result of pwd will give you the exact location that we will be using.
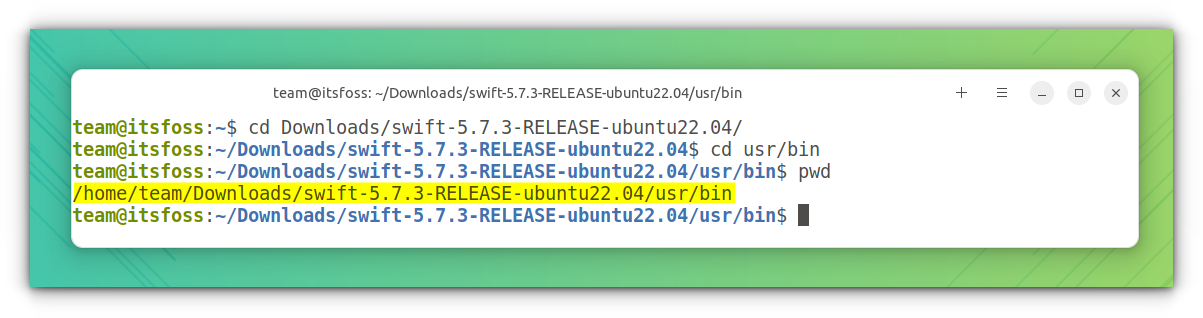
So, when you have the path to the bin directory, add them to the PATH variable like this. Do change the value of path_to_swift_usr_bin in the command below.
export PATH=path_to_swift_usr_bin:$PATHThis is for one shell instance and if you want it permanently, add it to your ~/.bashrc file with the following command:
echo 'export PATH=path_to_swift_usr_bin:$PATH' >> ~/.bashrcNow, restart your terminal session.
If you have Linux command line experience, you will find these instructions tedious, but it might help someone who is a noob to the command line in Linux.
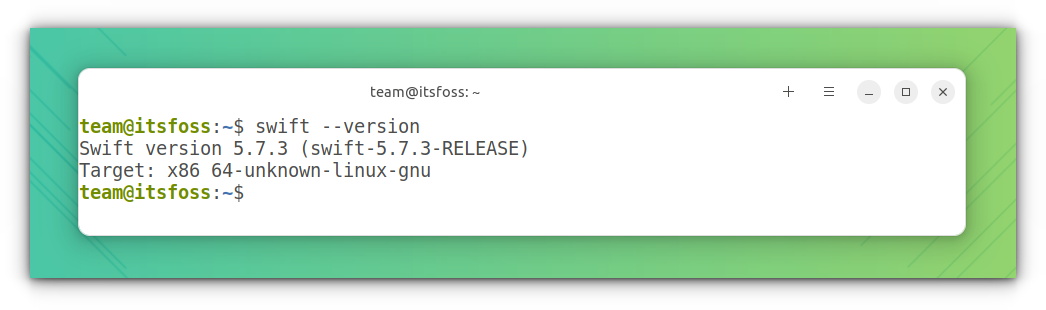
Step 6: Verify the installation
Use the command below to see if Swift is installed:
swift -versionThe result should be something like this:
Writing programs in Swift on Linux
Once you have everything ready, it’s time to write a simple program.
Method 1. Using REPL
Swift has its own interactive shell, REPL, where you can run a few commands. This is good if someone wants to verify Swift code quickly.
If you just run swift, it will output a small help section with some subcommands and their functions. Run swift repl to access the REPL and you can definitely print your “Hello World” here. Take a look at this screenshot for example:
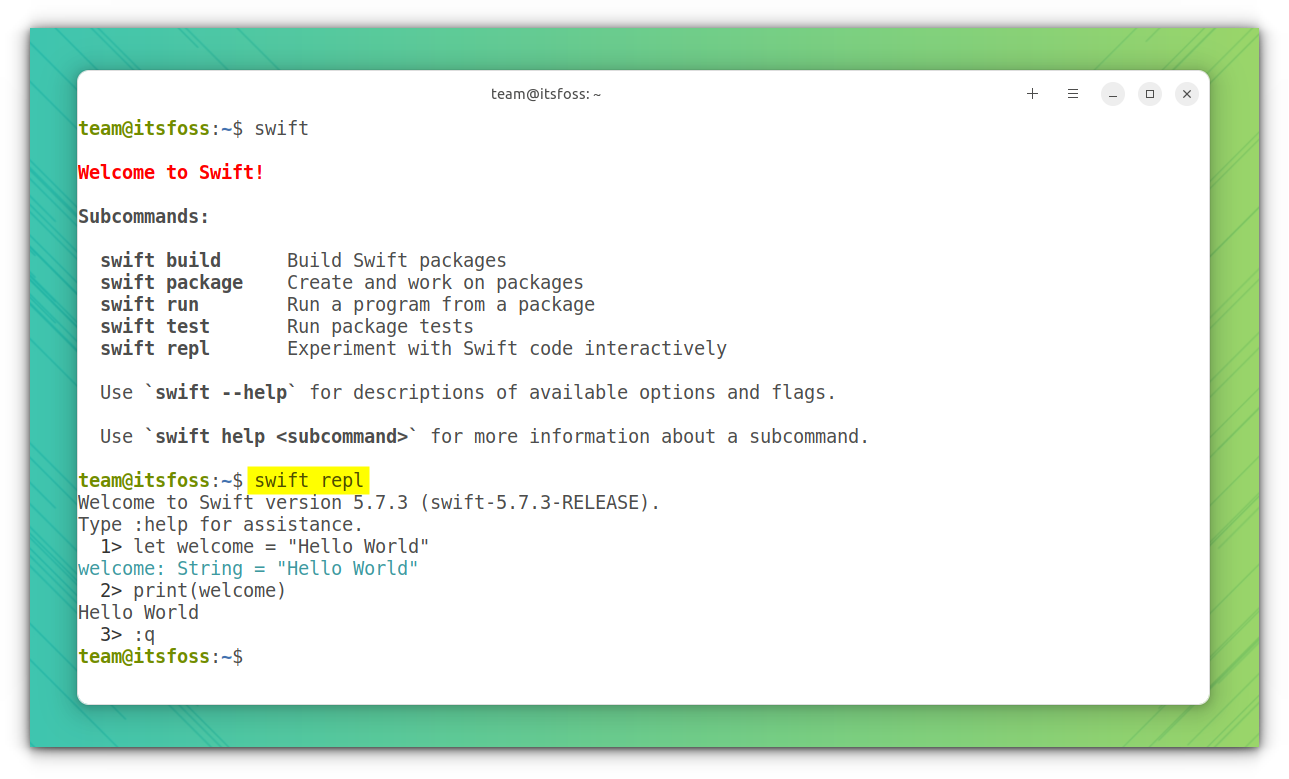
You’ll have to use :q to get out of the shell.
Troubleshoot: Module Not Found Error in Ubuntu 22.04
Sometimes, running swift repl will output a REPL with a ModuleNotFoundError.
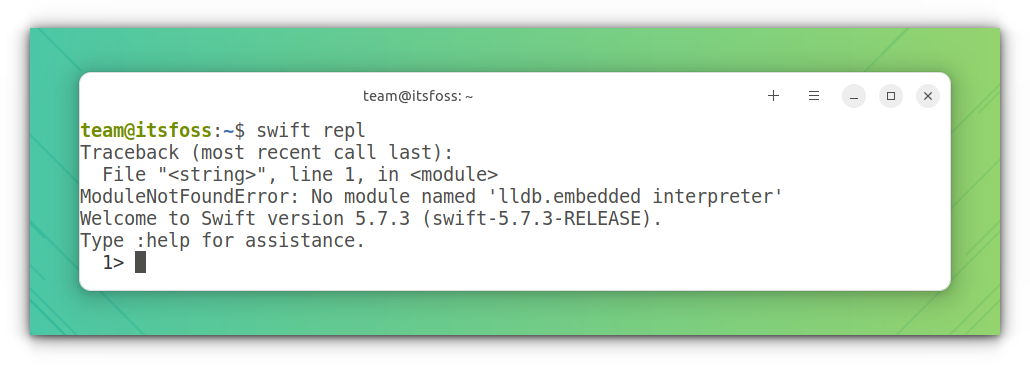
In this particular case, open a terminal and run the following commands:
sudo apt install python3-lldb-14
ln -s /usr/lib/llvm-14/lib/python3.10/dist-packages/lldb/* /usr/lib/python3/dist-packages/lldb/
This eliminated the error in the next run.
Anyway, this REPL shell is not enough to build applications. That’s a different procedure.
Method 2. Creating a Swift package
For all practical purposes, direct coding from REPL is not enough. We need to create executable packages. There is a couple of methods to do this from a beginner's perspective.
- Building a sample Swift project automatically
- Building a sample Swift project manually
Building a sample Swift project automatically
You can create a project simply by using the swift init commands. For this, first, create a directory for your project and enter inside that directory:
mkdir Hello
cd Hello
Inside this directory, run the below command:
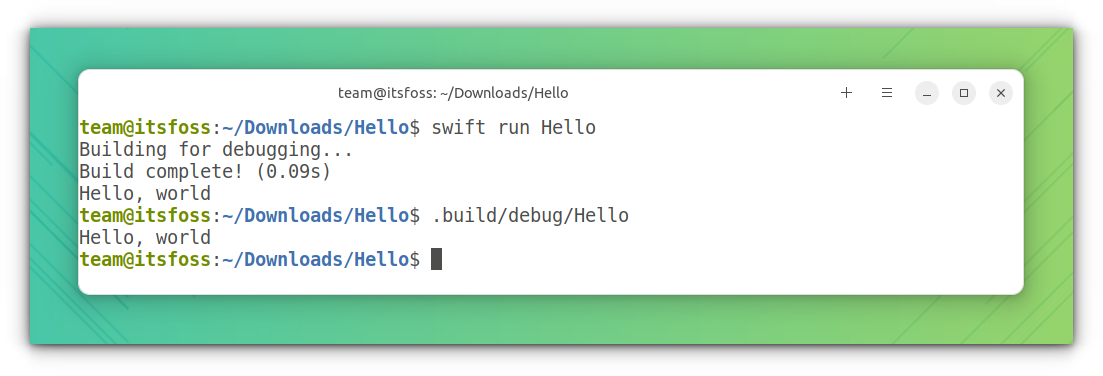
swift package init --type executableThis will create an executable package, with all the required files. Now, you can run this by:
swift run HelloOr, first, compile it and run the executable file using the below commands one by one:
swift build
.build/debug/Hello
swift package init commandThis will create everything for you. If you want to actually know the inner working, refer to the next section, how to do this manually.
Building a sample Swift project manually
This part will show you how to make a Swift project that prints Hello World. In the directory of your choice, create a Hello directory and switch to it:
mkdir Hello
cd Hello
We have just created a Swift package named Hello. But it is not complete yet as there each package must have Package.swift file. Create this file using this command:
touch Package.swiftYou need to have a Sources directory with a main.swift file in it.
mkdir Sources
touch Sources/main.swift
Now, edit the Package.swift file using your favorite editor and add the below lines.
// swift-tools-version:5.7.3

import PackageDescription

let package = Package(
    name: "Hello",
    dependencies: [],
    targets: [
        .executableTarget(
            name: "Hello",
            dependencies: [],
	    path: "Sources")
    ]
)executableTarget() and versions below 5.4 should use target().Now, edit this main.swift file. You can use a graphical text editor or do it in the command line. All you need to put the following line in the file:
print("Hello, world")Now use the below command to compile it:
swift buildThis will give you the executable program in .build/debug/Hello. You can either run swift run Hello directly without the above build command or run .build/debug/Hello to get the output printed on the terminal.
Next Step
Well, as I had said in the beginning, this tutorial is not going to teach you Swift programming. This is more of getting started with Swift in Linux with configuration and settings.
Unlike Xcode, you don’t get to use Playground to create iOS apps easily. There is no decent IDE for Swift in Linux yet.
Since you have just made your first program on Swift in Linux, I advise you to follow other tutorials and documentation on the official Swift website.
