
In an earlier article, we reviewed Univention Corporate Server (UCS). That version was more focused on enterprise clients. However, UCS can also be used as a home server.
Ingo Steuwer, Head of Professional Services at UCS, has taken some time to explain this procedure in details. If you are a DIY hobbyist, you’ll find this article interesting.
Univention Corporate Server (UCS) as a Home Server
Univention Corporate Server (UCS) is mainly used by professional IT users as a system that is easy to set up and easy to maintain. Yet, private users can also reap the benefits of this concept. In this article, I would like to provide an introduction to how you can set up your own server for e-mail, groupware, and file-sharing in just a few steps using UCS and the Nextcloud and Kopano apps – allowing you to construct an alternative to services such as GMail and Dropbox all under your own control.
Buy the hardware or rent a server?
The first question is of course: Where do I run the server? In principle, private users have the same options as companies: Either on their own hardware, in their own “IT center” (or storeroom), or on a rented system, hosted somewhere else, e.g., a “dedicated server” with a cloud service provider or as an Amazon Image [https://aws.amazon.com/marketplace/pp/B071GDRQ3C]. When taking the decision, it is important to consider how you actually intend to use the server.
A rented system involves a minimal initial investment and is not usually associated with significant bandwidth restrictions, plus it is easier to be expanded to suit your requirements. This kind of system is practical in cases of many accesses from different locations, e.g., when the server is used by members of an association.
Running a system on your own network not only offers full control over your own data, but also supports additional application scenarios such as a standard file server or the streaming of music and videos to local media players. However, dependency on a private Internet connection often represents a bottleneck when the system is accessed from outside; even the very latest VDSL connections come with a comparatively low upload capacity. Some Internet providers do not support access from outside at all. If in doubt, the best solution is therefore to run some tests before investing money in new hardware.
The steps described below are, in principle, equally applicable for both options.
If buying your own hardware – what do you need?
UCS places only minimal requirements on the hardware, meaning you have a large selection to choose from when it comes to possible systems. In principle, older desktop hardware can also be suitable, although often associated with disadvantages with respect to reliability and power consumption when the system is running around the clock. If you decide to invest in a brand-new system, there are a range of manufacturers offering hardware for this segment, systems which are suitable for running 24/7 (often referred to as “SOHO NAS” (Small or Home Office Network Attached Storage) systems). Examples include the HP systems in the MicroServer range and the Low Energy Servers from Thomas-Krenn.
The right size
The next question is the matter of the system’s size. The setup presented here runs on a system with a smaller CPU and 4 GB RAM without any problems. The decisive factor is the number of simultaneous accesses. As the number of users or applications increases, there will eventually be a need for more capacity. Cloud offers can be easily expanded. If purchasing the system, it is worth starting out with 8 or 16 GB RAM and a CPU with 4 cores.
The hard disk space required for UCS is negligible – 10 GB is enough to keep the operating system well supplied for a long time. The decisive factor here is the intended use, in particular, however, the amount of data to be saved on the system. When purchasing hardware, it is also important to consider redundancy via mirrored disks (RAID). Further information on this aspect can also be found in the Debian HowTos linked below.
Design: IP and DNS configuration
To access the system from the Internet, a public IP address and corresponding DNS entry are required. If you rent server resources, you will be supplied with at least an IP address and often also a public domain.
The public IP is generally assigned to the private router in home networks. It needs to be configured so that it can pass requests on to the local UCS system. How this is done depends on the router itself and possibly on the Internet provider. HowTos are available on the Web for the majority of routers and firewalls. If the private router does not have a public IP, it can prove difficult or impossible to run a publicly accessible server behind it. In case of doubt, it is best to contact your Internet provider or seek further information on the Web.
The next requirement is a publicly resolvable DNS entry, which can be procured from providers of “dynamic DNS”, if you don’t have a public domain. The router takes care of all communication with the DNS provider. As such, it is important to pay attention to compatibility here. The following uses the domain “my-ucs.dnsalias.org” as an example.
In the majority of home networks, DCHP is used to assign IP addresses automatically. But as we saw, the server’s IP address needs to be configured in the router (see next section for the ports shared to the outside), so the UCS server always need to receive the same IP address. This can be achieved by saving the UCS system or MAC address in the router’s DHCP configuration. Alternatively, a fixed IP address can also be specified during the UCS installation. In this case, however, it must be ensured that the router does not assign it to any other device. When using a fixed IP, please always ensure that the specifications for the default gateway and name server are correct. In the majority of cases, the router’s IP is both.
Enable access to service ports
For the services described here, it is necessary to make ports 80 (HTTP) and 443 (HTTPS) as well as 587 (SMTP submission for incoming mails) externally available. Once HTTP has been set up, this can be reduced to the encrypted port 443. An access to port 22 for SSH can be practical for remote administration especially in systems not on home networks. Additional ports may be required for additional application scenarios. For example, if IMAPS/SMTPS should also be used for mail clients alongside ActiveSync. While these ports can be enabled actively in the local router in a home setup, the configuration of a system operated externally via a provider should be set up in such a way that all other ports are disabled.
UCS setup
For the installation, the UCS ISO image is downloaded from Univention and burned to a DVD or transferred to a USB stick. The system should then be booted from this medium (BIOS setting). The installation begins and alongside a range of different steps such as the configuration of the language, the mounted hard disks are partitioned. In many cases, the partitioning suggestion can simply be adopted. If you want to increase the failure security- of the disk storage with a software RAID or expanded partitioning, this can be set up manually. For details, please refer to the Debian documentation, as UCS utilizes its installation process here.
The actual UCS configuration begins after the basic installation.
The following data are practical for the planned setup.
- Domain settings: As you are installing the first (and possibly only) system in a UCS environment, select “Create a new domain”. You are then prompted to enter a working e-mail address, to which the subsequently required key will be sent.
- PC settings: You are now asked for a fully qualified domain name for the UCS system. The first part of this is the name that will be given to the future system and its DNS domain. The basic configuration of many of a UCS system’s services depends on this setting. It is very difficult to change it at a later point in time. In our example, we defined an internal DNS domain. The public DNS entry introduced before can then be added at a later point in time. It is also recommendable to use a domain which actually can’t be resolved by the public DNS, as in our example “ucs.myhome.intranet”.
- Software configuration: You can select the first services for installation here. In an internal network, it is practical to install an Active Directory-compatible domain controller so as to be able to set up file shares in your network at a later point in time.
Complete documentation of the installation can be found in the product manual.
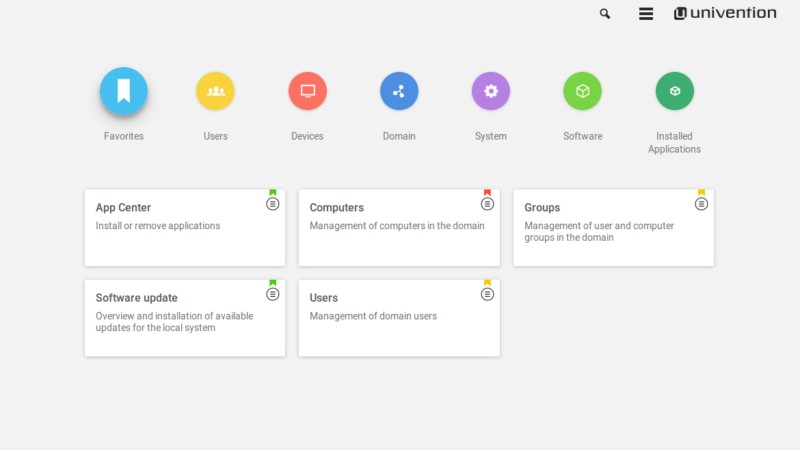
After the installation, the system can be reached via the Internet browser at http://<IP>. The “System and Domain Settings” link allows you to reach the Univention Management Console (UMC), where you can log in as the “Administrator” using the password specified during the installation. The remainder of the setup is performed there.
Setting up Nextcloud
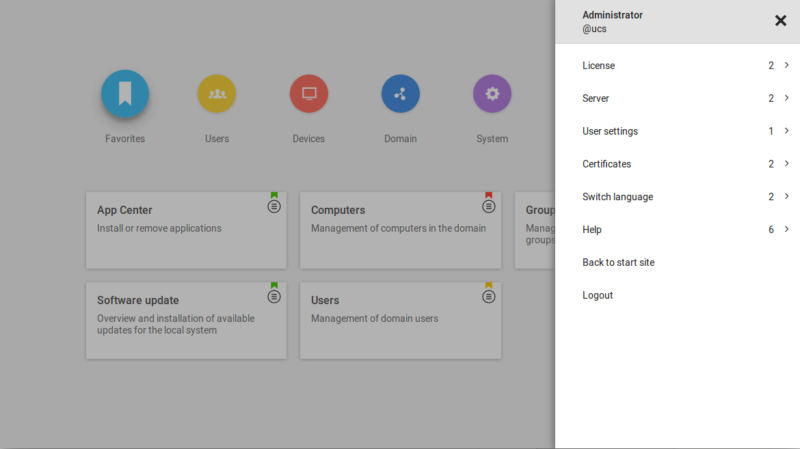
The first step is to install the requisite services and perform the basic setup. This is done via the App Center, which first needs to be activated. This is done using the key sent (to the specified email address) during the installation. This can be uploaded directly in the greeting dialog following the installation or subsequently in UMC in the menu (“Burger” icon in top right) via the “License” and “Import new license” points.
The first app to be installed is Nextcloud, which is recommended as a general storage location for files from PCs and mobile devices. This is done by opening the “App Center” module in the UMC and then searching for “Nextcloud”. This installation of Nextcloud can then be initiated directly. To do so, please follow the prompts in the web interface.
Once the installation is complete, Nextcloud is accessible at https:///nextcloud. This link is also available on the overview page of the UCS server. However, when opened, there are still warnings about the SSL certificate and the link to Nextcloud. This will be resolved subsequently through the installation of “Let’s Encrypt”.
Setting up mail & groupware
The second step concerns the mail and groupware functions. Here, we are using Kopano, which can be used free of charge for our purposes.
This is done by installing the following components of Kopano from the App Center module of the UMC one after another:“Kopano Core”, “Kopano WebApp”, and “Z-Push for Kopano”.
A mail domain for Kopano should then be registered before proceeding with the remainder of the configuration. Up until this step, only the “internal” mail domain has been configured, which was specified during the installation of UCS (in our example “ucs.myhome.intranet”). However, it is not known externally and cannot be used for mail accounts. The available mail domains are configured via the UMC module “E-Mail”. This module can be found in the “Domains” area of the UMC or via the search function. When doing so, it is important to note that, following registration of a mail domain, UCS assumes that all address in this domain will also be configured in UCS. It is thus recommendable to adopt the domains here which will later also be used for the external accesses to the server, in this example therefore “my-ucs.dnsalias.org”.
User accounts can then be set up. The “primary mail address” is the mail address that the user will use in Kopano. In other words, it should use the public domain (e.g., [email protected]).
Finishing touches to e-mail
The mail service is now capable of receiving mails sent to the publicly accessible mail domain (i.e., my-ucs.dnsalias.org). For the sending to function without any problems and mails not to be directly blocked by the spam filters of other mail servers, this name should also be used as “helo”. This can be done by setting the UCR variable “mail/smtp/helo/name” to the publicly accessible FQDN – in this example: my-ucs.dnsalias.org. The setting of UCR (“Univention Configuration Registry”) variables can be performed in the UMC module of the same name or in the command line with the command
ucr set mail/smtp/helo/name=“my-ucs.dnsalias.org”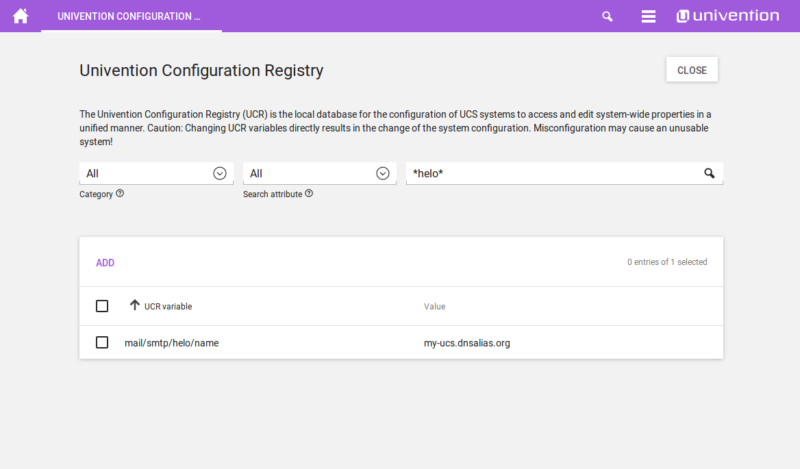
If possible, it is also recommendable to use an SMTP relay host (An external server authorized to send our emails). This especially applies when the sender’s IP address differs from that of the public domain. A guide can be found here.
Incoming mail is routed according to the DNS entries of your public domain. When a mail is intended towards your domain (my-ucs.dnsalias.org), the IP address of the MX record is used. If the MX record is not specified, the base IP address of the domain itself is used as the destination. The latter is the case in our configuration: The mail domain corresponds to the public IP address of the UCS server, with the result that our system can be found by other systems and contacted for the delivery of the mails.
Port 25 is specified in the UCS firewall by default. However, port 587 is preferred for the direct exchange between mail servers. This can be approved by UCR in the firewall. This is done by setting the variable “security/packetfilter/package/manual/tcp/587/all” to “ACCEPT” – as above for the “helo” string, this is also possible here via the UMC module or the command line.
Following the changes, the “postfix” and “univention-firewall” services need to be restarted. This can be done via the command line (“service postfix restart; service univention-firewall restart”) or by rebooting the server.
Univention Portal
The UCS server’s overview page, the “Univention Portal”, provides a good introduction to the available services. It is now easily available via “https://my-ucs.dnsalias.org”. However, there are still two things causing problems: Certificate warnings in the browser and “erroneous links” on the portal page. Both can be solved easily:
Let’s Encrypt TLS certificates
By default, the UCS web server uses a self-signed certificate, which results in warnings in the browser. The installation of a certificate via “Let’s Encrypt” helps here; we have published a corresponding integration as a “cool solution”. It is recommendable to specify the external domain in UCR in advance. This is done by setting the UCR variable “letsencrypt/domains”, in our example to “my-ucs.dnsalias.org”. Additionally, for the certificate to be adopted directly by the web and mail server, “letsencrypt/services/apache2” and “letsencrypt/services/postfix” each need to be set to “yes”. All the requisite steps are described in the linked wiki article.
Portal optimization
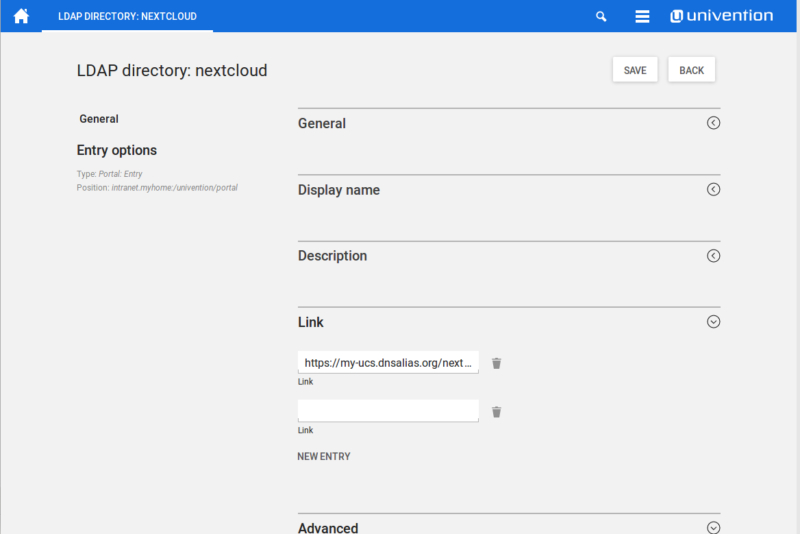
The shortcuts in the Univention Portal, the first page when accessing the UCS system Web interface, still use the internal domain which was specified during the installation. As this cannot be resolved for accesses from the Internet, the addresses need to be adapted. These shortcut addresses are configured in the LDAP. They can be found in the “Domain” area in the “LDAP Directory” module in the UMC. In the tree shown, the entries “nextcloud” and “kopano-webapp” can be found under “univention/portal”.
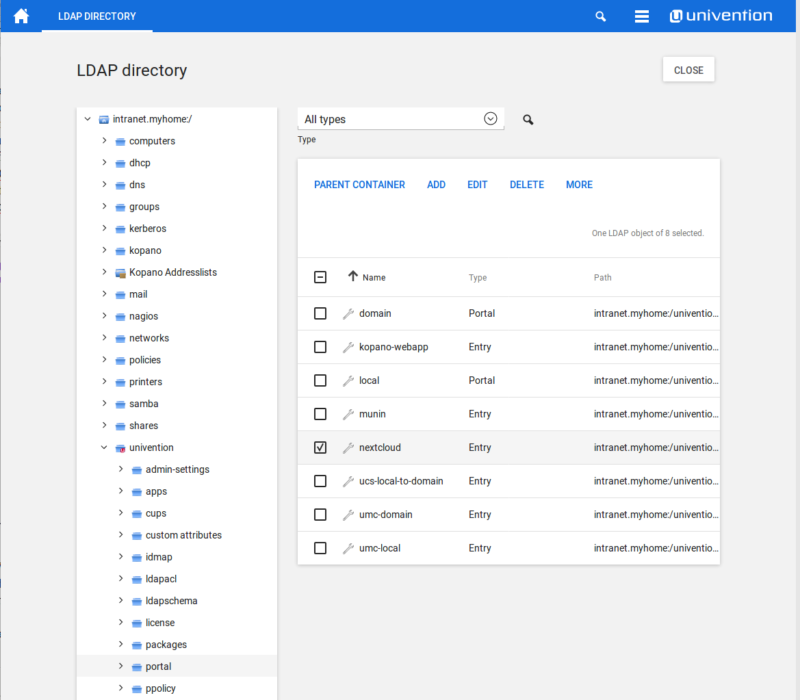
After opening, the correct path for the external domain can be entered under “Links” respectively – in the example, we used https://my-ucs.dnsalias.org/nextcloud/ for Nextcloud and https://my-ucs.dnsalias.org/kopano/ for Kopano.
Completion of Nextcloud
However, the first access to Nextcloud via the public domain produces an error message. Nextcloud registers internally the domain with which UCS was installed and rejects access via other domains for security reasons. The public domains can be approved either via the configuration files or via the link given in the Nextcloud error message. If you follow this link, you can log in as the “Administrator” using the password specified during the installation of UCS and enable the external domain.
In some scenarios, this workflow comes with a hitch: The link for the sharing refers to the internal domain, which cannot be resolved to an IP address in the hosting scenario described. An entry in the “hosts” file (under Linux: /etc/hosts) can provide help here, with which the internal FQDN of the UCS servers can be resolved to the public IP address. In this configuration, the enabling of the public DNS domain offered by Nextcloud then functions without any problems.
Alternatively, you can also change to Nextcloud’s docker container via the command “univention-app shell nextcloud” in the command line, install an editor via “apt install vim”, and edit the file “/var/www/html/config/config.php” in accordance with the Nextcloud HowTo.
Users
Users can now be created on the system. For every account created in UCS, a corresponding account is also created automatically in Nextcloud and, if a primary mail address has been specified, in Kopano too. The user can then log in to both services with the account password. Password changes are possible via the menu in the Univention Portal.
Kopano and Nextcloud can also be used on smartphones. An “Exchange” account is set up for the synchronization of mails, contacts, and appointments with Kopano. Further information on this can be found in the Kopano documentation. Nextcloud offers its own Android or iOS app, via which files can be exchanged with the smartphone and pictures and videos taken on the phone automatically saved to the server.
Outlook
This setup provides a good foundation for mounting additional services from the many apps available for UCS.
- The Fetchmail integration can be used to continue receiving existing e-mail addresses conveniently. The UCS server then automatically download mails from other providers and displays them in the Kopano inbox.
- Publicly accessible servers are often the target of automated attacks. If it is possible to access SSH in the firewall, this access should be restricted. Examples are available here.
- If the number of users increases, it can be helpful to give them the option of resetting their passwords themselves. This can be done using the “Self Service” app in the App Center.
- Nextcloud can be expanded with a whole range of plug-ins. The “Collabora” plug-in, which makes it possible to edit Office files directly in the browser can prove particularly helpful when dealing with a large number of documents.
