

The ability to split screen and view two applications simultaneously is a lifesaver.
It helps me in situations where I have to follow documentation and use the commands from the documentation.
If you have a monitor with a large screen capable enough to show multiple windows simultaneously, then splitting the screen to fit multiple windows becomes mandatory.
Splitting the screen is as simple as dragging an application to the left or right edge of the screen.
I'll show that in detail in this tutorial. I'll also discuss keyboard shortcuts and dedicated extensions to enhance this experience.
To summarise, you'll learn to split screen in GNOME
- Using the mouse (easy)
- Using keyboard shortcuts
- Using a GNOME extension (for more options to split windows and control)
Split screen in Ubuntu using mouse (easy)
By far, this is the easiest method to split screen.
To split screen, all you have to do is drag the window to the extreme left and you'd see a selected area in which the window will be placed:
Still confused? Follow two simple steps:
- Hover your cursor on the window header select and drag it to the extreme left or right, based on where you want to place the window.
- Repeat the same step for the other window in the opposite direction (if the first was on the left then this one should be on the right).
Here's a simple example of how I split Firefox and file manager in the entire screen:
split screen using a mouse
But you may not want to allocate half of the screen to that specific window.
Such as in my case, the browser window should be larger than the file managers'.
To resize the windows, hover your cursor on the split and then, press and hold the cursor and change the size of window panes accordingly:
resize split windows using the mouse
Split screen in Ubuntu using keyboard
If you prefer using the keyboard as much as possible, then you can have the same result as above but with the keyboard.
To split screen, all you have to do is follow two simple steps:
- Use
Alt + tabto focus on a window that needs to be splitted - Press
Shift + right/left arrow keyto split the focused window
Some people also use the super key in Ubuntu instead of Shift.
For your reference, here, I split the screen between the file manager and Firefox:
And if you want to resize two windows, here's what you have to follow:
- Press
Alt + F8to enable resize mode - Use arrow keys to resize the windows
- Press the
Escor theEnterkey to get out of the resize mode
Looks confusing? Here's what those three steps look like in real life:
 Abhishek Prakash
Split the screen into multiple portions using the GNOME extension
If you want to see even more application windows simultaneously, you can use some GNOME extensions and split the screen in four, six or eight parts.
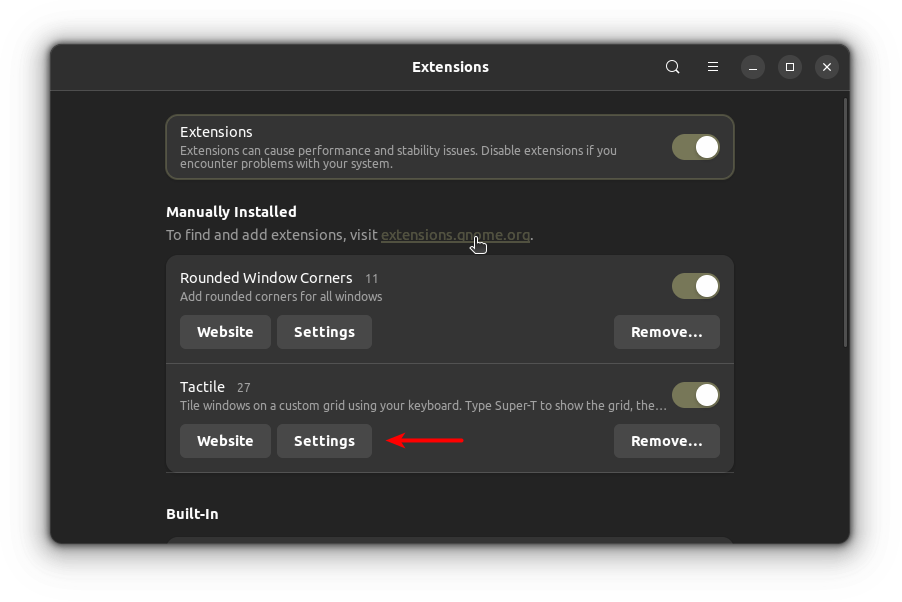
If you don't know how you install and manage extensions in GNOME, I would highly recommend our detailed guide on using GNOME extensions.
While many extensions exist for this purpose, I found Tactile the easiest yet the most effective.
Install Tactlie from the official extension page.
Once done, you have to follow simple steps to split screen:
- Press
Supet + tto start Tactile extension and will divide the screen into 6 parts written with alphabets. - You press one alphabet twice to split the focused window in the shown section.
- Furthermore, you can also use area from two or more alphabets by pressing them once in sequence.
- For example, if I want to allocate an area shown by
AandSto Firefox, then, I will keep Firefox in focus, pressSuper + tand pressAandS(in sequence).
For your reference, here, I split the screen between 4 windows:
Customizing the Tactile area
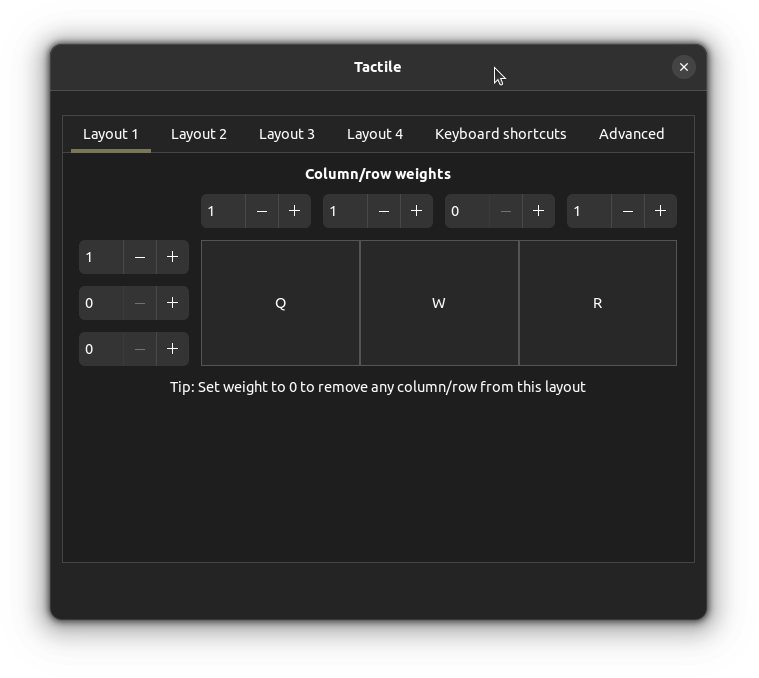
As I explained earlier, by default, you can divide your screen into 8 parts.
But let's be honest. Unless you have a very large display, dividing your screen between 8 windows is not practical (at all).
The good thing is Tactile allows you to customize the area with the option to have multiple layouts so you tweak each and use them as per the workload demands.
First, open the Extension (if you installed gnome-shell-extension) or Extension Manager.
Then, open the settings of the Tactile:
Here, you can remove/add rows and columns to create a perfect split-screen for your use case.
For example, I wanted to have only 3 columns to I can split the screen into 3 windows, so, I went with the following configuration:
Switching between layouts in Tactile
Customizing layouts, check ✅.
But how would you switch between them? The answer is pretty simple.
By following the given steps:
- Start the Tactile by pressing
Super + t - Press the number of the layout you want to select (press 3 for the 3rd layout)
Here's a visual representation:
Changing layouts in Tactile
Productivity hacks for handling multiple applications
If you run several applications simultaneously, grouping them in different workspaces could be a good idea. Learn about using workspaces in Ubuntu.
Sreenath
Love the splitting screen idea? How about implementing it inside a terminal with Terminator?
Anuj Sharma
I can't say I should call it a productivity hack. You can watch videos all the time using the 'always on top' feature in GNOME.
Abhishek Prakash
And if you loved the idea of multiple application views in one screen, you may like the tiling windows. Explore the Regolith project.
Abhishek Prakash
Small things like these often remain hidden. But once you discover them, you realize what you were missing on.
I hope you like the split screen feature enough to use it regularly. Subscribe to It's FOSS, if you haven't already, for more such desktop Linux tips and tutorials.
If this helped you, consider supporting It's FOSS
It's FOSS has been helping people use Linux for the past 14 years. Help us stay independent from big tech. Become a Plus member, enjoy ad-free reading and get 5 eBooks.

