

Did you ever feel the need to check CPU info in Linux? Did you ever want to know the real speed of your CPU? Or which process is currently bound to a given core? Those seem to be the questions for experts only.
But stay with me— like Alice, you may discover more than expected by going through the looking glass. So, without further ado, let me introduce our main protagonist: high-precision.
Know your CPU in Linux with CoreFreq
CoreFreq is a tool to collect CPU performance data on Linux systems. It has open source license. It is written by CyrIng a French developer and the sources are available on GitHub.
While apparently stable, CoreFreq must be considered as experimental. As of today, it is only available in Arch repository. It is not packaged (yet) for any other distribution. So if you want to give it a try, you may need to compile it. Which is not difficult, and may be a nice first step if you’ve never done that before.
Finally, what makes CoreFreq different from other similar tools is it aims at gathering high-precision data. To do that, CoreFreq needs to monitor the CPU as close as possible to the hardware. Let’s see now how does it get CPU information on Linux machine.
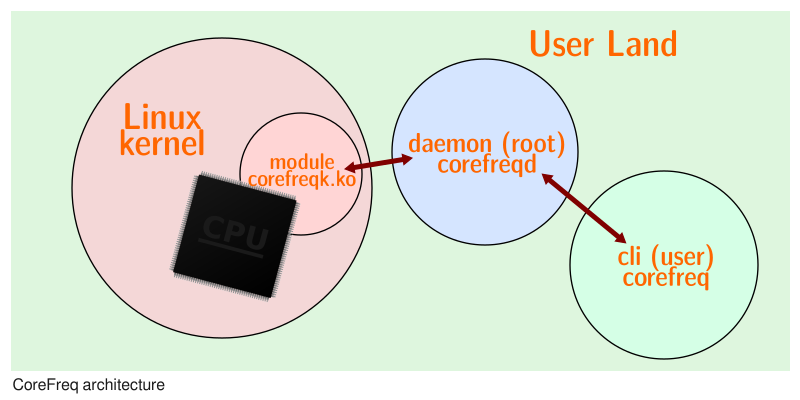
How does CoreFreq work?
CoreFreq is made of three parts. A kernel module, a daemon, and a userland command line interface (CLI).
- By definition, the kernel module will have full access to the host. It is its responsibility to gather the low-level data.
- Data are then collected by an userland daemon. The daemon must be run as root.
- Finally, CoreFreq comes with a terminal interface to report data in a nice human-readable format. That CLI tool is an ordinary process and may be used by the end user.
Compiling and running CoreFreq
Before running CoreFreq, you must compile it. That means, transforming the source code as written by the programmer in such a way your computer will understand it. Don’t be afraid when I say you must compile it–you won’t have much work to do. Your computer will do all the hard work.
The steps required to compile CoreFreq will mostly be the same for all Linux distributions— except for the installation of the required packages. Here I give the instructions for CentOS/Red Hat and Debian. Feel free to use the comment section to give more details concerning other distributions if needed.
Nevertheless, it is time now to open your favorite terminal emulator and start typing in. For Red Hat/CentOS, the required tools are part of the “Development Tools” group— so, just install that:
 # specific to Red Hat, CentOS
 sudo yum group install "Development Tools"
For Debian & Debian-based distributions, you will need to install a couple of individual packages instead:
 # specific to Debian-based distributions
 sudo apt-get install dkms git libpthread-stubs0-dev
- dkms is a tool to build kernel modules from source. It is required as CoreFreq is implemented as a kernel module to gather data as close as possible from the hardware;
- git is a tool used for distributed development. Here we will use only to download a copy of the latest CoreFreq development tree. But if you want, you can patch the software yourself and send pull requests to the original developer;
- libpthread-stubs0-dev is a required library to build CoreFreq (well, in fact, on Linux it only contains pkg-config data, but let’s pretend for today)
Once the required tools will be installed on your system, it will be time to download the source code of CoreFreq:
 # Distribution-agnostic part
 git clone https://github.com/cyring/CoreFreq.git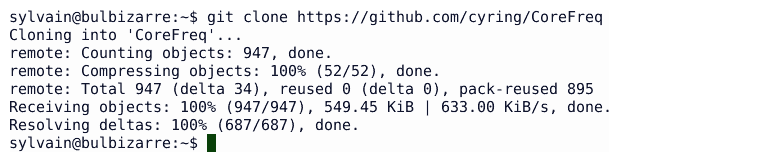
Please notice git will download both the latest version of the source, as well as all the modification history of the project. For a mere user, this is useless. But … I have the secret hope this could be the occasion for you to take a closer look at the open source development process. But let’s close that parenthesis— as you’re now ready to compile the software:
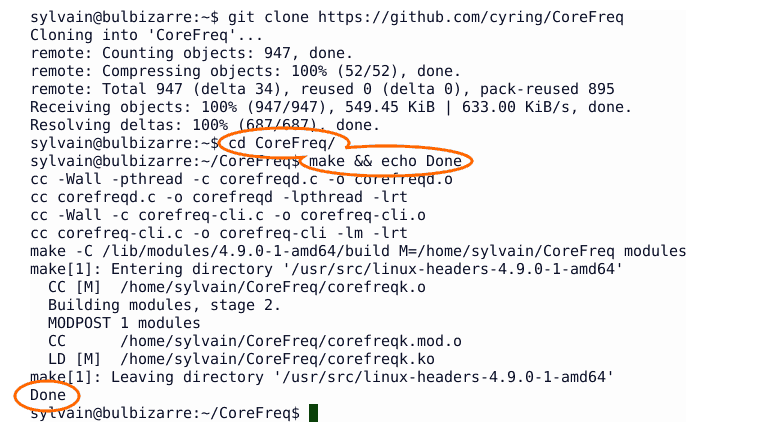
 cd CoreFreq/
 make && echo Done
After few seconds, the word “Done” should appear in the terminal window, meaning the compilation was successful.
At this point, the three parts of CoreFreq are compiled and ready to start. As I said it before, the software is made of three parts— so you have in fact three software to start to run CoreFreq.
Installing the kernel module
For technical reasons— as CoreFreq uses the same low-level counter— you should first disable NMI watchdog.
On my Debian system, that can be done by editing the /etc/default/grub file to add the “nmi_watchdog=0” kernel command line argument and running update-grub afterward:
 sudoedit /etc/default/grub
 update-grub
Of course, you need to reboot for the new kernel argument to be taken into account.
Please notice while writing this article, I didn’t do it. And I haven’t any noticeable issue.
To install the kernel module, we will use the standard Linux tool insmod. It will load the module into the kernel and “start” it:
sudo insmod corefreqk.koYou can check that CoreFreq is installed using lsmod:
 lsmod | grep corefreq
 corefreqk              45056  0
And finally you can check if CoreFreq has recognized your processor by examining the output of dmesg:
 sudo dmesg | grep CoreFreq
 [57413.945720] CoreFreq: Processor [06_1E] Architecture [Nehalem/Lynnfield] CPU [8/8]
Starting the daemon
It is now time to start the daemon. Its purpose is to collect data gathered by the kernel module (as it is a good design to do as little things as possible inside the kernel):
sudo ./corefreqd -i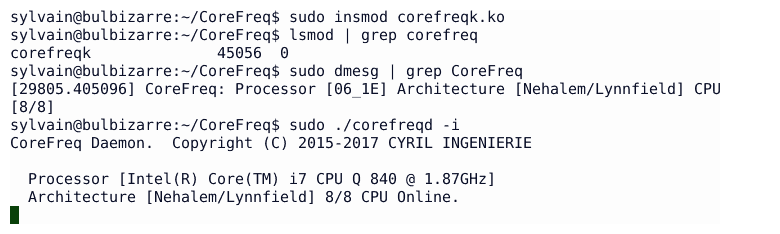
This command will not return while the daemon is running. So don’t be surprised to see you terminal apparently “hang”–it is not: the daemon is simply running, ready to accept client requests. Did you notice my use the “-i” flag above? This is for the daemon display more information on the terminal about what’s going on. Just a matter of curiosity— but hey, this article is all about curiosity!
Starting the client
You’re now ready to start the client application. Open a new terminal and go to CoreFreq directory. From there you will run the client:
 cd CoreFreq
 ./corefreq-cli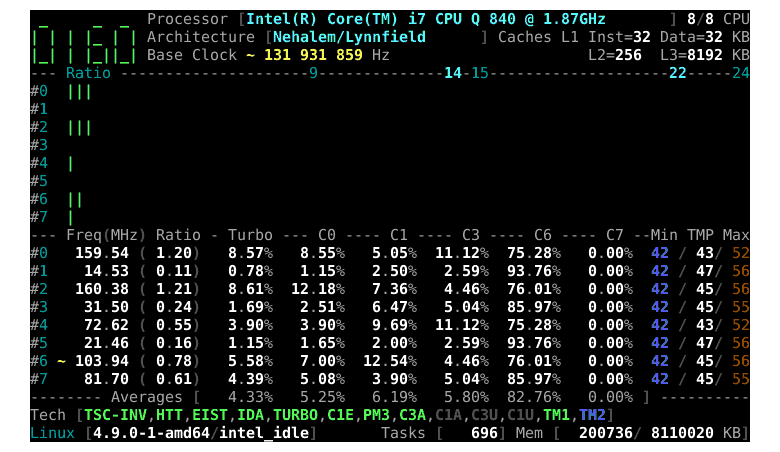
Investigating your CPU in Linux
Beyond static characteristics of your processor such as the model name or its capabilities, once CoreFreq is running, you may start to investigate the dynamic behavior of your CPU in live conditions. For example, in the screen capture above, you can see the various cores of my processor are running between 138MHz and 334MHz. The (very small) load being evenly distributed among them.
In addition, you can see for each core the amount of time spend in the various processor C-states (total should be 100%) — and the time spent in turbo Boost mode. If you’re not familiar with those concepts, I can only encourage you to take a look at those excellent explanations by Victor Stinner: https://haypo.github.io/intel-cpus.html
At this point, for the sake of the demonstration, I launched an infinite loop in a terminal in the “hope” to consume 100% of one core:
 # infinite loop
 # eats 100% of the CPU--really?
 while true; do : ; done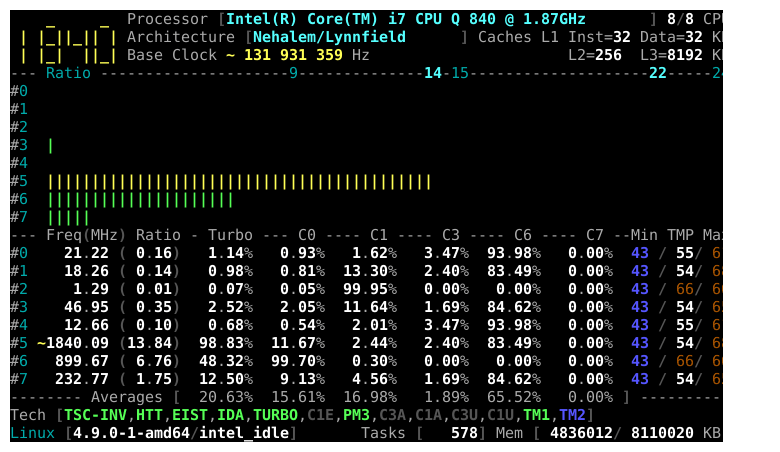
… and indeed, I can clearly see which core the shell running the infinite loop is currently bound. This can be confirmed by looking into the corefreq-cli task Monitor
Press <F2> to reveal the menu and choose view>task monitor:
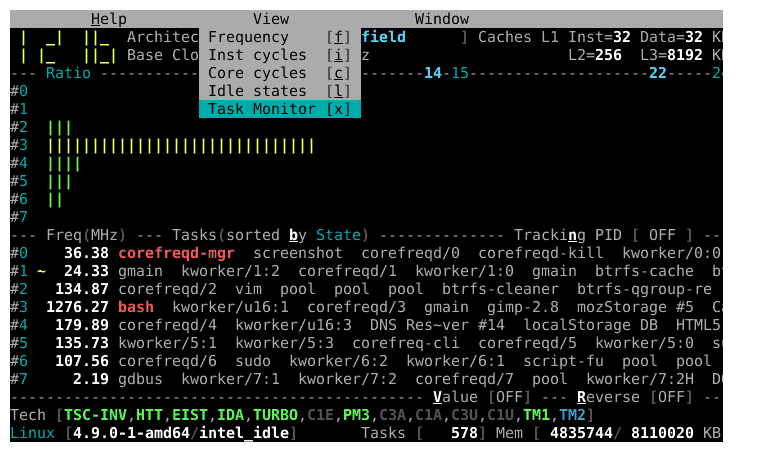
You can’t see that on the picture above, but if you run that by yourself you will notice the task jumps from a core to another one after few seconds. I think I know the reason for that behavior. But, could you guess it? Don’t hesitate to use the comment section to share your ideas!
But before doing that, let’s see how to stop CoreFreq.
Stoping CoreFreq
To stop CoreFreq, you simply have to quit the three part of the software, in the reverse order you’ve started them.
- quit the client by pressing F4 or CRTL-C in the client terminal
- quit the daemon by pressing CTRL-C is the daemon terminal
- remove the kernel module
sudo rmmod corefreqk
And you’re done.
And now?
By some aspects, CoreFreq brings you some CPU information in Linux you can gather using top, htop, sensors, lscpu and few other tools. But with CoreFreq, not only you have all the information in just one interface, but given the way data are collected you have a higher accuracy. Finally, some data are simply not available in any other tool— as far as I know it of course (C-states ratio? Instruction-per-cycles?)
You may find this tool as only targeted toward for developers trying to fine tune computation intensive algorithms. Or for gamers eager to check how much gain they obtained by overclocking their hardware.
But I must admit personally I always find such tools interesting as they allow us to “touch” the reality of modern hardware— usually much more complex than we usually figure it. For example, how many of you did know the various core of a CPU may run at different speed— or maybe in different C-mode?
Anyway, I’m pretty sure some of you will find very clever usages of that tool or will make intriguing discoveries about their hardware. Don’t hesitate to share that with us in the comment section below. I’m certain CyrIng would be happy to hear your ideas and feedback about CoreFreq to make it even better.
If this helped you, consider supporting It's FOSS
It's FOSS has been helping people use Linux for the past 14 years. Help us stay independent from big tech. Become a Plus member, enjoy ad-free reading and get 5 eBooks.
