
If you have been following the news, Ubuntu will be switching to Mir display server along with Unity 8 desktop. While it is still not certain if Unity 8 running on Mir will be available in Ubuntu 15.10 Willy Werewolf, a preview version of Unity 8 is available for you to try and test. With the official PPA, it is really easy to install Unity 8 in Ubuntu 14.04, 14.10 and 15.04.
Until now, this Unity 8 desktop preview has been available via an ISO for (primarily) developers to test it. But Canonical has made it available through LXC containers. By using this method you get a Unity 8 desktop session running on Mir display server as any desktop environment. It’s like as if you install Mate desktop in Ubuntu and choose the desktop session from the LightDm login screen.
Curious to give Unity 8 a try? Let’s see how to install it.
Note: It’s an experimental preview and may not work properly for everyone.
Install Unity 8 desktop in Ubuntu
Following are the steps to install and use Unity 8:
Step 1: Install Unity 8 in Ubuntu 12.04 and 14.04
If you are running Ubuntu 12.04 and 14.04, you’ll have to use the official PPA to install Unity 8. Use the following command:
sudo apt-add-repository ppa:unity8-desktop-session-team/unity8-preview-lxc
sudo apt-get update
sudo apt-get upgrade
sudo apt-get install unity8-lxc
Step 1: Install Unity 8 in Ubuntu 14.10 and 15.04
If you are running Ubuntu 14.10 or 15.04, Unity 8 LXC is already in the sources. You just need to run the following commands:
sudo apt-get update
sudo apt-get install unity8-lxc
Step 2: Set up Unity 8 desktop preview LXC
Once you have installed Unity 8 LXC, it’s time to set it up. Use the following command for this purpose:
sudo unity8-lxc-setupIt will take some time in set up, so have some patience. It downloads the ISO and then extracts it, and then any last bits of setup necessary to make it work. It will also install a slightly modified version of LightDM. Once everything is done, a restart is required.
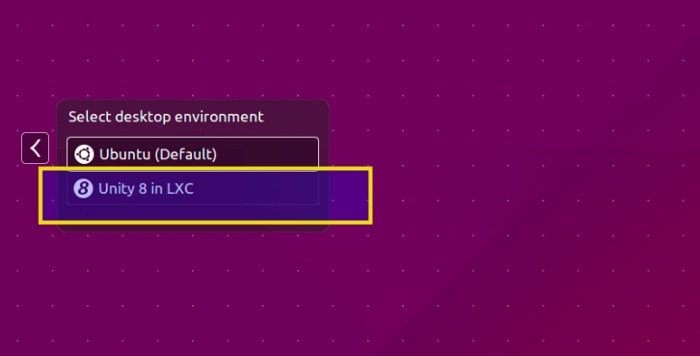
Step 3: Select Unity 8
After restarting, at login screen, click on the Ubuntu icon beside your login name:
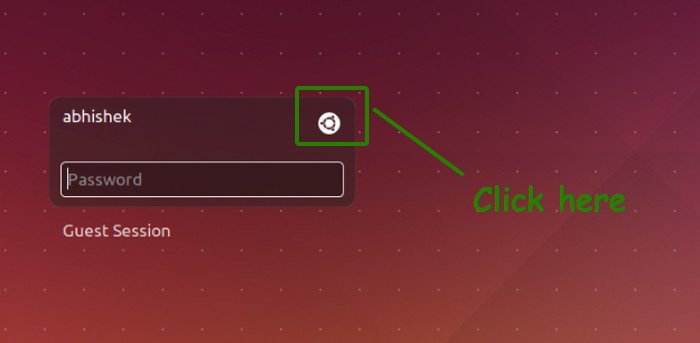
You should see the option of Unity 8 here. Select it:
Uninstall Unity 8 LXC
If you find Unity 8 too buggy or if you don’t like it, you can simply switch back to the default Unity version in similar fashion. Additionally, you can also remove Unity 8 using this command:
sudo apt-get remove unity8-lxcThis will remove the Unity 8 option from LightDM screen but the set-up will remain there.
That’s all you need to do to install Unity 8 with Mir in Ubuntu. Do share what you think of Unity 8 when you try it out.
