Ubuntu Touch images are finally available for Nexus 7 2013 WiFi model (code named Flo) and I just installed it on my Nexus. If you are eager to experience Ubuntu Touch, I’ll show you how to install Ubuntu Touch on Nexus 7 2013 WiFi.
This tutorial was performed on a Dell Inspiron 14.10 running Ubuntu 13.10, Nexus 7 2013 WiFi Flo. The steps followed were mentioned on the official Ubuntu Touch installation page. I am rewriting it to make it more simple and easy to follow, specially for beginners.
Lets check some of the prerequisite before proceeding to install Ubuntu Touch:
- A computer running Linux (preferably Ubuntu).
- Nexus 7 2013 and a USB cable.
- Internet connection.
Please note that the following the steps here will wipe out all the data in your Android device, quite obviously. So, make any backups you want to make beforehand. Now without further delay, lets see how to install Ubuntu Touch.
Install Ubuntu Touch on Nexus 7 2013:
Step 1: Install required tools
You’ll be needing some tools first. Use the following command to install adb:
sudo apt-get install android-tools-adbAfterwards, install ubuntu-device-flash using the official PPA. For Ubuntu 12.04, use the following PPA:
sudo add-apt-repository ppa:ubuntu-sdk-team/ppaFor newer versions such as Ubuntu 12.10, 13.04 and 13.10, use the following PPA followed by the installation of the tool:
sudo add-apt-repository ppa:phablet-team/tools
sudo apt-get update
sudo apt-get install ubuntu-device-flash
Once you have installed the tools, lets proceed to next step which is to unlock the bootloader of Nexus 7. If you already have bootloader unlocked, skip to step 3.
Step 2: Unlock the bootloader
Unlocking the bootloader is not a herculean task. You can follow this guide to unlock bootloader of Nexus 7 2013 which has screenshots with clear instructions.
Step 3: Enable debugging mode
Connect the Nexus device to the computer. Now enable USB debugging via Settings > Developer options > USB debugging. If you don’t see the developer options then you need to enable it first by going to Settings > About Tablet and tap the Build number 7 times to see the Developer Options. Here is a screenshot tutorial to help you enable debugging mode in Nexus.
Step 4: Install Ubuntu Touch on Nexus
Make sure that device is recognized. Use the following command:
adb devicesThe output should show some device. If it shows offline, it means USB debugging has not been enabled. Make sure that device is not connected in MTP mode.
If the device is recognized correctly, boot in to the bootloader with the command below:
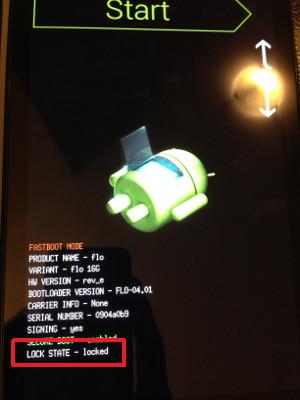
adb reboot bootloaderYour Nexus device will look like the one below when you are in bootloader:
Once you see the green robot on Nexus device, it’s time to install Ubuntu Touch with the command below:
ubuntu-device-flash --channel=trusty --bootstrapThe output of the above command will be like:
abhishek@itsfoss:~$ ubuntu-device-flash –channel=trusty –bootstrap
2014/03/12 21:29:48 Expecting the device to be in the bootloader… waiting
2014/03/12 21:29:48 Device is |flo|
2014/03/12 21:29:48 Flashing version 229 from trusty channel and server https://system-image.ubuntu.com to device flo
It will download around 300 MB of data. Have patience. It takes some time to install it. Once installed, you will boot in to Ubuntu Unity Shell, a familiar boot menu for Ubuntu users. In here choose the first option. It will provide you with the following question:
root access possibly lost. Fix?
THIS CAN NOT BE UNDONE
Use volume up and down button to select +++Go back+++. Now the device will reboot again. You’ll see Google logo and may be 4 bouncing colored balls. Wait for some time. You’ll see the familiar purple screen soon. It will then followed by a little tour to familiarize with the OS.
That’s it. I hope you find this guide helpful to install Ubuntu Touch in Nexus 7 2013. Stay tuned for more Ubuntu Touch related articles. Any questions are suggestions are always welcomed.


