

Over the years, I used many different tools to write articles, reports and documentation. I think it all started for me with Luc Barthelet’s Epistole on Apple IIc from the French editor Version Soft. Then I switched to GUI tools with the excellent Microsoft Word 5 for Apple Macintosh, then the less convincing (to me) StarOffice on Sparc Solaris, which was already known as OpenOffice when I definitively switched to Linux. All these tools were really word-processors.
But I was never really convinced by WYSIWYG editors. So I investigated many different more-or-less human-readable text formats: troff, HTML, RTF, TeX/LaTeX, XML and finally AsciiDoc which is the tool I use the most today. In fact, I am using it right now to write this article!
If I made that history, it was because somehow the loop was closed. Epistole was a word processor of the text-console era. As far as I remember, there were menus and you can use the mouse to select text — but most of the formatting was done by adding non-intrusive tags into the text. Just like it is done with AsciiDoc. Of course, it was not the first software to do that. But it was the first I used!
Why AsciiDoc (or any other text file format)?
I see two advantages in using text formats for writing: first, there is a clear separation between the content and the presentation. This argument is open to discussion since some text formats like TeX or HTML require a good discipline to adhere to that separation. And on the other hand, you can somehow achieve some level of separation by using templates and stylesheets with WYSIWYG editors.
I agree with that. But I still find presentation issues intrusive with GUI tools. Whereas, when using text formats, you can focus on the content only without any font style or widow line disturbing you in your writing. But maybe it’s just me? However, I can’t count the number of times I stopped my writing just to fix some minor styling issue — and having lost my inspiration when I came back to the text. If you disagree or have a different experience, don’t hesitate to contradict me using the comment section below!
Anyway, my second argument will be less subject to personal interpretation: documents based on text formats are highly interoperable. Not only you can edit them with any text editor on any platform, but you can easily manage text revisions with a tool such as git or SVN, or automate text modification using common tools such as sed, AWK, Perl and so on.
To give you a concrete example, when using a text-based format like AsciiDoc, I only need one command to produce highly personalized mailing from a master document, whereas the same job using a WYSIWYG editor would have required a clever use of “fields” and going through several wizard screens.
What is AsciiDoc?
Strictly speaking, AsciiDoc is a file format. It defines syntactic constructs that will help a processor to understand the semantics of the various parts of your text. Usually, in order to produce a nicely formatted output.
Even if that definition could seem abstract, this is something simple: some keywords or characters in your document have a special meaning that will change the rendering of the document. This is the exact same concept as the tags in HTML. But a key difference with AsciiDoc is the property of the source document to remain easily human readable.
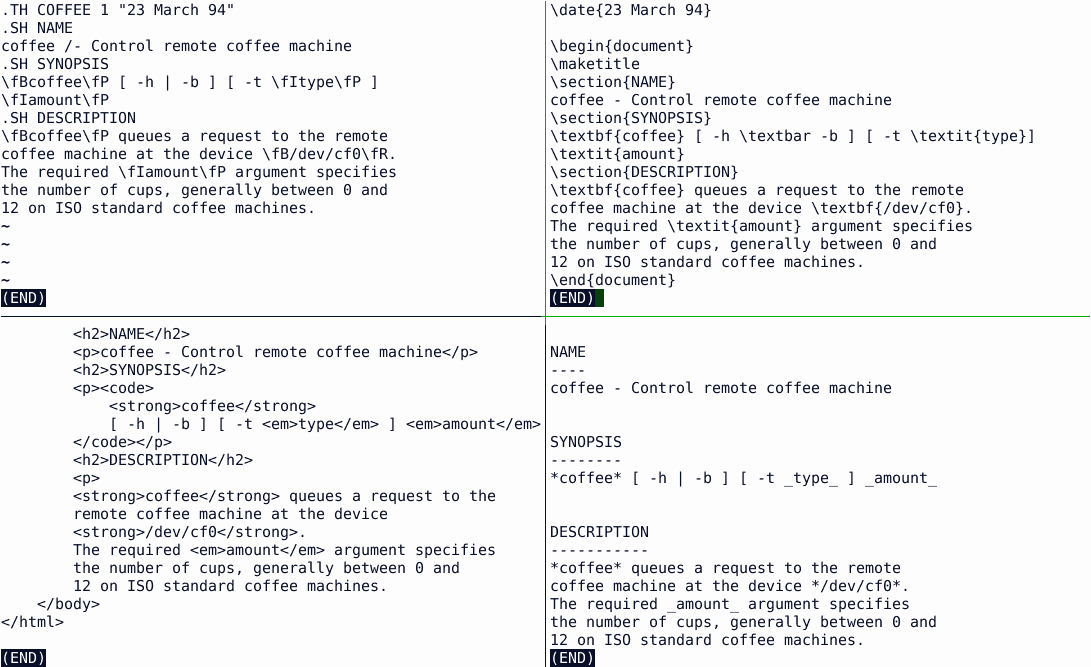
Check our GitHub repository to compare how the same output can be produced using few common text file formats: (coffee manpage idea courtesy).
coffee.manuses the venerable troff processor (based on the 1964 RUNOFF program). It’s mostly used today to write man pages. You can try it after having downloaded thecoffee.*files by typingman ./coffee.manat your command prompt.coffee.texuses the LaTeX syntax (1985) to achieve mostly the same result but for a PDF output. LaTeX is a typesetting program especially well suited for scientific publications because of its ability to nicely format mathematical formulae and tables. You can produce the PDF from the LaTeX source usingpdflatex coffee.texcoffee.htmlis using the HTML format (1991) to describe the page. You can directly open that file with your favorite web browser to see the result.coffee.adoc, finally, is using the AsciiDoc syntax (2002). You can produce both HTML and PDF from that file:
asciidoc coffee.adoc                   # HTML output
a2x --format pdf ./coffee.adoc         # PDF output (dblatex)
a2x --fop --format pdf ./coffee.adoc   # PDF output (Apache FOP)
Now you’ve seen the result, open those four files using your favorite text editor (nano, vim, SublimeText, gedit, Atom, … ) and compare the sources: there are great chances you will agree the AsciiDoc sources are easier to read — and probably to write too.
How to install AsciiDoc in Linux?
AsciiDoc is relatively complex to install because of the many dependencies. I mean complex if you want to install it from sources. For most of us, using our package manager is probably the best way:
apt-get install asciidoc fopor the following command:
yum install acsiidoc fop(fop is only required if you need the Apache FOP backend for PDF generation — this is the PDF backend I use myself)
More details about the installation can be found on the official AsciiDoc website. For now, all you need now is a little bit of patience, since, at least on my minimal Debian system, installing AsciiDoc require 360MB to be downloaded (mostly because of the LaTeX dependency). Which, depending on your Internet bandwidth, may give you plenty of time to read the rest of this article.
AsciiDoc Tutorial: How to write in AsciiDoc?

I said it several times, AsciiDoc is a human-readable text file format. So, you can write your documents using the text editor of your choice. There are even dedicated text editors. But I will not talk about them here— simply because I don’t use them. But if are using one of them, don’t hesitate to share your feedback using the comment section at the end of this article.
I do not intend to create yet another AsciiDoc syntax tutorial here: there are plenty of them already available on the web. So I will only mention the very basic syntactic constructs you will use in virtually any document. From the simple “coffee” command example quoted above, you may see:
- titles in AsciiDoc are identified by underlying them with
===or---(depending on the title level), - bold character spans are written between starts,
- and italics between underscores.
Those are pretty common convention probably dating back to the pre-HTML email era. In addition, you may need two other common constructs, not illustrated in my previous example: hyperlinks and images inclusion, whose syntax is pretty self-explanatory.
// HyperText links
link:http://dashing-kazoo.flywheelsites.com[ItsFOSS Linux Blog]

// Inline Images
image:/content/images/wordpress/2017/06/itsfoss-text-logo.png[ItsFOSS Text Logo]

// Block Images
image::/content/images/wordpress/2017/06/itsfoss-text-logo.png[ItsFOSS Text Logo]
But the AsciiDoc syntax is much richer than that. If you want more, I can point you to that nice AsciiDoc cheatsheet: http://powerman.name/doc/asciidoc
How to render the final output?
I will assume here you have already written some text following the AsciiDoc format. If this is not the case, you can download here some example files copied straight out of the AsciiDoc documentation:
# Download the AsciiDoc User Guide source document
BASE='https://raw.githubusercontent.com/itsfoss/asciidoc-intro/master'
wget "${BASE}"/{asciidoc.txt,customers.csv}
Since AsciiDoc is human-readable, you can send the AsciiDoc source text directly to someone by email, and the recipient will be able to read that message without further ado. But, you may want to provide some more nicely formatted output. For example as HTML for web publication (just like I’ve done it for this article). Or as PDF for print or display usage.
In all cases, you need a processor. In fact, under the hood, you will need several processors. Because your AsciiDoc document will be transformed into various intermediate formats before producing the final output. Since several tools are used, the output of one being the input of the next one, we sometimes speak of a toolchain.
Even if I explain some inner working details here, you have to understand most of that will be hidden from you. Unless maybe when you initially have to install the tools— or if you want to fine-tune some steps of the process.
In practice?
For HTML output, you only need the asciidoc tool. For more complicated toolchains, I encourage you to use the a2x tool (part of the AsciiDoc distribution) that will trigger the necessary processors in order:
# All examples are based on the AsciiDoc User Guide source document

# HTML output
asciidoc asciidoc.txt
firefox asciidoc.html

# XHTML output
a2x --format=xhtml asciidoc.txt

# PDF output (LaTeX processor)
a2x --format=pdf asciidoc.txt

# PDF output (FOP processor)
a2x --fop --format=pdf asciidoc.txt
Even if it can directly produce an HTML output, the core functionality of the asciidoc tool remains to transform the AsciiDoc document to the intermediate DocBook format. DocBook is a XML-based format commonly used for (but not limited to) technical documentation publishing. DocBook is a semantic format. That means it describes your document content. But not its presentation. So formatting will be the next step of the transformation. For that, whatever is the output format, the DocBook intermediate document is processed through an XSLT processor to produce either directly the output (e.g. XHTML), or another intermediate format.
This is the case when you generate a PDF document where the DocBook document will be (at your will) converted either as a LaTeX intermediate representation or as XSL-FO (a XML-based language for page description). Finally, a dedicated tool will convert that representation to PDF.
The extra steps for PDF generations are notably justified by the fact the toolchain has to handle pagination for the PDF output. Something this is not necessary for a “stream” format like HTML.
dblatex or fop?
Since there are two PDF backends, the usual question is “Which is the best?” Something I can’t answer for you.
Both processors have pros and cons. And ultimately, the choice will be a compromise between your needs and your tastes. So I encourage you to take the time to try both of them before choosing the backend you will use. If you follow the LaTeX path, dblatex will be the backend used to produce the PDF. Whereas it will be Apache FOP if you prefer using the XSL-FO intermediate format. So don’t forget to take a look at the documentation of these tools to see how easy it will be to customize the output to your needs. Unless of course if you are satisfied with the default output!
How to customize the output of AsciiDoc?
AsciiDoc to HTML
Out of the box, AsciiDoc produces pretty nice documents. But sooner or later you will what to customize their appearance.
The exact changes will depend on the backend you use. For the HTML output, most changes can be done by changing the CSS stylesheet associated with the document.
For example, let’s say I want to display all section headings in red, I could create the following custom.css file:
h2 {
    color: red;
}
And process the document using the slightly modified command:
# Set the 'stylesheet' attribute to
# the absolute path to our custom CSS file
asciidoc -a stylesheet=$PWD/custom.css asciidoc.txt
You can also make changes at a finer level by attaching a role attribute to an element. This will translate into a class attribute in the generated HTML.
For example, try to modify our test document to add the role attribute to the first paragraph of the text:
[role="summary"]
AsciiDoc is a text document format ....
Then add the following rule to the custom.css file:
.summary {
    font-style: italic;
}
Re-generate the document:
asciidoc -a stylesheet=$PWD/custom.css asciidoc.txt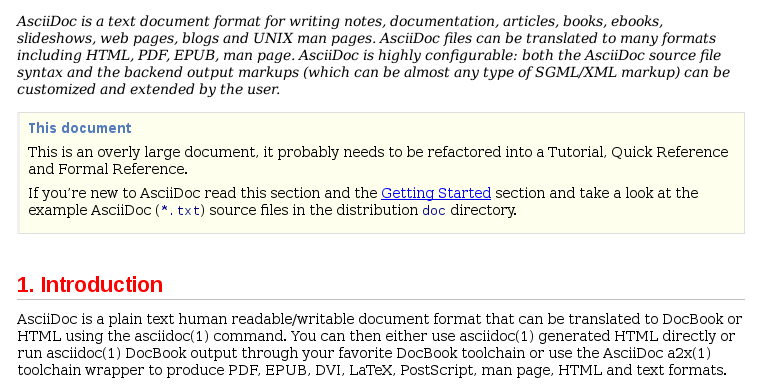
Et voila! The first paragraph is now displayed in italics. With a little bit of creativity, some patience and a couple of CSS tutorials, you should be able to customize your document at your will.
AsciiDoc to PDF
Customizing the PDF output is somewhat more complex. Not from the author’s perspective since the source text will remain identical. Eventually using the same role attribute as above to identify the parts that need a special treatment.
However you can no longer use CSS to define the formatting for PDF output. For the most common settings, there are parameters you can set from the command line. Some parameters can be used both with the dblatex and the fop backends, others are specific to each backend.
Since margin adjustment is a pretty common requirement, you may also want to take a look at that.
If the parameter names are somewhat consistent between the two backends, the command-line arguments used to pass those values to the backends differ between dblatex and fop.
So, double check first your syntax if apparently, this isn’t working. But to be honest, while writing this article I wasn’t able to make the body.font.family parameter work with the dblatex backend.
Since I usually use fop, maybe did I miss something? If you have more clues about that, I will be more than happy to read your suggestions in the comment section at the end of this article!
Worth mentioning using non-standard fonts— even with fop–require some extra work. But it’s pretty well documented on the Apache website.
# XSL-FO/FOP
a2x -v --format pdf \
    --fop \
    --xsltproc-opts='--stringparam page.margin.inner 10cm' \
    --xsltproc-opts='--stringparam body.font.family Helvetica' \
    --xsltproc-opts='--stringparam body.font.size 8pt' \
    asciidoc.txt

# dblatex
# (body.font.family _should_ work, but, apparently, it isn't ?!?)
a2x -v --format pdf \
    --dblatex-opts='--param page.margin.inner=10cm' \
    --dblatex-opts='--stringparam body.font.family Helvetica' \
    asciidoc.txt
Fine-grained setting for PDF generation
Global parameters are nice if you just need to adjust some pre-defined settings. But if you want to fine-tune the document (or completely change the layout) you will need some extra effort.
At the core of the DocBook processing, there is XSLT. XSLT is a computer language, expressed in XML notation, that allows to write arbitrary transformation from an XML document to … something else. XML or not.
For example, you will need to extend or modify the DocBook XSL stylesheet to produce the XSL-FO code for the new styles you may want. And if you use the dblatex backend, this may require modifying the corresponding DocBook-to-LaTeX XSLT stylesheet. In that latter case you may also need to use a custom LaTeX package. But I will not focus on that since dblatex is not the backend I use myself. I can only point you to the official documentation if you want to know more. But once again, if you’re familiar with that, please share your tips and tricks in the comment section!
Even while focusing only on fop, I don’t really have the room here to detail the entire procedure. So, I will just show you the changes you could use to obtain a similar result as the one obtained with few CSS lines in HTML output above. That is: section titles in red and a summary paragraph in italics.
The trick I use here is to create a new XSLT stylesheet, importing the original DocBook stylesheet, but overriding the attribute sets or template for the elements we want to change:
<?xml version='1.0'?>
<xsl:stylesheet xmlns:xsl="http://www.w3.org/1999/XSL/Transform"
                xmlns:exsl="http://exslt.org/common" exclude-result-prefixes="exsl"
                xmlns:fo="http://www.w3.org/1999/XSL/Format"
                version='1.0'>

<!-- Import the default DocBook stylesheet for XSL-FO -->
<xsl:import href="/etc/asciidoc/docbook-xsl/fo.xsl" />

<!--
    DocBook XSL defines many attribute sets you can
    use to control the output elements
-->
<xsl:attribute-set name="section.title.level1.properties">
    <xsl:attribute name="color">#FF0000</xsl:attribute>
</xsl:attribute-set>

<!--
    For fine-grained changes, you will need to write
    or override XSLT templates just like I did it below
    for 'summary' simpara (paragraphs)
-->
<xsl:template match="simpara[@role='summary']">
  <!-- Capture inherited result -->
  <xsl:variable name="baseresult">
    <xsl:apply-imports/>
  </xsl:variable>

  <!-- Customize the result -->
  <xsl:for-each select="exsl:node-set($baseresult)/node()">
    <xsl:copy>
      <xsl:copy-of select="@*"/>
      <xsl:attribute name="font-style">italic</xsl:attribute>
      <xsl:copy-of select="node()"/>
    </xsl:copy>
  </xsl:for-each>
</xsl:template>


</xsl:stylesheet>
Then, you have to request a2x to use that custom XSL stylesheet to produce the output rather than the default one using the --xsl-file option:
a2x -v --format pdf \
    --fop \
    --xsl-file=./custom.xsl \
    asciidoc.txt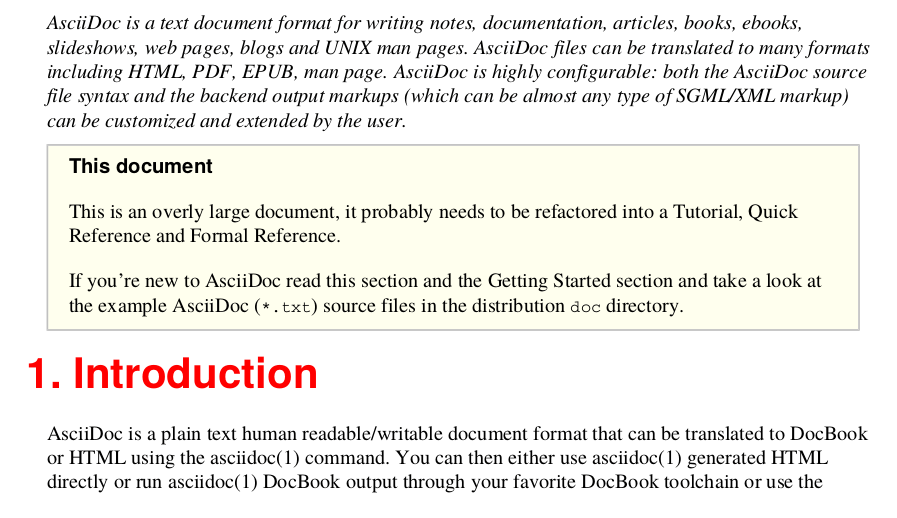
With a little bit of familiarity with XSLT, the hints given here and some queries on your favorite search engine, I think you should be able to start customizing the XSL-FO output.
But I will not lie, some apparently simple changes in the document output may require you to spend quite some times searching through the DocBook XML and XSL-FO manuals, examining the stylesheets sources and performing a couple of tests before you finally achieve what you want.
My opinion
Writing documents using a text format has tremendous advantages. And if you need to publish to HTML, there is not much reason for not using AsciiDoc. The syntax is clean and neat, processing is simple and changing the presentation if needed, mostly require easy to acquire CSS skills.
And even if you don’t use the HTML output directly, HTML can be used as an interchange format with many WYSIWYG applications today. As an example, this is was I’ve done here: I copied the HTML output of this article into the WordPress edition area, thus conserving all formatting, without having to type anything directly into WordPress.
If you need to publish to PDF— the advantages remain the same for the writer. Things will be certainly harsher if you need to change the default layout in depth though. In a corporate environment, that probably means hiring a document designed skilled with XSLT to produce the set of stylesheets that will suit your branding or technical requirements— or for someone in the team to acquire those skills. But once done it will be a pleasure to write text with AsciiDoc. And seeing those writings being automatically converted to beautiful HTML pages or PDF documents!
Finally, if you find AsciiDoc either too simplistic or too complex, you may take a look at some other file formats with similar goals: Markdown, Textile, reStructuredText or AsciiDoctor to name few. Even if based on concepts dating back to the early days of computing, the human-readable text format ecosystem is pretty rich. Probably richer it was only 20 years ago. As a proof, many modern static web site generators are based on them. Unfortunately, this is out of the scope for this article. So, let us know if you want to hear more about that!
