
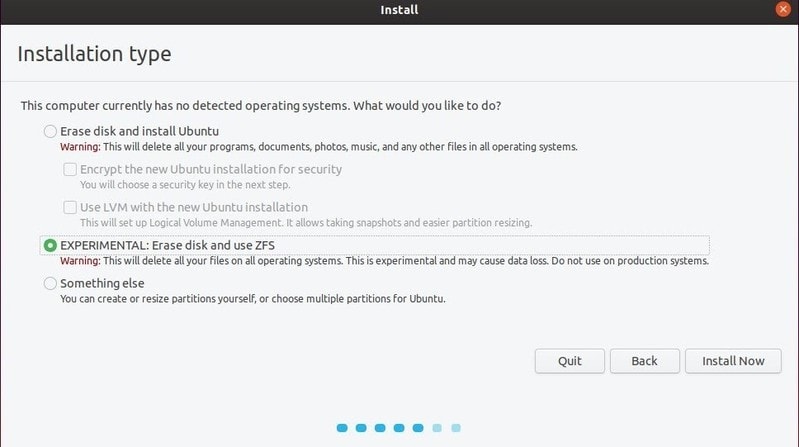
One of the main features of Ubuntu 19.10 is support for ZFS. Now you can easily install Ubuntu with on ZFS without any extra effort.
Normally, you install Linux with Ext4 filesystem. But if you do a fresh install of Ubuntu 19.10, you’ll see the option to use ZFS on the root. You must not use it on a dual boot system though because it will erase the entire disk.
Let’s see why ZFS matters and how to take advantage of it on ZFS install of Ubuntu.
How ZFS is different than other filesystems?
ZFS is designed with two major goals in mind: to handle large amounts of storage and prevent data corruption. ZFS can handle up to 256 quadrillion Zettabytes of storage. (Hence the Z in ZFS.) It can also handle files up to 16 exabytes in size.
If you are limited to a single drive laptop, you can still take advantage of the data protection features in ZFS. The copy-on-write feature ensures that data that is in use is not overwritten. Instead, the new information is written to a new block and the filesystem’s metadata is updated to point to the new block. ZFS can easily create snapshots of the filesystem. These snapshots track changes made to the filesystem and share with the filesystem the data that is the same to save space.
ZFS assigned a checksum to each file on the drive. It is constantly checking the state of the file against that checksum. If it detects that the file has become corrupt, it will attempt to automatically repair that file.
I have written a detailed article about what is ZFS and what its features are. Please read it if you are interested in knowing more on this topic.
Note
Keep in mind that the data protection features of ZFS can lead to a reduction in performance.
Using ZFS on Ubuntu [For intermediate to advanced users]

Once you have a clean install of Ubuntu with ZFS on the main disk you can start taking advantage of the features that this filesystem has.
Please note that all setup of ZFS requires the command line. I am not aware of any GUI tools for it.
Creating a ZFS pool
The section only applies if you have a system with more than one drive. If you only have one drive, Ubuntu will automatically create the pool during installation.
Before you create your pool, you need to find out the id of the drives for the pool. You can use the command lsblk to show this information.
To create a basic pool with three drives, use the following command:
sudo zpool create pool-test /dev/sdb /dev/sdc /dev/sdd. Remember to replace pool-test with the pool name of your choice.
This command will set up “a zero redundancy RAID-0 pool”. This means that if one of the drives becomes damaged or corrupt, you will lose data. If you do use this setup, it is recommended that you do regular backups.
You can alos add another disk to the pool by using this command:
sudo zpool add pool-name /dev/sdxCheck the status of your ZFS pool
You can check the status of your new pool using this command:
sudo zpool status pool-test 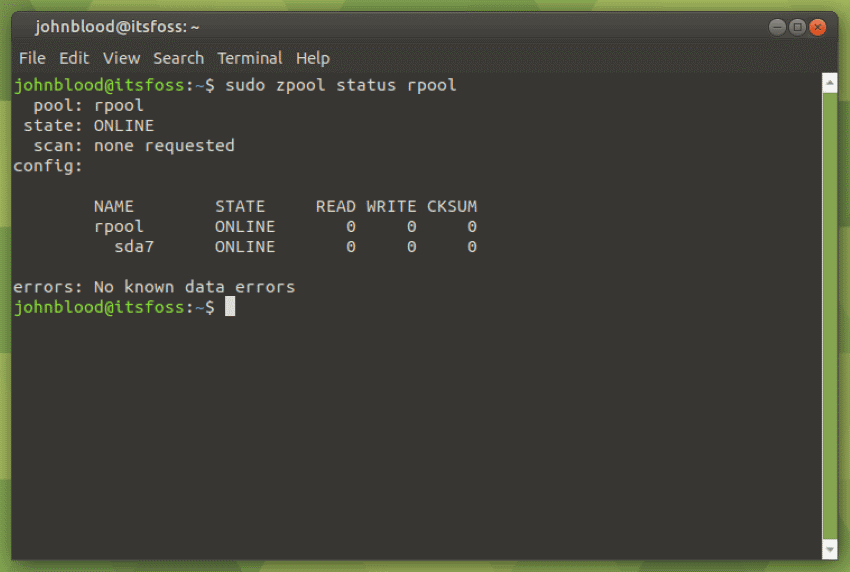
Mirror a ZFS pool
To ensure that your data is safe, you can instead set up mirroring. Mirroring means that each drive contains the same data. With mirroring setup, you could lose two out of three drives and still have all of your information.
To create a mirror, you can use something like this:
sudo zpool create pool-test mirror /dev/sdb /dev/sdc /dev/sddCreate ZFS Snapshots for backup and restore
Snapshots allow you to create a fall-back position in case a file gets deleted or overwritten. For example, let’s create a snapshot, delete some folder in my home directory and restore them.
First, you need to find the dataset you want to snapshot. You can do that with the
zfs list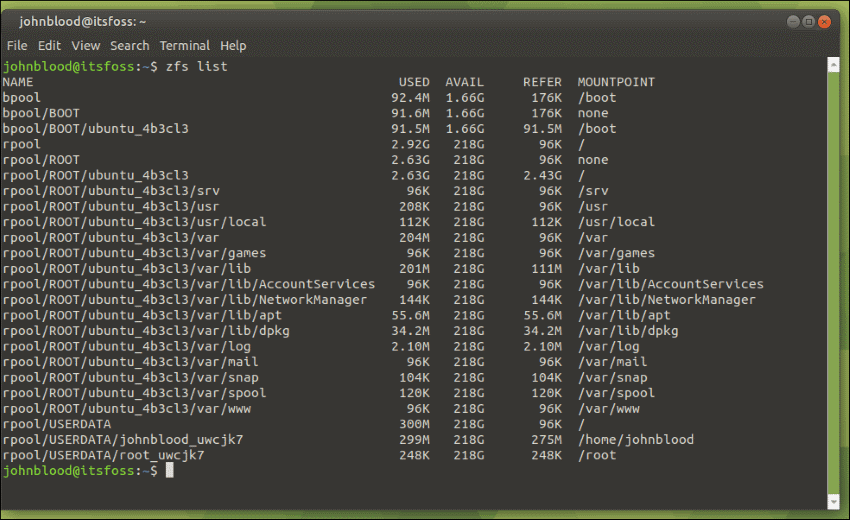
You can see that my home folder is located in rpool/USERDATA/johnblood_uwcjk7.
Let’s create a snapshot named 1910 using this command:
sudo zfs snapshot rpool/USERDATA/johnblood_uwcjk7@1019The snapshot will be created very quickly. Now, I am going to delete the Downloads and Documents directories.
Now to restore the snapshot, all you have to do is run this command:
sudo zfs rollback rpool/USERDATA/johnblood_uwcjk7@1019. The length of the rollback depends on how much the information changed. Now, you can check the home folder and the deleted folders (and their content) will be returned to their correct place.
To ZFS or not?
This is just a quick glimpse at what you can do with ZFS on Ubuntu. For more information, check out Ubuntu’s wiki page on ZFS. I also recommend reading this excellent article on ArsTechnica.
This is an experimental feature and if you are not aware of ZFS and you want to have a simple stable system, please go with the standard install on Ext4. If you have a spare machine that you want to experiment with, then only try something like this to learn a thing or two about ZFS. If you are an ‘expert’ and you know what you are doing, you are free to experiment ZFS wherever you like.
At this time the implementation of ZFS in Ubuntu 19.10 is experimental because of the way the disk is laid out may change in the Ubuntu 20.04 release. They are not guaranteeing that you will be able to upgrade if you have ZFS installed.
According to the Ubuntu podcast, the Ubuntu desktop team is working on a tool named zsys. It will hook into apt and grub. As you upgrade your system, zsys will take snapshots so you can boot into a previous snapshot if the upgrade fails. It will arrive in the 20.04 release.
Have you ever used ZFS? Please let us know in the comments below. If you found this article interesting, please take a minute to share it on social media, Hacker News or Reddit.
