

When I switched from Windows to Ubuntu as my primary OS, I was first worried about the availability of screenshot tools.
It is easy to utilize the default keyboard shortcuts to take screenshots, but with a standalone tool, I get to annotate/edit the image while taking the screenshot.
In this article, I will introduce you to the default methods/tools to take a screenshot while also covering the list of the best screenshot tools available for Linux.
Method 1: The default way to take screenshots in Linux
Do you want to capture the image of your entire screen? A specific region? A specific window?
If you just want a simple screenshot without any annotations/fancy editing capabilities, the default keyboard shortcuts will do the trick. These are not specific to Ubuntu. Almost all Linux distributions and desktop environments support these keyboard shortcuts.
Let’s take a look at the list of keyboard shortcuts you can utilize:
PrtSc – Save a screenshot of the entire screen to the “Pictures” directory.
Shift + PrtSc – Save a screenshot of a specific region to Pictures.
Alt + PrtSc – Save a screenshot of the current window to Pictures.
Ctrl + PrtSc – Copy the screenshot of the entire screen to the clipboard.
Shift + Ctrl + PrtSc – Copy the screenshot of a specific region to the clipboard.
Ctrl + Alt + PrtSc – Copy the screenshot of the current window to the clipboard.
As you can see, taking screenshots in Linux is absolutely simple with the default GNOME screenshot tool. However, if you want to immediately annotate (or other editing features) without importing the screenshot to another application, you can use a dedicated screenshot tool.
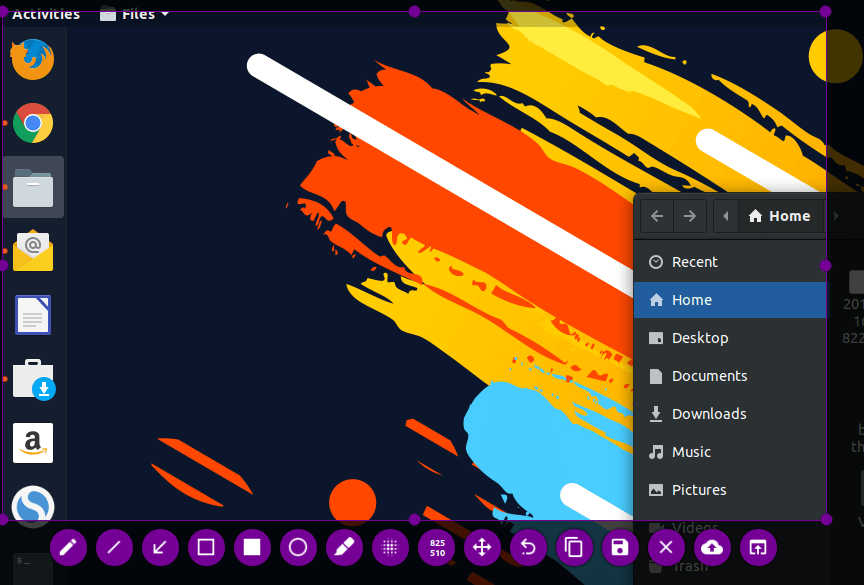
Method 2: Take and edit screenshots in Linux with Flameshot
Feature Overview
- Annotate (highlight, point, add text, box in)
- Blur part of an image
- Crop part of an image
- Upload to Imgur
- Open screenshot with another app
Flameshot is a quite impressive screenshot tool which arrived on GitHub last year.
If you have been searching for a screenshot tool that helps you annotate, blur, mark, and upload to imgur while being actively maintained unlike some outdated screenshot tools, Flameshot should be the one to have installed.
Fret not, we will guide you on how to install it and configure it as per your preferences.
To install it on Ubuntu, you just need to search for it on Ubuntu Software center and get it installed. In case you want to use the terminal, here’s the command for it:
sudo apt install flameshotIf you face any trouble installing, you can follow their official installation instructions. After installation, you need to configure it. Well, you can always search for it and launch it, but if you want to trigger the Flameshot screenshot tool by using PrtSc key, you need to assign a custom keyboard shortcut.
Here’s how you can do that:
- Head to the system settings and navigate your way to the Keyboard settings.
- You will find all the keyboard shortcuts listed there, ignore them and scroll down to the bottom. Now, you will find a + button.
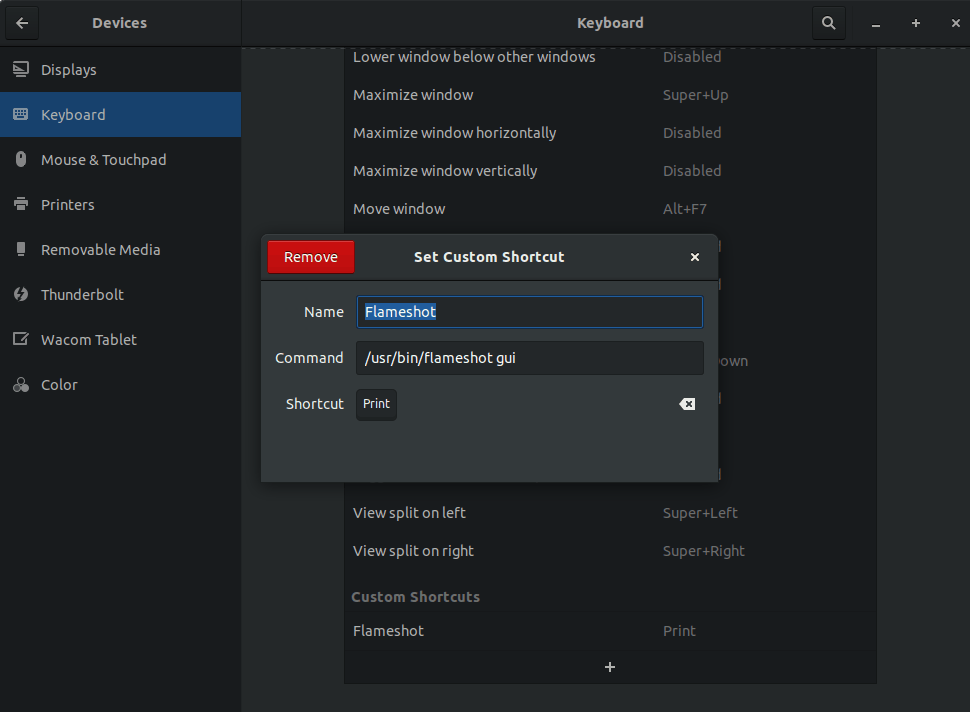
- Click the “+” button to add a custom shortcut. You need to enter the following in the fields you get:
Name: Anything You Want
Command: /usr/bin/flameshot gui - Finally, set the shortcut to PrtSc – which will warn you that the default screenshot functionality will be disabled – so proceed doing it.
For reference, your custom keyboard shortcut field should look like this after configuration:
Method 3: Take and edit screenshots in Linux with Shutter

Feature Overview:
- Annotate (highlight, point, add text, box in)
- Blur part of an image
- Crop part of an image
- Upload to image hosting sites
Shutter is a popular screenshot tool available for all major Linux distributions. Though it seems to be no more being actively developed, it is still an excellent choice for handling screenshots.
You might encounter certain bugs/errors. The most common problem with Shutter on any latest Linux distro releases is that the ability to edit the screenshots is disabled by default along with the missing applet indicator. But, fret not, we have a solution to that. You just need to follow our guide to fix the disabled edit option in Shutter and bring back the applet indicator.
After you’re done fixing the problem, you can utilize it to edit the screenshots in a jiffy.
To install shutter, you can browse the software center and get it from there. Alternatively, you can use the following command in the terminal to install Shutter in Ubuntu-based distributions:
sudo apt install shutterAs we saw with Flameshot, you can either use the app launcher to search for Shutter and manually launch the application, or you can follow the same instructions (with a different command) to set a custom shortcut to trigger Shutter when you press the PrtSc key.
If you are going to assign a custom keyboard shortcut, you need to use the following in the command field:
shutter -fMethod 4: Use GIMP to take screenshots in Linux
Feature Overview:
- Advanced Image Editing Capabilities (Scaling, Adding filters, color correction, Add layers, Crop, and so on.)
- Take a screenshot of the selected area
If you use GIMP a lot and you probably want some advance edits on your screenshots, GIMP would be a good choice.
You should already have it installed, if not, you can always head to your software center to install it. If you have trouble installing, you can always refer to their official website for installation instructions.
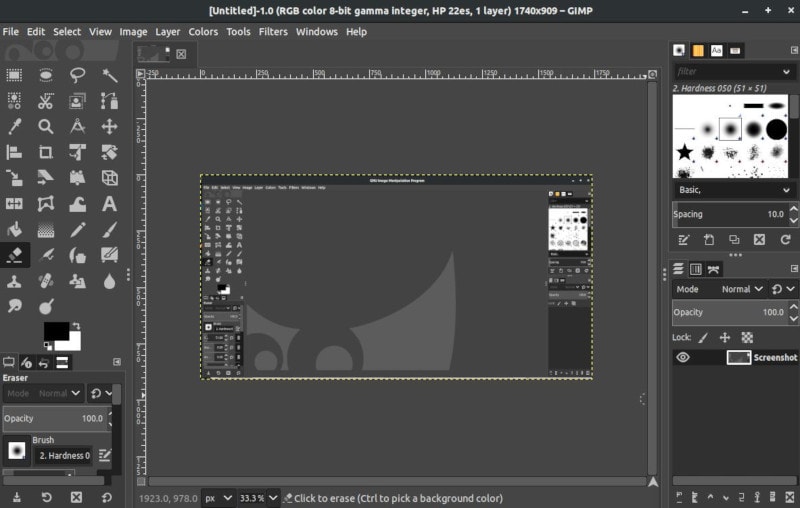
To take a screenshot with GIMP, you need first to launch it, and then navigate your way through File->Create->Screenshot.
After you click on the screenshot option, you will be greeted with a couple of tweaks to control the screenshot. That’s just it. Click “Snap” to take the screenshot, and the image will automatically appear within GIMP, ready for you to edit.
Method 5: Taking screenshots in Linux using command-line tools
This section is strictly for terminal lovers. If you like using the terminal, you can utilize the GNOME screenshot tool or ImageMagick or Deepin Scrot– which comes baked in on most of the popular Linux distributions.
To take a screenshot instantly, enter the following command:
GNOME Screenshot (for GNOME desktop users)
gnome-screenshotTo take a screenshot with a delay, enter the following command (here, 5 – is the number of seconds you want to delay)
GNOME screenshot is one of the default tools that exists in all distributions with GNOME desktop.
gnome-screenshot -d -5ImageMagick
ImageMagick should be already pre-installed on your system if you are using Ubuntu, Mint, or any other popular Linux distribution. In case, it isn’t there, you can always install it by following the official installation instructions (from source). In either case, you can enter the following in the terminal:
sudo apt-get install imagemagickAfter you have it installed, you can type in the following commands to take a screenshot:
To take the screenshot of your entire screen:
import -window root image.pngHere, “image.png” is your desired name for the screenshot.
To take the screenshot of a specific area:
import image.pngDeepin Scrot
Deepin Scrot is a slightly advanced terminal-based screenshot tool. Similar to the others, you should already have it installed. If not, get it installed through the terminal by typing:
sudo apt-get install scrotAfter having it installed, follow the instructions below to take a screenshot:
To take a screenshot of the entire screen:
scrot myimage.pngTo take a screenshot of the selected aread:
scrot -s myimage.pngWrapping Up
So, these are some of the best screenshot tools available for Linux.
If you find a better screenshot tool than the ones mentioned in our article, feel free to let us know in the comments below.
Also, do tell us about your favorite screenshot tool!
If this helped you, consider supporting It's FOSS
It's FOSS has been helping people use Linux for the past 14 years. Help us stay independent from big tech. Become a Plus member, enjoy ad-free reading and get 5 eBooks.
