The other day I was trying to extend my root partition of Ubuntu which I dual boot with Windows. The partition extension was successful except that I screwed up the Grub configuration. When I booted in my laptop after the partition changes, I was welcomed by the Death Screen of Linux saying:
error: no such partition
grub rescue
After googling a bit, I found this mega thread on Ubuntu forum that helped me. But since it is a very complicated thread, I have re-written the tutorial so that one can follow it easily. So there are some assumption and some requirements to fix the error: no such partition grub rescue problem.
Requirements and presumptions:
- You must have a live CD/DVD/USB of the same version of OS
- You must have internet connection
- You are dual booting Windows with Ubuntu (no Wubi installation)
- You do not have a separate /boot partition
Now let's see how can you rescue the grub here.
How To Fix: error: no such partition grub rescue
You’ll be using chroot to rescue grub. The whole concept is that since grub configuration files have been deleted or corrupted, it need to be re-installed. And using the live CD of the exact OS version, we can install the grub configuration again. It will delete all the changes (if any) you have made to the grub.
Please follow these steps to easily fix grub rescue problem in Ubuntu (or other Linux distributions):
Step 1: Know you root partition
Boot from live CD, DVD or USB drive. Try Ubuntu from live disk. Open a terminal (Ctrl+Alt+T) and use the following command:
sudo su
fdisk -l
Here, you will see the drive name and partition number. It should look like sdXY. Where X is the drive letter and Y is the partition number. Usually it should be like sdaY. You have to recognize the partition where root has been installed.
Step 2: Mount the root partition
Once we have got the partition where root has been installed, we’ll mount the root partition where Ubuntu has been installed. Use the following commands to mount it:
sudo mkdir /mnt/temp
sudo mount /dev/sdXY /mnt/temp
Replace XY with appropriate values.
Step 3: Be the CHROOT
Once we have the partition mounted, next step is to mount certain items in preparation of the chroot. Run the following commands one by one:
for i in /dev /dev/pts /proc /sys; do sudo mount -B $i /mnt/temp$i;  done
sudo cp /etc/resolv.conf /mnt/temp/etc/resolv.conf
sudo chroot /mnt/temp
If the above commands ran successfully, you’ll see root@ubuntu:/# in the terminal indicating that you are in chroot mode.
Step 4: Purge Grub 2 packages
Now when we are in chroot environment (you can think of it as if we are behaving as root for the mounted partition)., time to get rid of the Grub 2 packages but before that lets update the repository.
apt-get update
apt-get purge grub grub-pc grub-common
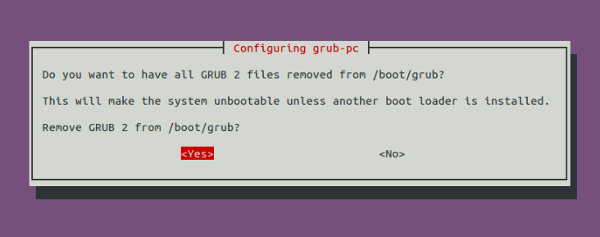
While removing the grub, you’ll see a strange screen asking if you want to remove Grub 2 packages. Press TAB to select Yes. It will be highlighted once selected. Press enter to proceed.

Step 5: Re-install Grub packages
As we deleted the previous Grub, we deleted the messed up settings as well as any favourite settings stored in it. Now we’ll install a new and fresh Grub. Few things to keep in mind before you go on with the command to install the Grub.
- While installing the new Grub, it will ask you to add extra kernel options. Just press TAB to go to OK and press enter to continue.
- It will bring you the installation notes. Press Tab to OK followed by enter and continue.
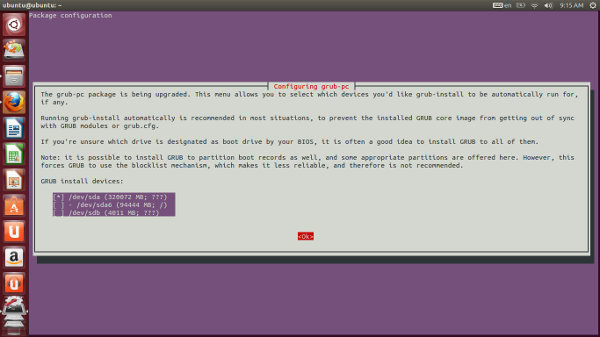
- When it presents with you the device option (to ask on which partition should it install Grub), choose the option in the format of sdX. DO NOT select the drive partition in 4 letter format i.e. sda4 etc. When you select the partition, it should have an asterisk (*) before it like [*] sdX. If it does not, highlight (with tab) and press SPACE to select it. Tab OK and press enter.
It should look like this:

Now when you taken all those things in mind, use the command below to install the Grub.
apt-get install grub-common grub-pcUpdate the grub and exit the chroot:
update-grub
exit
Step 6: Unmount the partition:
We mounted something at the start, didn’t we? Well lets just unmount them.
for i in /dev/pts /dev /proc /sys; do sudo umount /mnt/temp$i ; doneThat’s it. Reboot your system and you should see the good old Grub boot screen as before. I hope this tutorial helped you to get rid of error: no such partition grub rescue problem and the tutorial was easy to follow. Any question, suggestions or a word of thanks is always welcomed. Stay tuned for more Linux tutorials.

