

We have seen how to password protect folders in Ubuntu earlier. We have also seen encrypted text editor for Linux. Today, we’ll see how to create password protected zipped files in Linux, in both command line and graphical way.
I am using Ubuntu in this tutorial but you can use any Linux distribution that uses Nautilus (now called Files) file manager for the graphical part. Command line steps are the same for any Linux distribution.
- Create password protected zip file in Linux command line
- Create password protected zip file using Nautilus file manager [GUI method]
There are several ways you can encrypt zip file in Linux. There are dedicated command line tools for this task, but I am not going to talk about those. I will show you how to password protect a zip file without installing a dedicated tool.
Create password protect zip file in Linux command line
First thing first, make sure that you have zip support enabled in your Linux system. Use your distribution’s package manager and try to install it. If its not installed already, it will be installed.
In Debian/Ubuntu, you can use this command:
sudo apt install zip unzipNow, let’s see how to password protect a zip file in Linux. The method is almost the same as creating zip folder in Linux. The only difference is the use of option -e for encryption.
zip -re output_file.zip file1 folder1The -r option is used to recursively look into directories. The -e option is for encryption.
You’ll be asked to enter and verify the password. You won’t see the password being typed on the screen, that’s normal. Just type the password and press enter both times.
Here’s what the process looks like on the screen:
zip -re my_zip_folder.zip agatha.txt cpluplus.cpp test_dir
Enter password:
Verify password:
adding: agatha.txt (deflated 41%)
adding: cpluplus.cpp (deflated 4%)
adding: test_dir/ (stored 0%)
adding: test_dir/myzip1.zip (stored 0%)
adding: test_dir/myzip2.zip (stored 0%)
adding: test_dir/c.xyz (stored 0%)
Do note that if someone tries to unzip this file, he/she can see the content of the folder such as which files are there in the zipped file. But the files cannot be read.
Create a password protected zip file in Linux using GUI
I have created a password-protected zip file in Ubuntu 18.04 here but you can use the same steps on any Linux distribution with GNOME desktop environment.
Search for Archive Manager and open it.

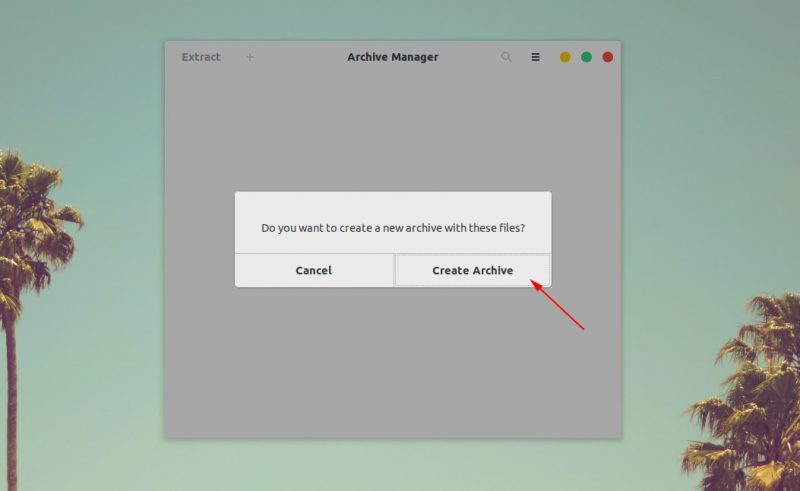
Drag and drop the file(s) you want to compress into a zip file. Select Create Archive option here.
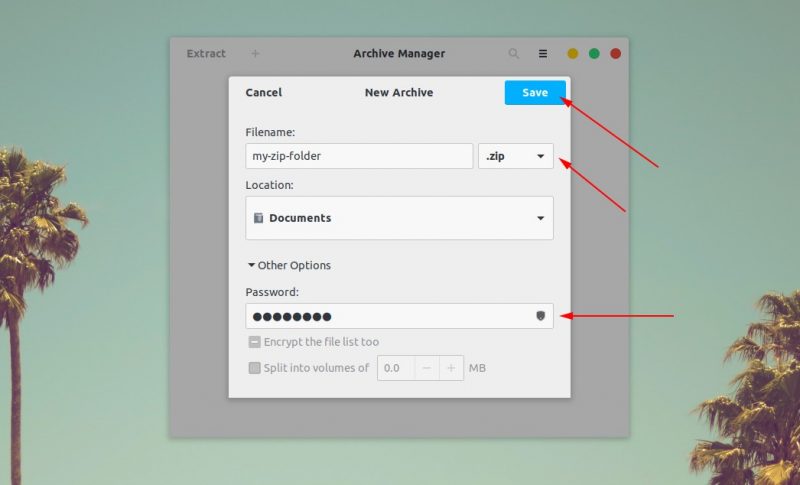
In here, choose the type of compressed file. It will be .zip in my case. You’ll see the “Other Options”, click on it and you’ll see the password field. Enter the password you want and click on the Save button.
That’s it. You have successfully created a password protected zip file in Ubuntu Linux graphically. The next time you want to extract it, it will ask for a password.
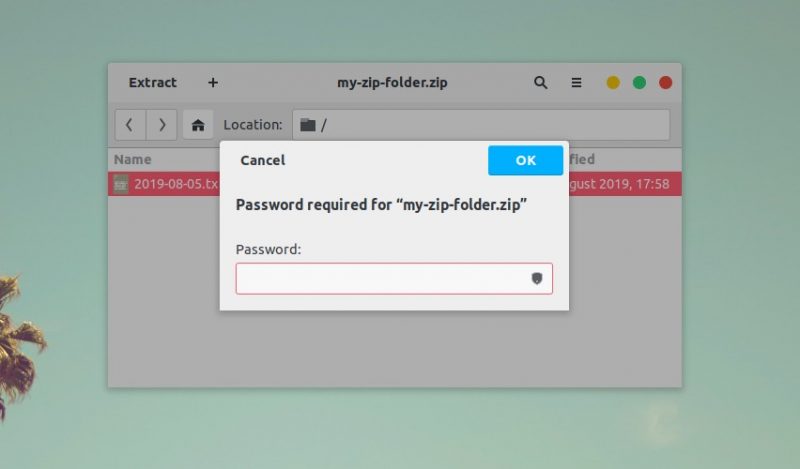
As you can see, no one (in normal ways) can extract this file without the password. Congratulations, you just learned how to encrypt zip files in Ubuntu Linux.
There are other ways to password protect folders in Linux. This tutorial shows how to do that.
 Abhishek Prakash
I hope this quick tutorial helped you to create password-protected zip files in Linux.
If this helped you, consider supporting It's FOSS
It's FOSS has been helping people use Linux for the past 14 years. Help us stay independent from big tech. Become a Plus member, enjoy ad-free reading and get 5 eBooks.
