

Brief: Manjaro-Architect was a command line net installer that lets you install Manjaro from a minimal ISO by downloading other components of your choice from the internet.
In late March, the development team behind Manjaro announced the creation of Manjaro Architect. This made it easy to install Manjaro the way you want. I took it for a spin more than five years ago. These were my findings.
What is Architect?
Architect was an installer that was created by Carl Duff. Duff created Architect with the goal improving the installation of Arch. Normally, when you install Arch you have enter of series of commands to guide the installation. Architect presents you with a series of menus that allow you to choose what Arch to be installed. This takes away the need to constantly refer to the excellent Arch wiki.
Installation
Be warned: If you plan to use Manjaro Architect, make sure that you have a decent internet connection because it will download all of the parts of the system as you install them. If you have a slow connection, this could take forever because it uses several gigabytes of data. Also, I had to redo the install because I thought I could figure it out and some goofed it up somewhere along the line. If you do decide to try it, be sure to use the tutorial.
The ISO I downloaded for Manjaro Architect was about 500MB, so I was able to burn it to a CD. Once I booted from the CD, which took a couple minutes, I was presented with a command line login screen with the necessary username and password spelled out. (By the way, the answer is manjaro and manjaro.) Once I signed it, I launched the installer by typing setup.
If you have an ethernet cable hooked to your system, Manjaro Architect will download and install the latest installer. If you don’t have a network setup, or you are on wifi, you will be prompted to set it up.
Once the installer is updated, you choose your language preference. Next, you are present with the main menu of the installer.
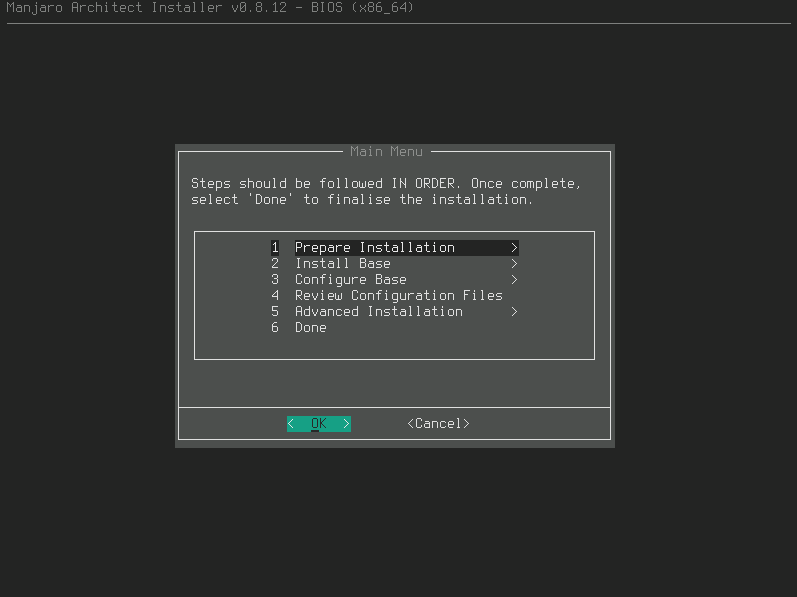
Step 1
Your first option is to prepare for installation. This consist of three main parts: setting your keyboard layout, partition the disks, and mounting partitions. You can also list the devices and encrypt them. You can either let the installer automatically partition your drive or pick one of the following programs to do it manually: cfdisk, cgdisk, fdisk, gdisk, and parted. You can format the drive as ext3, ext4, jfs, xfs, Btrfs, and ReiserFS.
Step 2
Back on the main menu, you can now install the base. You are given the option to choose which init system you want to use. (Please note that only XFCE, KDE, Lxqt and i3 work with both systems.) Next, you select with kernel and kernel extramodules, such as specific drivers, you want to install. From here, the install goes out to the web and retrieves and installs the needed files.
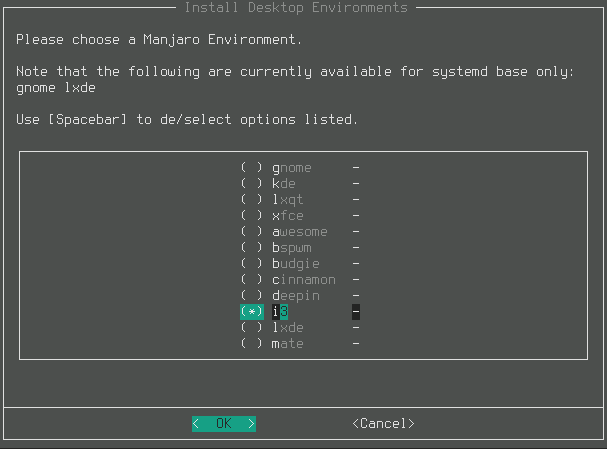
Step 3
With the base installed, you can move on to installing the desktop. You can pick from Gnome, KDE, Lxqt, XFCE, Awesome, Bspwm, Budgie, Cinnamon, Deepin, i3, Lxde or MATE. The installation of the desktop takes the longest because that has the most pieces. Some desktops have the option to install a basic or full version of the desktop. Next, you can decide whether to use free or proprietary display drivers. Then you install the bootloader.
Now that, you have your system installed, you have to configure it from the main menu using the Configure base option. After setting up the FSTAB to determine how the system identifies the partitions on your disk, you can set hostname, locale, keyboard layout, timezone and clock, root password and users. There are options to perform advanced setup, as well. With a quick reboot, you can log into your fresh desktop.
Final Thoughts
I’ve been using Manjaro for a couple of years now. I’ve used the old cli installer and the newer Calamares installer. But I’ve never done a net install, which what this basically was. It was a great experience. Sure I had to redo it because the first time around I decided to do without reading the tutorial, but that was part of the fun. Obviously, I haven’t learned all the important jargon you need to know to survive in the Linux world. It did prove that Manjaro Architect is not for the faint of heart.
Another thing I liked about Manjaro Architect, was the option to select which init system or desktop you want without having to download multiple ISOs. I can see that it is a great way to test out everything Manjaro had to offer.
The only real problem I ran into was that it failed to create a swap file. Also, you can only install one desktop environment.
You can explore its unspported archive page to do whatever you want with it.
Have you ever used Manjaro Architect? What was your favorite thing about it? Please let us know in the comments below.
If this helped you, consider supporting It's FOSS
It's FOSS has been helping people use Linux for the past 14 years. Help us stay independent from big tech. Become a Plus member, enjoy ad-free reading and get 5 eBooks.
