

Installing Java is certainly one of the first things to do after installing Ubuntu.
Even if you are not a Java developer, you might have to install Java if you have to use tools like Android Studio or play Minecraft.
If you are not particular about the Java versions, install it using this command:
sudo apt install default-jdk
But there is more to installing Java on Ubuntu and I would like to provide you complete details in this tutorial.
The thing is that you can get Java on Ubuntu via multiple packages. There is JRE, OpenJDK and Oracle JDK. But what is the difference between these packages, and which one should you install? Let me explain that in the next section.
JRE vs. JDK vs. OpenJDK vs. Oracle JDK: What's the difference
Before we go on seeing the process to install Java, let’s quickly understand the difference between JRE, OpenJDK and Oracle JDK.
- JRE (Java Runtime Environment): This is needed to run a Java-based application on Ubuntu. This is all you require if you are not a programmer.
- JDK (Java Development Kit): This is what you need to if you want to program in Java.
- OpenJDK vs Oracle JDK: It is the open-source implementation of Java Development Kit, while Oracle JDK is the official Oracle version of Java Development Kit. While OpenJDK is sufficient for most of the cases, some programs such Android Studio suggest using Oracle JDK to avoid UI/performance issues.
Now that you know the difference between JRE, JDK, OpenJDK and Oracle JDK, you should make a decision to install one of these packages.
Once you do that, it’s time to see how to install these packages and get Java on your Ubuntu Linux.
Check if Java is already installed in Ubuntu
Before you see how to install Java, you should verify if Java is already installed. This is also helpful in knowing which version of Java is installed on your system.
Open a terminal and use the following command:
java -version
If you have Java installed, you should see an output like this:

As you can see in the above screenshot, the system has Java 21 installed via OpenJDK.
If you don’t have Java installed on your system, you’ll see an output like this:
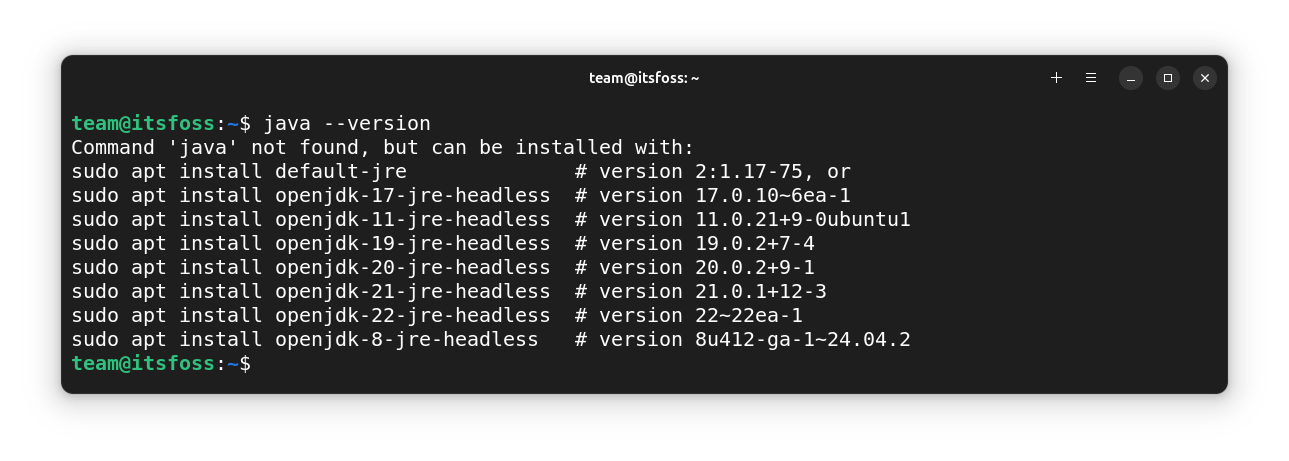
Basically, Ubuntu is giving you a hint about the various packages you can install to get Java. And as you can see, there are multiple Java versions available to install.
java -version command (if Java is not installed or with apt search jre --names-only (if Java is already installed).Installing Java in Ubuntu and Linux Mint (easy and recommended)
We have seen the difference between various types of ‘Java’, let’s see how to install them.
Install JRE (for running Java applications)
JRE is required for running Jar files on Ubuntu. Jar files are basically precompiled Java files. As an end user, if you just want to use Java applications, you’ll need JRE.
Open a terminal and use the following command to install JRE:
sudo apt install default-jre
This will install the latest JRE available from Ubuntu. But if you want to install a specific version, you can use openjdk-21-jre, openjdk-17-jre or openjdk-11-jre instead of default-jre in the above command.
Search for available Java versions on your system:
apt search jre --names-onlyThis will have a huge output with various packages that contain the term jre in their name. Look for packages like openjdk-XX-jre and install them.
Let's say you want to install openjdk-11-jre which is available for your Linux system. Install it in this fashion:
sudo apt install openjdk-11-jreInstall OpenJDK (for compiling and running Java programs)
As mentioned previously, if you intend to compile and run Java programs on Ubuntu, you need the JDK. It contains the Java Compiler (javac) package.
In a terminal, use the following command to install OpenJDK Java Development Kit:
sudo apt install default-jdk
This will install the latest JDK available from Ubuntu. But if you want to install a specific version, you can use openjdk-21-jdk, openjdk-17-jdk or openjdk-11-jdk instead of default-jdk in the above command.
Search for available Java versions on your system:
apt search -jdk --names-onlyThis will have a huge output with various packages that contain the term -jdk in their name. Look for packages like openjdk-XX-jdk and install them.
Let's say you want to install openjdk-11-jdk which is available for your Linux system. Install it in this fashion:
Install specific Java version in Ubuntu (only if you must)
Can't find the Java version you are looking for in Ubuntu repositories? Don't worry. Oracle provides a couple of installation files for Debian and Ubuntu-based systems. Let's take a look at those.
Using Official DEB File
If you are on a Debian-based system, you can use the official DEB file to install Java on your system.
Let's see how to install Oracle JDK in Ubuntu and Linux Mint, using the DEB file.
First, go to the official Oracle Java downloads page and download the deb installer file.
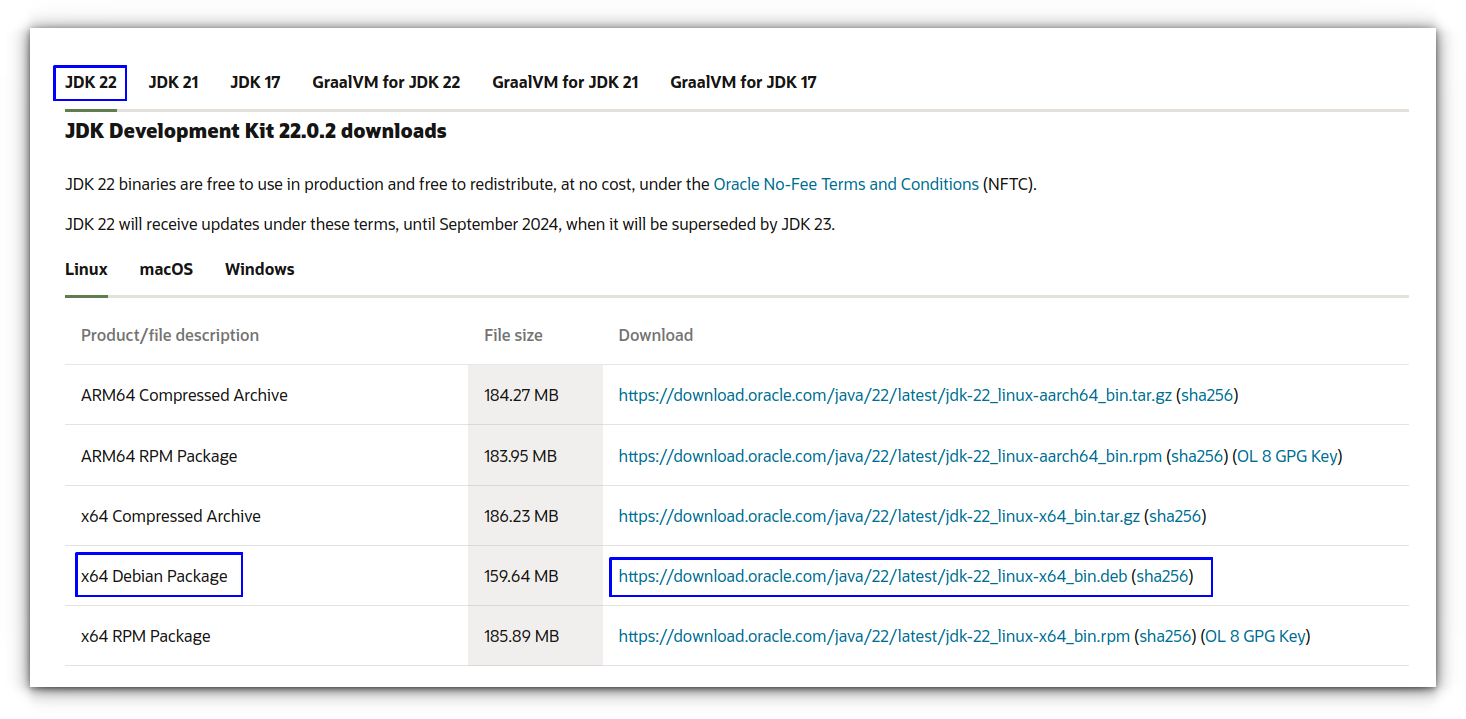
You may need to accept license when prompted.
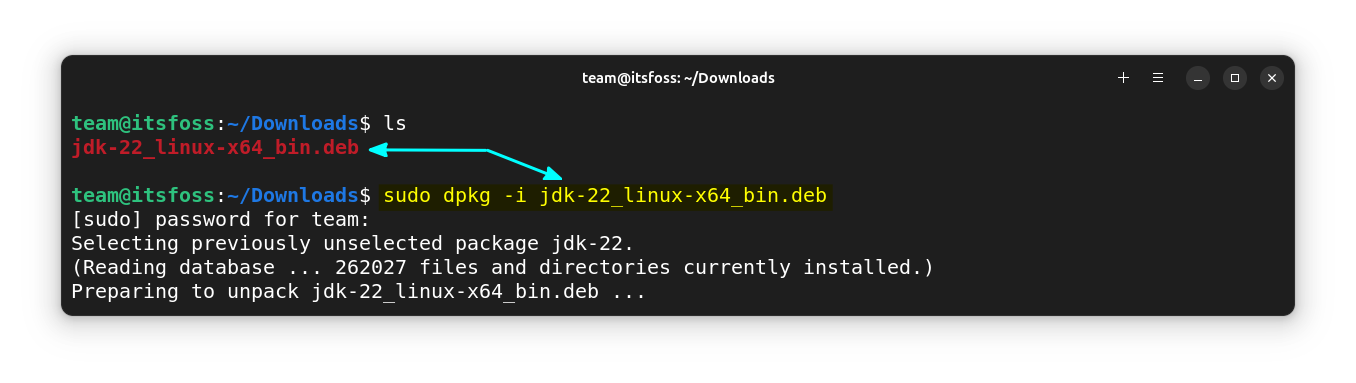
Now, got to the downloaded directory and install the file using the command:
sudo dpkg -i <downloaded-file.deb>
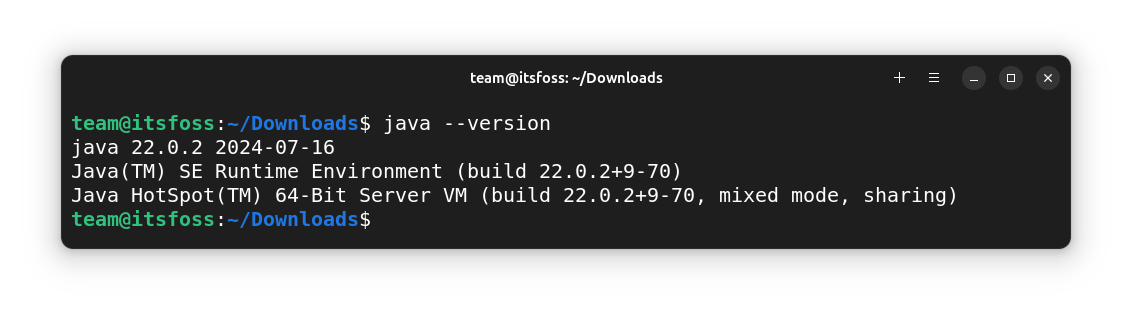
You can now check the installed java version using the command:
java --version
Using Official Archive Files
There is a TAR file for specific Java versions, that can be used to install Java on various Linux distributions. Here, you can install it in both a privileged directory (require root permission) like /opt or any directory in $HOME of the user.
With the archive files, you can install a private version of the JDK into any location, without affecting other JDK installations.
First, download the TAR file for Java from the official website.
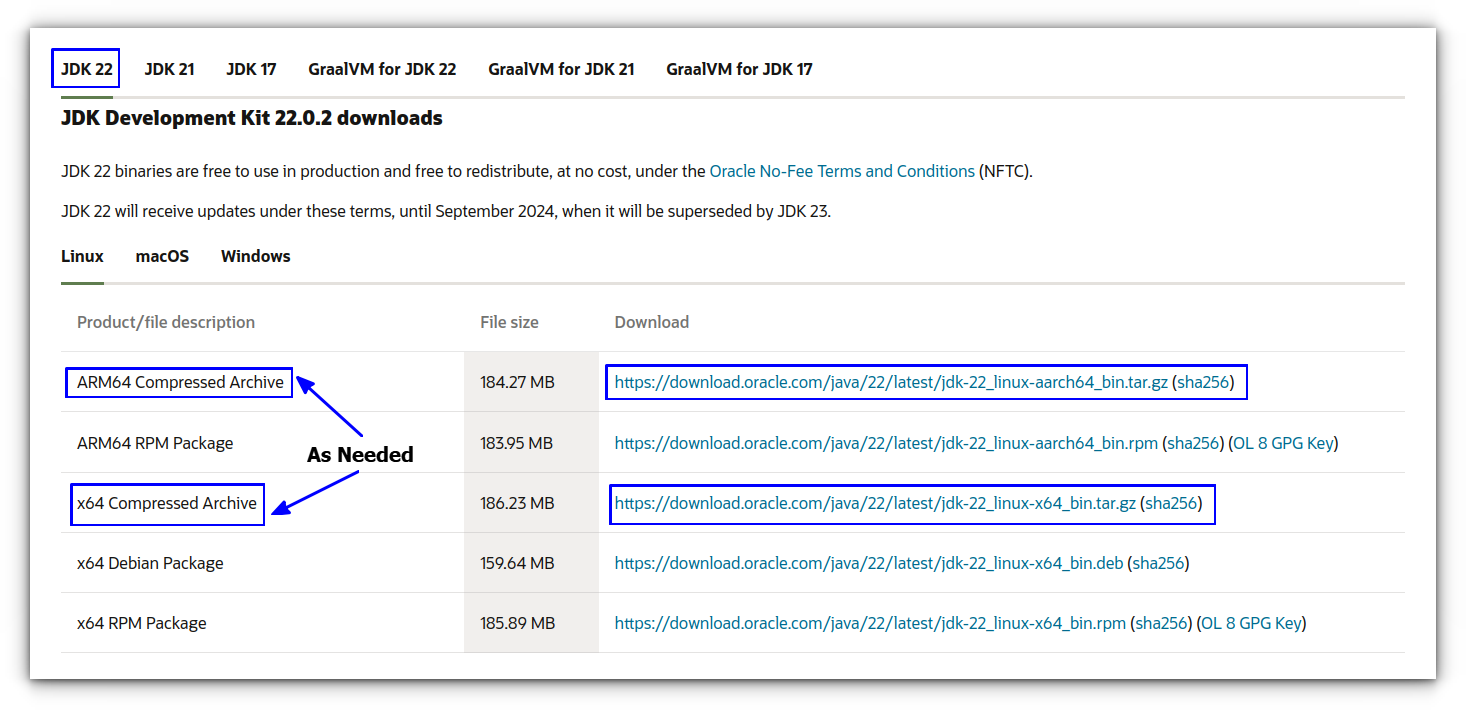
You may need to accept license when prompted.
Now, I am going to install Java to the /opt directory. Here, I need root permission. First, move the file from the downloaded directory to the required installation directory.
sudo mv /home/team/Downloads/jdk-22_linux-x64_bin.tar.gz /opt
Now, go inside the directory and extract the tarball.
sudo tar zxvf jdk-22_linux-x64_bin.tar.gz
This will extract the files to the /opt directory. To use the Java components, you can use:
/opt/jdk-22.0.2/bin/java --version
Keep care when you add this directory to your path. It may impact your other Java installations. Do it only if you know what you are doing.
Wrapping Up
If you are into Java, C++, or PHP programming, you may need to install Eclipse IDE.
 Abhishek Prakash
Running Java programs in an IDE? Here's how you can set JAVA_HOME variable correctly.
Abhishek Prakash
Now that you learned to install Java on Ubuntu, you may want to improve your Java skills. I suggest trying the interactive Java Tutorial by CodeGym. It’s a fun and engaging way to learn Java.
Any questions or suggestions are always welcome.
If this helped you, consider supporting It's FOSS
It's FOSS has been helping people use Linux for the past 14 years. Help us stay independent from big tech. Become a Plus member, enjoy ad-free reading and get 5 eBooks.
