
This tutorial presents two ways to install MongoDB on Ubuntu and Ubuntu-based Linux distributions.
MongoDB is an increasingly popular free and open-source NoSQL database that stores data in collections of JSON-like, flexible documents, in contrast to the usual table approach you’ll find in SQL databases.
You are most likely to find MongoDB used in modern web applications. Its document model makes it very intuitive to access and handle with various programming languages.

In this article, I’ll cover two ways you can install MongoDB on your Ubuntu system.
Installing MongoDB on Ubuntu based Distributions
- Install MongoDB using Ubuntu’s repository. Easy but not the latest version of MongoDB
- Install MongoDB using its official repository. Slightly complicated but you get the latest version of MongoDB.
The first installation method is easier, but I recommend the second method if you plan on using the latest release with official support.
Some people might prefer using snap packages. There are snaps available in the Ubuntu Software Center, but I wouldn’t recommend using them; they’re outdated at the moment and I won’t be covering that.
Method 1. Install MongoDB from Ubuntu Repository
This is the easy way to install MongoDB on your system, you only need to type in a simple command.
Installing MongoDB
First, make sure your packages are up-to-date. Open up a terminal and type:
sudo apt update && sudo apt upgrade -y
Go ahead and install MongoDB with:
sudo apt install mongodb
That’s it! MongoDB is now installed on your machine.
The MongoDB service should automatically be started on install, but to check the status type
sudo systemctl status mongodb
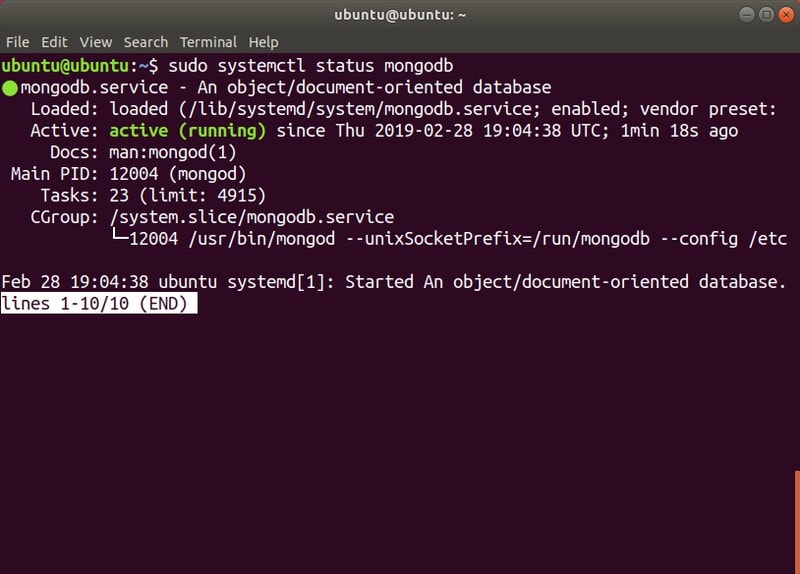
You can see that the service is active.
Running MongoDB
MongoDB is currently a systemd service, so we’ll use systemctl to check and modify it’s state, using the following commands:
sudo systemctl status mongodb
sudo systemctl stop mongodb
sudo systemctl start mongodb
sudo systemctl restart mongodb
You can also change if MongoDB automatically starts when the system starts up (default: enabled):
sudo systemctl disable mongodb
sudo systemctl enable mongodb
To start working with (creating and editing) databases, type:
mongo
This will start up the mongo shell. Please check out the manual for detailed information on the available queries and options.
Note: Depending on how you plan to use MongoDB, you might need to adjust your Firewall. That’s unfortunately more involved than what I can cover here and depends on your configuration.
Uninstall MongoDB
If you installed MongoDB from the Ubuntu Repository and want to uninstall it (maybe to install using the officially supported way), type:
sudo systemctl stop mongodb
sudo apt purge mongodb
sudo apt autoremove
This should completely get rid of your MongoDB install. Make sure to
Method 2. Install MongoDB Community Edition on Ubuntu
This is the way the recommended way to install MongoDB, using the package manager. You’ll have to type a few more commands and it might be intimidating if you are newer to the Linux world.
But there’s nothing to be afraid of! We’ll go through the installation process step by step.
Installing MongoDB
The package maintained by MongoDB Inc. is called mongodb-org, not mongodb (this is the name of the package in the Ubuntu Repository). Make sure mongodb is not installed on your system before applying this steps. The packages will conflict. Let’s get to it!
First, we’ll have to import the public key:
sudo apt-key adv --keyserver hkp://keyserver.ubuntu.com:80 --recv 9DA31620334BD75D9DCB49F368818C72E52529D4
Now, you need to add a new repository in your sources list so that you can install MongoDB Community Edition and also get automatic updates:
echo "deb [ arch=amd64 ] https://repo.mongodb.org/apt/ubuntu $(lsb_release -cs)/mongodb-org/4.0 multiverse" | sudo tee /etc/apt/sources.list.d/mongodb-org-4.0.list
To be able to install
sudo apt update
Now you can ether install the latest stable version of MongoDB:
sudo apt install -y mongodb-org
or a specific version (change the version number after equal sign)
sudo apt install -y mongodb-org=4.0.6 mongodb-org-server=4.0.6 mongodb-org-shell=4.0.6 mongodb-org-mongos=4.0.6 mongodb-org-tools=4.0.6
If you choose to install a specific version, make sure you change the version number everywhere. If you only change it in the mongodb-org=4.0.6 part, the latest version will be installed.
By default, when updating using the package manager (apt-get), MongoDB will be updated to the newest updated version. To stop that from happening (and freezing to the installed version), use:
echo "mongodb-org hold" | sudo dpkg --set-selections
echo "mongodb-org-server hold" | sudo dpkg --set-selections
echo "mongodb-org-shell hold" | sudo dpkg --set-selections
echo "mongodb-org-mongos hold" | sudo dpkg --set-selections
echo "mongodb-org-tools hold" | sudo dpkg --set-selections
You have now successfully installed MongoDB!
Configuring MongoDB
By default, the package manager will create /var/lib/
I won’t go into changing these default settings since that is beyond the scope of this guide. You can check out the manual for detailed information.
The settings in /etc/mongod.conf are applied when starting/restarting the mongodb service instance.
Running MongoDB
To start the mongodb daemonmongod, type:
sudo service mongod start
Now you should verify that the
sudo cat /var/log/mongodb/mongod.log
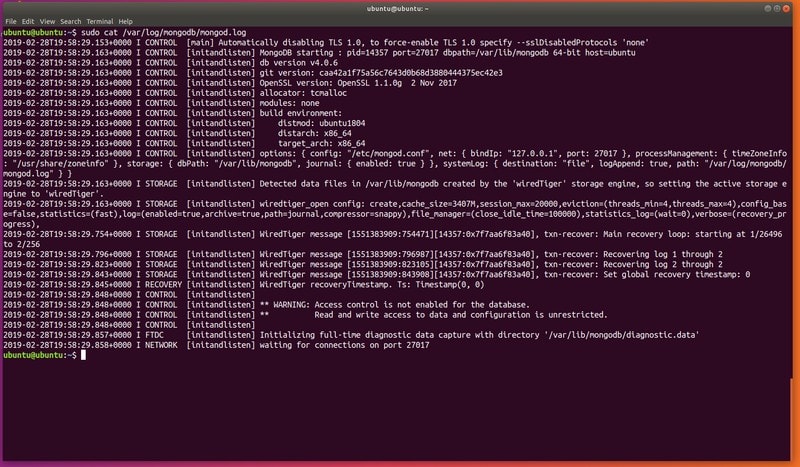
As long as you get this: [initandlisten] waiting for connections on port 27017 somewhere in there, the process is running properly.
Note: 27017 is the default port of mongod.
To stop/restart mongod enter:
sudo service mongod stop
sudo service mongod restart
Now, you can use MongoDB by opening the mongo shell:
mongo
Uninstall MongoDB
Run the following commands
sudo service mongod stop
sudo apt purge mongodb-org*
To remove the databases and log files (make sure to backup what you want to keep!):
sudo rm -r /var/log/mongodb
sudo rm -r /var/lib/mongodb
Wrapping Up
MongoDB is a great NoSQL database, easy to integrate
