

Halloween is here. Some people carve pumpkins, I crafted a special set up for my Arch Linux 🎃
In this tutorial, I'll share with you all the steps I took to give a Halloween-inspired dark, spooky makeover with Hyprland. Since it is Hyprland, you can relatively easily replicate the setup by getting the dot files from our GitHub repository.
If videos are your thing, you can watch all the steps in action in this video on our YouTube channel.
Step 1: Install Hyprland and necessary packages
First, install all the essential Hyprland packages to get the system up and running:
sudo pacman -S hyprland xdg-desktop-portal-hyprland hyprpolkitagent kitty
The above will install Hyprland and necessary packages. Now, install other utility packages.
sudo pacman -S hyprpaper hyprpicker hyprlock waybar wofi dunst fastfetch bat eza starship nautilus
What do these packages do? Well, here are some info:
hyprpaper: Hyprland Wallpaper utilityhyprpicker: Color pickerhyprlock: Lock screen utilitywaybar: Waybar is a Wayland panelwofi: Rofi launcher alternative, but for Wayland. Rofi can be used. In fact, we have some preset config for Rofi in our GitHub repository. But Wofi was selected for this video.dunst: Notification daemon.fastfetch: fastfetch is a system information display utility.bat: Modern alternative forcatcommand.eza: Modernlscommand alternativestarship: Starship is a prompt customization tool.nautilus: Nautilus is the file manager from GNOME.
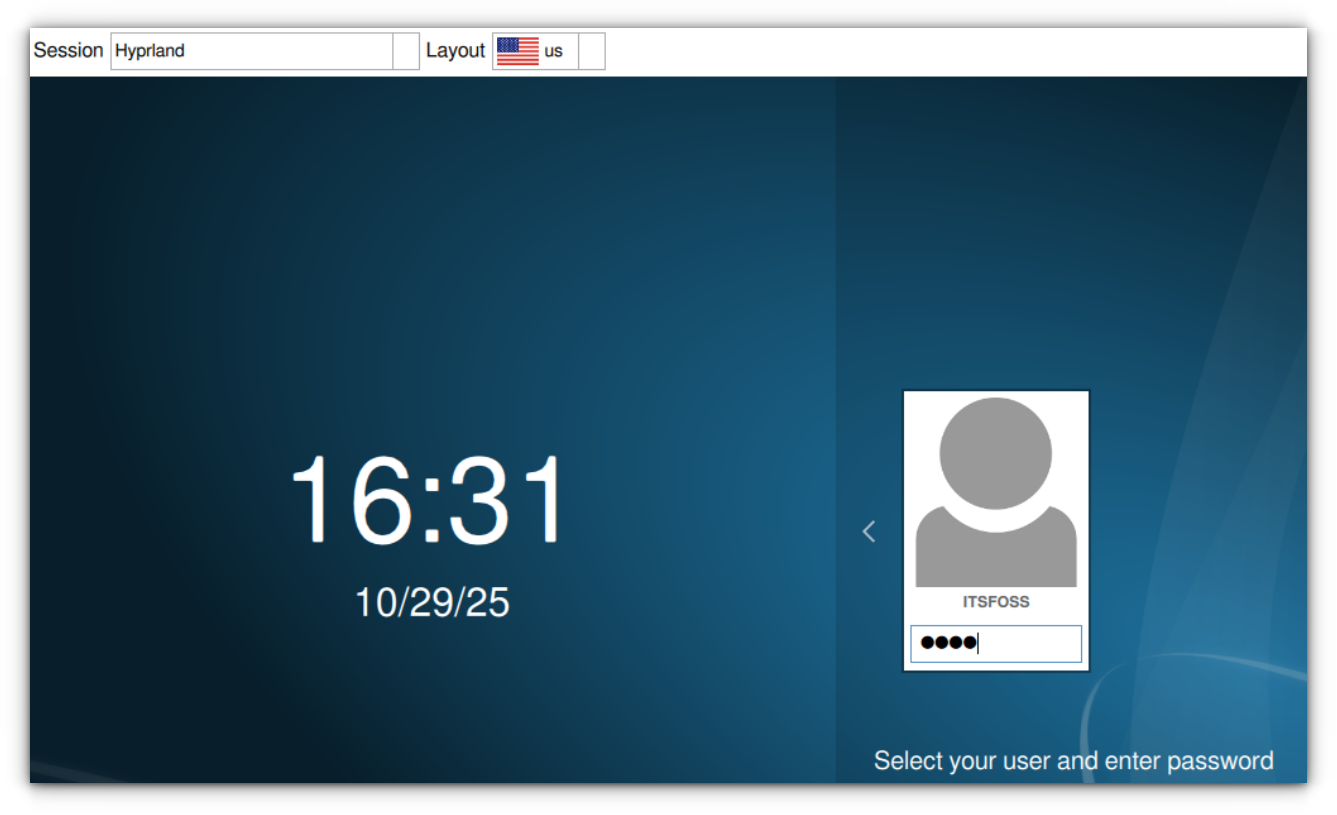
Step 2: Install and enable display manager
You need a display manager to login to the system. We use SDDM display manager. GDM also works fine with Hyprland.
sudo pacman -S sddm
Once SDDM package is installed, enable the display manager on boot time.
sudo systemctl enable sddm.service

Now, reboot the system. When login prompt appears, login to the system.
Step 3: Install other utility packages
Once essential Hyprland packages are installed and you are logged in, open a terminal in Hyprland using Super + Q. Now install Firefox browser using:
sudo pacman -S firefox
It's time to install theme packages. Hyprland is not a desktop environment in the sense of what GNOME or KDE is. Yet you may still use some apps developed for GNOME (GTK apps) or Qt apps.
To theme, you need to install theme managers for respective system:
nwg-look: To apply theme to GTK apps.qt5ct: To apply theme to Qt5 apps.
Install these packages using the command:
sudo pacman -S qt5ct nwg-look
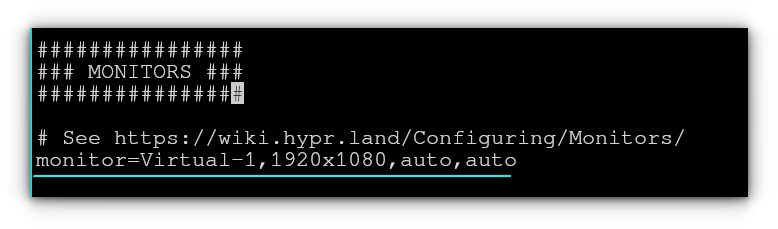
nano to edit file in terminal.Step 4: Change the monitor settings
In most cases, Hyprland should recognize the monitor and load accordingly. But in case you are running it in a VM, it will not set the display size properly.
Even though we give full configuration at a later stage, if you want to fix the monitor, use the command:
monitor=<Monitor-name>,1920x1080,auto,auto
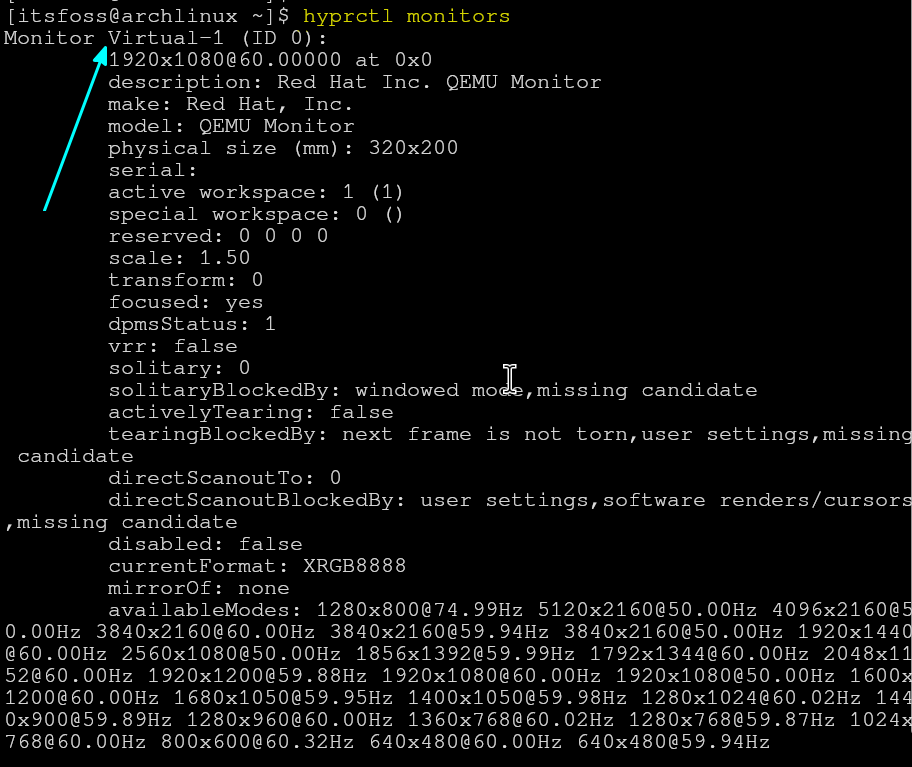
It is important to get the name of the monitor. Use this command:
hyprctl monitors
Remember the name of your monitor.
Step 5: Download our custom Hyprland dot files
Go to It's FOSS GitHub page and download the text-script-files repository.
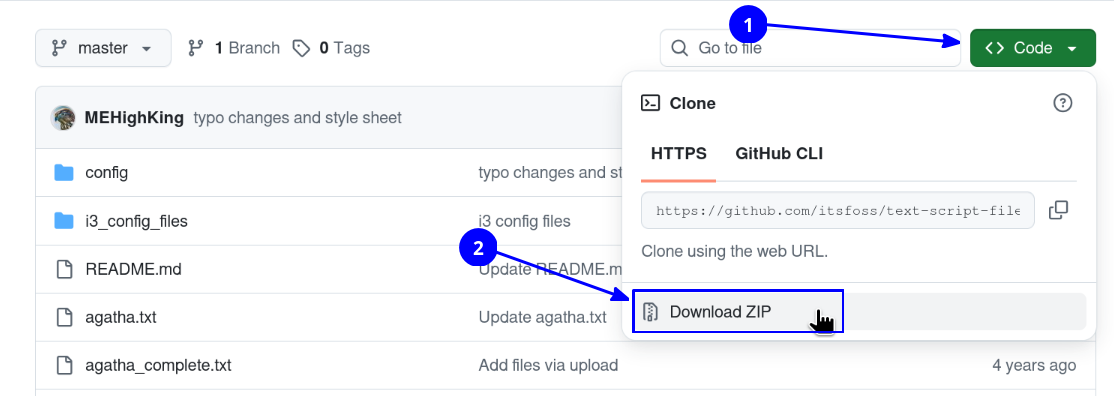
You can also clone the repo, if you want using the command:
git clone https://github.com/itsfoss/text-script-files.git
But the above needs git installed.
If you have downloaded the zip file, extract the archive file. Inside that, you will find a directory config/halloween-hyprland. This is what we need in this article.
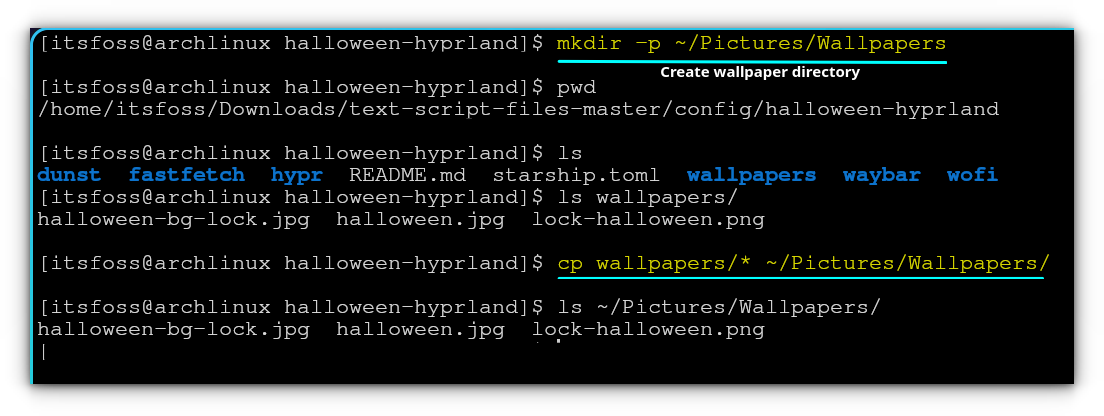
Step 6: Copy wallpaper to directory
Copy the images in the wallpapers folder to a directory called ~/Pictures/Wallpapers. Create it if it does not exist, of course.
mkdir -p ~/Pictures/Wallpapers
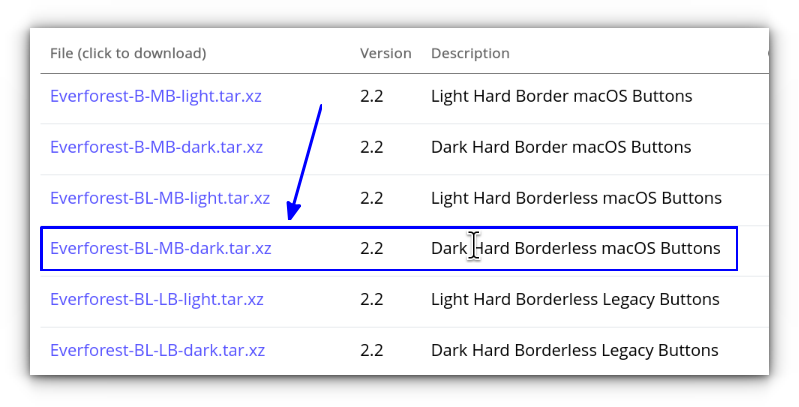
Step 7: Download GTK theme, icons and fonts
Download the Everforest GTK theme dark borderless macOS buttons.
Download Dominus Funeral icon theme dark style.
Download the "Creepster" font from Google Fonts website.
Next, create ~/.themes, ~/.icons, and ~/.fonts respectively:
mkdir -p ~/.themes ~/.icons ~/.fonts
And we need to paste theme, icon, and font files in their respective locations:
- Extract the "Creepster" font file and place it at
~/.fonts. - Extract the theme file and paste it at
~/.themes. - Extract the icon file and paste it at
~/.icons
Step 8: Install other nerd fonts
Install Nerd fonts like:
- Firacode Mono Nerd Font and Caskaydia Nerd font: Download from Nerd Fonts website.
- Font awesome free desktop fonts
- JetBrains Mono
If you are in Arch Linux, open a terminal and run the command:
sudo pacman -S ttf-firacode-nerd ttf-cascadia-code-nerd ttf-cascadia-mono-nerd woff2-font-awesome ttf-jetbrains-mono
Step 9: Verify Waybar and Hyprland config
Open the config.jsonc file on the downloaded directory and replace any occurrence of Virtual-1 with your monitor name.
For GNOME Box VM, it is Virtual-1. On my main system, I have two monitors connected. So, the names for my monitors are HDMI-A-1 and HDMI-A-2. Note the name of the monitors as we saw in Step 4:
hyprctl monitorsNow in the Waybar config, change the monitor name from Virtual-1 to the name of your monitor. Change all such occurrences.
Virtual-1 and replace it with your monitor name. If you are using nano, follow this guide to learn search and replace in nano editor.Also, take a look at the panel item. If you see any item that is not needed in the panel, you can remove it from the [modules-<position>] part.
👉 Similarly, open the hyprland config in the downloaded directory. Change all reference to Virtual-1 to your monitor name. Similarly, replace monitor name in the hyprlock and hyprpaper config files.
Step 10: Copy and paste config files
Copy the following directories (in the downloaded GitHub files) and paste it to the ~/.config folder.
waybar: Waybar panel configs and styles.wofi: Application launcher configdunst: Customized dunst notification system.starship.toml: Customized starship prompt.
If you are using a GUI file manager, copy all file/folders except hypr, wallpaper, and README.

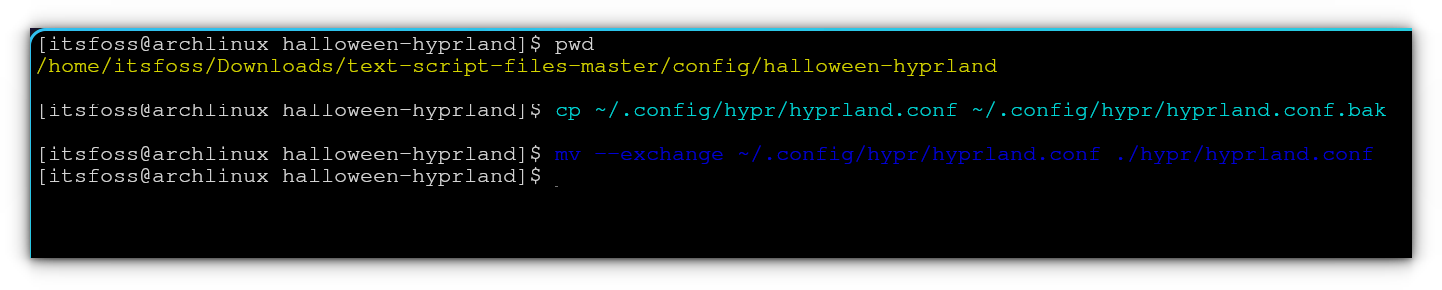
Step 11: Replace Hyprland config
We did not copy hypr folder, because there is already a folder called hypr in every Hyprland system, which contains the minimal config.
I don't want to make it vanish. Instead, keep it as a backup.
cp ~/.config/hypr/hyprland.conf ~/.config/hypr/hyprland.conf.bak
Now, exchange the content of the hyprland.conf in your system with the customized content. Luckily, the mv command has a convenient option called -exchange.
mv --exchange ~/.config/hypr/hyprland.conf /path/to/new/hyprland/config
Step 12: Paste hyprlock and hyprpaper configs
Now, copy the hyprlock.conf and hyprpaper.conf file to ~/.config/hypr directory.

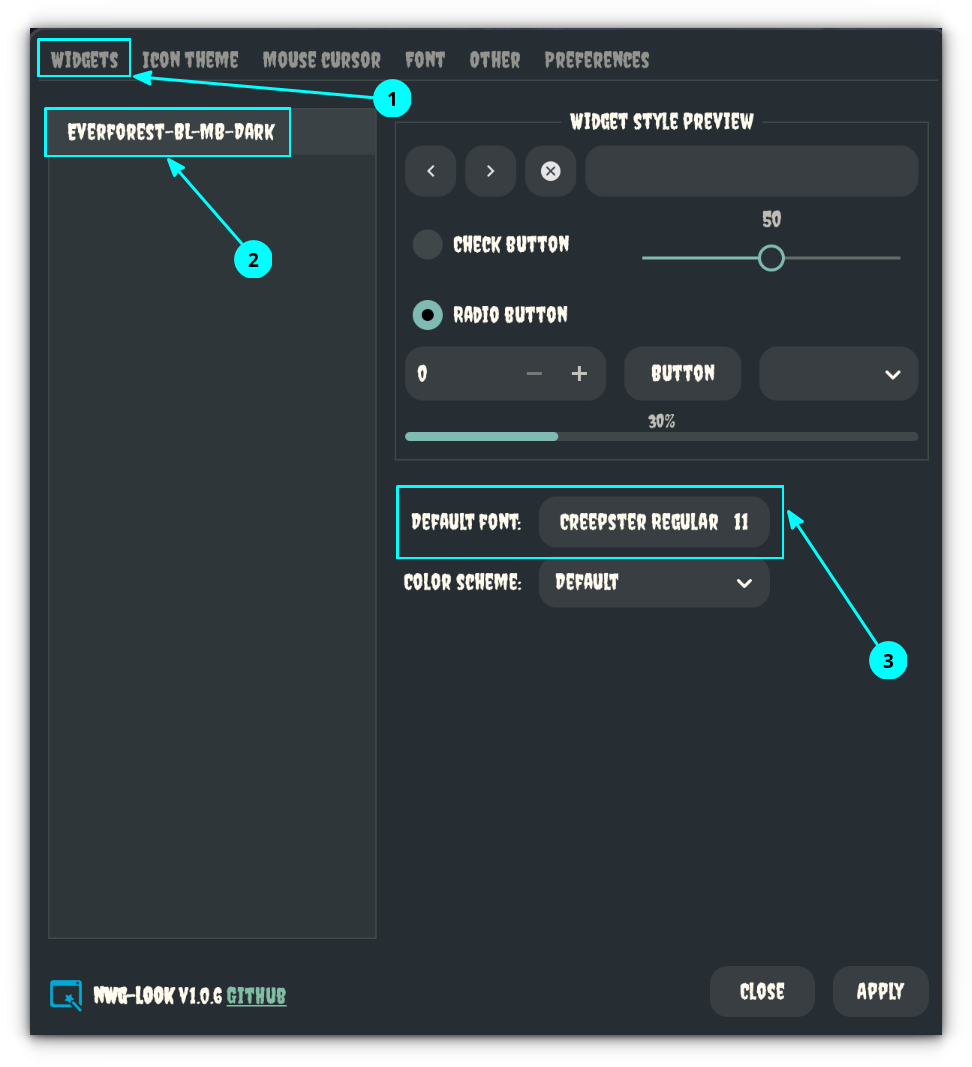
Step 13: Change themes
Open the NWG-Look app and set the GTK theme and font (Creepster font) for GTK apps:
Now, change icon theme:
This app automatically adds necessary file links in the ~/.config/gtk-4.0. Thanks to this feature, you don't need to apply theme manually to the GTK4 apps.
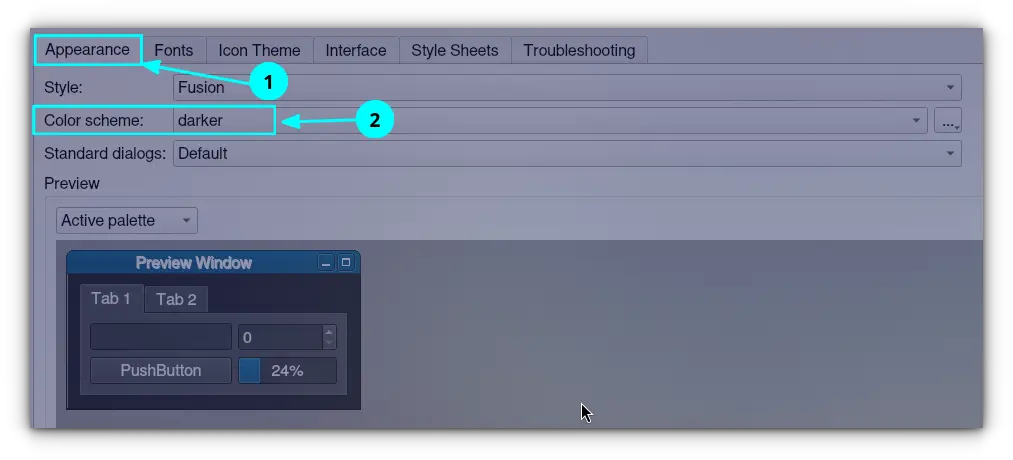
Open the Qt5ct app and change the theme to darker.
Now, apply icon theme:
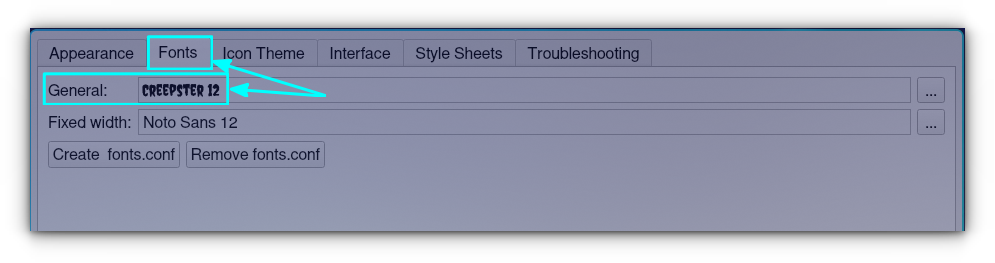
And change the normal font to "Creepster":
Step 14: Set Starship and aliases
First, paste some cool command aliases for the normal ls and cat command, using the modern alternatives eza and bat respectively. This is optional, of course.
Open ~/.bashrc in any editor and paste these lines at the bottom of this file:
alias ls='eza -lG --color always --icons'
alias la='eza -alG --color always --icons'
alias cat='bat --color always --theme="Dracula"'
Now, to enable Starship prompt, paste the starship eval line to the ~/.bashrc and source the config.
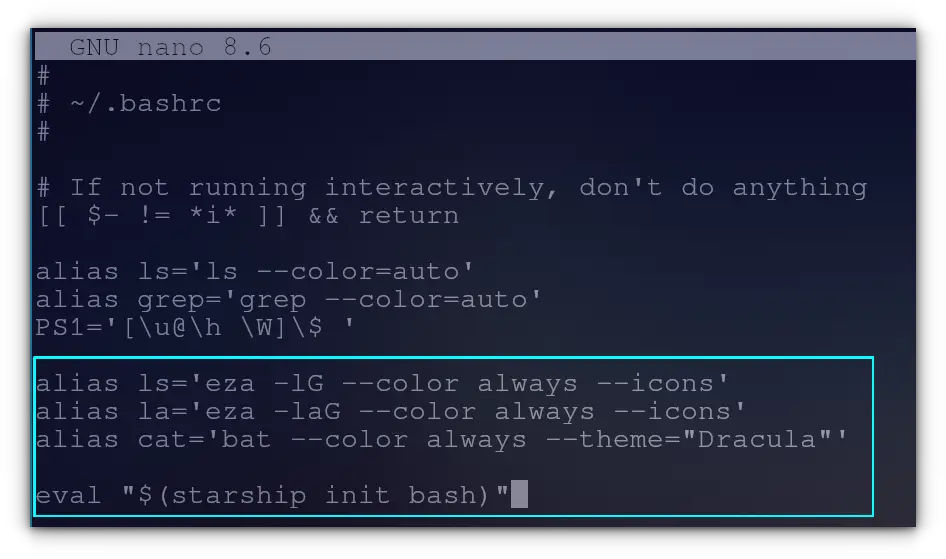
eval "$(starship init bash)"

source ~/.bashrc
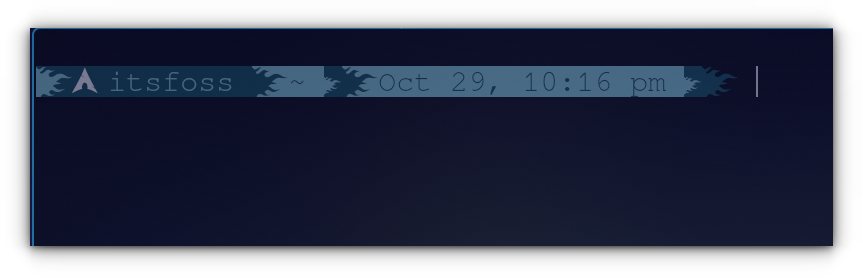
Once all this is done, restart the system, and log back in to see the Halloween themed Hyprland.
Hyprland Halloween Makeover
Enjoy the spooky Hyprland set up. Happy Halloween 🎃
