


GnuPG, popularly known as GPG, is an extremely versatile tool, being widely used as the industry standard for encryption of things like emails, messages, files, or just anything you need to send to someone securely.
It’s easy to get started with GPG, and you can be on your way with using it in a matter of minutes.
In this tutorial, I’ll show you how to encrypt and decrypt files with GPG.
Read the entire tutorial first and then start doing it on your own.
What are GPG Keys?
To start using GPG, you’ll first need to have a GPG key.
A GPG key is what you’ll use to encrypt (or decrypt) files later in the tutorial. It’s also what is used to identity you, with things like your name and email being tied to the key as well.
GPG keys work by using two files, a private key and a public key. These two keys are tied to each other, and are both needed to use all of GPG’s functionality, notably encrypting and decrypting files.
The private key is meant to be stored in a fashion stated directly in its name – privately, and not given out to anyone.
The public key, on the other hand, is meant to be given to others, or anyone you want to be able to communicate with.
How GPG Encryption Work?
As said above, GPG encryption utilizes both the public and private keys, an asymmetric encryption technique. It allows you to encrypt files locally and then allows others to be ensured that the files they received were actually sent from you.
When you intend to encrypt a file using GPG, you will use the Public key of the person to whom you intend to send the file. Then, the receiver can decrypt that file using his private key. Let us go in a bit of detail.
You now know that GPG works with the public-private key pair. While you create a key on your system, it generates the public and private key. When a file is encrypted using your public key, only your associated private key can decrypt it. Not even your Public key, the one used to encrypt that file, can decrypt it.
So, let’s say a person called Sender wants to encrypt a file and send it to another person called Receiver.
- Sender will ask the Receiver to send his public key to him.
- Receiver will send his public key to the Sender. This can be either by email or through any public key server like https://keyserver.ubuntu.com/
- When Sender gets the public key of the Receiver, he/she encrypts the file that needs to be transmitted with the Receiver’s public key.
- The file is now transmitted to the Receiver.
- Once Receiver gets the encrypted file, he/she will decrypt the file using his/her Private Key. This is possible because the file was encrypted using the Receiver’s public key.
- Thus, the communication is completed securely, without any other person decrypting the message.
Here's an illustration to describe the process:
Encrypt and Decrypt Files using GPG Keys
Why You Should Never Encrypt Files with your Private Key?
You should NEVER encrypt a file using your private key. This is because, if you encrypt the file using your private key, then the only key that can decrypt that file is your public key. As the name suggests, a Public key is meant to be shared with others or added to public key servers. Thus, in essence, anybody, who has access to your public key, can decrypt your data.
This is not acceptable, since you encrypt a file only to be decrypted by the receiver, and that’s the point of encryption in the first place.
You are already using GPG without realizing
One of the most common examples of using GPG is in the Linux package manager, specially the external repositories. You add the public key of the developer into your system’s trusted keys. The developer signs the packages (generates a signature) with his/her private key. Since your Linux system has the public file, it understands that the package is actually coming from the trusted developer.
A number of encrypted services use some sort of GPG implementation underneath without you realizing it. But it’s better to not go into those details right now.
Now that you are a bit familiar with the concept, let’s see how you can use GPG for encrypting a file and then use it to decrypt.
Encrypting and decrypting files with GPG
This is a very simplistic scenario. Here, we presume that, you have two systems, with public-private key pairs. You want to encrypt a file and then decrypt on the other system.
Step 1: Installing GPG
Firstly, you need to install GPG on both systems. GPG can be found in most distribution’s repositories out of the box.
On Debian and Ubuntu-based systems, install the gpg package:
sudo apt install gpgIf you use Arch-based distributions, install the gnupg package with the pacman command:
sudo pacman -S gnupgStep 2: Generating a GPG key
Generating a GPG key on your system is a simple one-command procedure.
Just run the following command, and your key will be generated. You can use the defaults for most questions as shown below.
gpg --full-generate-key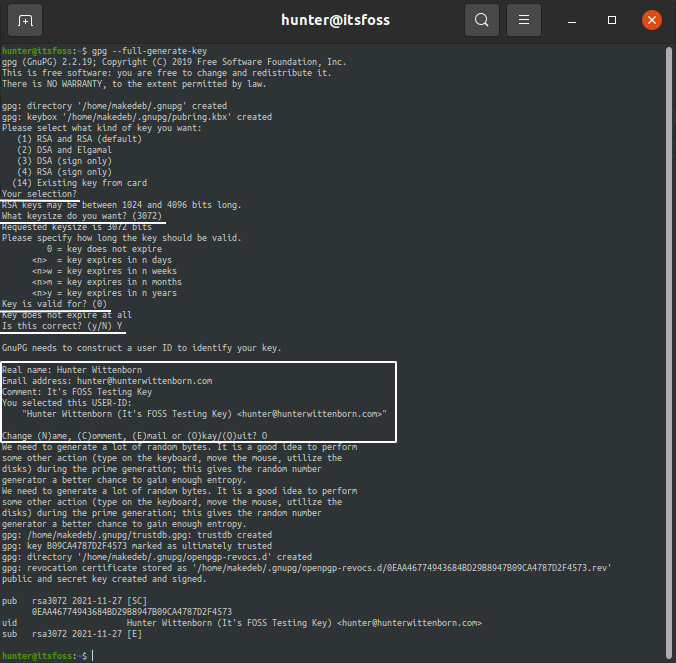
Checking the GPG Key
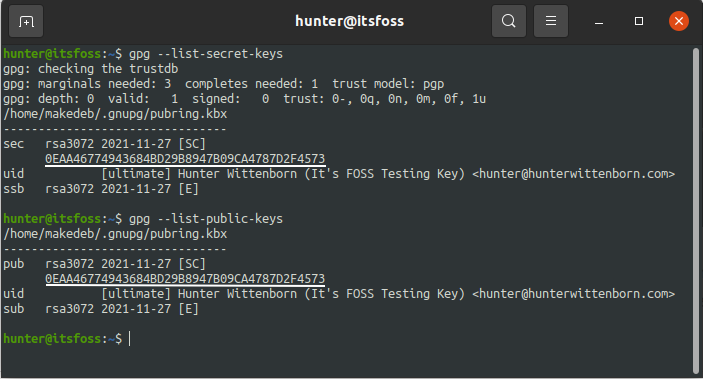
You can then see that the private key and public key are both tied to each other by that ID shown under pub by using the –list-secret-keys and –list-public-keys commands respectively:
You should do this on both the systems you want to communicate with.
Step 3: Receiving the Public Key of the Receiver
To encrypt the file, you need the Public key of the receiver. So, for simplicity, the receiver can send his public key as a text file to you.
For this, the receiver should export his public key to an ASCII armored format. You can use the command below.
gpg --output sample.gpg --export --armor [email protected]Here, [email protected] is the email address used for the key pair of the receiver.
It will create an ASCII armored file called sample.gpg (with the --armor option), which is easier to send to other people.
Now, the receiver can send the file to the sender using email, or other means.
Step 4: Import the Public key of the Receiver
Once you receive the public key of the receiver, you should import it to your system. This is to make sure that, the key is accessible, and you can encrypt data using that key.
To import the key, go to the directory where you downloaded the file and just run:
gpg --import sample.gpg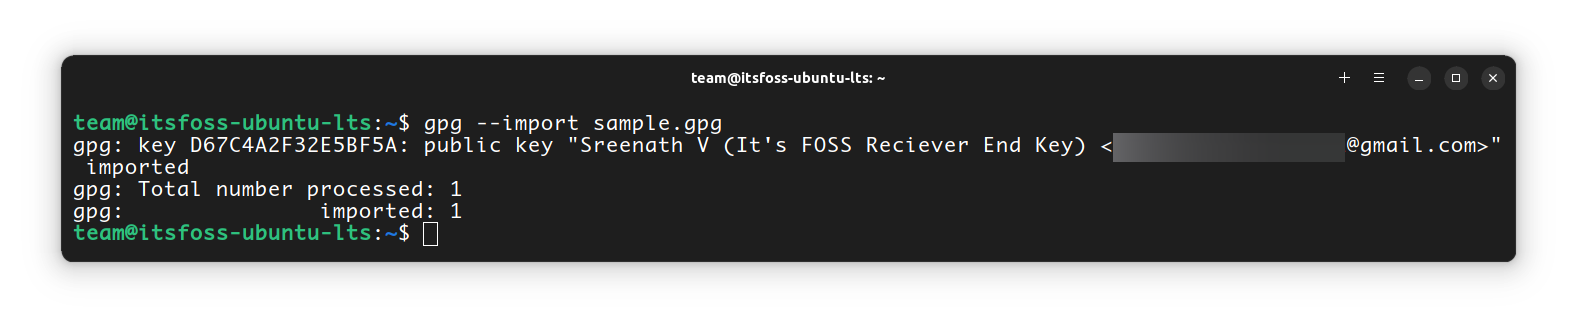
Step 4: Verify the Fingerprint of the Key
Are you sure the key you got is from the right person you want to communicate with? What if it was a wrong key so that you encrypted the data, only to be decrypted by an unexpected person? To avoid this, you should make sure that the key you got is from the person that you aim to communicate with.
GPG Fingerprint is used to verify the authenticity of the key. Once you receive the key, first, list the keys:
gpg --list-keys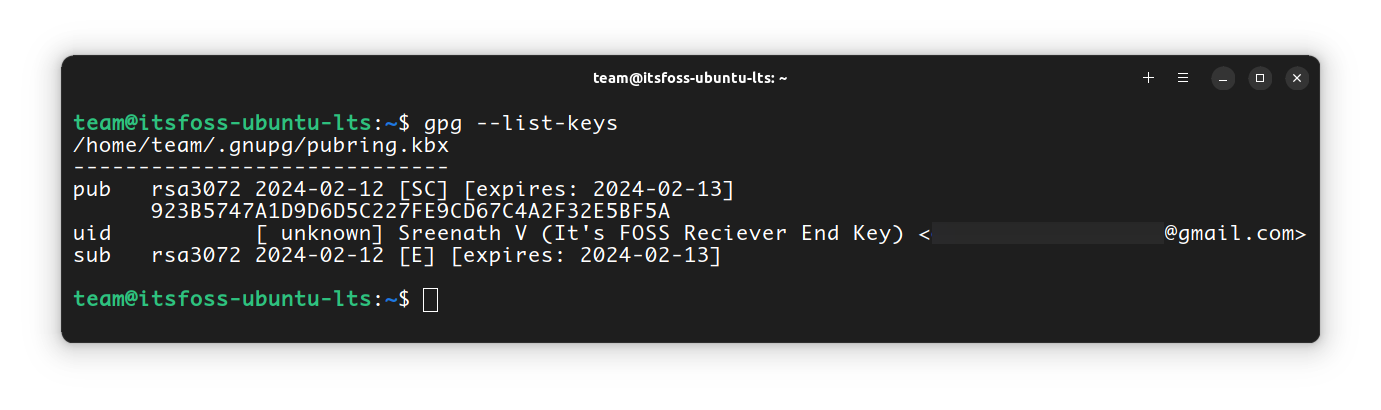
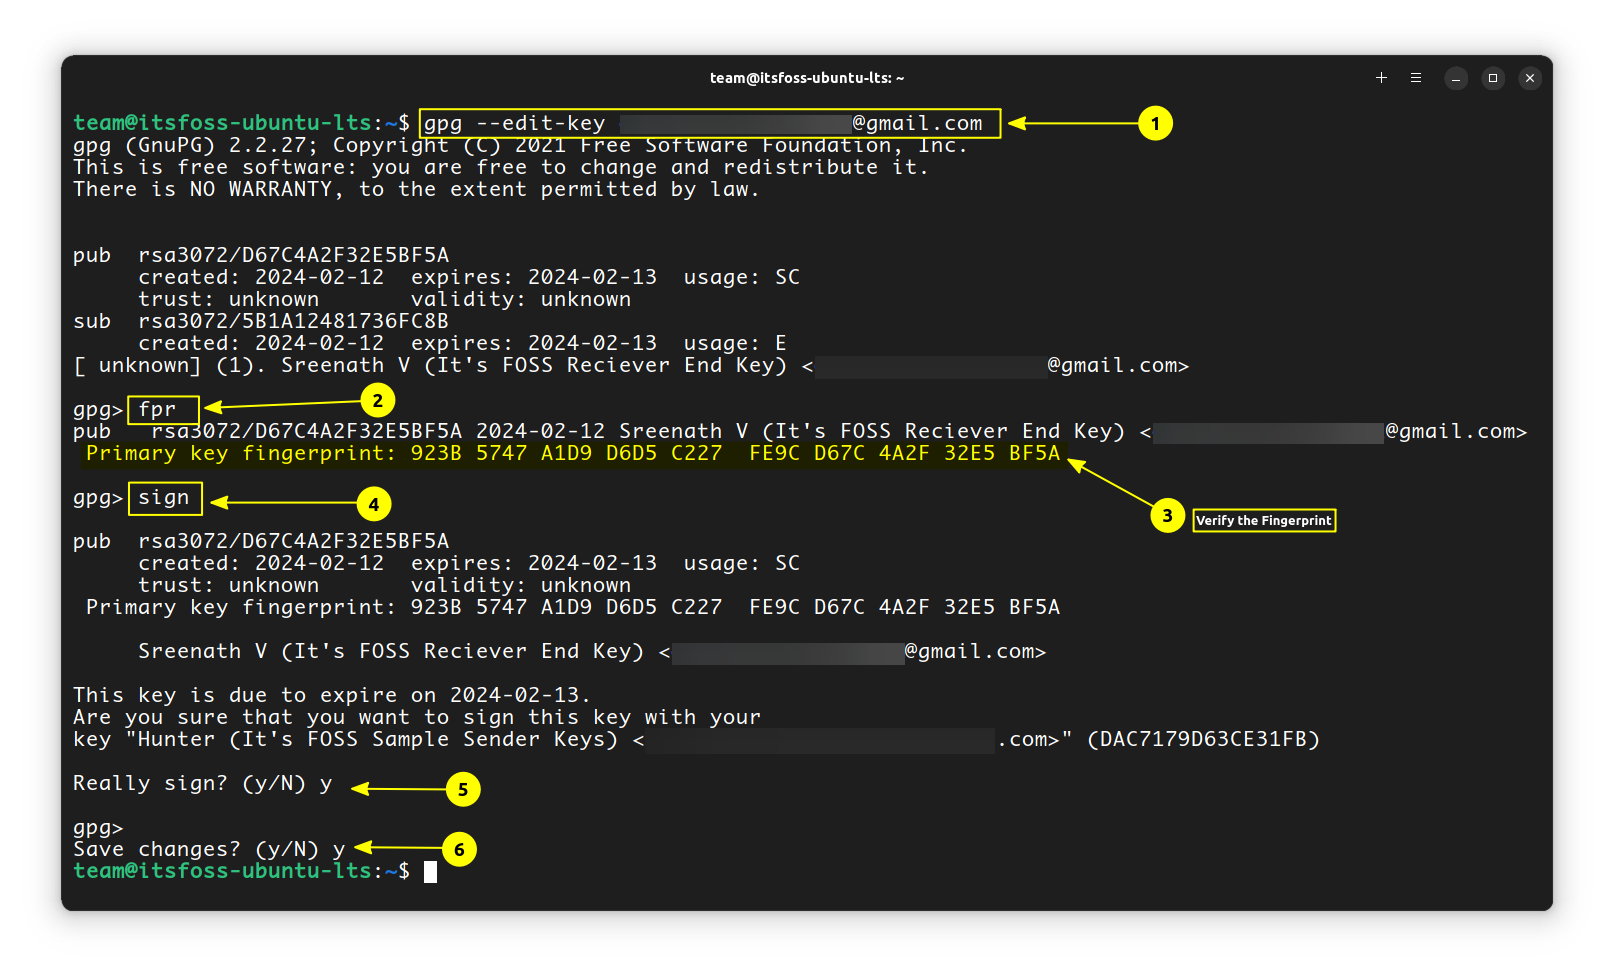
Now, from the list of public keys, note the one that is from the receiver. To start to verify the key, run the gpg command with the --edit-key option on the sender’s system.
gpg --edit-key [email protected]This will enter you into a command> prompt. Here, run the fpr command, which will show the fingerprint for the key.
fprIt will print a fingerprint of the key. This should be validated against the output on the other machine (sender and receiver), which can be found by running the same --edit-key command on that system.
You can verify it by calling the sender or by some other authentic means to verify the identity of the receiver.
Once you found the fingerprint are matching, on the same command prompt, enter:
signIt will ask you to confirm with a passphrase. Do it and you are ok to go. You can exit the prompt using CTRL+D. Press y to save changes and exit.
Step 5: Encrypt the File
Now that you’ve set up the GPG keys, you can start encrypting our files! Let’s say document.txt is the name of or file, that needs to be encrypted.
Use the following command to encrypt files:
gpg --output document.txt.gpg --encrypt --recipient [email protected] document.txtLet’s go over what that command does very quick:
First, you specified --output file.gpg. This can be anything, though it’s typically the name of the file you’re encrypting plus a .gpg extension (so document.txt would become document.txt.gpg).
Then, you specified the --encrypt option. This tells GPG that we’ll be encrypting a file.
Next, you type --recipient [email protected]. This specifies the email for a corresponding GPG key of the receiver, that you have received and imported earlier.

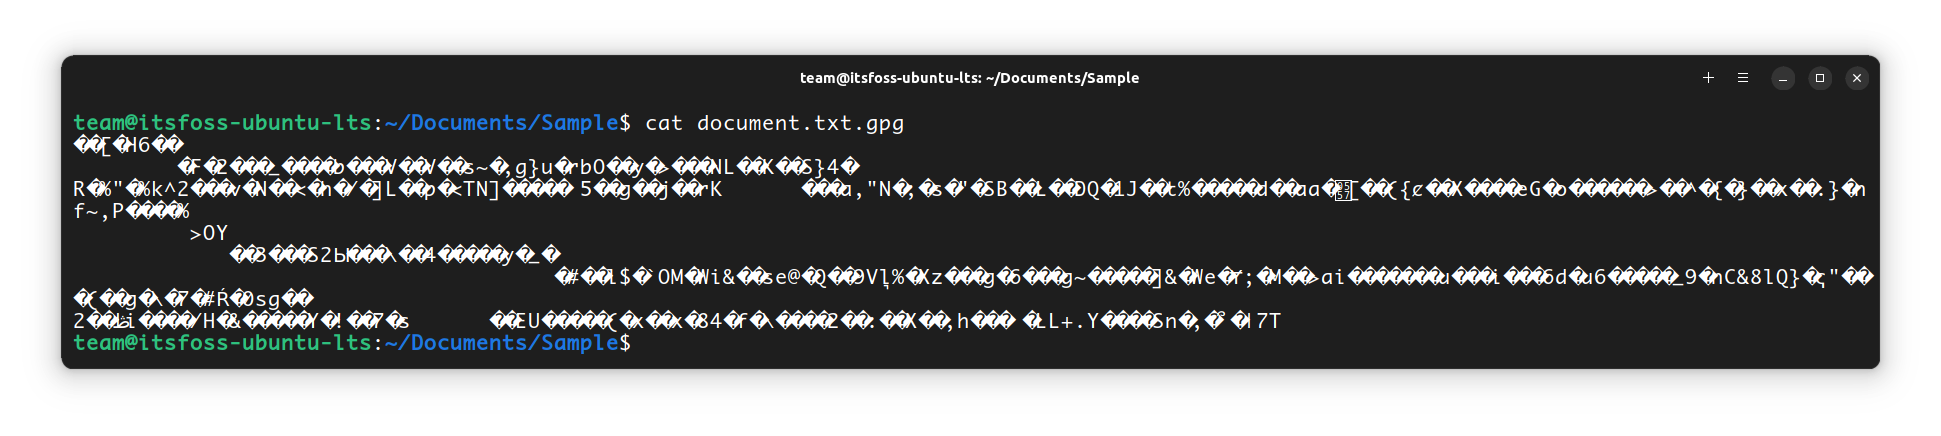
When you try to view the content of this encrypted file, it will be some gibberish.
Step 6: Send the Encrypted File
You can now send this file to the recipient through any means. Only the receiver, with his Private key can now decrypt this message.
Step 7: Decrypt the Message
On the receiver’s end, you have document.txt.gpg file, which is the encrypted file. To decrypt that file, you will run:
gpg --output document.txt --decrypt document.txt.gpg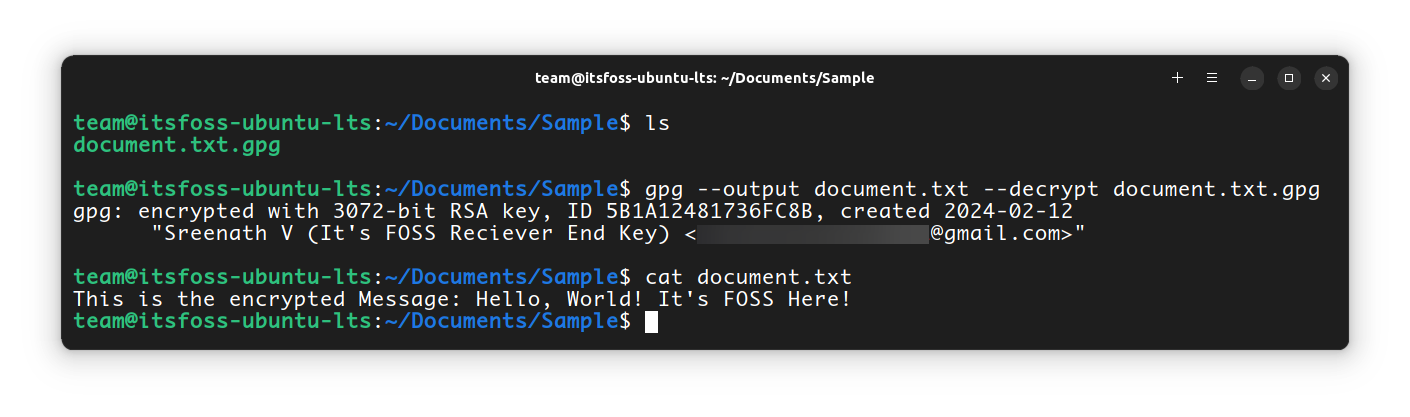
Going through the argument here, we first enter --output file, which tells GPG what file you’ll be saving the encrypted form of our file to after you decrypt it.
Then, we specify the option --decrypt, which tells GPG that you’re going to be decrypting a file.
Lastly, you enter file.gpg, which is just the path to your encrypted file.
What this means is, you are decrypting the document.txt.gpg file to the original document.txt using the private key of the receiver. It will ask for the password, that the receiver has set. Give it and you are done!
If you try to decrypt the document on the sender’s end itself, then you will get an error:
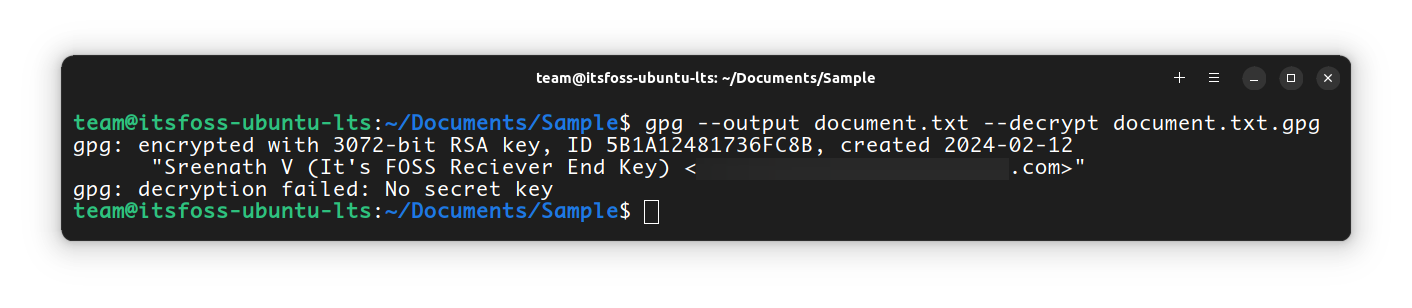
This is because the file was encrypted using the Receiver’s public key. So the only key, that can decrypt this data is the Receiver’s private key.
Encrypting and Decrypting for Self
If you want to encrypt and decrypt for yourself, you can do that as well. First, encrypt a file using:
gpg --output document.txt.gpg --encrypt --recipient [email protected] document.txt
Here, the [email protected] is the email address corresponding to the gpg key of your system. Now, to decrypt the same, you can use:
gpg --output document.txt --decrypt document.txt.gpgThis will ask for the passphrase. Give it and you are done.
Wrapping Up
You’ve now gone over everything you need to start using GPG. As I mentioned earlier, this is just for understanding how the GPG encryption and decryption process works. The basic GPG knowledge you just acquired can be taken to the next level when applied in real-world scenarios.
Need some help figuring out something still, or something just not working right? You are welcome to leave any of it in the comments below.
