

When I last installed Ubuntu, I made an ext4 partition of around 80 Gb in notebook’s HDD.
The problem arouse when I tried to copy something on this partition. I was simply not able to copy anything in it or create a new file.
Apparently, I did not have ‘write permission’ on the said partition.
In this tutorial I’ll show you how to set write permission on ext4 partition in Ubuntu, in the correct way. Let’ssee how to do it.
How to set write permission on ext4 partition in Ubuntu:
The tutorial is performed in Ubuntu and uses extensively command line. A little knowledge about file ownership in Linux system would be a plus. Even if you do not know, no worries. You can still follow the tutorial with ease. Just follow the steps below:
Step 1:
First this, you need to know the UUID of the ext4 partition. But before that it will be better to know the name of partition.
The name, in Ubuntu, would be like sdaX or something. To find that, use the following command in terminal (Ctrl+Alt+T):
sudo fdisk -lOutput of the command will look like this:
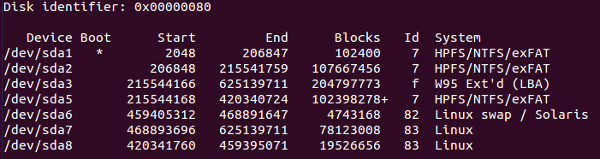
You can find the name of the partition from its size, given under the Blocks field (in bytes). So in the picture above 78123008 roughly amounts to 78 Gb and thus it tells me that the partition name is sda7.
Now when you have the name, you can find the UUID by using the following command:
sudo blkidOutput of the command looks like this:

As you can see, with the partition name, you can easily identify the UUID.
Step 2:
Once you have the UUID, the next step is to find out where is the partition mounted.
Usually the location of the ext4 mount is /media/<user_name>. Where user_name is your own username.
You can also use $USER variable. It automatically takes your username.
You can display the mounted partitions in the following manner:
ll /media/$USERThe output of the command for me was this:

Now you see why I took the trouble of finding the UUID. If you have several partition mounted, you need to distinguish between them.
You can also see that only root has write on the mounted ext4 partition. You need to change the write permission for this partition here.
Step 3:
Now the easiest option is to give the write access to everyone using the infamous chmod 777.
But again, you won’t want to do that as it will give write access to anyone. Avoid using chmod 777 as far as it is possible.
Now, if not chmod 777, then what else? The file has root as owner and root as the group. Even ‘admin’ comes under ‘other’ group here.
What you can do do here is to change the group ownership of the mounted drive to admin. The admin group is generally named adm. You can use the following command to change the group owner:
sudo chgrp adm /media/itsfoss/56d0c0ab-60a0-48bf-955d-bc2f283009b6Once you have changed the group, change the write permission for the group in the following manner:
sudo chmod g+w /media/itsfoss/56d0c0ab-60a0-48bf-955d-bc2f283009b6Voila! Now you can copy-paste and create new files in the ext4 partition without any hindrance. And with added security, non-admin users will not be able to do so.
This tutorial is similar to what you need to do in order to auto mount Windows partition in Ubuntu. Any questions or suggestions are always welcomed. :)
