

Large Language Models (LLMs) are powerful, but they have one major limitation: they rely solely on the knowledge they were trained on.
This means they lack real-time, domain-specific updates unless retrained, an expensive and impractical process. This is where Retrieval-Augmented Generation (RAG) comes in.
RAG allows an LLM to retrieve relevant external knowledge before generating a response, effectively giving it access to fresh, contextual, and specific information.
Imagine having an AI assistant that not only remembers general facts but can also refer to your PDFs, notes, or private data for more precise responses.
This article takes a deep dive into how RAG works, how LLMs are trained, and how we can use Ollama and Langchain to implement a local RAG system that fine-tunes an LLM’s responses by embedding and retrieving external knowledge dynamically.
By the end of this tutorial, we’ll build a PDF-based RAG project that allows users to upload documents and ask questions, with the model responding based on stored data.
What is Retrieval-Augmented Generation (RAG)?
RAG is an AI framework that improves LLM responses by integrating real-time information retrieval.
Instead of relying only on its training data, the LLM retrieves relevant documents from an external source (such as a vector database) before generating an answer.
How RAG works
- Query Input – The user submits a question.
- Document Retrieval – A search algorithm fetches relevant text chunks from a vector store.
- Contextual Response Generation – The retrieved text is fed into the LLM, guiding it to produce a more accurate and relevant answer.
- Final Output – The response, now grounded in the retrieved knowledge, is returned to the user.
Why use RAG instead of fine-tuning?
- No retraining required – Traditional fine-tuning demands a lot of GPU power and labeled datasets. RAG eliminates this need by retrieving data dynamically.
- Up-to-date knowledge – The model can refer to newly uploaded documents instead of relying on outdated training data.
- More accurate and domain-specific answers – Ideal for legal, medical, or research-related tasks where accuracy is crucial.
How LLMs are trained (and why RAG improves them)
Before diving into RAG, let’s understand how LLMs are trained:
- Pre-training – The model learns language patterns, facts, and reasoning from vast amounts of text (e.g., books, Wikipedia).
- Fine-tuning – It is further trained on specialized datasets for specific use cases (e.g., medical research, coding assistance).
- Inference – The trained model is deployed to answer user queries.
While fine-tuning is helpful, it has limitations:
- It is computationally expensive.
- It does not allow dynamic updates to knowledge.
- It may introduce biases if trained on limited datasets.
With RAG, we bypass these issues by allowing real-time retrieval from external sources, making LLMs far more adaptable.
Building a local RAG application with Ollama and Langchain
In this tutorial, we'll build a simple RAG-powered document retrieval app using LangChain, ChromaDB, and Ollama.
The app lets users upload PDFs, embed them in a vector database, and query for relevant information.
Installing dependencies
To avoid messing up our system packages, we’ll first create a Python virtual environment. This keeps our dependencies isolated and prevents conflicts with system-wide Python packages.
Navigate to your project directory and create a virtual environment:
cd ~/RAG-Tutorial
python3 -m venv venv
Now, activate the virtual environment:
source venv/bin/activateOnce activated, your terminal prompt should change to indicate that you are now inside the virtual environment.
With the virtual environment activated, install the necessary Python packages using requirements.txt:
pip install -r requirements.txt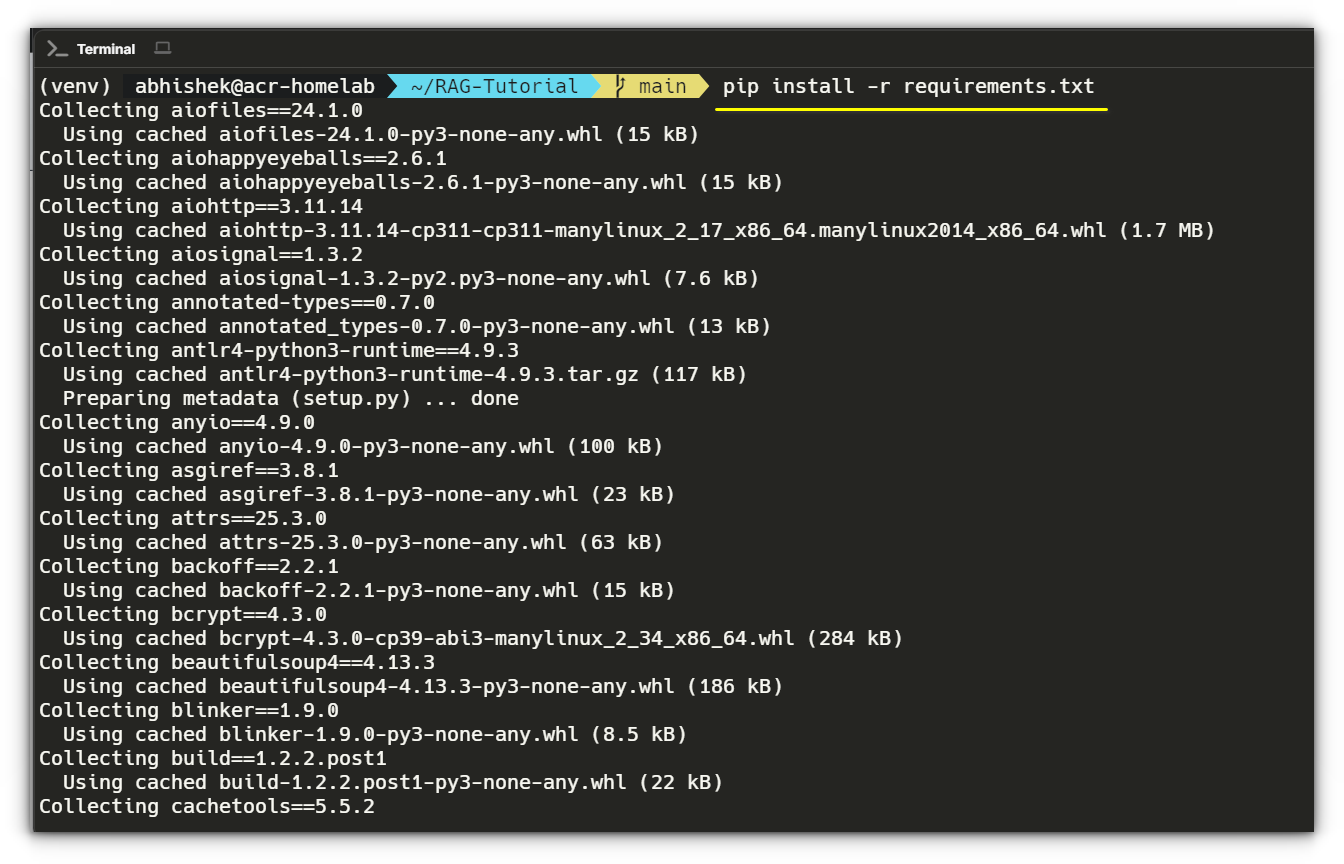
This will install all the required dependencies for our RAG pipeline, including Flask, LangChain, Ollama, and Pydantic.
Once installed, you’re all set to proceed with the next steps!
Project structure
Our project is structured as follows:
RAG-Tutorial/
│── app.py              # Main Flask server
│── embed.py            # Handles document embedding
│── query.py            # Handles querying the vector database
│── get_vector_db.py    # Manages ChromaDB instance
│── .env                # Stores environment variables
│── requirements.txt    # List of dependencies
└── _temp/              # Temporary storage for uploaded files
Step 1: Creating app.py (Flask API Server)
This script sets up a Flask server with two endpoints:
/embed– Uploads a PDF and stores its embeddings in ChromaDB./query– Accepts a user query and retrieves relevant text chunks from ChromaDB.route_embed(): Saves an uploaded file and embeds its contents in ChromaDB.route_query(): Accepts a query and retrieves relevant document chunks.
import os
from dotenv import load_dotenv
from flask import Flask, request, jsonify
from embed import embed
from query import query
from get_vector_db import get_vector_db

load_dotenv()
TEMP_FOLDER = os.getenv('TEMP_FOLDER', './_temp')
os.makedirs(TEMP_FOLDER, exist_ok=True)

app = Flask(__name__)

@app.route('/embed', methods=['POST'])
def route_embed():
    if 'file' not in request.files:
        return jsonify({"error": "No file part"}), 400
    file = request.files['file']
    if file.filename == '':
        return jsonify({"error": "No selected file"}), 400
    embedded = embed(file)
    return jsonify({"message": "File embedded successfully"}) if embedded else jsonify({"error": "Embedding failed"}), 400

@app.route('/query', methods=['POST'])
def route_query():
    data = request.get_json()
    response = query(data.get('query'))
    return jsonify({"message": response}) if response else jsonify({"error": "Query failed"}), 400

if __name__ == '__main__':
    app.run(host="0.0.0.0", port=8080, debug=True)
Step 2: Creating embed.py (embedding documents)
This file handles document processing, extracts text, and stores vector embeddings in ChromaDB.
allowed_file(): Ensures only PDFs are processed.save_file(): Saves the uploaded file temporarily.load_and_split_data(): UsesUnstructuredPDFLoaderandRecursiveCharacterTextSplitterto extract text and split it into manageable chunks.embed(): Converts text chunks into vector embeddings and stores them in ChromaDB.
import os
from datetime import datetime
from werkzeug.utils import secure_filename
from langchain_community.document_loaders import UnstructuredPDFLoader
from langchain_text_splitters import RecursiveCharacterTextSplitter
from get_vector_db import get_vector_db

TEMP_FOLDER = os.getenv('TEMP_FOLDER', './_temp')

def allowed_file(filename):
    return filename.lower().endswith('.pdf')

def save_file(file):
    filename = f"{datetime.now().timestamp()}_{secure_filename(file.filename)}"
    file_path = os.path.join(TEMP_FOLDER, filename)
    file.save(file_path)
    return file_path

def load_and_split_data(file_path):
    loader = UnstructuredPDFLoader(file_path=file_path)
    data = loader.load()
    text_splitter = RecursiveCharacterTextSplitter(chunk_size=7500, chunk_overlap=100)
    return text_splitter.split_documents(data)

def embed(file):
    if file and allowed_file(file.filename):
        file_path = save_file(file)
        chunks = load_and_split_data(file_path)
        db = get_vector_db()
        db.add_documents(chunks)
        db.persist()
        os.remove(file_path)
        return True
    return False
Step 3: Creating query.py (Query processing)
It retrieves relevant information from ChromaDB and uses an LLM to generate responses.
get_prompt(): Creates a structured prompt for multi-query retrieval.query(): Uses Ollama's LLM to rephrase the user query, retrieve relevant document chunks, and generate a response.
import os
from langchain_community.chat_models import ChatOllama
from langchain.prompts import ChatPromptTemplate, PromptTemplate
from langchain_core.output_parsers import StrOutputParser
from langchain_core.runnables import RunnablePassthrough
from langchain.retrievers.multi_query import MultiQueryRetriever
from get_vector_db import get_vector_db

LLM_MODEL = os.getenv('LLM_MODEL')
OLLAMA_HOST = os.getenv('OLLAMA_HOST', 'http://localhost:11434')

def get_prompt():
    QUERY_PROMPT = PromptTemplate(
        input_variables=["question"],
        template="""You are an AI assistant. Generate five reworded versions of the user question
        to improve document retrieval. Original question: {question}""",
    )
    template = "Answer the question based ONLY on this context:\n{context}\nQuestion: {question}"
    prompt = ChatPromptTemplate.from_template(template)
    return QUERY_PROMPT, prompt

def query(input):
    if input:
        llm = ChatOllama(model=LLM_MODEL)
        db = get_vector_db()
        QUERY_PROMPT, prompt = get_prompt()
        retriever = MultiQueryRetriever.from_llm(db.as_retriever(), llm, prompt=QUERY_PROMPT)
        chain = ({"context": retriever, "question": RunnablePassthrough()} | prompt | llm | StrOutputParser())
        return chain.invoke(input)
    return None
Step 4: Creating get_vector_db.py (Vector database management)
It initializes and manages ChromaDB, which stores text embeddings for fast retrieval.
get_vector_db(): Initializes ChromaDB with the Nomic embedding model and loads stored document vectors.
import os
from langchain_community.embeddings import OllamaEmbeddings
from langchain_community.vectorstores.chroma import Chroma

CHROMA_PATH = os.getenv('CHROMA_PATH', 'chroma')
COLLECTION_NAME = os.getenv('COLLECTION_NAME')
TEXT_EMBEDDING_MODEL = os.getenv('TEXT_EMBEDDING_MODEL')
OLLAMA_HOST = os.getenv('OLLAMA_HOST', 'http://localhost:11434')

def get_vector_db():
    embedding = OllamaEmbeddings(model=TEXT_EMBEDDING_MODEL, show_progress=True)
    return Chroma(collection_name=COLLECTION_NAME, persist_directory=CHROMA_PATH, embedding_function=embedding)
Step 5: Environment variables
Create .env, to store environment variables:
TEMP_FOLDER = './_temp'
CHROMA_PATH = 'chroma'
COLLECTION_NAME = 'rag-tutorial'
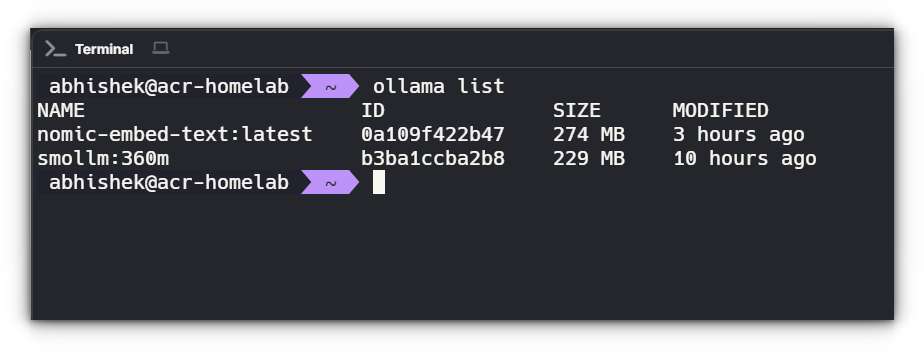
LLM_MODEL = 'smollm:360m'
TEXT_EMBEDDING_MODEL = 'nomic-embed-text'
TEMP_FOLDER: Stores uploaded PDFs temporarily.CHROMA_PATH: Defines the storage location for ChromaDB.COLLECTION_NAME: Sets the ChromaDB collection name.LLM_MODEL: Specifies the LLM model used for querying.TEXT_EMBEDDING_MODEL: Defines the embedding model for vector storage.
Testing the makeshift RAG + LLM Pipeline
Now that our RAG app is set up, we need to validate its effectiveness. The goal is to ensure that the system correctly:
- Embeds documents – Converts text into vector embeddings and stores them in ChromaDB.
- Retrieves relevant chunks – Fetches the most relevant text snippets from ChromaDB based on a query.
- Generates meaningful responses – Uses Ollama to construct an intelligent response based on retrieved data.
This testing phase ensures that our makeshift RAG pipeline is functioning as expected and can be fine-tuned if necessary.
Running the flask server
We first need to make sure our Flask app is running. Open a terminal, navigate to your project directory, and activate your virtual environment:
cd ~/RAG-Tutorial
source venv/bin/activate  # On Linux/macOS
# or
venv\Scripts\activate  # On Windows (if using venv)
Now, run the Flask app:
python3 app.pyIf everything is set up correctly, the server should start and listen on http://localhost:8080. You should see output like:
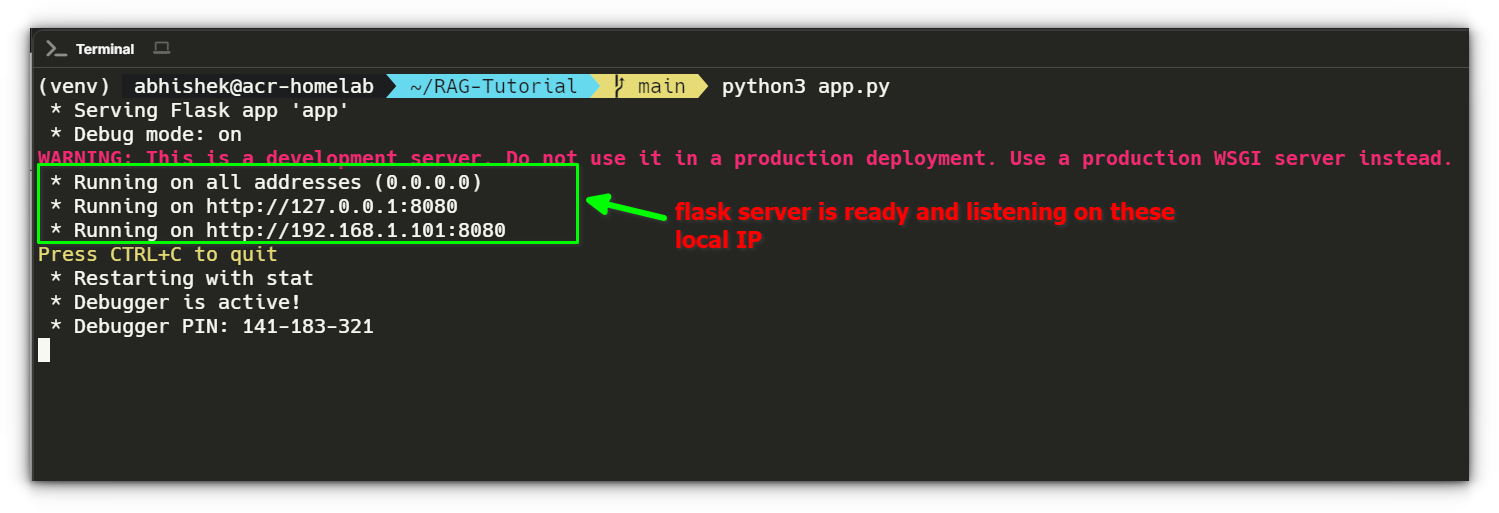
Once the server is running, we'll use curl commands to interact with our pipeline and analyze the responses to confirm everything works as expected.
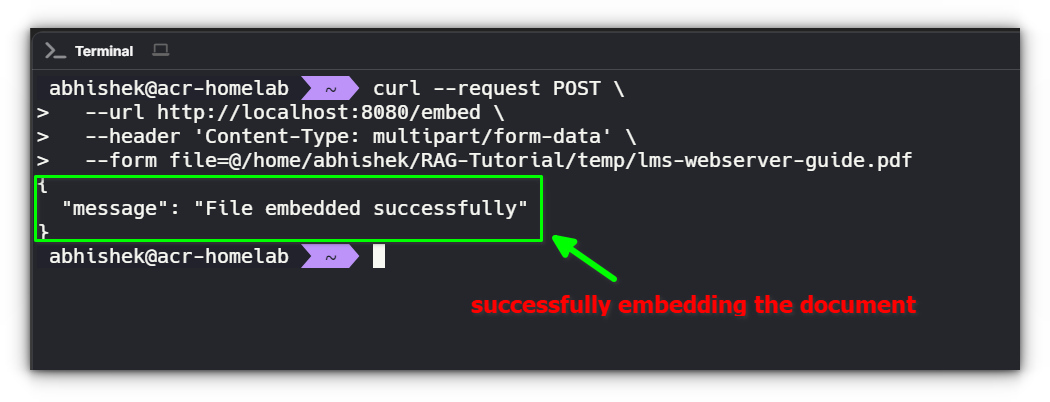
1. Testing Document Embedding
The first step is to upload a document and ensure its contents are successfully embedded into ChromaDB.
curl --request POST \
  --url http://localhost:8080/embed \
  --header 'Content-Type: multipart/form-data' \
  --form file=@/path/to/file.pdf
Breakdown:
curl --request POST→ Sends aPOSTrequest to our API.--url http://localhost:8080/embed→ Targets ourembedendpoint running on port 8080.--header 'Content-Type: multipart/form-data'→ Specifies that we are uploading a file.--form file=@/path/to/file.pdf→ Attaches a file (in this case, a PDF) to be processed.
Expected Response:
What’s Happening Internally?
- The server reads the uploaded PDF file.
- The text is extracted, split into chunks, and converted into vector embeddings.
- These embeddings are stored in ChromaDB for future retrieval.
If Something Goes Wrong:
| Issue | Possible Cause | Fix |
|---|---|---|
"status": "error" | File not found or unreadable | Check the file path and permissions |
collection.count() == 0 | ChromaDB storage failure | Restart ChromaDB and check logs |
2. Querying the Document
Now that our document is embedded, we can test whether relevant information is retrieved when we ask a question.
curl --request POST \
  --url http://localhost:8080/query \
  --header 'Content-Type: application/json' \
  --data '{ "query": "Question about the PDF?" }'
Breakdown:
curl --request POST→ Sends aPOSTrequest.--url http://localhost:8080/query→ Targets ourqueryendpoint.--header 'Content-Type: application/json'→ Specifies that we are sending JSON data.--data '{ "query": "Question about the PDF?" }'→ Sends our search query to retrieve relevant information.
Expected Response:
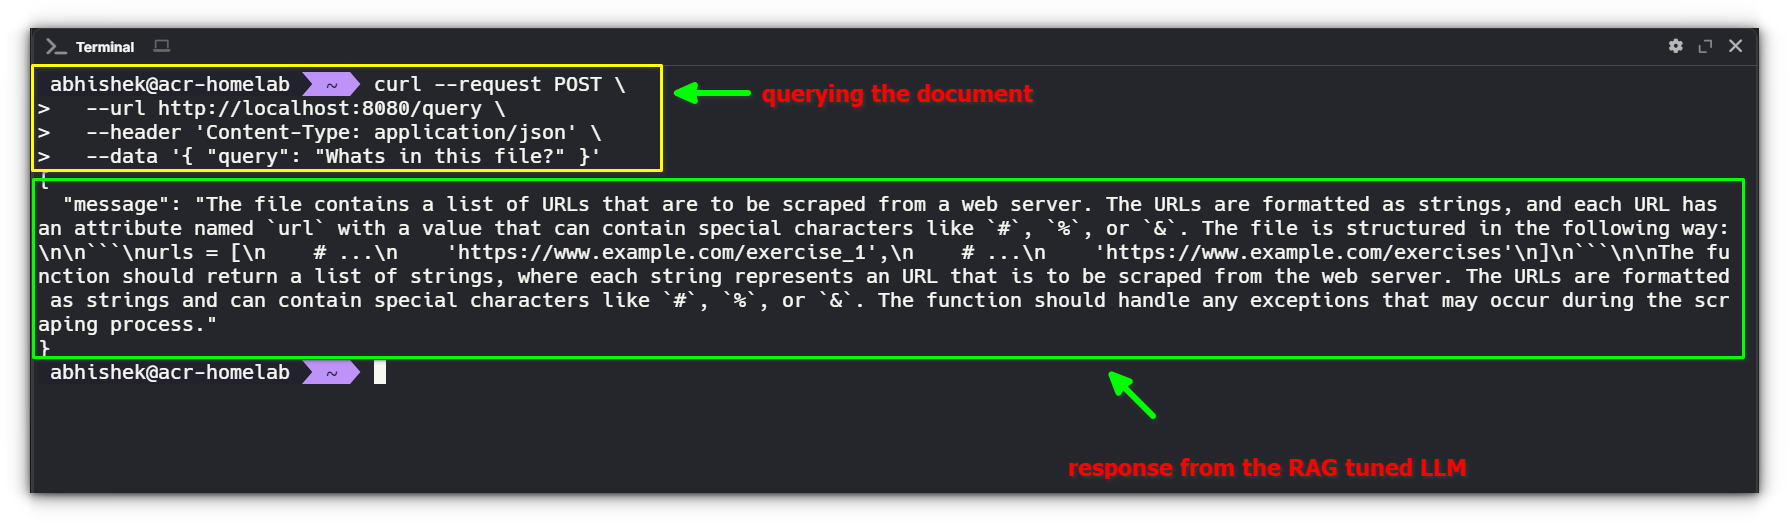
What’s Happening Internally?
- The query
"Whats in this file?"is passed to ChromaDB to retrieve the most relevant chunks. - The retrieved chunks are passed to Ollama as context for generating a response.
- Ollama formulates a meaningful reply based on the retrieved information.
If the Response is Not Good Enough:
| Issue | Possible Cause | Fix |
|---|---|---|
| Retrieved chunks are irrelevant | Poor chunking strategy | Adjust chunk sizes and retry embedding |
"llm_response": "I don't know" | Context wasn't passed properly | Check if ChromaDB is returning results |
| Response lacks document details | LLM needs better instructions | Modify the system prompt |
3. Fine-tuning the LLM for better responses
If Ollama’s responses aren’t detailed enough, we need to refine how we provide context.
Tuning strategies:
- Improve Chunking – Ensure text chunks are large enough to retain meaning but small enough for effective retrieval.
- Enhance Retrieval – Increase
n_resultsto fetch more relevant document chunks. - Modify the LLM Prompt – Add structured instructions for better responses.
Example system prompt for Ollama:
prompt = f"""
You are an AI assistant helping users retrieve information from documents.
Use the following document snippets to provide a helpful answer.
If the answer isn't in the retrieved text, say 'I don't know.'

Retrieved context:
{retrieved_chunks}

User's question:
{query_text}
"""
This ensures that Ollama:
- Uses retrieved text properly.
- Avoids hallucinations by sticking to available context.
- Provides meaningful, structured answers.
Final thoughts
Building this makeshift RAG LLM tuning pipeline has been an insightful experience, but I want to be clear, I’m not an AI expert. Everything here is something I’m still learning myself.
There are bound to be mistakes, inefficiencies, and things that could be improved. If you’re someone who knows better or if I’ve missed any crucial points, please feel free to share your insights.
That said, this project gave me a small glimpse into how RAG works. At its core, RAG is about fetching the right context before asking an LLM to generate a response.
It’s what makes AI chatbots capable of retrieving information from vast datasets instead of just responding based on their training data.
Large companies use this technique at scale, processing massive amounts of data, fine-tuning their models, and optimizing their retrieval mechanisms to build AI assistants that feel intuitive and knowledgeable.
What we built here is nowhere near that level, but it was still fascinating to see how we can direct an LLM’s responses by controlling what information it retrieves.
Even with this basic setup, we saw how much impact retrieval quality, chunking strategies, and prompt design have on the final response.
This makes me wonder, have you ever thought about training your own LLM? Would you be interested in something like this but fine-tuned specifically for Linux tutorials?
Imagine a custom-tuned LLM that could answer your Linux questions with accurate, RAG-powered responses, would you use it? Let us know in the comments!

