

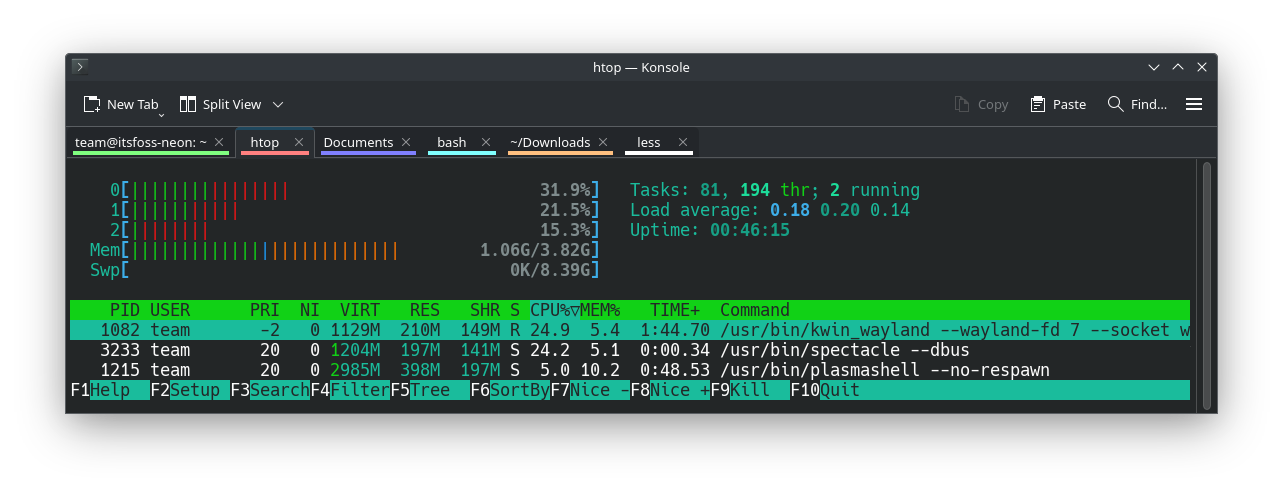
KDE Plasma desktop comes with Konsole as the default terminal emulator.
It may seem like just another terminal application, but like KDE itself, Konsole is also highly customizable.
With the correct set of configurations, you can make Konsole the most beautiful and functional terminal ever.
Let me share some tips with you.
1. Open a location in Dolphin file manager
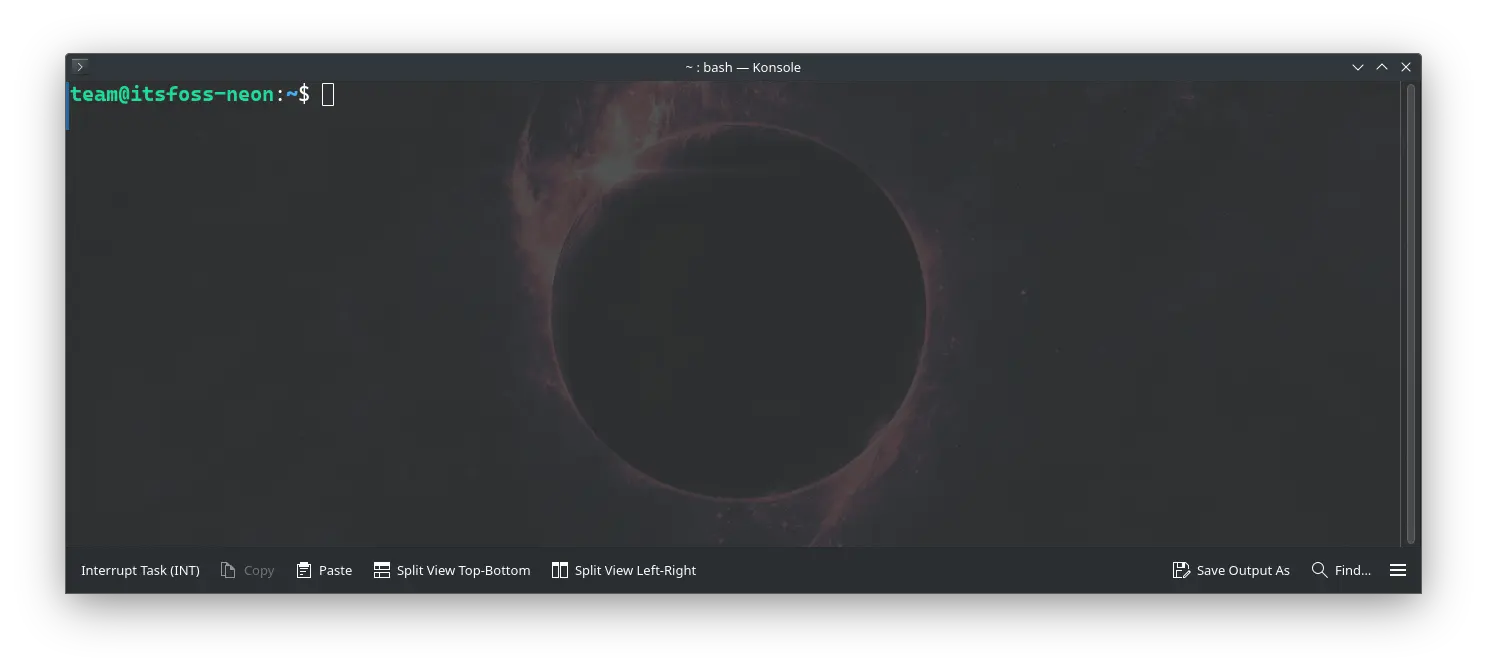
If you are currently working in a directory and want to open it in File Manager, first right-click anywhere in the terminal and select Open File Manager.
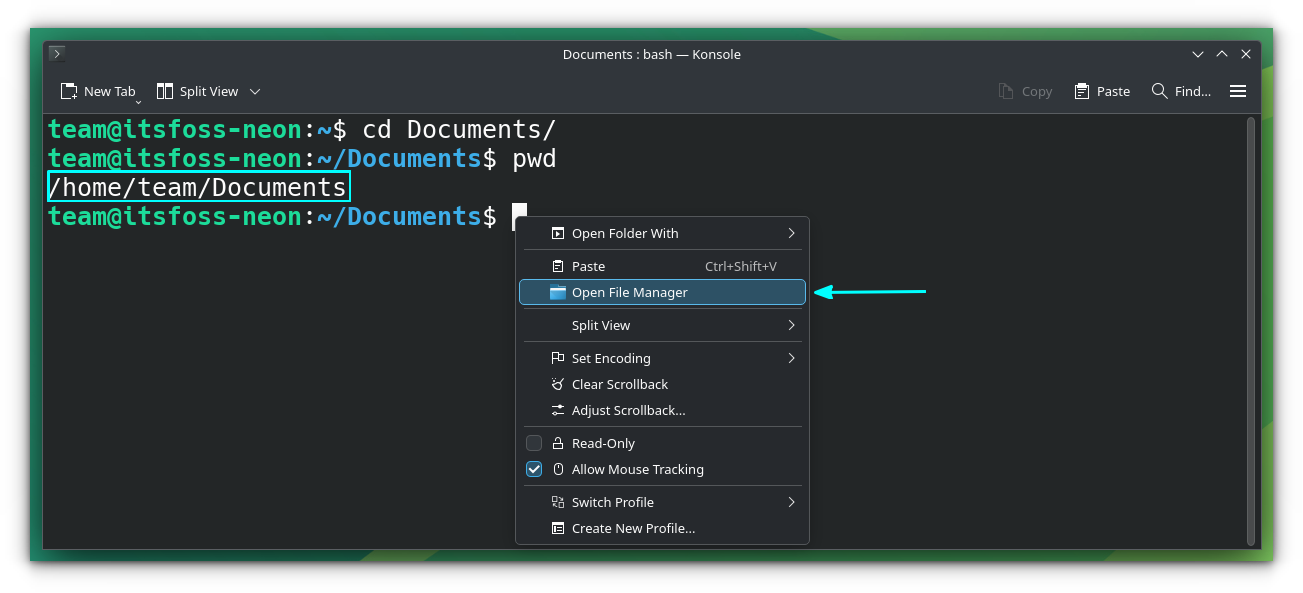
You can open the folder in any other file manager installed on your system too. Just select that application from the Open Folder With option in the right-click context menu.
2. Search for text from the current terminal screen
I know you can rely on find and grep to look for text in the terminal. However, your terminal also features a find option to look for text on the terminal output.
In Konsole, click on the Find button.
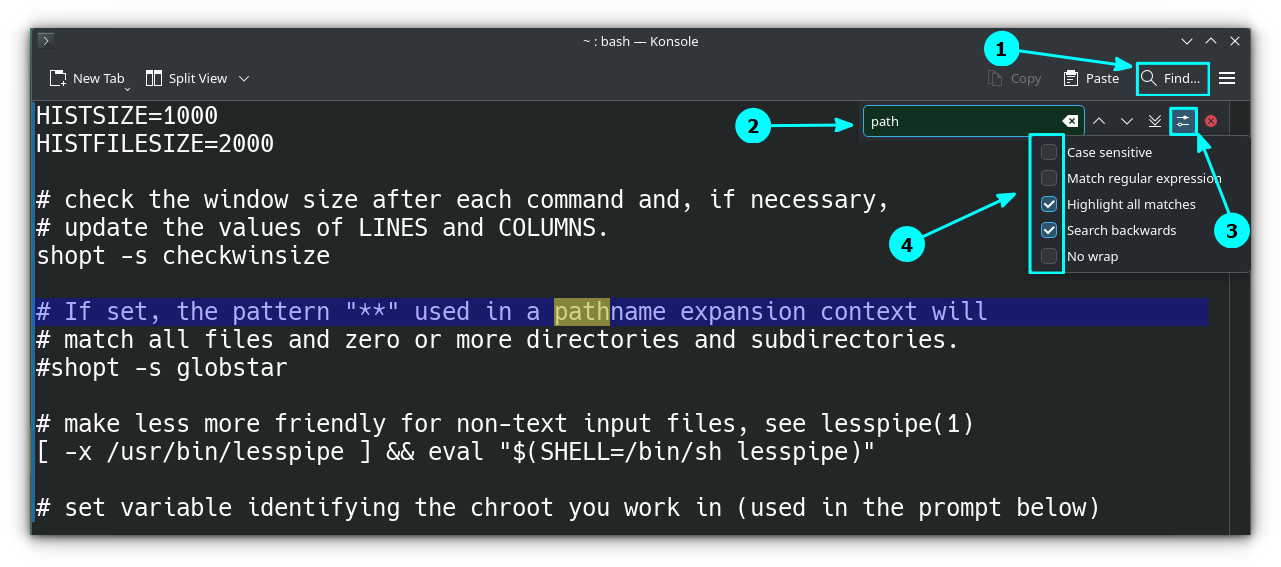
Here, enter the text you want to find and then use the settings button to fine tune the search, as shown in the screenshot above.
Use the up and down arrow to navigate between search results.
3. Managing multiple tabs
These days, most terminal emulators allow you to create multiple tabs. But Konsole sets an entirely new level for terminal tab management. Let's see some examples.
You can open new tabs by clicking on the New Tab button on the top panel of Konsole.
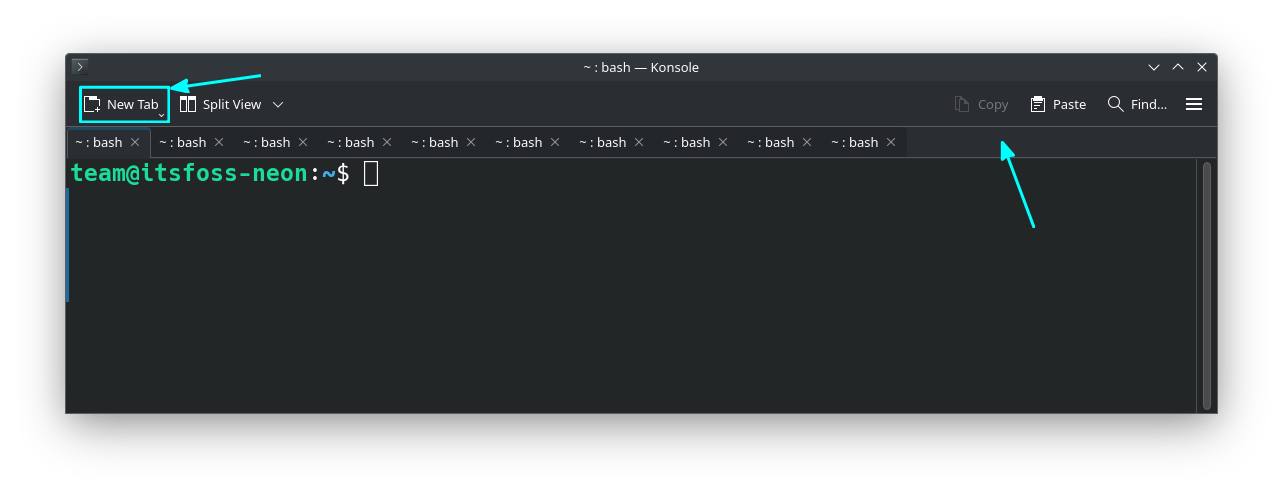
Once a tab is created, you can just double-click on the tab bar to create new terminal tabs on the go.
To edit a tab property, right-click on top of a tab and select Configure or Rename Tab. In the new settings window, you can insert items to the tab title by using the Insert button:
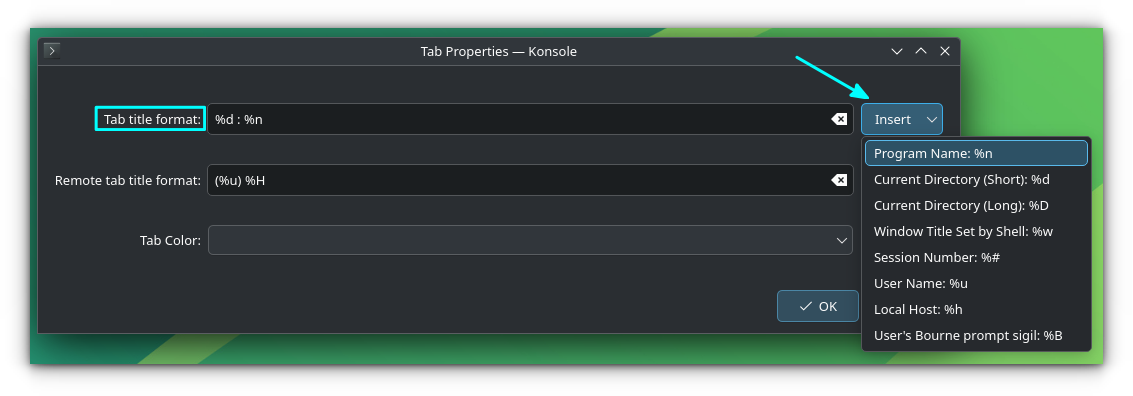
You can also change the color of the tab by using the Tab Color drop-down.
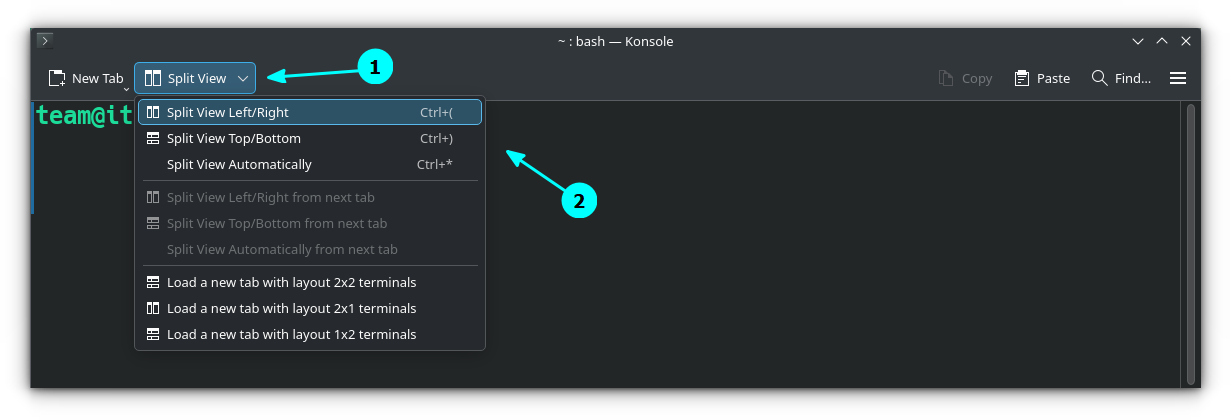
4. Split the terminal window
Have you heard about Tmux? Or Screen perhaps? Tmux, Screen, etc. are terminal multiplexers that let you work on multiple commands and sessions from a single terminal window. But these need a learning curve.
If you are a casual user who just wants to use two panes of terminal, Konsole has got your back.
On most of the KDE Plasma desktop installations, Konsole has this split window feature pinned on the top bar. Click on it and select a split direction.
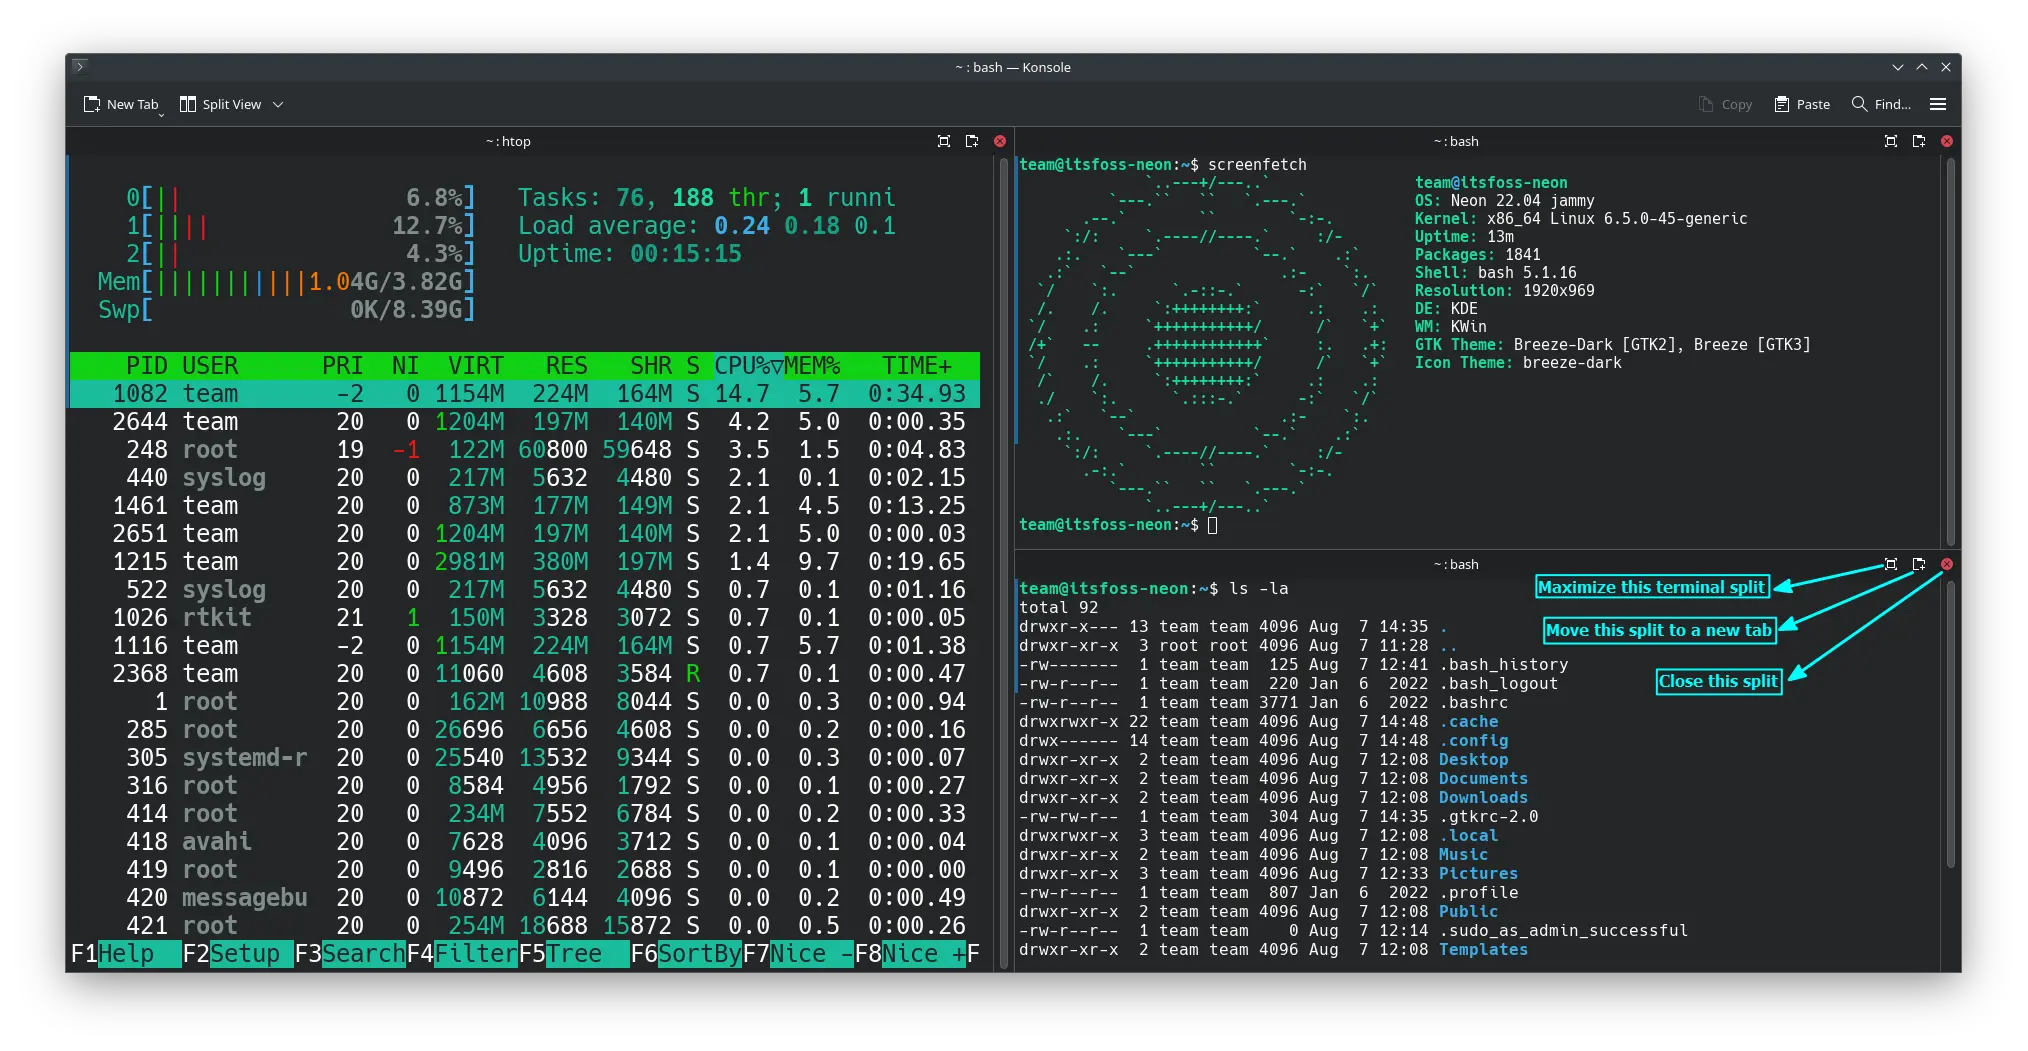
Konsole supports multiple splits, and the below screenshot shows a three split Konsole layout, with the window control details.
5. Save entire terminal output to a file
The redirection operator works for the command that is being run at the moment. What if you want to save everything on the terminal screen to a file?
On Konsole, click on the top-right hamburger menu and select Save Output As.
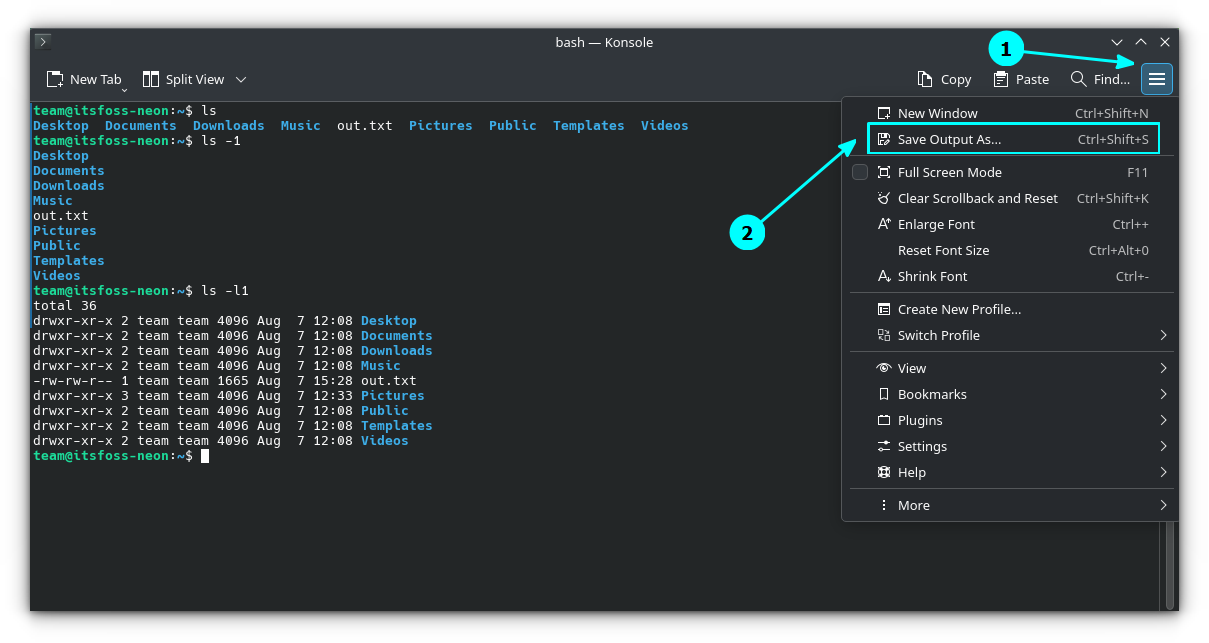
Name the file and click on Save to save the output to a text file.
6. Search what an output means on the web
Did you get an error while running a command? There is no need to copy and then paste to a browser to search for that error.
Select the text on the terminal that you need to search on the web. Right-click on top of it and then select Search For... From the list, select either DDG or Google (default items).
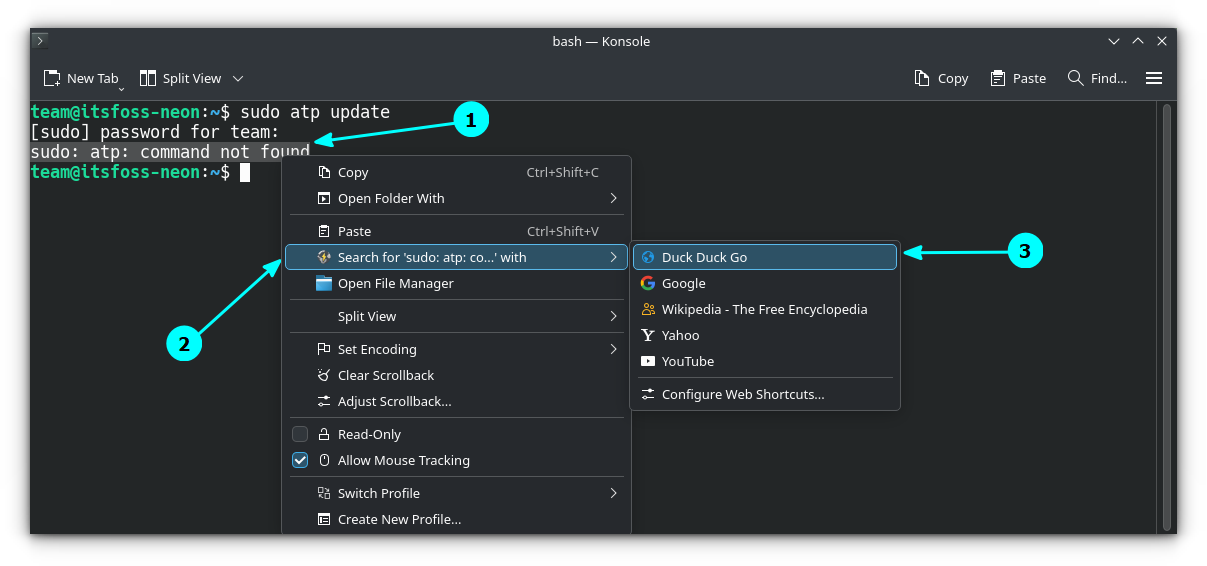
This will search for the selected text using the selected search engine on your default browser.
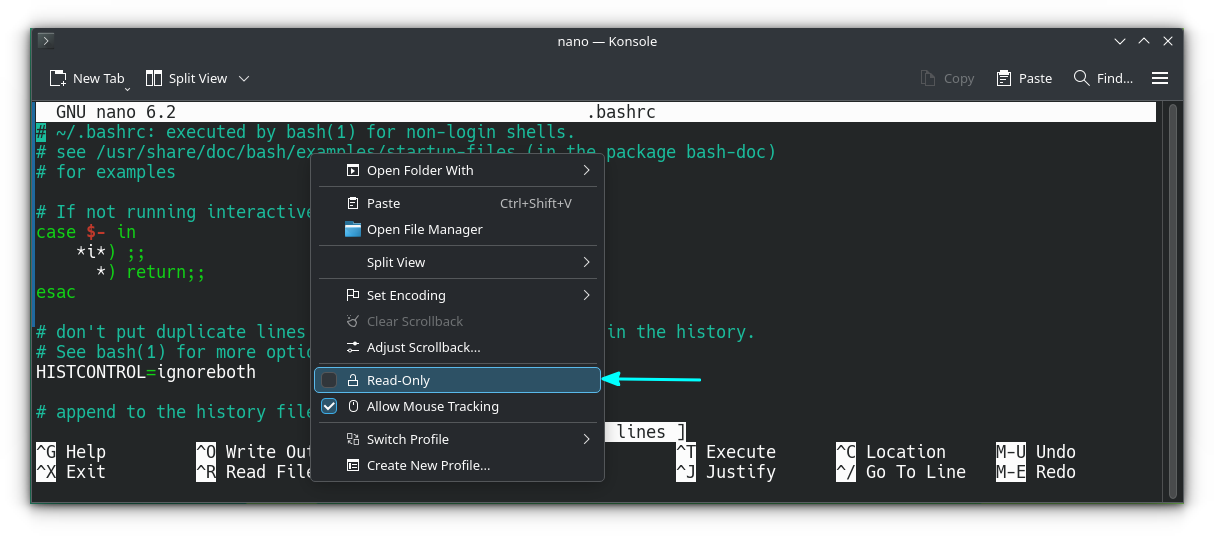
7. Read-only terminal
Sometimes, it is good to make a terminal session read-only to avoid accidental inputs. In Konsole, right-click on any empty place in a terminal session and select Read Only from the context menu.
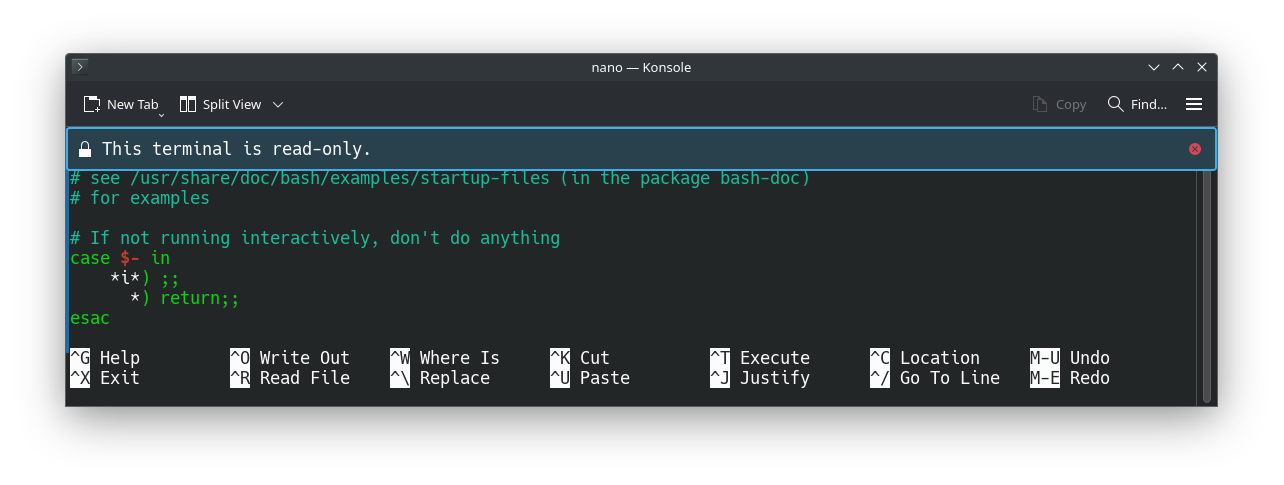
Now, the session will be read only and until you disable the read-only mode through the same step, the session stays so.
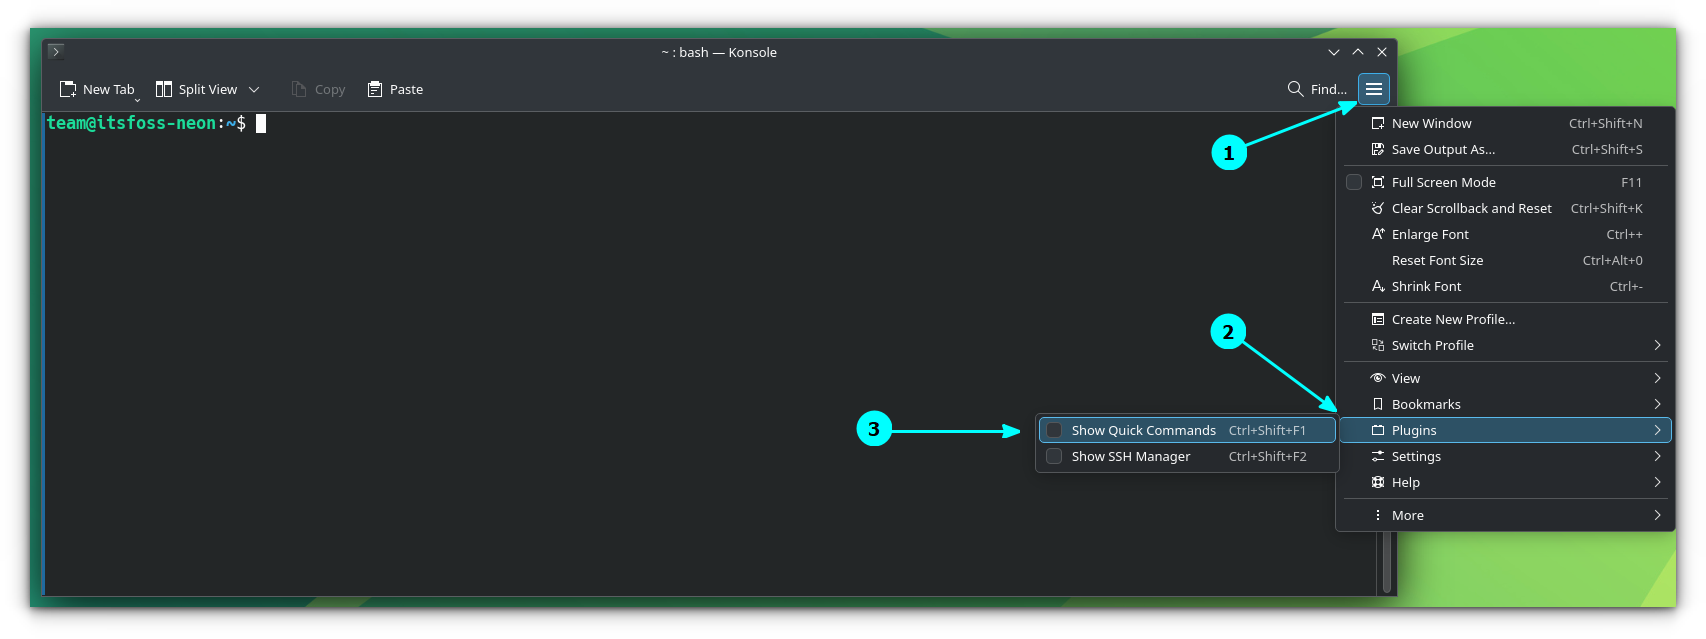
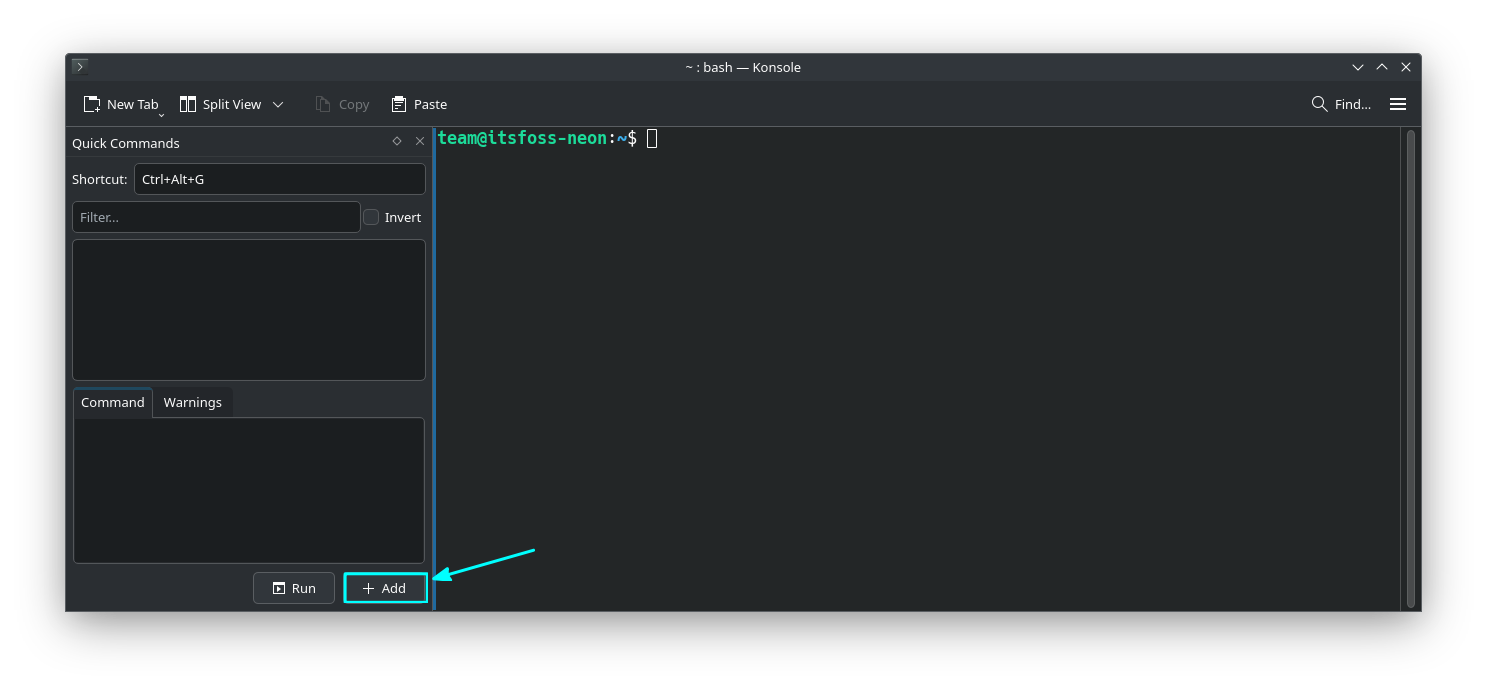
8. Using Quick Commands
Do you use a particular command repeatedly? Say if you are constantly editing a script file. Here, set the command to edit that file into Quick commands so that it is easily accessible.
First, click on the Menu button and select Plugins → Show Quick Commands.
This will open a left-side panel with fields to add a new command. Click on Add to start creating a new Quick Command.
Fill in the necessary fields. For example, I have added a shortcut to edit my Starship Prompt config.
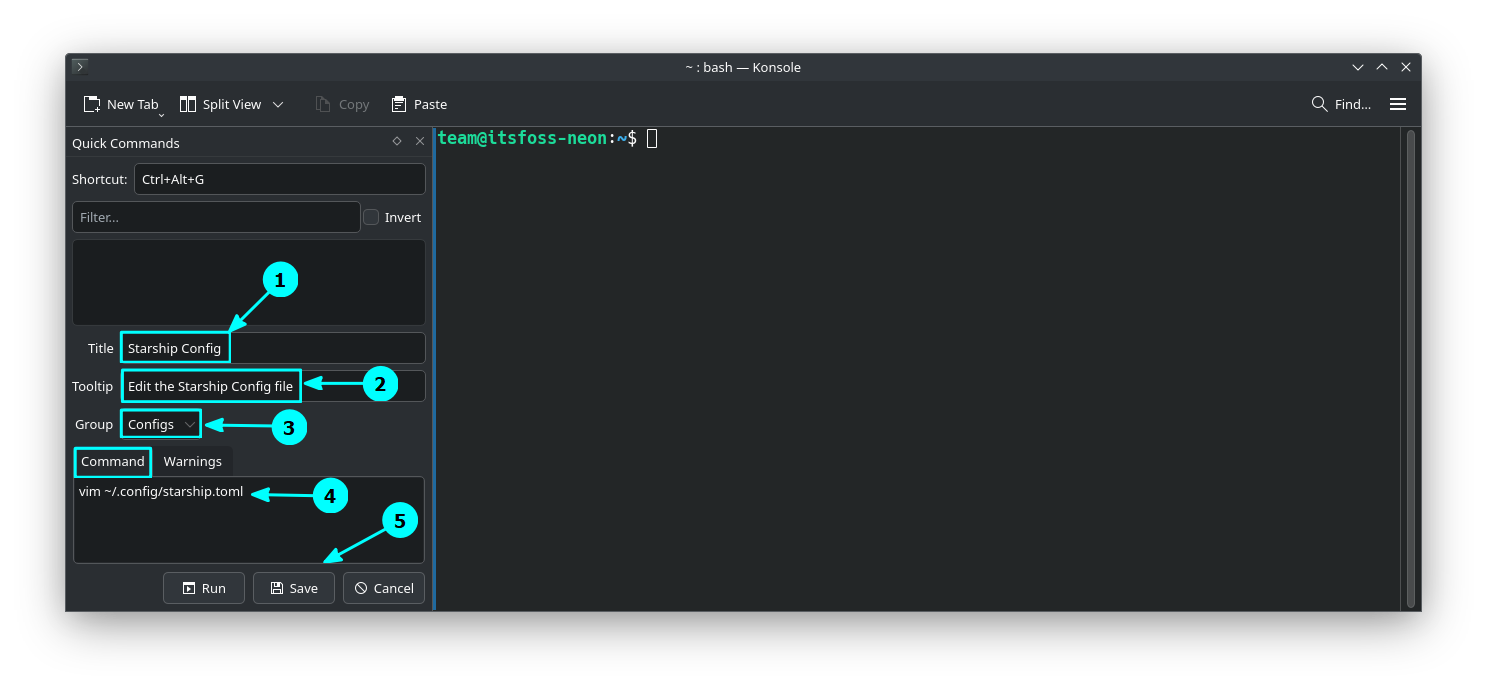
shellcheck package, you can get warnings for possible errors with your commands. But I was unable to add source command to a quick command.Now, once saved, you can access this command by pressing CTRL+ALT+G and then selecting from the list.
Access quick commands from the list
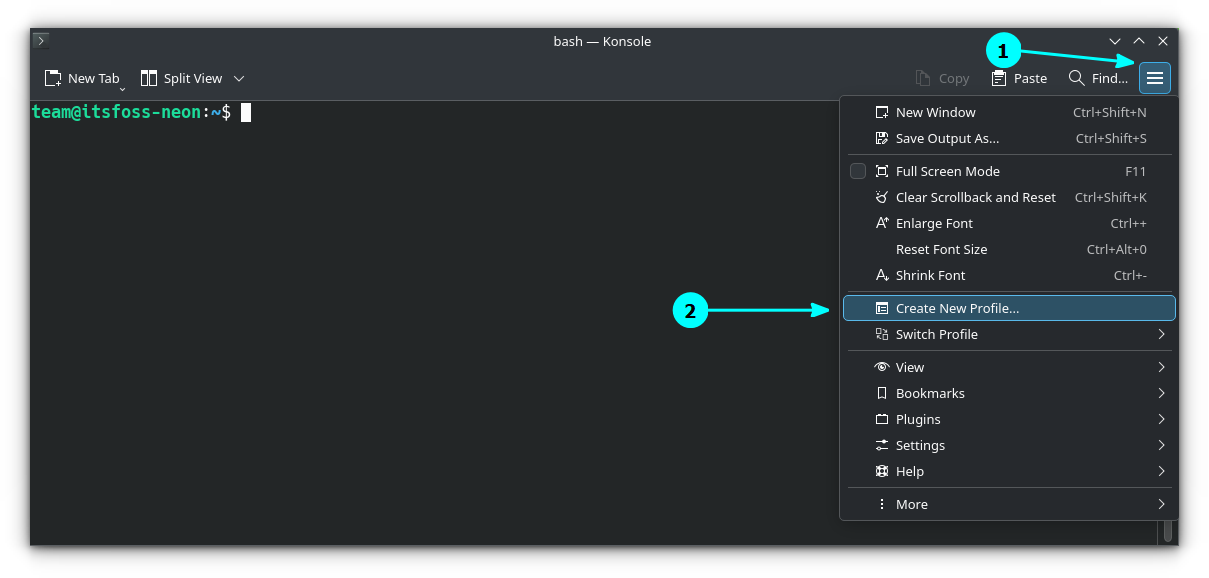
9. Create a new Profile
Profiles are a very efficient way to be more productive and more ordered in general. In Konsole, profiles can do much more than just defaulting a particular shell/command to a profile.
To create a new profile, click on the top-right hamburger menu and select Create a new profile.
Here, as a simple new profile, you can set several things as noted below.
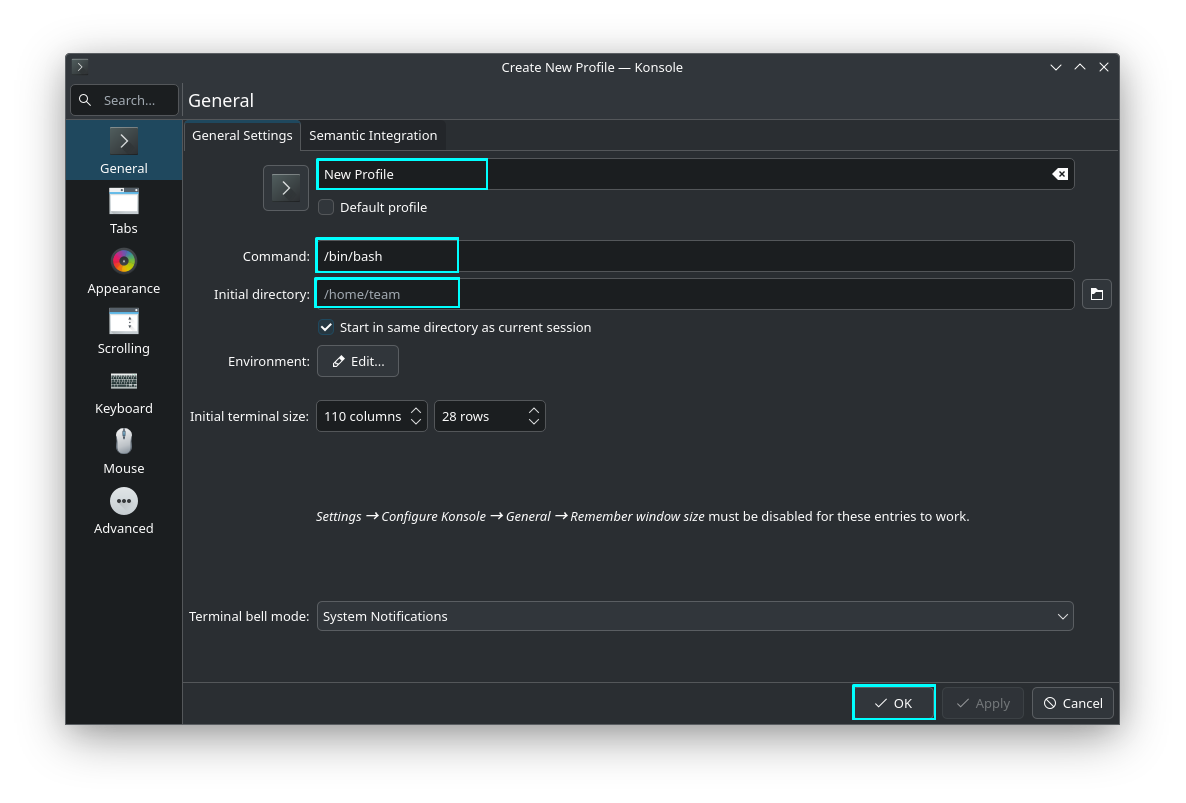
- Name: Give a catchy name for each profile to distinguish between their purpose.
- Command: By default, it points to bash in most distros. If you have any other shell installed, use it instead. First, find the location of the executable of the command and enter it here. E.g.
/usr/bin/zshfor ZSH shell. It is not necessary for this to be a shell. In fact, you can use any command here. - Initial Directory: Home directory of the current user is the default. If you are using a particular directory frequently, paste the path of that directory here. So, when this profile is opened, you will be in that directory by default.
This is more than enough for a simple user profile.
All the profiles, including newly created ones are available to see in the Konsole configuration window, accessed via Hamburger Menu → Settings → Configure Konsole → Profiles.
You can edit profiles from here.
10. Change the appearance
Who does not want an awesome-looking terminal? When it comes to KDE Plasma, it's all about appearance kustomizations!
The appearance of a terminal window is done through profiles. As in the previous step, create a profile using Menu → Create a New Profile. Or edit and existing user created profile.
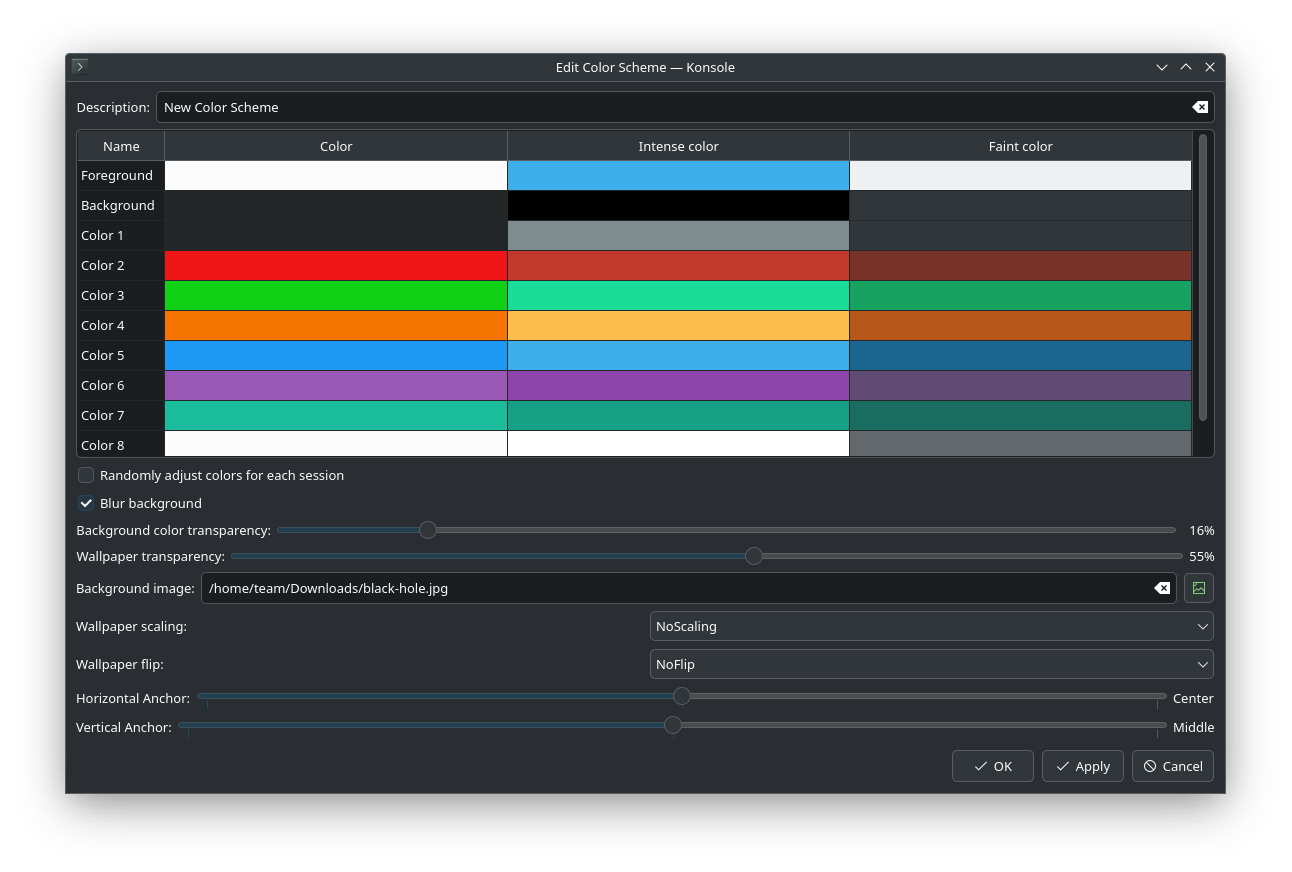
In that window, use the “Appearance” tab and click on the New button to create a new color scheme.
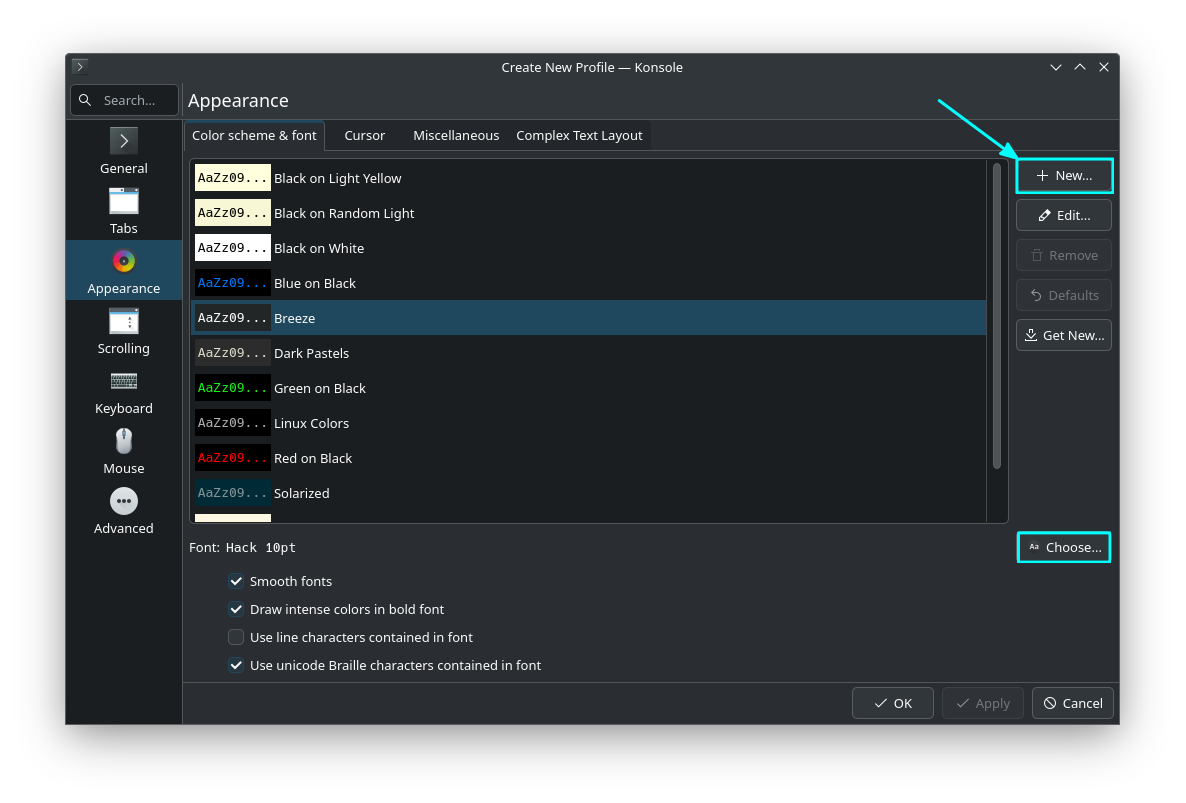
In the color scheme settings window, you can make several visual changes, such as:
- Change color of different aspects of terminal text and background.
- Blur the background.
- Change the transparency of the terminal window.
- Apply a background image to the terminal window.
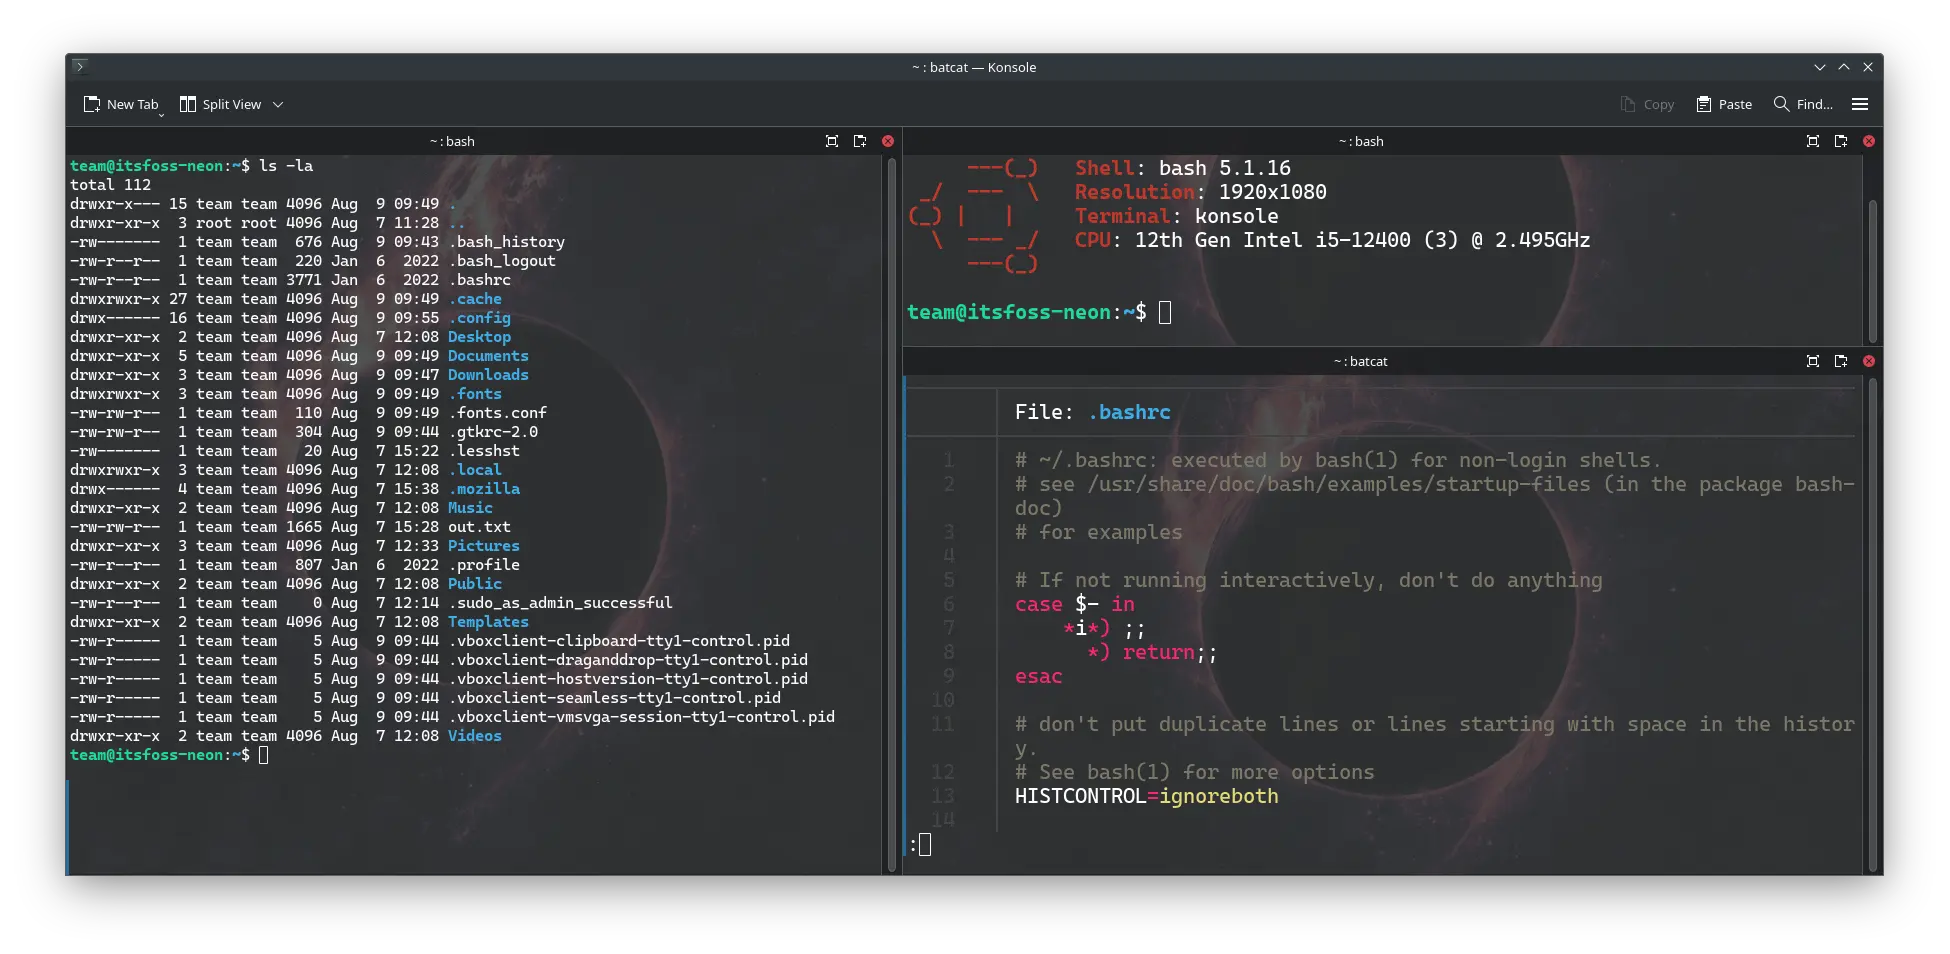
Here is the resulting appearance of the terminal.
11. Change the scrolling settings
At times, you will notice that you cannot scroll back after a certain point in the terminal. So, whatever appears on the very top will be inaccessible to you.
You can change this scenario by setting the scroll back in Konsole. On the profile settings, go to the Scrolling tab and set the Fixed Size value to 10000. By default, its value is set to 1000.
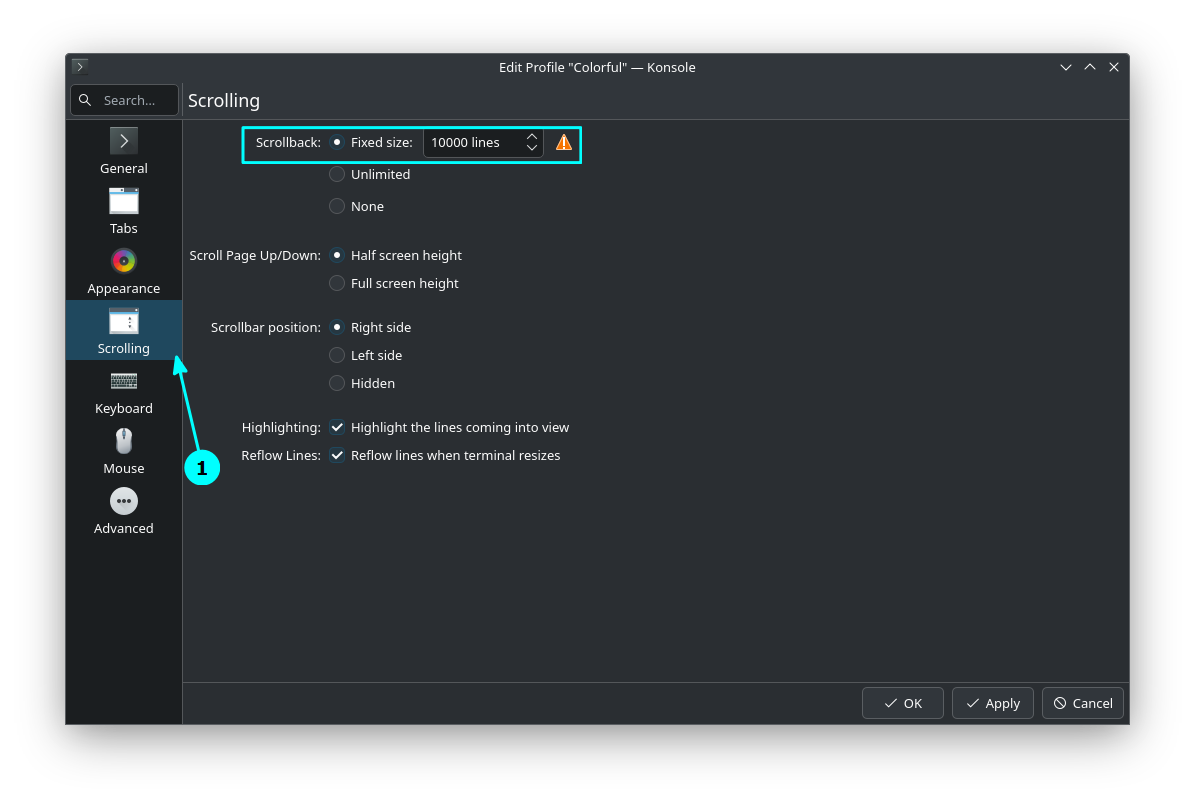
I suggest you go through the other options in this Scrolling section as well.
12. Open files in Dolphin from the terminal
When you list files in a directory, it will be highly beneficial, if you get an option to open it in the preferred app. Konsole can give you that!
In the Profile settings window, go to the Mouse section and then select the Miscellaneous section.
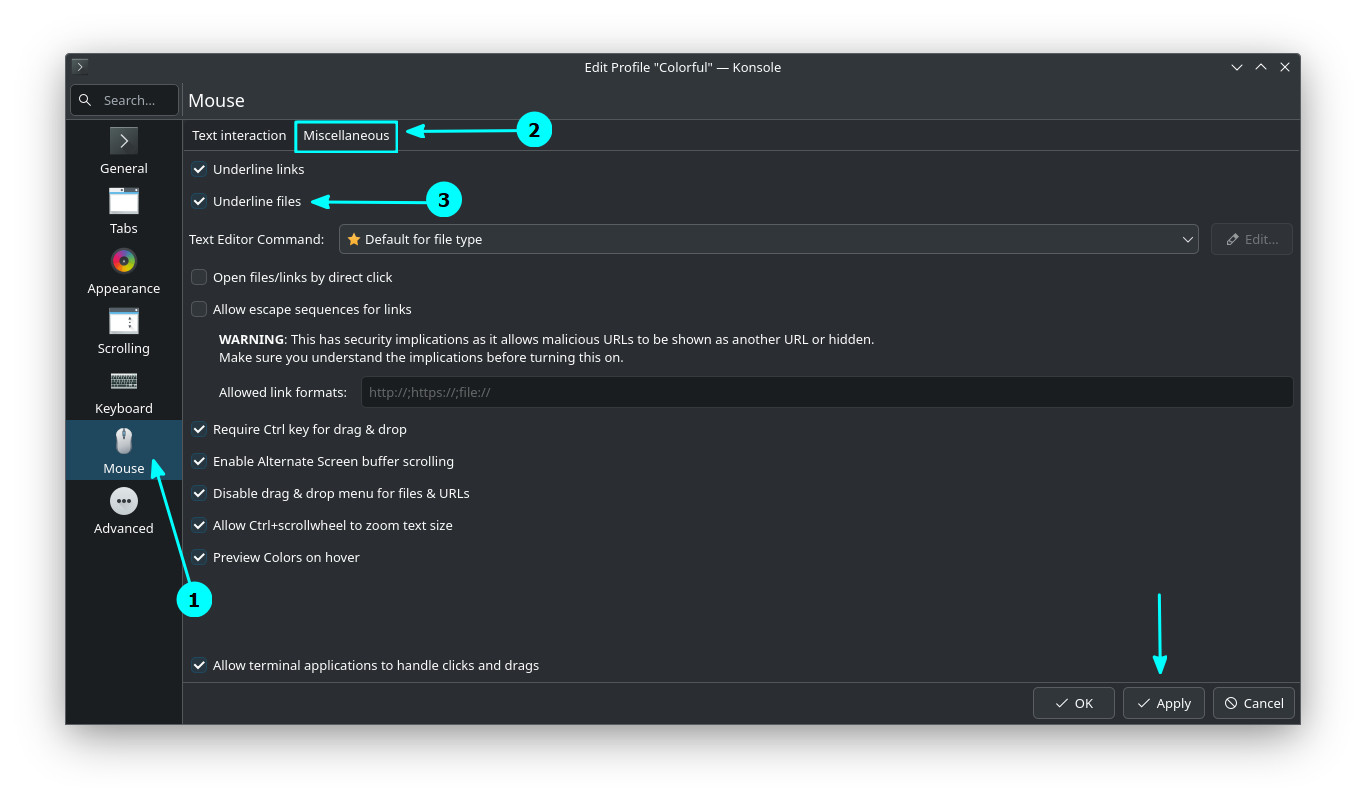
Here, check the Underline Files checkbox and apply the settings.
At this point, when you hover over a file (including directories), those will be underlined. Other than that, the directories give a small thumbnail too!
You can press CTRL and click on any file to open it in the preferred app. Or open a directory in Dolphin.
Drag and Drop Files
If you disable the “Disable drag & drop menu for files & URLs” checkbox, Konsole will give you a small context menu when you drag and drop a file to the Konsole window. This context menu can be used to move that file to pwd, copy it to pwd, create a link there or paste the location of the file to terminal.
Show file thumbnails on hover
If you go to the Top Right Hamburger menu and Settings → Configure Konsole → Thumbnails, you can enable thumbnail generation.
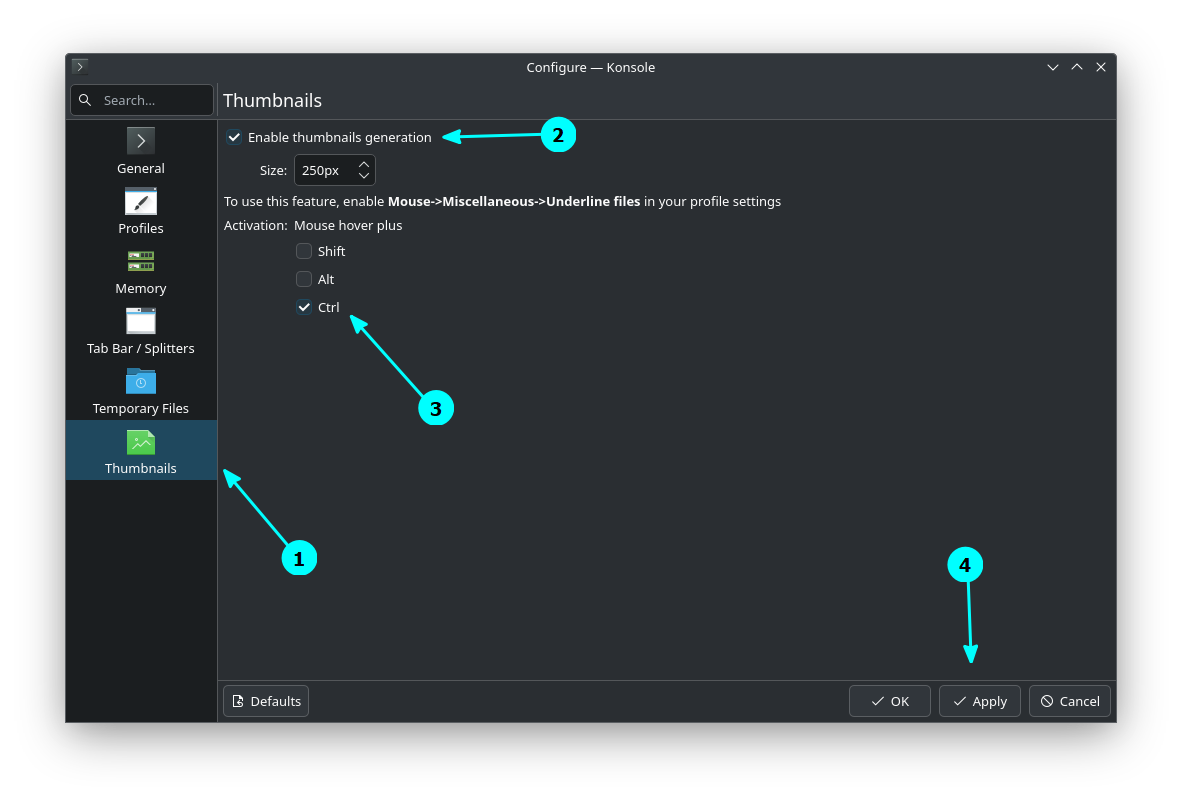
Here set an activation key other than you just mouse hover and save. Now, when you hover over images, you will get a neat small thumbnail of that image.
Get image thumbnail in Konsole
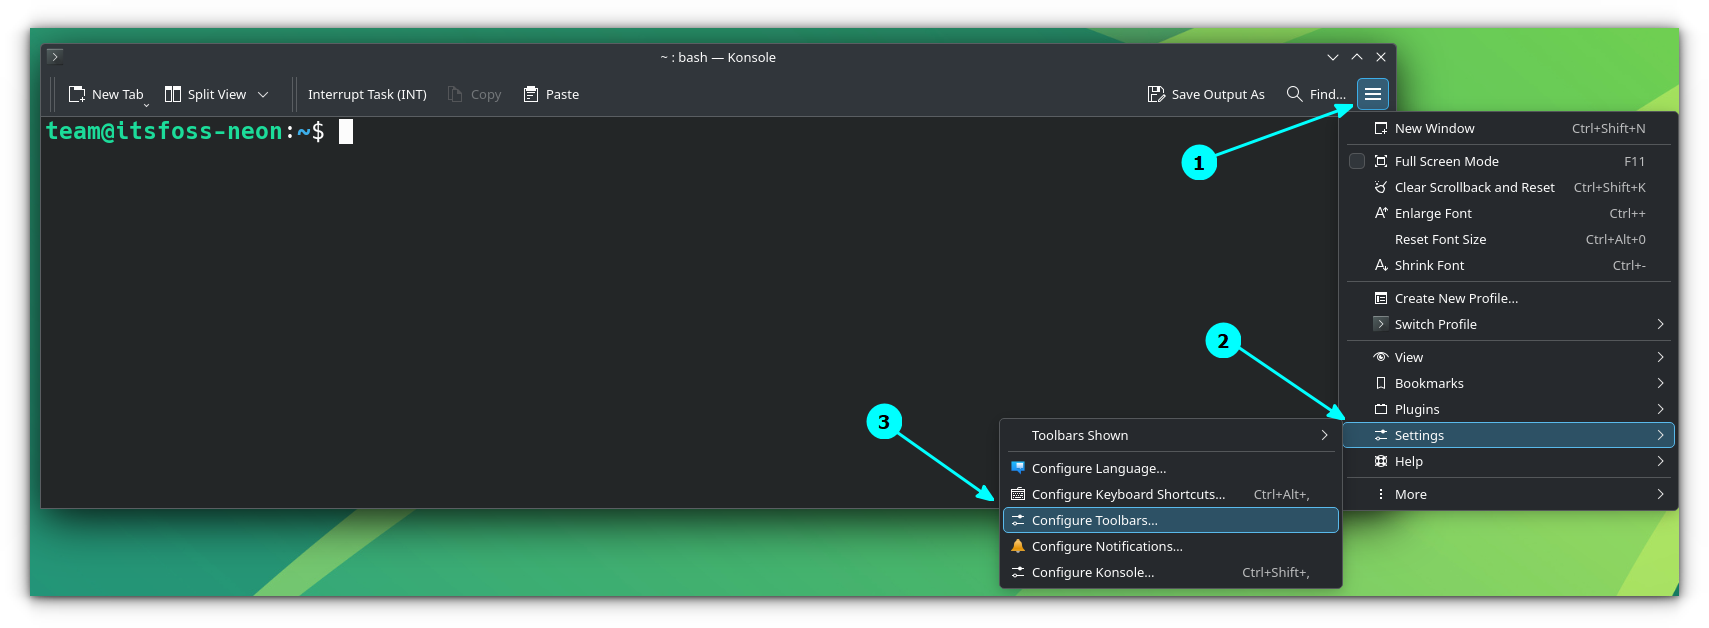
13. Configure the Toolbar
Toolbar items can be very useful for terminal starters. Here, we will place several useful buttons on the toolbar that you can access easily, without the need to remember keyboard shortcuts and commands.
To edit the toolbar, you can go to the Menu → Settings → Configure Toolbar.
Essential Toolbar items
To place an item on the toolbar, either drag and drop or click on that item in the left pane and then click the right-arrow button.
Arranging the toolbar buttons.
You can click on the item in the right pane and then click on the left arrow to remove it from the toolbar.
Now, the following items can be added for a better experience.
- Read-only: For quickly making a terminal session read-only.
- Interrupt Task (INT): This is the SIGINT signal. In simpler terms, this is what happens when you press CTRL + C to interrupt a task.
- Save Output as: To quickly save the output on the screen to a file.
- Separator and Expanded Separator: To align the items as needed.
- Split view from Left/Right and Split View from Top-Bottom: This is a personal choice as, I use only the session toolbar and hide the main toolbar (in the next step).
Change the Toolbar position
It is not essential to place the toolbar at the top. You can make it appear on the bottom, left, and right side as well.
First, right-click on the toolbar and disable the Lock Toolbar Position from the list.
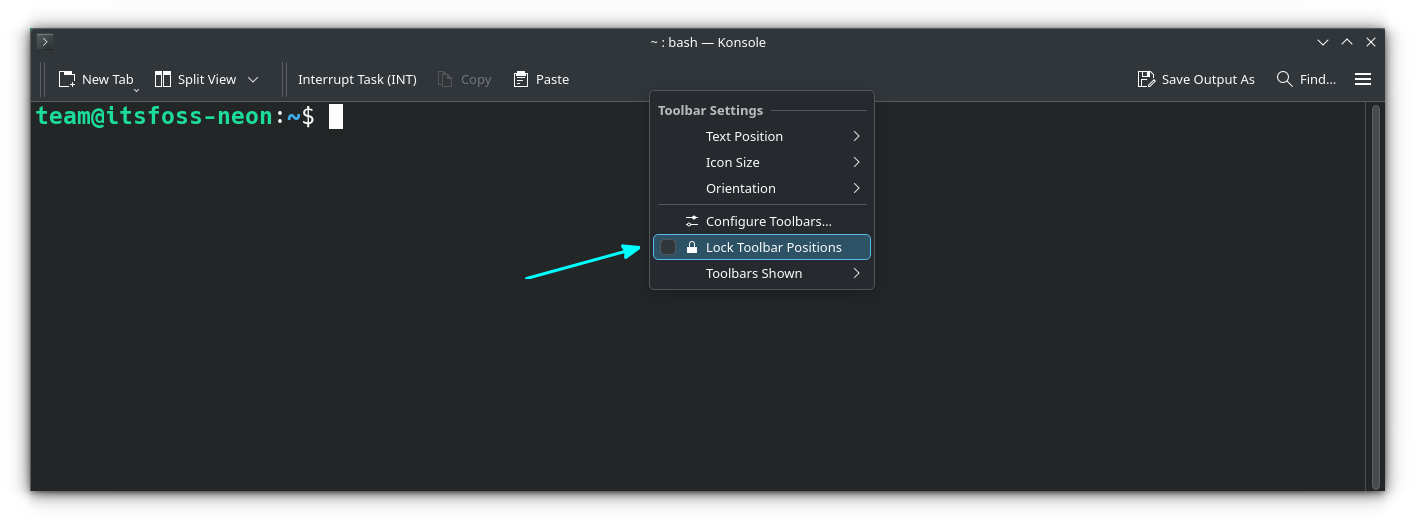
You can see some vertical bars or handles appearing on the toolbar. Once more, right-click on the toolbar and select Orientation → Bottom.
Here, you can either show the main toolbar or hide it by unchecking the Main toolbar from Toolbars shown.
Once done with the positioning, lock the toolbar similar to how we unlocked. Right-click on the toolbar (now bottom) and check the Lock Toolbar Position checkbox.
Here's how our terminal will look.
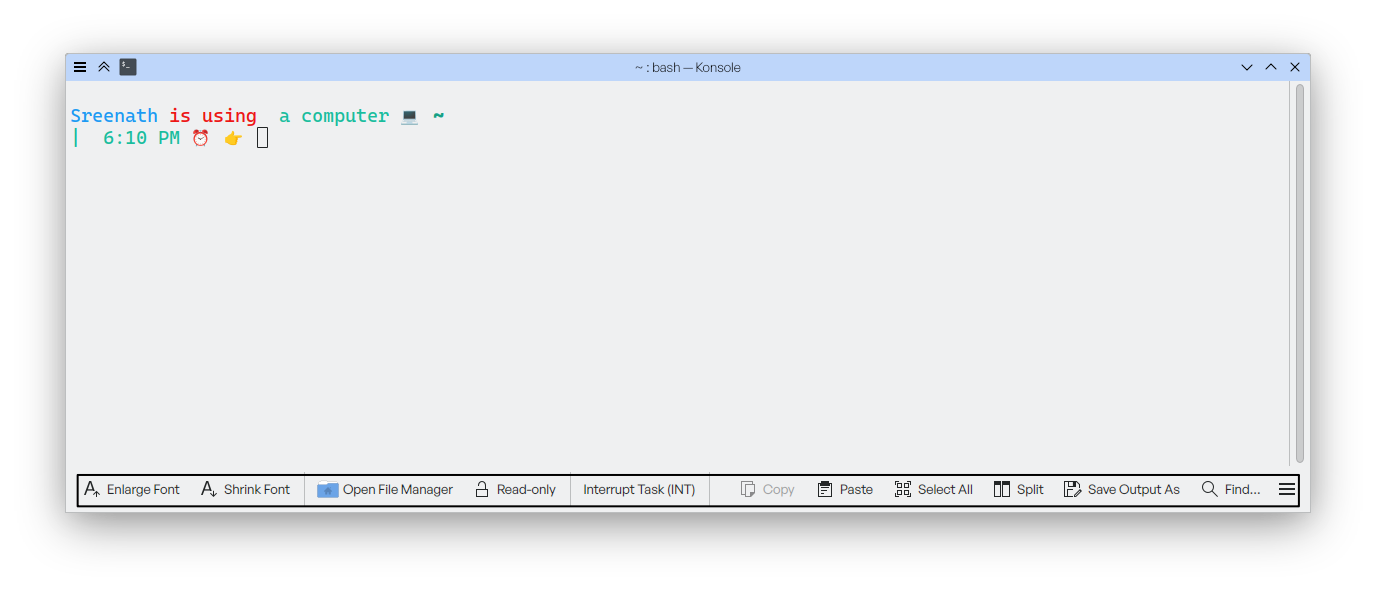
Here is my daily terminal setup:
There is more...
Like KDE, there is no end to customization here. A few more tweaks that I can remember are:
- By default, when you hover over a color in HEX form, Konsole will preview that color.
- You can add locations as bookmarks by using CTRL+SHIFT+B.
- You can open Konsole Handbook with important help articles by pressing the F1 key.
I understand that many of these terminal customization options are available in other emulators but Konsole seems to have the most of them. That's my guess.
If you like the Konsole customization tips, perhaps you would also like Dolphin file manager tweaks.
💬 Did you find some useful tweaks in this tutorial? Share it in the comment section please.

