

Linux Mint has improvised a few things in its distribution, and two notables among them are Cinnamon and Nemo.
Nemo is the default file manager of Cinnamon desktop and it was forked from the popular file manager Nautilus in GNOME.
Few Linux users like to experiment by mixing stuff. For example, some people like to install the Cinnamon desktop environment on top of Ubuntu.
For some, it's just the Nemo that is of interest and hence, they just use this file manager instead of the entire Cinnamon desktop.
Yes, you can install Linux Mint's Nemo file manager in Ubuntu. I'll show the steps for that but first, do you really want to?
Installing Nemo file manager in Ubuntu Linux
Open the terminal (you can use Ctrl+Alt+T terminal shortcut in Ubuntu) and use the following command:
sudo apt install nemoOnce installed you can look for Nemo in Ubuntu Activities Overview, it will be shown as Files and not Nemo.
It is a bit difficult to distinguish between Nemo and Files (Nautilus) by the icons if you search for files. So, just search for Nemo.
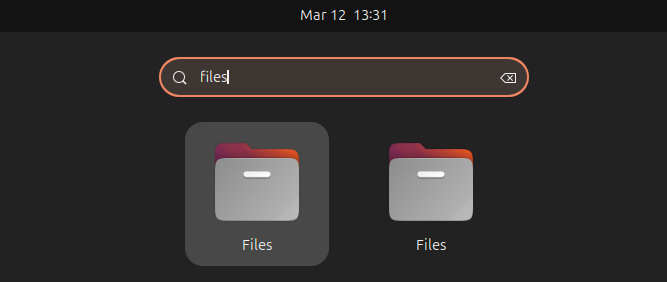
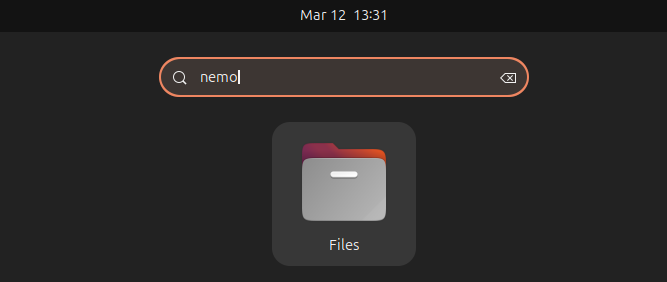
Search for Files and Nemo in Ubuntu Activities Overview
Once you have installed Nemo file manager in Ubuntu, you’ll see that Nautilus is still the primary file manager in the system.
Now, let’s see how you can make Nemo the default file manager in Ubuntu.
Disable the Desktop Icons extension
Before changing the default file manager, you should disable the Desktop Icons extension. For this, first install the GNOME Shell Extension Manager app.
sudo apt install gnome-shell-extension-managerOpen the extension manager and disable the Desktop Icons NG (DING) extension.
Make Nemo default file manager in Ubuntu
Open the terminal and use the following command:
xdg-mime default nemo.desktop inode/directory application/x-gnome-saved-searchAnd then you can set up Nemo to handle the desktop completely with the following commands (in the given order):
gsettings set org.nemo.desktop show-desktop-icons trueThe command enables Nemo to manage the addition of desktop icons.
You should also add the nemo-desktop in the list of startup applications.
For that, search for Startup in Activities overview.
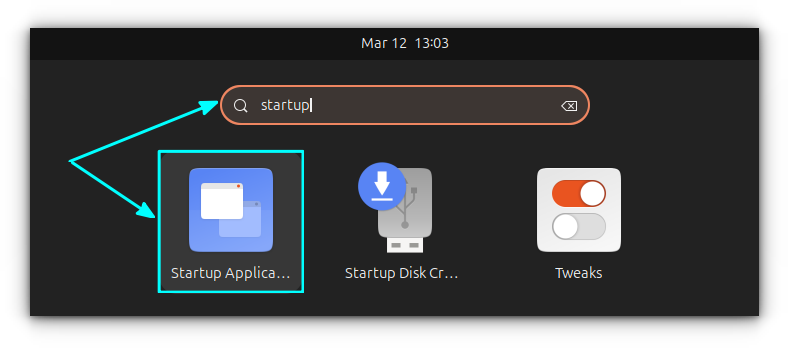
Here, click on the Add button. In the next dialog box, give a simple name in the name field and enter the command, nemo-desktop as shown in the screenshot below.

nemo-desktop as a startup applicationThat’s it. Now, restart your system.
At this point, you have made Nemo the default file manager in Ubuntu. You can verify it by using the xdg-open $HOME command in the terminal.
The tutorial to make Nemo default file manager should also work with other versions of Ubuntu.
Additional tip: Customize the desktop icons
Once you restarted your system, you can change the appearance of desktop icons. For this, right-click on an empty place on the desktop and select Customize.
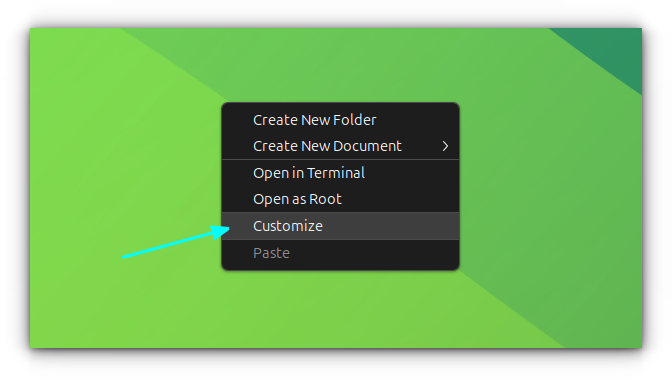
In the dialog box, make the required changes like icon position, orientation, etc.
Remove Nemo and go back to Nautilus
I can understand if you don’t like Nemo in Ubuntu. While Nemo is a great choice for Linux Mint, using it in Ubuntu may lead to issue, and it might not be the same experience as in Linux Mint.
So, if you want to remove Nemo and go back to using the default Nautilus, here is what you need to do.
Make GNOME Files default again:
xdg-mime default nautilus.desktop inode/directory application/x-gnome-saved-searchNow disable Nemo's desktop icons handling using:
gsettings set org.nemo.desktop show-desktop-icons falseNow you should enable Nautilus to draw desktop icons. For this, re-enable the Desktop Icons NG (DING) extension using the GNOME Shell Extension Manager, the same way we disabled.
If you added Nemo in the startup applications, remove it from there.
Now that you have gone back to using Nautilus, you probably also want to remove Nemo from Ubuntu. You can use the command below to remove Nemo:
sudo apt purge nemo nemo*
sudo apt autoremove
Restart the system to finish the process.
I hope this tutorial helped you to install Nemo on Ubuntu, make it default and even move back to Nautilus. If you have questions or suggestions, please leave a comment below.
