In my opinion, the ls command is the most used Linux command as it is often used to verify the outcome of the previous operation by listing the directory contents.
The ls command stands for a list; all it does is list the contents of the specified directory.
In this tutorial, I'll walk you through multiple examples of using the ls command.
I will also share some practice questions to test the learnings.
How to use the ls command
To use the ls command, you'd have to follow the simple command syntax:
ls [OPTIONS] Targeted_DirectoryHere,
[OPTIONS]: It is used to tweak the default behavior of the ls command.Targeted_Directory: This is where you provide the directory name or the absolute path to the directory.
You might wonder what happens when you use the ls command without any options. And to answer that, I used the ls command in my current working directory:
ls 
As you can see, it listed all the directories and files available in the current working directory. But you can do a lot more than just getting the names and files present in the current working directory.
Let me show you how.
1. List files and directories with ownership
One of the primary use of the ls command to find the permissions and ownership of a particular file or a directory.
For that you'd have to use the -l option (also called long listing) with the ls command:
ls -lOnce you do that, you can expect similar output:
sagar@itsFOSS:~$ ls -lh
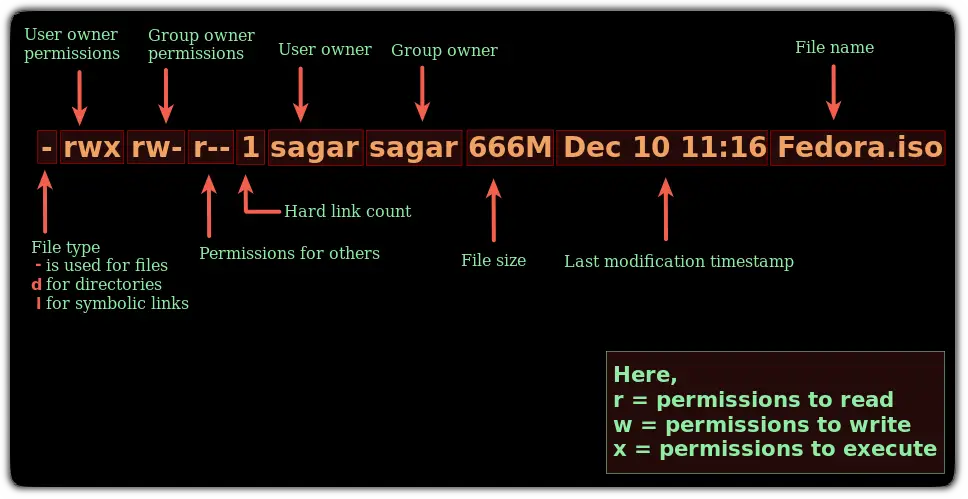
-rwxrw-r-- 1 sagar sagar 666M Dec 10 18:16 Fedora.iso
Notice how I used an addition -h option? I'll discuss it in the next section.
For now, if the output looks too complicated, then let me simplify things for you:

As you can see, each text block has its own meaning such as the permissions for owner, group, and others.
If you want to dive deep into file permissions, I would recommend our detailed guide on file permissions in Linux:

2. Get information in a human-readable format
By default, the file size is shown in bytes which is not the best way to know your file size. So how do you get the same info but in human-readable form?
Simple. You use the -h option with the ls command:
ls -l -hAnd here's the comparison between the default and the human-readable form:

Much better. Isn't it?
The ls command is good to see the file sizes. However, it won't give you the directory size which is almost always displayed as 4K. To get directory size, use the du command.
3. List hidden files
Like any other file manager, the ls command won't list the hidden files (I mean they are supposed to be hidden. Right?).
But what if you want to list the hidden files along with the regular files? To do so, you can use the -a option:
ls -aAs you can see, the filename starting with a dot . are hidden files.

You may also use ls -A which works almost the same as ls -a except it won't include the . and .. directories.
4. List files recursively
There are multiple ways to list files recursively and using the ls command is one of them.
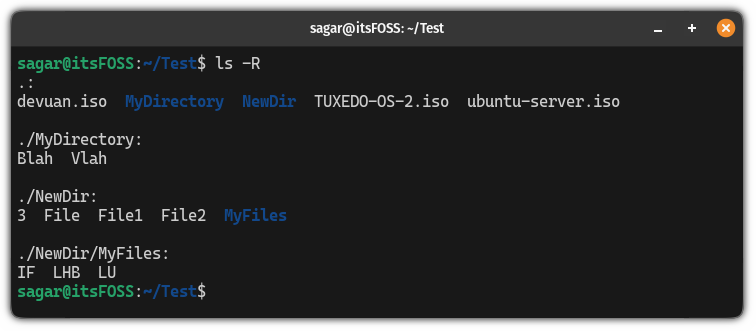
In case you don't know, listing files recursively means listing files of all the sub-directories present until the last element of every sub-directory is shown.
And to list files recursively, you can use the -R flag as shown:
ls -R
In a way, it gives you the current directory structure. Personally, I prefer the for this purpose but you'll have to install it first.
You don't have to be in the directory to list its content. You can also list directory contents by providing its absolute or relative path like this: ls /var/log
5. Differentiate between files and directories while using ls
While the different colors for files and directories should do the job. But due to some reason, if you want to symbolize files and directories here you have it.
In the ls command, you have a -F flag that adds a forward slash / to every directory name:
ls -F
6. List only files with certain file extensions
There are times when you only want to list files with specific file extensions and trust me this is the easiest of all.
To do that, you don't have to use any options. Just append the file extension to the Asterisk * such as *.png, *.txt, etc:
ls *.extensionFor example, if I only want to list the ISO files, then, I will be using the following command:
ls *.iso
7. Sort output based on size
To sort the output based on the file size, you'd have to use the -S flag and it will list files from largest to the smallest manner (descending):
ls -lhS
Similarly, if you want to reverse this order to list the smallest files first, you can use the -r flag to reverse the order:
ls -lhSr
8. Sort files based on date and time
The ls commands includes the modified time in its listing.
To list the newest files first, you can use the -t flag as shown:
ls -lht
You can use the -r flag as I explained previously to reverse the order here too.
ls -lrtThis will give you the latest modified files at the bottom of the display. This is particularly helpful if you have too many files in the directory and want to see which files were modified recently. I used this while troubleshooting my software project.

Let's summarize what you've learned so far!
Here, I will share a table with multiple options that were used with the ls command in this tutorial:
| Command | Description |
|---|---|
ls -l |
Long list of files and directories |
ls -lh |
Prints information in human-readable form |
ls -a |
Include hidden files in listing |
ls -R |
List files recursively |
ls -F |
Add a forward slash to the directory name |
ls *.ext |
List files having specific extensions |
ls -lS |
Sort files based on file size |
ls -lt |
Sort files based on time |
-r |
Reverse the sorting (combined with S or t) |
🏋️And practice your learning
Practicing what you've learned is always a good idea, which is why we try to add a practice section in each terminal guide.
So here are some simple practice exercise of the ls command:
- List the contents of the
/var/log - Save the command output in a file named output.txt
- Identify the 3 most recent files (Use time based sorting)
- Display the files based on their size but in reverse order
- Check if there are any hidden files
That would be good practice for you. Stay tuned for more Linux command learning.
And if you are new to the terminal, don't forget to follow our Terminal Basics series

Enjoy :)


