
If you happen to own the first Ubuntu phone and want to replace Ubuntu with Android on the bq Aquaris e4.5, this post is going to help you.
There can be plenty of reasons why you might want to remove Ubuntu and use the mainstream Android OS. One of the foremost reason is that the OS itself is at an early stage and intend to target developers and enthusiasts. Whatever may be your reason, installing Android on bq Aquaris is a piece of cake, thanks to the tools provided by bq.
Let’s see what to do we need to install Android on bq Aquaris.
Prerequisite
- Working Internet connection to download Android factory image and install tools for flashing Android
- USB data cable
- A system running Linux
This tutorial is performed using Ubuntu 15.10. But the steps should be applicable to most other Linux distributions.
Replace Ubuntu with Android in bq Aquaris e4.5
Step 1: Download Android firmware
First step is to download the Android image for bq Aquaris e4.5. Good thing is that it is available from the bq’s support website. You can download the firmware, around 650 MB in size, from the link below:
Download Android for bq Aquaris e4.5
Yes, you would get OTA updates with it. At present the firmware version is 2.0.1 which is based on Android Lolipop. Over time, there could be a new firmware based on Marshmallow and then the above link could be outdated.
I suggest to check the bq support page and download the latest firmware from there.
Once downloaded, extract it. In the extracted directory, look for MT6582_Android_scatter.txt file. We shall be using it later.
Step 2: Download flash tool
bq has provided its own flash tool, Herramienta MTK Flash Tool, for easier installation of Android or Ubuntu on the device. You can download the tool from the link below:
Since the flash tool might be upgraded in future, you can always get the latest version of flash tool from the bq support page.
Once downloaded extract the downloaded file. You should see an executable file named flash_tool in it. We shall be using it later.
Step 3: Remove conflicting packages (optional)
If you are using recent version of Ubuntu or Ubuntu based Linux distributions, you may encounter “BROM ERROR : S_UNDEFINED_ERROR (1001)” later in this tutorial.
To avoid this error, you’ll have to uninstall conflicting package. Use the commands below:
sudo apt-get remove modemmanagerRestart udev service with the command below:
sudo service udev restartJust to check for any possible side effects on kernel module cdc_acm, run the command below:
lsmod | grep cdc_acmIf the output of the above command is an empty list, you’ll have to reinstall this kernel module:
sudo modprobe cdc_acmStep 4: Prepare to flash Android
Go to the downloaded and extracted flash tool directory (in step 2). Use command line for this purpose because you’ll have to use the root privileges here.
Presuming that you saved it in the Downloads directory, use the command below to go to this directory (in case you do not know how to navigate between directories in command line).
cd ~/Downloads/SP_Flash*After that use the command below to run the flash tool as root:
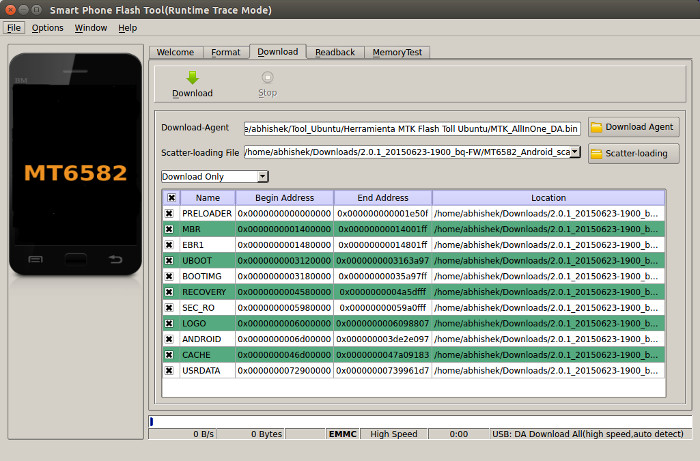
sudo ./flash_toolYou’ll see a window popped as the one below. Don’t bother about Download Agent field, it will be automatically filled. Just focus on Scatter-loading field.

Remember we talked about MT6582_Android_scatter.txt in step 1? This text file is in the extracted directory of the Andriod firmware you downloaded in step 1. Click on Scatter-loading (in the above picture) and point to MT6582_Android_scatter.txt file.
When you do that, you’ll see several green lines like the one below:
Step 5: Flashing Android
We are almost ready. Switch off your phone and connect it to your computer via a USB cable.
Select Firmware Upgrade from the dropdown and after that click on the big download button.
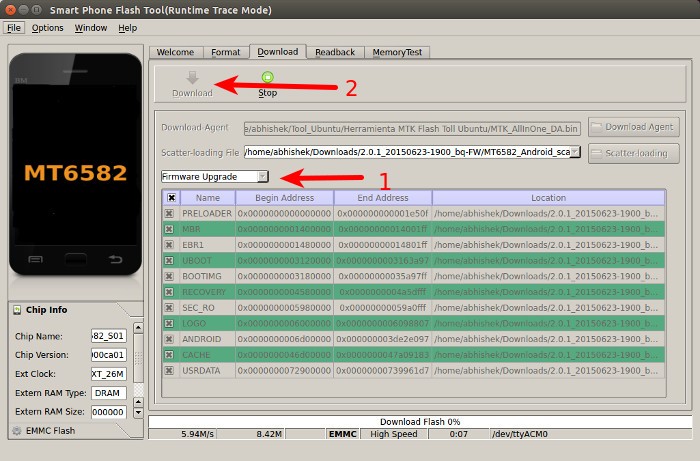
If everything is correct, you should see a flash status in the bottom of the tool:

When the procedure is successfully completed, you’ll see a notification like this:
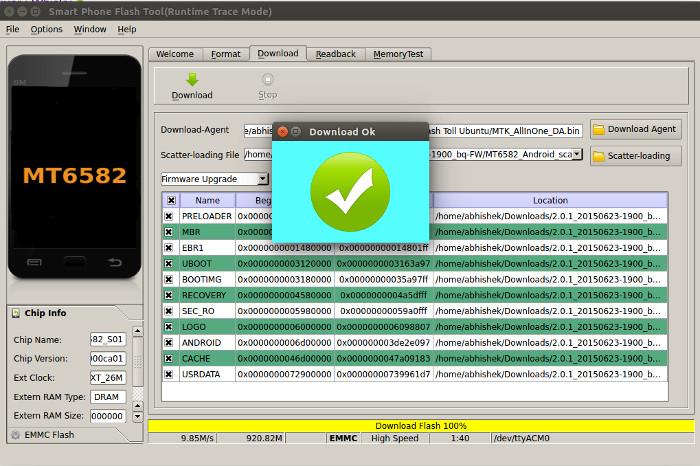
Unplug your phone and power it on. You should see a white screen with AQUARIS written in the middle and at bottom, “powered by Android” would be displayed. It might take upto 10 minutes before you could configure and start using Android.
Note: If something goes wrong in the process, Press power, volume up, volume down button together and boot in to fast boot mode. Turn off again and connect the cable again. Repeat the process of firmware upgrade. It should work.
Conclusion
Thanks to the tools provided, it becomes easier to flash Android on bq Ubuntu Phone. Of course, you can use the same steps to replace Android with Ubuntu. All you need is to download Ubuntu firmware instead of Android.
I hope this tutorial helped you to replace Ubuntu with Android on your bq phone. If you have questions or suggestions, feel free to ask in the comment section below.
