There are several graphical tools available for creating live USB. Etcher on Linux is probably the most popular. Ubuntu has its own Startup Disk Creator tool for this purpose.
However, advanced Linux users swear by the comfort and swiftness of creating live USBs in Linux terminal using the dd command.
The dd command is a CLI tool that gives you powerful features for copying and converting files.
A common use case that people use dd for is to write ISO files to an external storage device such as a USB drive, which can be used to do things like install a new Linux distribution onto a computer or laptop.
That’s what I am going to show in this tutorial. I’ll go over the commands you will need to run, finding our USB drive from the terminal, and then finally doing the actual flashing of the ISO file.
Creating live USB from ISO with dd command
Before I show you the steps, let me quickly go over the command which you’ll be using and explain what it does.
Here’s the example command for flashing of the ISO:
dd if="./filename.iso" of="/dev/sdb" status="progress" conv="fsync"Let’s go over what exactly that dd command is doing.
Understanding the above dd command
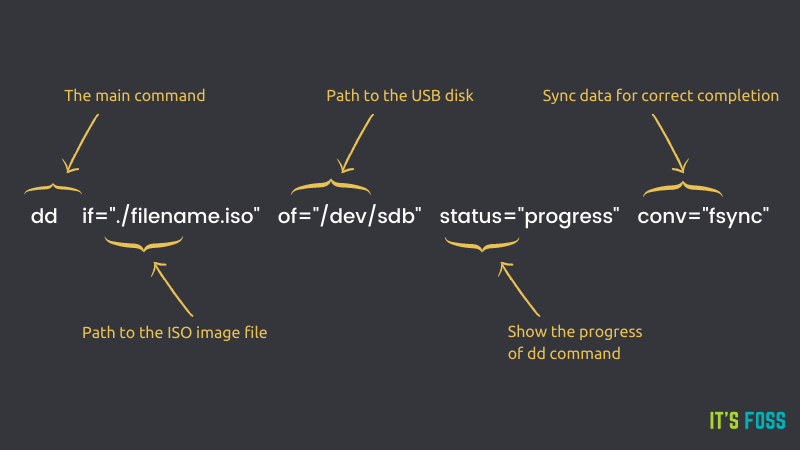
First, you enter dd. As expected, this is just the name of the program you are going to run.
Next, you specify if="./filename.iso". if stands for input file, which tells dd what file you are going to be writing to the external storage drive.
After that, you enter of="/dev/sdb". As was with if, of simply stands for output file.
The thing to remember is that the output file doesn’t technically have to be a file on your system. You can also specify things like the path to an external device (as shown in the example), which just looks like a normal file on your system, but actually points to a device connected to your machine.
status can be set to three options: none, noxfer and progress.
The progress option that you set will cause dd to show periodic statistics on how much of the ISO has been transferred to the storage drive, as well as an estimation on how much longer it will be until dd is finished.
If you were to have set the none option instead, dd would only print error messages during the writing of the ISO, thus removing things like the progress bar.
The noxfer option hides some information that’s printed after a transfer is complete, such as how long it took from start to finish.
Lastly, you set the conv option to fsync. This causes dd to not report a successful write until the entire ISO has been written to the USB drive.
If you omit this option, dd will still write just fine (and might actually appear to run quicker), but you might find your system taking quite a while before it tells you it’s safe to remove the USB drive as it will finish writing the ISO’s content in the background, thus allowing you to do other things in the meantime.
Now that you understand what you have to do, let’s see how to do it.
Warning
The command line is a double-edged sword. Be extra careful when you are running a command like dd. You must make sure that you are using the correct device for the output file destination. One wrong step and you may format your main system disk and lose your operating system.
Step 0: Download the desired ISO
This goes without saying that you need to have an ISO image file in order to flash it on a USB.
I am going to use Ubuntu 20.04 ISO (downloadable here) to test the dd command I showed earlier.
Step 1: Get the USB disk label
Plug in your USB disk.
The specific path I entered for of was /dev/sdb. The USB disks are usually labelled /dev/sdb but that’s not a hard and fast rule.
This path may differ on your system, but you can confirm the path of the drive with the lsblk command. Just look for a listing that looks like the size of your USB drive, and that’ll be it.
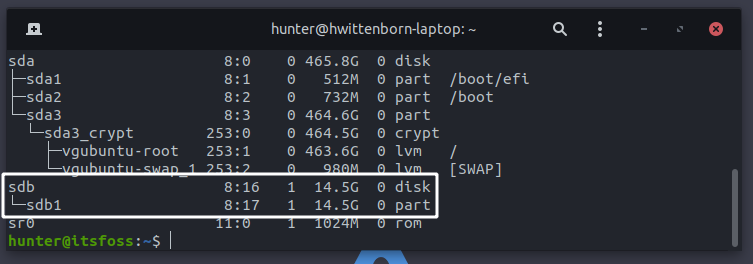
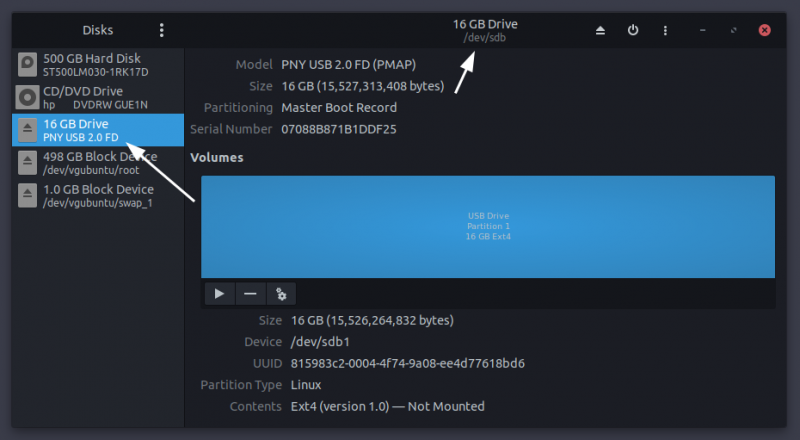
If you are more comfortable with GUI programs, you can also find the drive’s path with tools like GNOME Disks.
Now that you have established the path to our external drive, let’s create the live USB.
Step 2: Writing the ISO file to the USB disk
Open up a terminal at the directory where the ISO file is downloaded, and run the following (remember to replace /dev/sdb with the name of your storage device if it’s something different):
sudo dd if="./ubuntu-20.04.2.0-desktop-amd64.iso" of="/dev/sdb" status="progress" conv="fsync"After that, just let dd do it’s thing, and it’ll print a completion message once it’s done:
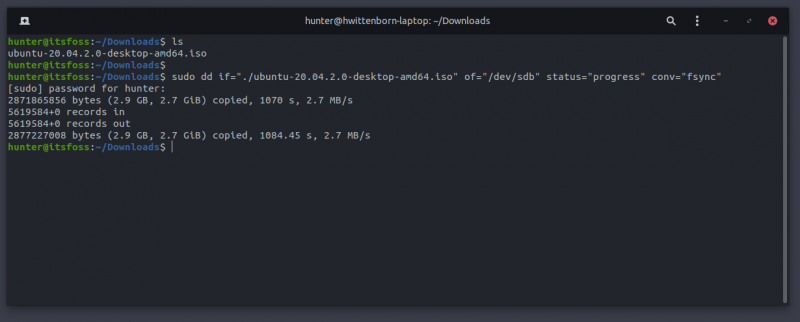
And just like that, you’ve flashed an ISO with dd command in the Linux terminal!
Wrapping Up
Now you’re on your way to doing even more things through the terminal, allowing you to do things faster and quicker than you might have been able to do before.
Got any remaining questions about the dd command, or something just not working right? Feel free to leave any of it in the comment section below.