If you ask the geeky sysadmins, they will swear by rsync or scp commands for transferring files between remote server and local system.
However, those are command line methods and not everyone feels comfortable.
Thankfully, there are some GUI tools available that let you transfer files to or from the remote servers.
FileZilla is a popular, cross-platform, open-source tool for this purpose. It supports transferring file using FTP over TLS or SSL (FTPS) and also FTP over SSH (SFTP) along with old FTP protocol.
Let me show how to install FileZilla on Linux and then use it for file transfer.
So, let’s get started!
Installing FileZilla on Ubuntu and other Linux distributions
You can get the source code tarball but it is always recommended to use your distribution provided package. Since it is a popular software, it should be available in the software repository of most Linux distributions (if not all). Please use your distribution’s software center and package manager.
On Ubuntu, you can install it from the software center:
You can also use the command line method to install it.
sudo apt install filezillaIf you see the package not found error, you should enable the Universe repository.
Once installed, go to the menu (by pressing the windows key), type FileZilla and start it.

Using FileZilla
When you first run FileZilla, you’ll see an interface like the picture below.
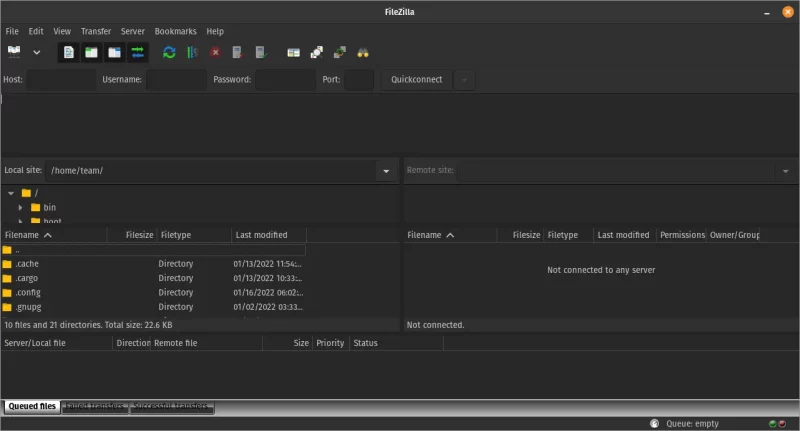
The left side pane shows the files and directory from your local system. The right side pane is empty for now. When you connect to a remote server, the files from your remote system will be displayed there.
Before I show you that, let me share a few details on understanding the important aspects of FileZilla interface.
Understaing the FileZilla interface
The image below give you an overview of the different sections of the window layout of FileZilla.
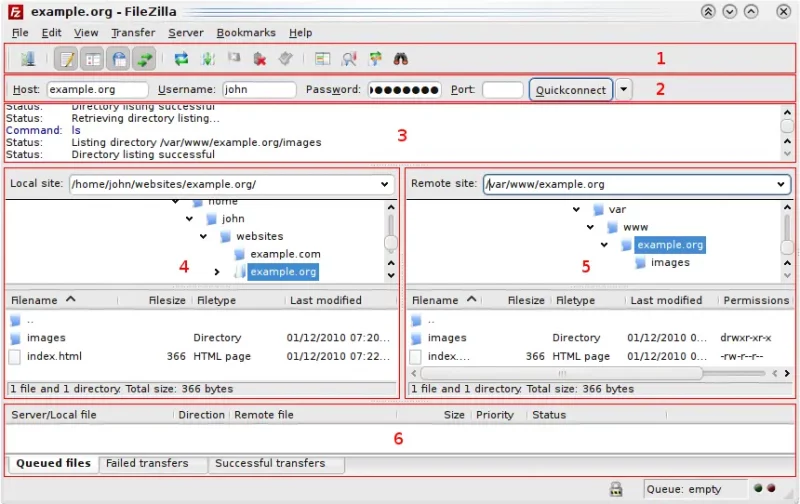
The GUI is split in 6 different zones/window layout. Let me briefly explain them to you.
1. Toolbar: It has a variety of options like opening the Site Manager, refreshing local and/or remote directory file and folder lists, start processing current queue of files to be transferred, stop all transfers and discard files from queue, etc.
2. The Quick connect bar: As its name suggests, allows you to quickly connect to a remote site without specifying many details about it except the host, username, password and port.
3. The Message log: It shows you a log, regardless if the connection was successful or not. The errors are in red, normal messages are in white, and commands are in blue.
4 & 5. The Local pane and remote panes: Both are very similar except for the fact that the Local pane shows contents of a local directory and a context menu has options for uploading files. Whereas, the remote pane shows contents of a remote directory and has options for downloading files from a remote directory to your local storage.
6. Transfer queue: Lastly, the Transfer queue pane shows the status of items being transferred, their transfer speeds, items in queue and the file transfer history (limited to current instance
Connecting to a SFTP server using FileZilla
You need to know the username, password and the IP address of the remote server. The remote server should also be configured to accept connections with the provided details. You also need to have correct access settings in the destination folder.
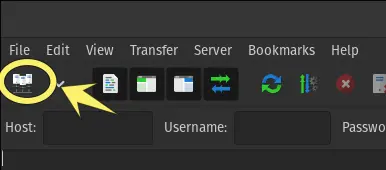
To add a new SFTP connection, you need to open the site manager. There are two ways to open it.
There is a “Site Manager” item under the “Files” menu option on the menu bar. Or, you can click on the “Site manager” icon on the toolbar.
Once the Site Manager dialog pops up, click on the “New site” button and [optionally] rename the new site that is added to the entry. I have called mine “test8”.
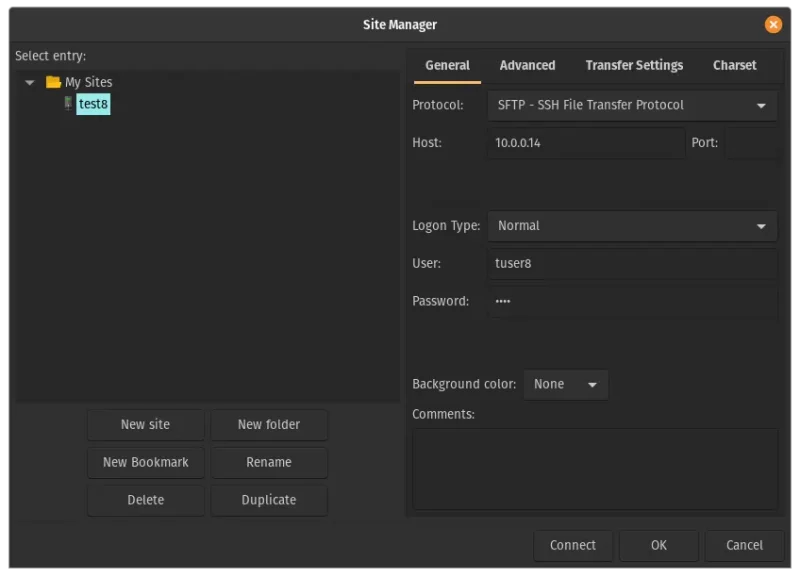
To the right, under the General tab, ensure that the protocol used is appropriate to what the server administer has set for you. In my case, I set up a SFTP server (FTP over SSH) so I will proceed by choosing the option “SFTP – SSH File Transfer Protocol”.
The next field is for the IP address of the remote server.
If you do not mention the port number, FileZilla will assume that the port number to be used is the default SSH port 22.
There are a few options for the “Logon Type” drop-down. In the Normal logon method, you provide the username and password.
The Key file authentication method is useful for you if you have a pair of public and private keys set up to authenticate your SSH connection for the user.
Once you have filled all the appropriate details for the remote server and authentication, click on the “Connect” button positioned at the bottom to connect to the site. Do not worry, the new site you just established a connection to, will be saved in compliance to the “Logon Type”.
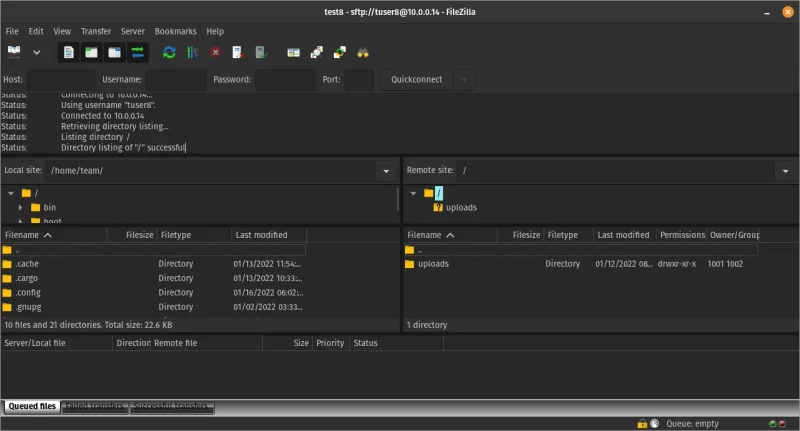
If you see a status message as “Connected to <host IP address>” and the most recent status message as “Directory listing of “/” was successful”, you have successfully connected to the remote SFTP server (FTP using the SSH protocol).
Another indicator of a successful SFTP connection is that the remote directory pane gets populated when a connection is successfully established.
Sending files to remote system
You must make sure to be in the directories where you have to transfer the file. Transferring files is as simple as double-clicking on the file without explicitly specifying the target location.
If you click on a file from the left pane, it immediately gets transferred (or added to the queue if there are pending transfers) to the directory visible in the right pane.
The same goes from transferring files from right to left, i.e., from remote server to local. This is why it is important to be in the correct locations in both local and remote systems.
Alternatively, you can right-click on the file(s) and upload them (or add them to the upload queue). The destination is always the directory displayed in FileZilla interface.
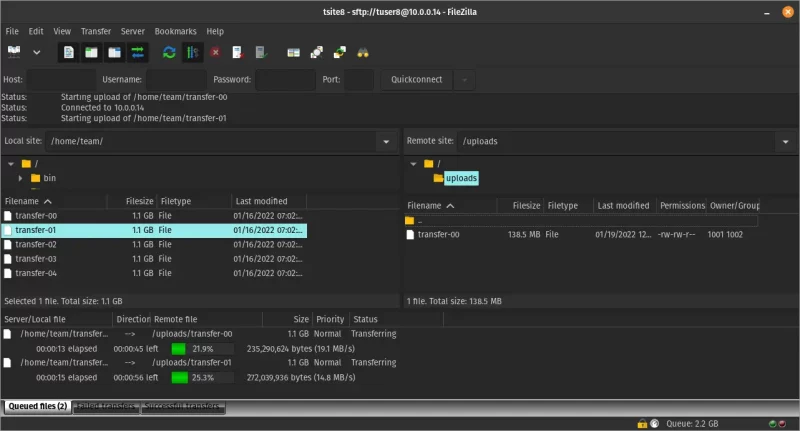
There isn’t much difference in either way of uploading files except for convenience and timing.
Downloading files from remote system
Just like uploading files, you get two options when transferring file from a remote server to local storage, but instead of “Upload” it is “Download”.
Downloading a file will download that file in the local directory that you currently have open in the Local directory pane.
You will notice a consistent behavior in downloading and uploading files, except for the sender and receiver. The file transfers will be in done in parallel unless the number of connections is restricted.
Conclusion
Awesome! With the basics covered, you should be able to transfer files to and from your computer to your server. I hope you learnt something new :)
If you have any queries, please ask them in the It’s FOSS community forums. If you felt this was helpful to you, do let me know with a comment down below!