What are the essential Ubuntu commands?
I have been asked this question several times by regular readers, and I have tried to avoid answering it.
Why? Don’t I know Ubuntu commands? Nope. That’s not the reason. It is because it is difficult to categorize them. What’s essential to me may not be essential to you.
But I guess that applies to everything and every such list of recommended applications on our portal.
That’s why I finally gave in and created this list of basic yet essential Linux commands that should be helpful to you as a Ubuntu user. This is more focused on desktop Ubuntu users, but if you use Ubuntu as a server, they should also help you. Debian and other Linux distribution users should also find it helpful.
Essential Ubuntu Commands
Every command I list here has multiple options and several uses. If I try giving even the most common examples of each command, it will quickly turn into a pocketbook of more than 10,000 words.
I will not go into detail with any of these commands. I’ll list the purpose of each command with its basic syntax. You can read more about using these commands from their linked tutorials.
Recommended reading before you start following the list:
- Concept of path in Linux
- Concept of file permission
- Knowing the terminal jargon
Another thing. I have used the term folder here more than the directory.
A folder is called a directory in Linux, and puritans may not like this. However, I believe it is easier to grasp for beginners.
1. ls command: List the contents of a folder
This is among the first few commands a new Linux user learns. This command lets you see what files and folders are in your current folder.
lsYou can use the long listing option ls -l to see details like file size, permission, modified time, etc. You can sort and control these options if you want to.
ls -l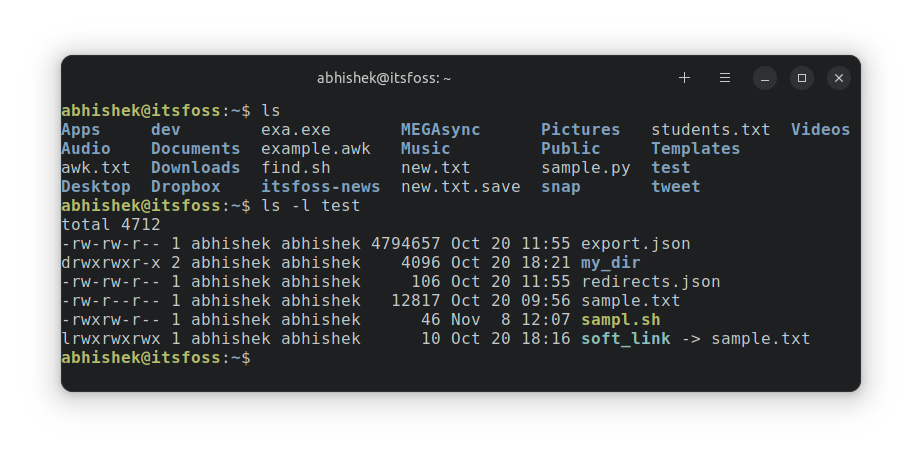
Related Read: ls command examples
2. cd command: Change the directory
By default, you start in your home directory. You’ll often require to change the directory and move to another one.
For example, you downloaded a deb file or script. Now you want to run it. You can do that from your present working directory by providing the full path but switching to that location makes things easier.
The cd command stands for change directory; with this, you can change your location and move to another directory.
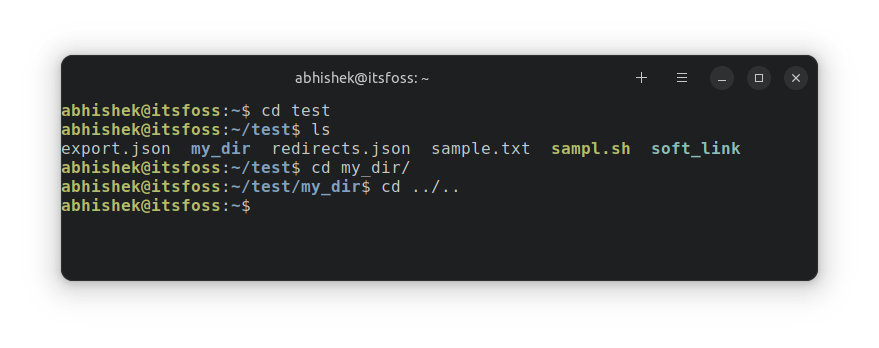
At this point, I highly recommend reading about the concept of paths in Linux so that things are easy to understand while navigating through directories in the Linux command line.
Recommended Read: cd command examples
3. cat command: Read a text file
If you quickly want to see the contents of a text file in Linux, cat is the command you use. It displays the contents on the screen.
cat filename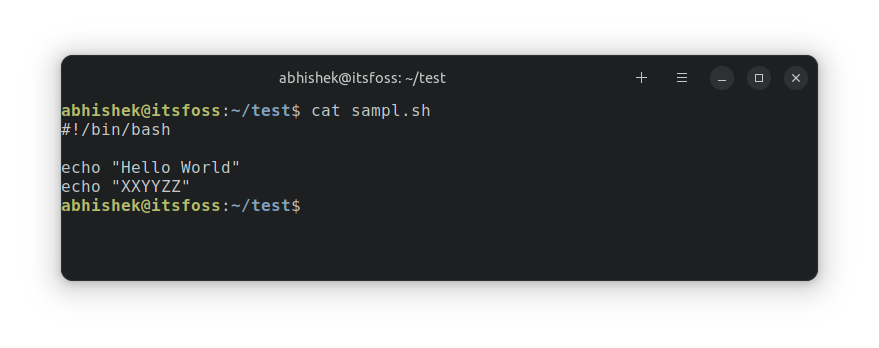
You can also use the cat command to create new files or add more text to existing files.
Recommended Read: cat command examples
4. less command: Read a large text file
The cat command is good enough for viewing small text files. But I won’t recommend using cat if you have a huge text file with hundreds of lines. It will flood your screen with all the text, and you will have difficulty with it.
This is where the less command comes into the picture. When you open a file with less, it opens the file in pages. You can scroll up/down, look for text, and more.
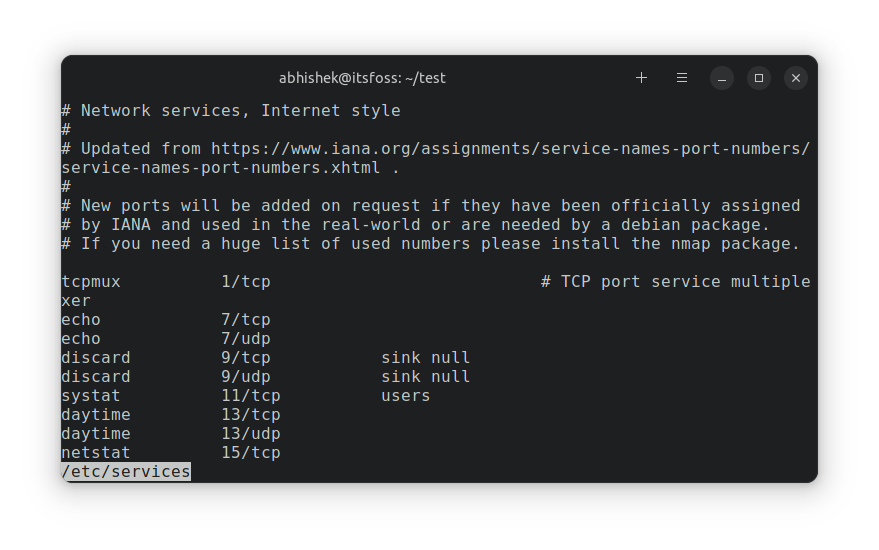
Once you are done reading the file, you can exit the less view by pressing the Q key. You’ll notice that nothing is displayed on the screen. Your screen is clean.
Suggested Read: less command examples
5. touch command: Create new files
There are multiple ways of creating new files in the Linux terminal. The cat command you saw above can also create new files.
However, I prefer the touch command for this purpose.
touch new_file_name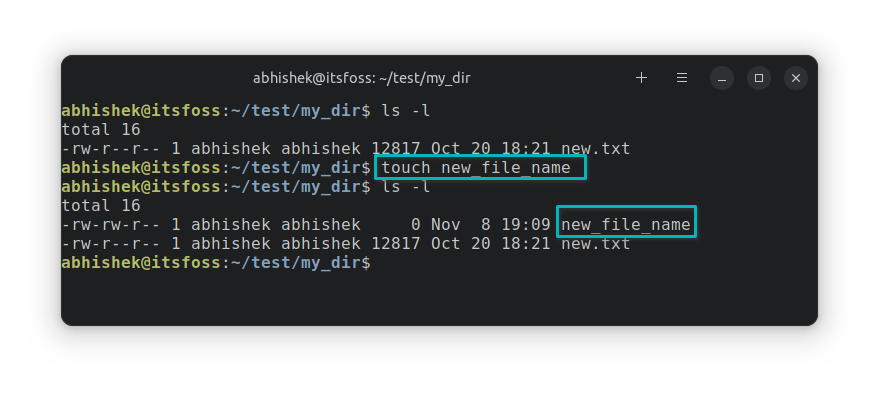
If you use it with existing files, their timestamps will be modified.
Also Read: touch command examples
6. mkdir command: Make new folders
While there is no specific command for creating new files, there is a dedicated command for making new folders (or directories, as we call them in Linux).
mkdir new_dir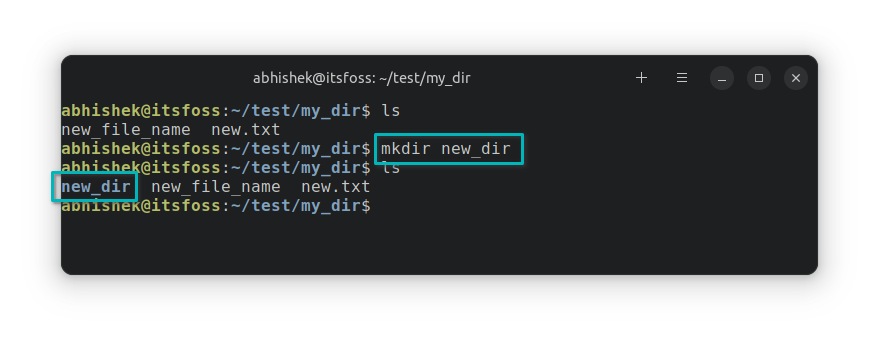
Explore More Here: mkdir command examples
7. cp command: Copy files and folders
Copying files and folders in the command line is also one of the common tasks you will encounter. The cp command, short for copy, is used for this purpose.
Imagine that you have to modify a configuration file. A smart move will be to copy the file with another name. This way, you’ll have a backup of the file.
cp existing_file.txt existing_file.backYou can use the same cp command for copying directories as well. For that, you must specify the recursive option -r:
cp -r dir another_location
You May Also Read: cp command examples
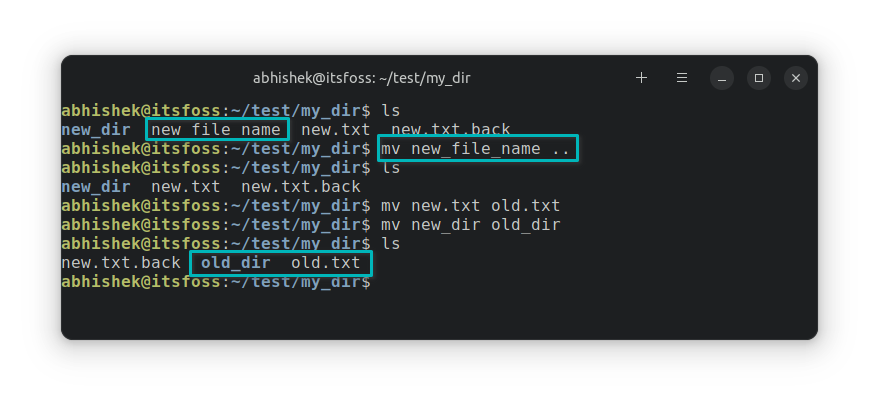
8. mv command: Cut-paste or rename files and folders
The mv command stands for ‘move’. When you copy a file to another location, it remains in its original place.
The mv command moves the files and folders to the other location. You can think of it as a cut-paste operation.
mv file.txt /another/locationYou can use the mv command to rename the file as well.
mv file.txt new_file.txtThe same mv command also moves or renames folders without any special options.
Recommended Read: mv command examples
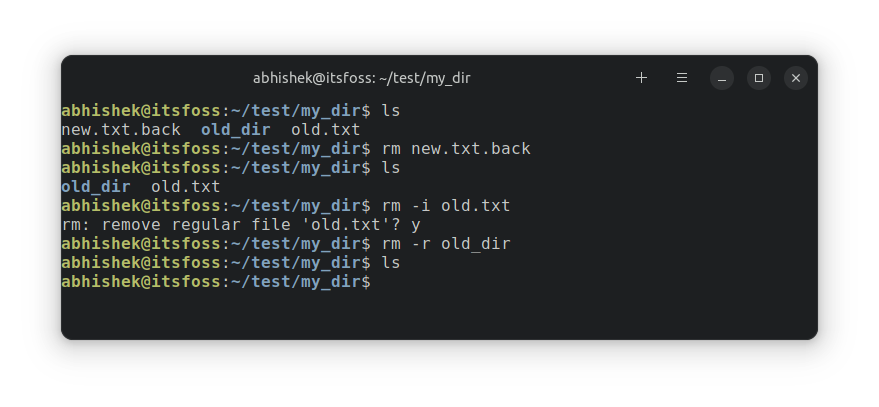
9. rm command: Remove files and folders
You use the rm (short for remove) command to delete files in the Linux terminal.
rm filenameThere is no undo option after you delete files in the command line. This is why you should be extremely careful while deleting files. If you are afraid of deleting the wrong file, use the interactive mode with option -i, which gives you an additional prompt to confirm the action.
rm -i filenameWith the recursive option -r, you can also use the same rm command to delete folders.
Recommended Read: rm command examples
10. nano: Edit files
Sooner or later, you’ll be required to make changes to the contents of a file. Imagine that you have to change a configuration file of SSH, grub, or some other application.
There are command line-based text editors for this purpose. Ubuntu comes with Nano editor preinstalled, and it is relatively easier to use than Vim, Emacs, etc.
If you are curious about differences, read our Nano vs. Vim comparison article.
Easier to use doesn’t mean the same comfort as a GUI-based text editor. You will have to use the keyboard shortcuts for moving around, making changes, saving, and exiting files.
To open a new, unnamed file with nano, use:
nanoTo edit an existing file in Nano, use:
nano filenameIn both cases, you should see an interface like this.
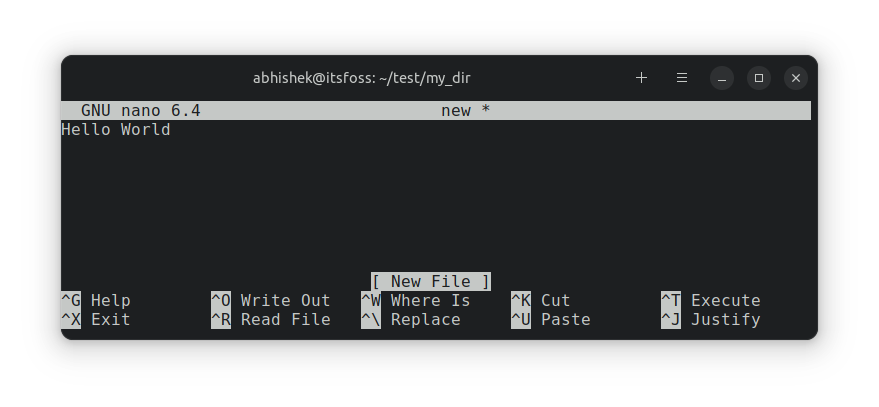
To save (or discard changes) and exit the editor interface, use the Ctrl+x keys.
Please refer to the Nano beginner guide I created earlier to get comfortable with it.
11. clear: Clear terminal screen
Nano feels like a complicated one, right? Let me share a simple command.
The clear command clears the terminal. That’s it.
clearAnd why do you need to do that? Well, if your terminal screen is flooded with random stuff and you want to do something new. Cleaning the terminal is like cleaning the board or opening a new page in your notebook.
12. ps: Check and handle processes
The ps command is for handling the processes running on your system. Each process has an associated ID called PID, which can be used for various purposes, such as terminating a process.
abhishek@itsfoss:~$ ps
    PID TTY          TIME CMD
  15358 ?        00:00:00 bash
  15404 ?        00:00:00 ps
Here,
- PID: Process ID
- TTY: Controlling terminal associated with the process (Not that important these days)
- TIME: Total CPU usage time
- CMD: Name of command that runs the process
But a system cannot run just 2-3 processes, can it? To see all the processes running by all users, use:
ps auxThis will give a massive list of processes and more details about them. If you run this command, now will be an excellent time to use the clear command.
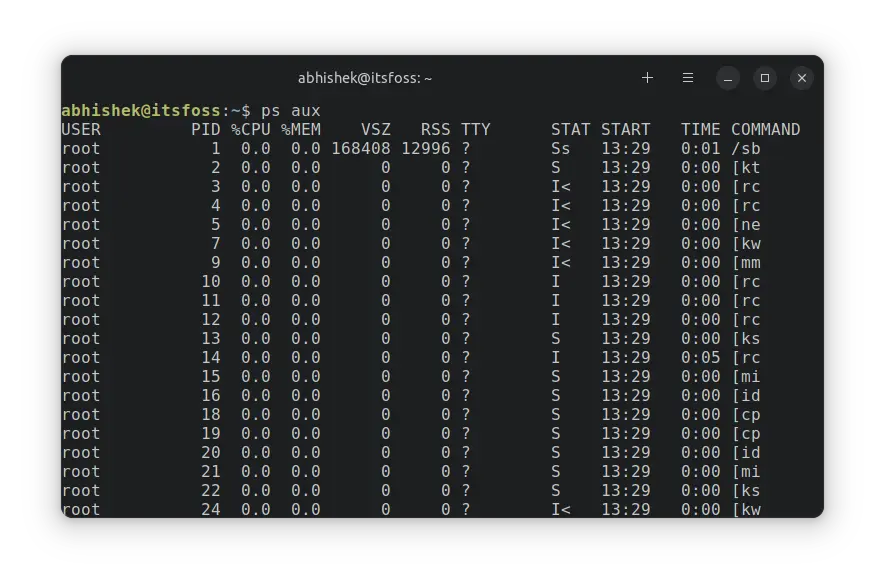
Recommended Read: ps command examples
13. top: System monitor
While the ps command gives you all the running processes, the top command gives you a real-time view of the processes and the system resource consumption.
topConsider it like the terminal variant of the task manager in Linux. You’ll see a lot of interesting details with the top command.
I primarily use the top command to check which process takes too much CPU or RAM. There are better top alternatives if you are interested in experimenting.
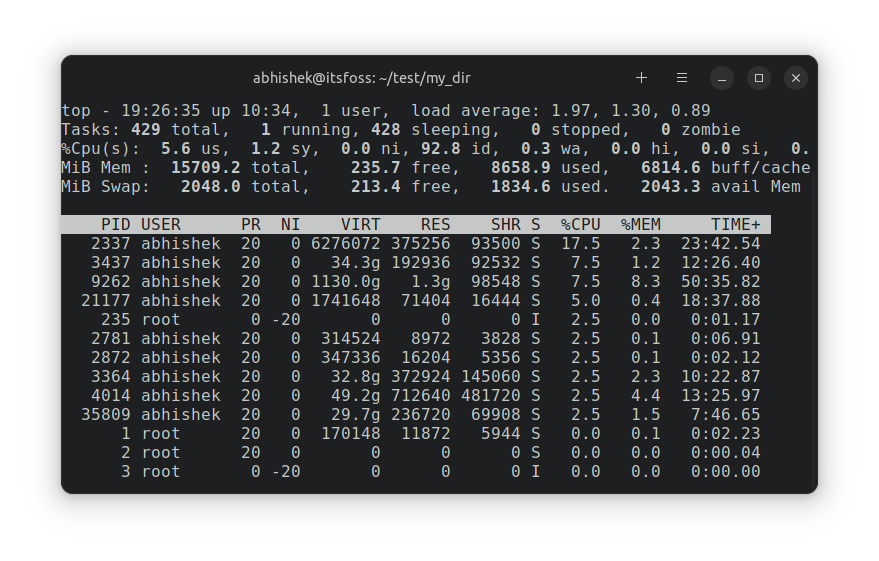
To stop the running top command, use the Ctrl+C keyboard shortcut.
Recommended Read: Using top command effectively as a task manager
14. lsblk: List disks and partitions
The lsblk command lists all the block devices on your system. In really simple (and not entirely technically accurate) terms, it displays the disks and partitions.
root@learnubuntu:~# lsblk
NAME    MAJ:MIN RM  SIZE RO TYPE MOUNTPOINTS
loop0     7:0    0 79.9M  1 loop /snap/lxd/22923
loop1     7:1    0  103M  1 loop /snap/lxd/23541
loop2     7:2    0 63.2M  1 loop /snap/core20/1623
loop3     7:3    0   48M  1 loop /snap/snapd/17336
loop4     7:4    0   48M  1 loop /snap/snapd/17029
loop6     7:6    0 63.2M  1 loop /snap/core20/1634
vda     252:0    0   25G  0 disk
├─vda1  252:1    0 24.9G  0 part /
├─vda14 252:14   0    4M  0 part
└─vda15 252:15   0  106M  0 part /boot/efi
vdb     252:16   0  466K  1 disk
root@learnubuntu:~#
15. fdisk: List and manage disks and partitions
Another similar but better command is the fdisk command. It lets you manipulate the disk partitions. This means you can create new partitions and delete and resize existing ones with this command.
You can also use it to list all the block devices, including loop devices, on your system.
sudo fdisk -lThe output could be huge if you have many partitions, disks, and loop devices (created by snap applications). I am showing a relevant part of the output here:
Disk /dev/vda: 25 GiB, 26843545600 bytes, 52428800 sectors
Units: sectors of 1 * 512 = 512 bytes
Sector size (logical/physical): 512 bytes / 512 bytes
I/O size (minimum/optimal): 512 bytes / 512 bytes
Disklabel type: gpt
Disk identifier: 0B7C796D-51CD-4DD4-962A-7D94B31690E2

Device      Start      End  Sectors  Size Type
/dev/vda1  227328 52428766 52201439 24.9G Linux filesystem
/dev/vda14   2048    10239     8192    4M BIOS boot
/dev/vda15  10240   227327   217088  106M EFI System
16. find: Search for files
Even as a desktop user, you’ll encounter cases where you may have to search for files in the Linux command line.
The find command is an extensive and versatile command for this purpose. It has more than fifty options, and you will probably never need all of them.
Here’s an example of the find command that will give you all the files that end with .txt extension in the current directory.
find . -type f -name "*.txt"Other common examples include finding files by size, modified time, etc. You can combine find with exec or xargs to take actions on the result of the find command. For example, you can look for all the .txt files and choose to delete them.
Also Read: find command examples
17. grep: Search in file content
The find command search for files based on their name and type. If you want to search based on the content of the files, you use the grep command.
So, instead of looking for all files ending with .txt, you look for all files containing the text ‘foss’ with grep.
grep -ri search_term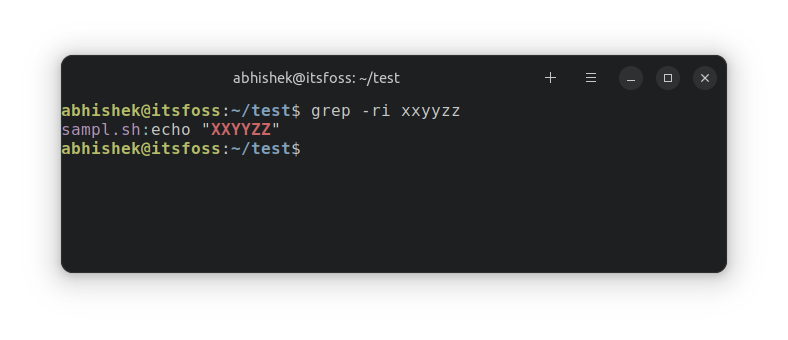
Want more? Here are some more practical examples of the grep command. The handy grep cheat sheet should help you out.
18. kill: Terminate processes
Violence is not the answer … it’s the solution.
Just kidding!
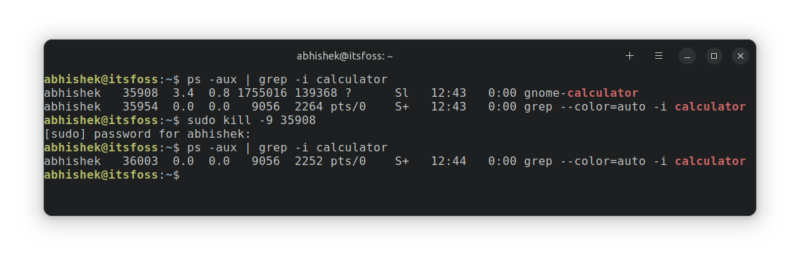
If you have a misbehaving process that takes too many system resources, you can find it and then terminate it using the kill command.
sudo kill -9 process_ID_or_NameAs you can see in the above command, you need to know the process ID (PID) or the name to terminate it. You can use the ps or the top command to get the PID or exact process name.
ps aux | grep -i “name of your desired program”Did you notice the use of grep command? You are already utilizing the commands mentioned in this list.
I don’t know about you, but I feel like Liam Nesson in Taken when I look for rogue processes to terminate.

19. history: Look back into what commands you ran in the past
So, you used a specific Linux command a few days ago. You need to rerun it, but you cannot recall it correctly.
You can press the up and down arrow keys.
That’s a familiar scenario for many Linux users; this is where the history command helps.
In Ubuntu, your shell keeps a history of the commands you run. Enter history in the terminal, and you should see a history of commands you ran in the past.
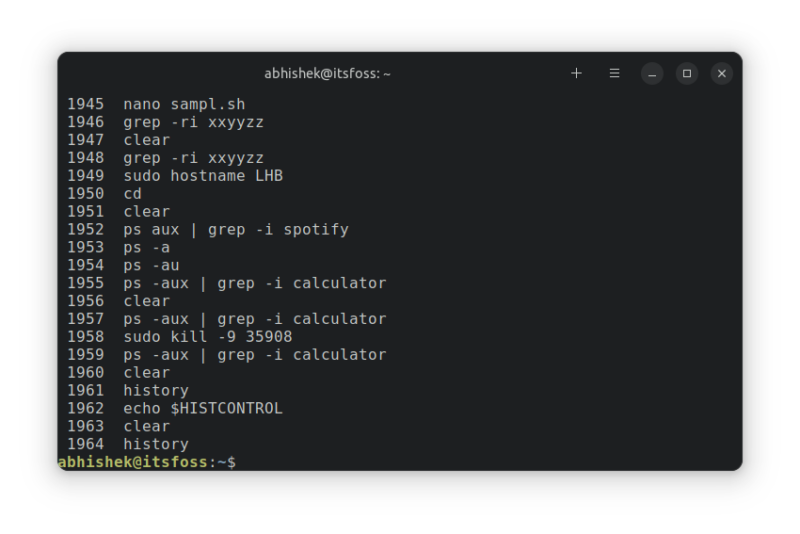
You can choose to run an entry from the history using its number like this:
!numberBut even the history could be huge, so (again) use the grep command to filter your search term.
abhishek@itsfoss:~$ history | grep aux
 1915  ps aux
 1952  ps aux | grep -i spotify
 1955  ps -aux | grep -i calculator
 1957  ps -aux | grep -i calculator
 1959  ps -aux | grep -i calculator
 1970  history | grep aux
There is another way to access the command history and search it. Press Ctrl+R and then enter the search term.
Recommended Read: history command examples
20. chmod: Change file permissions
I highly recommend reading about Linux file permissions at this stage. That will help you understand things better than just running the chmod command blindly.
The chmod (change mode) command is used to change a file's permissions.
The most common use of this command is when you want to make a file executable. Got a shell script? Make it executable like this:
chmod u+x file executableMany more use cases make chmod a must-know command for Ubuntu users.
Fun fact: The parent company of It’s FOSS is chmod777 Media Tech. chmod 777 command gives all the permissions to all the users. This represents our motto of ‘knowledge access to everyone‘.
21. lshw: Get the hardware details
There are tons of command line tools to get the hardware details and other system information in Linux.
The one that probably comes preinstalled on Ubuntu is lshw (short for list hardware).
Now, by default, it displays a vast output with details about all the hardware components and trust me, that’s not very easy to understand.
lshwYou may feel the temptation of using grep here, but there is no need for that. The output of lshw is divided into classes and you can use that to show the details for a class of hardware.
Want to know the manufacturer of your network adapters? Use this:
lshw -C network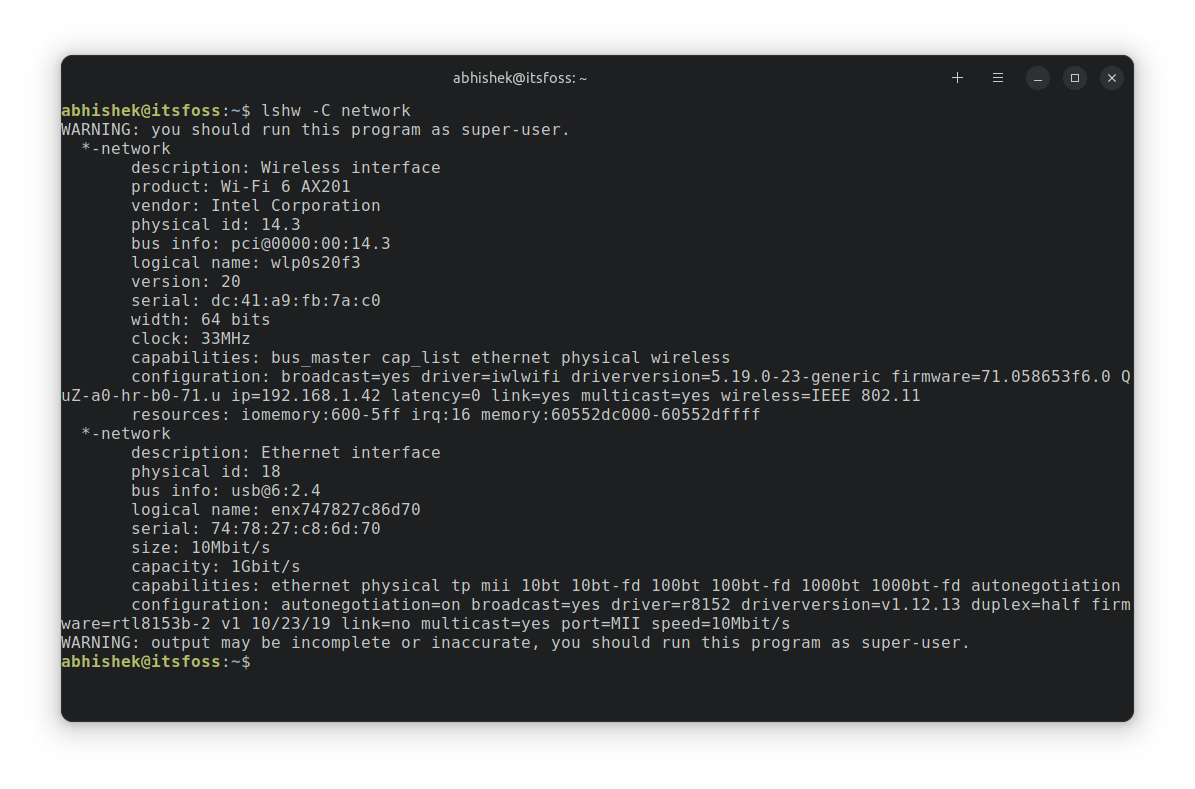
22. sudo: Run commands with root privileges
You must have noticed that I used sudo as a prefix for some commands I discussed previously.
By default, in Ubuntu, sudo is configured in a way that it allows you (to the default admin user) to run any command with root privileges.
You are asked to enter a password, and it’s your user account password. When you enter the password, nothing is displayed on the screen. New users get baffled by it, but it’s the expected behavior in UNIX/Linux. You type the password and press enter.
More about root user in Ubuntu here.
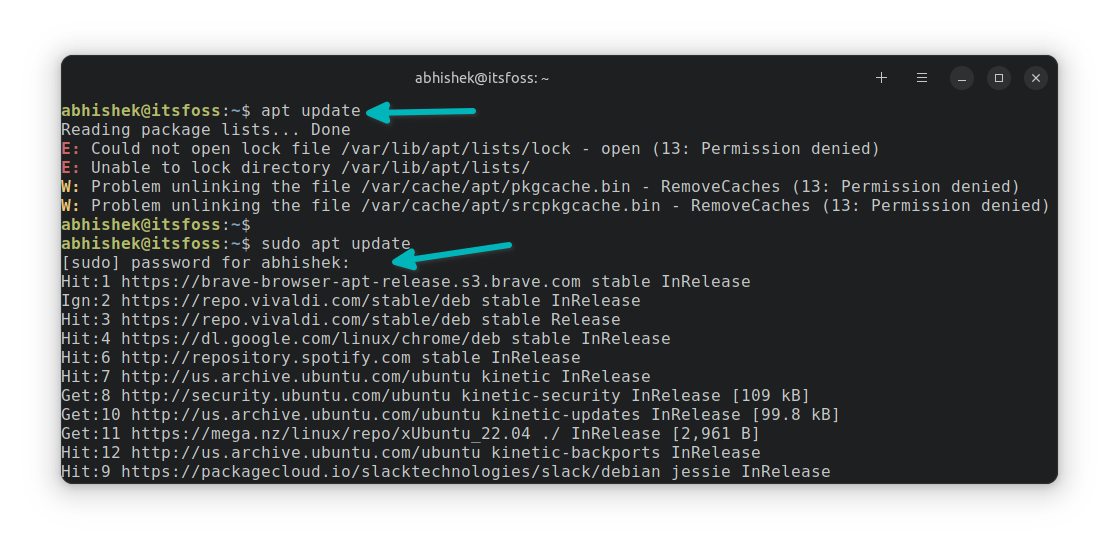
23. apt: Install, remove and manage .deb packages
The apt command is used for managing packages in Ubuntu. You’ll have to use it with sudo as these are administrative tasks.
To install a package, use:
sudo apt install package_nameTo delete an installed software, use:
sudo apt remove package_nameTo update your Ubuntu system with all upgradable packages at once:
sudo apt update && sudo apt upgradeThe difference between apt update and upgrade is that an update refreshes the package cache and the upgrade actually installs the update.
There is a lot more to the apt command. You can read this detailed apt command guide.
24. add-apt-repository: Add, and remove PPAs
Alright! This one is not as popular as it was a decade ago. You’ll still come across the add-apt-repository command here and there. It’s used to manage your system's PPA (unofficial, user-generated repositories).
While following tutorials on the web, you may come across installation instructions that are composed of three lines:
sudo add-apt-repository ppa:dr-akulavich/lighttable
sudo apt update
sudo apt install lighttable-installer
The first command is adding the PPA (external repository). You are already familiar with the following two, which are used to update the package cache and install software provided by the PPA repository you just added.
To delete a PPA, you should first delete the software you installed from it and then remove it like this:
sudo add-apt-repository -r ppa:dr-akulavich/lighttableI have a complete guide on PPA for more details on this topic.
25. snap: Install, remove and manage snap packages
So far, you know apt packages and their management. However, Ubuntu also uses and actively recommends using its snap packaging format.
Learning a few basic snap commands will help you manage these packages effectively.
To find a package, use:
snap find search_termTo install a package, use:
sudo snap install package_nameTo list installed snap applications:
snap listTo remove an installed Snap application, use:
sudo snap remove package_name26. ip: Check IP address and other info
The ip command lets you check your IP address. You can also see and manipulate the routes, network devices, and more.
ip a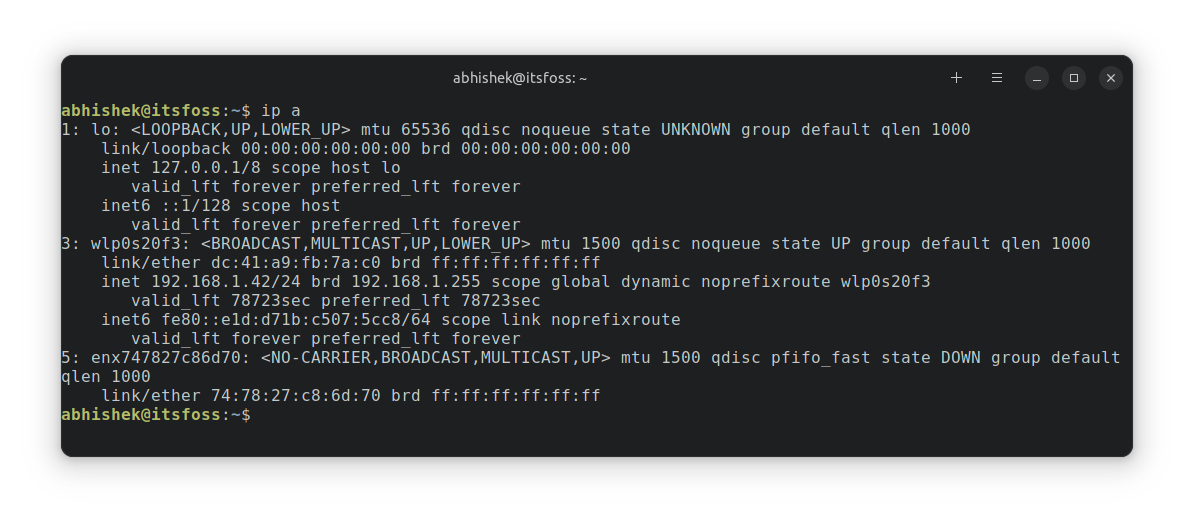
27. ping: Check if the remote system is reachable
Ping is another Linux networking command you should be aware of. To check whether a remote system is available or not, give its IP address to the ping command:
ping ip_addressYou can also use it to check if a website is down though it is not very accurate these days.
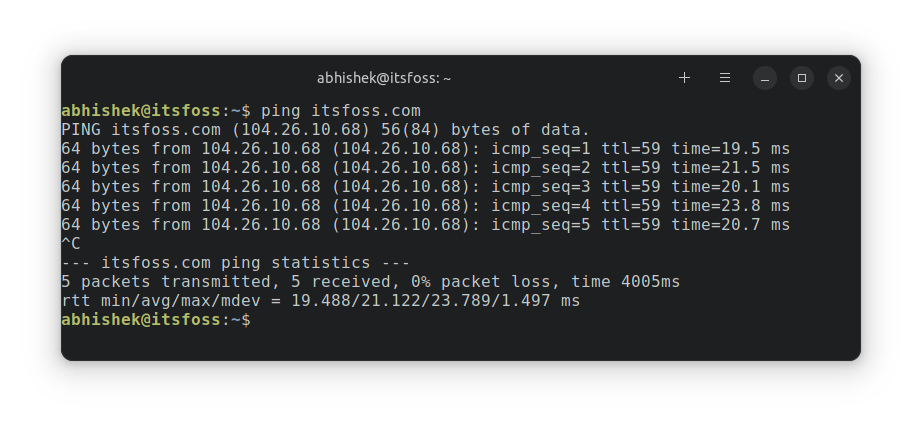
Use Ctrl+C to stop the running ping command.
Recommended Read: ping command examples
28. ssh: Connecting to remote systems
I was skeptical about adding ssh to the list of must-know Linux commands. Many desktop users may not need it. SSH is used for connecting to other Linux systems from your terminal.
ssh user@ip_address_of_remote_systemYou need to know the user and password of the remote system, of course.
If you have cloud servers or a home setup where other Linux systems are available, you can use it to connect to them from your primary system.
29. scp: Copy files between remote systems
Since I included ssh in the list, it was only fair to include something for transferring files between the remote systems over SSH connection.
The scp command works almost like the cp command you saw earlier.
Here’s an example that copies the file from the home directory of the user on the remote system to the current directory of your locally logged in system.
scp username@ip_address:/home/username/filename .Recommended Read: scp command examples
30. exit: Close the terminal
The list of essential Linux commands is ending. So let’s talk about exiting the terminal. It’s quite simple. Just enter:
exitIf you are using another user or shell, you’ll be logged out from that.
You may also use Ctrl+D keys to exit the terminal.
31. shutdown: Turn off or reboot the system
Alright. Let me share a final command if you haven’t exited the terminal yet.
How about turning off your system from the command line?
Use the shutdown command for this purpose:
shutdownThe above command schedules a shutdown in one minute. You can make it turn off immediately with:
shutdown -nowYou can use the same shutdown command for rebooting your Ubuntu system as well:
shutdown -r nowBonus tip: man: Learn about commands in detail
One more, and this is the last one, I promise. All Linux systems come with a manual for the commands. It’s called manpage, and you can access the manual page of an installed command with the following:
man command_nameUnderstanding the manpage can be overwhelming for new users, but it comes quite handy. It gives you the generic syntax and description of a command's options.
When you are unsure about using a command, try checking its man page before searching for it on the internet.
There’s always more …
That’s just about 30 commands. And that’s not even 20% of the Linux commands. I haven’t covered many networking commands. I didn’t even go for the user management commands.
I wrote this keeping a regular Ubuntu desktop user in mind. These are the kinds of commands you are more likely to use. Having some knowledge about them would be helpful in the long run.
Other than that, there is no end to learning. Even the most seasoned Linux users constantly discover and learn new stuff.
Considering that you are interested in learning Linux commands, let me recommend some good Linux books and resources.
- How Linux Works: Explains the working of Linux more than the commands
- The Linux Command Line by William Shotts: Legally available to download for free in PDF format
- Linux Pocket Guide by Daniel J Barrett: Linux commands into category and briefly explained with small examples
- Learn Linux Quickly: Entirely focused on Linux commands with proper examples and sample exercises
Apart from that, you can also learn from websites like Linux Journey and Linux Handbook.
I know it’s been a long read, but it’s not even the tip of the iceberg. There is always more to learn, but it’s also not the case that you have to feel miserable if you don’t know all the Linux commands.
No one knows everything.
Now, it’s your turn. Did you find this list of Ubuntu commands helpful?
If you had to add some more commands to it, what would they be? The comment section is all yours.